Lessons learned during migrations to Grav CMS from Textpattern
After the most of four years since the arrival of Textpattern 4.8.8, Textpattern 4.9.0 was released. Since, I was running two subsites using the software, I tried one of them out with the new version. That broke an elderly navigation plugin that no longer appears in any repository, prompting a rollback, which was successful. Even so, it stirred some curiosity about alternatives to this veteran of the content management system world, which is pushing on for twenty-two years of age. That might have been just as well, given the subsequent release of Textpattern 4.9.1 because of two reported security issues, one of which affecting all preceding versions of the software.
Well before that came to light, there had been a chat session in a Gemini app on a mobile which travelling on a bus. This started with a simple question about alternatives to Textpattern. The ensuing interaction led me to choose Grav CMS after one other option turned out to involve a subscription charge; A personal website side hustle generating no revenue was not going to become a more expensive sideline than it already was, the same reasoning that stops me paying for WordPress plugins.
Exploring Known Options
Without any recourse to AI capability, I already had options. While WordPress was one of those that was well known to me, the organisation of the website was such that it would be challenging to get everything placed under one instance and I never got around to exploring the multisite capability in much depth. Either way, it would prove to involve quite an amount of restructuring, Even having multiple instances would mean an added amount of maintenance, though I do automate things heavily. The number of attack surfaces because of database dependence is another matter.
In the past, I have been a user of Drupal, though its complexity and the steepness of the associated learning curve meant that I never exploited it fully. Since those were pre-AI days, I wonder how things would differ now. Nevertheless, the need to make parts of a website fit in with each other was another challenge that I failed to overcome in those days. Thus, this content framework approach was not one that I wished to use again. In short, this is an enterprise-grade tool that may be above the level of personal web tinkering, and I never did use its capabilities to their full extent.
The move away from Drupal brought me to Hugo around four years ago. That too presents a learning curve, though its inherent flexibility meant that I could do anything that I want with it once I navigated its documentation and ironed out oversights using web engine searches. This static website generator is what rebuilds a public transport website, a history website comprised of writings by my late father together with a website for my freelancing company. There is no database involved, and you can avoid having any dynamic content creation machinery on the web servers too. Using Git, it is possible to facilitate content publishing from anywhere as well.
Why Grav?
Of the lot, Hugo had a lot going for it. The inherent flexibility would not obstruct getting things to fit with a website wide consistency of appearance, and there is nothing to stop one structuring things how they wanted. However, Grav has one key selling point in comparison: straightforward remote production of content without recourse to local builds being uploaded to a web server. That decouples things from needing one to propagate the build machinery across different locations.
Like Hugo, Grav had an active project behind it and a decent supply of plugins and an architecture that bested Textpattern and its usual languid release cycle. The similarity also extended as far as not having to buy into someone else's theme: any theming can be done from scratch for consistency of appearance across different parts of a website. In Grav's case, that means using the Twig PHP templating engine, another thing to learn and reminiscent of Textpattern's Textile as much as what Hugo itself has.
The centricity of Markdown files was another area of commonality, albeit with remote editing. If you are conversant with page files having a combination of YAML front matter and subsequent page content from Hugo, Grav will not seem so alien to you, even if it has a web interface for editing that front matter. This could help if you need to edit the files directly for any reason.
That is never to say that there were no things to learn, for there was plenty of that. For example, it has its own way of setting up modular pages, an idea that I was to retrofit back into a Hugo website afterwards. This means care with module naming as well as caching, editor choice and content collections, each with their own uniqueness that rewards some prior reading. A learning journey was in the offing, a not attractive part of the experience in any event.
Considerations
There have been a number of other articles published here regarding the major lessons learned during the transitions from Textpattern to Grav. Unlike previous experiences with Hugo, another part of this learning was the use of AI as part of any debugging. At times, there was a need to take things step by step, interacting with the AI instead of trying out a script that it had put my way. There are times when one's own context window gets overwhelmed by the flow of text, meaning that such behaviour needs to be taken in hand.
Another thing to watch is that human consultation of the official documentation is not neglected in a quest for speed that lets the AI do that for you; after all, this machinery is fallible; nothing we ever bring into being is without its flaws. Grav itself also comes from a human enterprise that usefully includes its own Discord community. The GitHub repository was not something to which I had recourse, even if the Admin plugin interface has prompts for reporting issues on there. Here, I provide a synopsis of the points to watch that may add to the help provided elsewhere.
Choosing an Editor
By default, Grav Admin uses CodeMirror as its content editor. While CodeMirror is well-suited to editing code, offering syntax highlighting, bracket matching and multiple cursors, it renders its editing surface in a way that standard browser extension APIs cannot reach. Grammar checkers and spell-check extensions such as LanguageTool rely on native editable elements to detect text, and CodeMirror does not use these. The result is that browser-based writing tools produce no output in Grav Admin at all, which is a confirmed architectural incompatibility rather than a configuration issue documented in the LanguageTool issue tracker.
This can be addressed by replacing CodeMirror using the TinyMCE Editor Integration plugin, installable directly from the Admin plugin interface, which brings a familiar style of editor that browser extensions can access normally. Thus, LanguageTool functionality is restored, the writing workflow stays inside Grav Admin and the change requires only a small amount of configuration to prevent TinyMCE from interfering with Markdown files in undesirable ways. Before coming across the TinyMCE Editor plugin, I was seriously toying with the local editing option centred around a Git-based workflow. Here, using VS Code with the LanguageTool extension like I do for Hugo websites remained a strong possibility. The plugin means that the need to do this is not as pressing as it otherwise might be.
None of this appears to edit Twig templates and other configuration files unless one makes use of the Editor plugin. My brief dalliance with this revealed a clunky interface and interference with the appearance of the website, something that I never appreciated when I saw it with Drupal. Thus, the plugin was quickly removed, and I do not miss it. As it happened, editing and creating files over an SSH connection with a lightweight terminal editor worked well enough for me during the setup phase anyway. If I wanted a nicer editing experience, then a Git-based approach would allow local editing in VSCode before pushing the files back onto the server.
Grav Caching
Unlike WordPress, which requires plugins to do so, Grav maintains its own internal cache for compiled pages and assets. Learning to work with it is part of understanding the platform: changes to CSS, JavaScript and other static assets are served from this cache until it is refreshed. That can be accomplished using the admin panel or by removing the contents of the cache directory directly. Once this becomes second nature, it adds very little overhead to the development process.
Modular Pages
On one of the Textpattern subsites, I had set up the landing page in a modular fashion. This carried over to Grav, which has its own way of handling modular pages. There, the modular page system assembles a single page from the files found within a collection of child folders, each presenting a self-contained content block with its own folder, Markdown file and template.
All modules render together under a single URL; they are non-routable, meaning visitors cannot access them directly. When the parent folder contains a modular.md file, the name tells Grav to use the modular.html.twig template and whose front matter defines which modules to include and in what order.
Module folders are identified by an underscore at the start of their name, and numeric prefixes control the display sequence. The prefix must come before the underscore: _01.main is the correct form. For a home page with many sections this structure scales naturally, with folder names such as 01._title, 04._ireland or 13._practicalities-inspiration making the page architecture immediately readable from the file system alone.
Each module's Markdown filename determines which template renders it: a file named text.md looks for text.html.twig in the theme's modular templates folder. The parent modular.md assembles the modules using @self.modular to collect them, with a custom order list giving precise control over sequence. Once the folder naming convention and the template matching relationship are clear, the system is very workable.
Building Navigation
Given that the original impetus for leaving Textpattern was a broken navigation plugin, ensuring that Grav could replicate the required menu behaviour was a matter of some importance. Grav takes a different approach to navigation from database-driven systems, deriving its menu structure directly from the content directory tree using folder naming conventions and front matter flags rather than a dedicated menu editor.
Top-level navigation is driven by numerically prefixed subfolders within the content directory (pages), so a structure such as 01.home, 02.about and 03.blog yields an ordered working menu automatically. Visibility can be fine-tuned without renaming folders by setting visible: true or visible: false in a page's YAML front matter, and menu labels can be shortened for navigation purposes using the menu: field while retaining a fuller title for the page itself.
The primary navigation loop iterates over the visible children of the pages tree and uses the active and activeChild flags on each page object to highlight the current location, whether the visitor is on a given top-level page directly or somewhere within its subtree. A secondary menu for the current section is assembled by first identifying the active top-level page and then rendering its visible children as a list. Testing for activeChild as well as active in the secondary menu is important, as omitting it means that visitors to grandchild pages see no item highlighted at all. The approach differs from what was possible with Textpattern, where a single composite menu could drill down through the full hierarchy, but displaying one menu for pages within a given section alongside another showing the other sections proves to be a workable and context-sensitive alternative.
Setting Up RSS Feeds
Because Grav does not support the generation of RSS feeds out of the box, it needs a plugin and some extra configuration. The latter means that you need to get your head around the Grav concept of a collection because without it, you will not see anything in your feed. In contrast, database-driven platforms like WordPress or Drupal push out the content by default, which may mean that you are surprised when you first come across how Grav needs you to specify the collections explicitly.
There are two details that make performing configuration of a feed straightforward once understood. The first is that Grav routes do not match physical folder paths: a folder named 03.deliberations on disk is referenced in configuration as /deliberations, since the numeric prefix controls navigation ordering but does not appear in the route, that is the actual web page address. The second is the choice between @page.children, which collects only the immediate children of a folder, and @page.descendants, which collects recursively through all subdirectories. The collection definition belongs in the feed page's front matter, specifying where the content lives, how it should be ordered and in which direction.
Where All This Led
Once I got everything set in place, the end results were pleasing, with much learned along the way. Web page responsiveness was excellent, an experience enhanced by the caching of files. In the above discussion, I hardly mentioned the transition of existing content. For one subsite, this was manual because the scale was smaller, and the Admin plugin's interface made everything straightforward such that all was in place after a few hours of work. In the case of the other, the task was bigger, so I fell on an option used for a WordPress to Hugo migration: Python scripting. That greatly reduced the required effort, allowing me to focus on other things like setting up a modular landing page. The whole migration took around two weeks, all during time outside my client work. There are other places where I can use Grav, which surely will add to what I already have learned. My dalliance with Textpattern is feeling a little like history now.
Resolving a Linux Mint and Windows keyboard shortcut conflict encountered when using SAS Enterprise Guide in a remote Citrix session
Here is a gotcha, slight though it is, that caught me when working in SAS Enterprise Guide on a Windows system to which I was connecting from Linux via Citrix. What I wanted to do was use the keyboard shortcut CTRL + SHIFT + U to convert text to upper case in the program editor, only for it to produce a black square and nothing else.
What I was encountering was a clash in keyboard shortcut assignments. On Linux Mint, CTRL + SHIFT + U activates Unicode character input mode. The black square was there for me to enter a hexadecimal code to add a character that my keyboard would not facilitate in normal circumstances. While the facility clearly has its uses, it was getting in my way and a solution had to be found.
Taking the simple route, I changed the keyboard shortcut to avoid the clash. Though others may want to go further than this, that was enough for me. At the command line, I issued the following command so that I could accomplish this:
ibus-setup
In the application screen that appeared, I navigated to the Emoji tab. To the right of the Unicode code point box, I clicked on the button with four dots. That led me to another dialogue box where I could change the modifier keys. Thus, I unchecked the box for SHIFT and ticked the one for SUPER (the Windows key on many keyboards these days) instead, before clicking on the OK button to confirm the setting. With that completed, I closed the IBus Preferences screen.
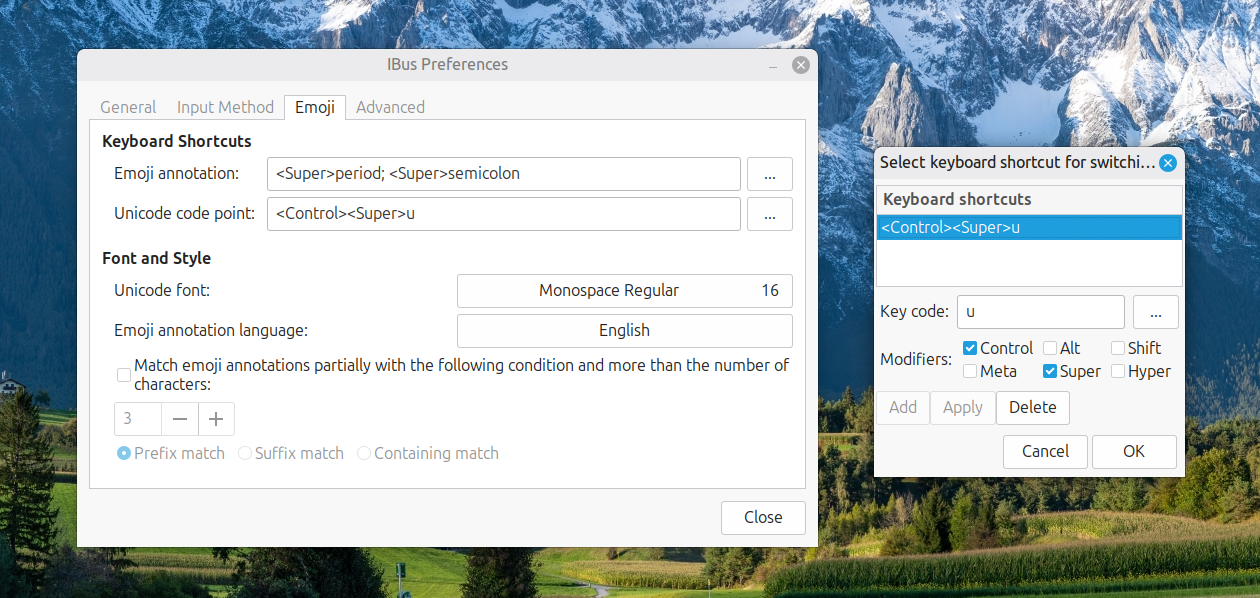
Now, I had CTRL + SUPER + U instead of CTRL + SHIFT + U. This meant that the CTRL + SHIFT + U in Enterprise Guide worked exactly as I expected it to do. A baffling situation had been resolved to leave me working without intrusion.
Building context-sensitive navigation in Grav CMS with Twig
If you are migrating a web portal because a new CMS release broke a site navigation menu plugin, then you are going to make sure that something similar is there in the new version. The initial upset was caused by Textpattern 4.9.0, the move to which resulted in a hasty rollback. A subsequent AI interaction brought Grav CMS into the fray, where menus can be built using the Twig templating language.
Along the way, there was one noticeable difference: a composite menu with hierarchy that drilled down to the pages in a selected section was not quite as possible in Grav. Nevertheless, displaying one menu for pages in a given section along with another showing the other sections is hardly a dealbreaker as far as I am concerned, especially when things are context-sensitive anyway.
This may because Grav derives its navigation directly from the content directory tree using folder naming conventions and front matter flags, all unlike database-driven systems that rely on a dedicated menu editor. After all, you are working with files that expose page state, and not queries of database tables.
The Pages Folder
At the heart of the system is the pages folder. Grav looks at the top level of this directory to determine the primary navigation, and any subfolder that begins with a numeric prefix is treated as a visible page whose position in the menu is set by that number. A structure such as pages/01.home, pages/02.about, pages/03.blog and pages/04.contact immediately yields a working menu in the order you expect. Because this approach is driven by the file system, reordering pages is as simple as renaming the folders, with no additional configuration required.
Visibility can also be controlled without renaming if you prefer to keep folders unnumbered. Each page has a Markdown file containing YAML front matter (commonly named default.md), and adding visible: true to that front matter ensures the page appears in navigation. Setting visible: false hides it. Both approaches work across a site, though the numeric prefix convention remains the most straightforward way to manage ordering and visibility together.
Customising Menu Labels
Menu text defaults to the page title, which suits most cases well. There are times when you want a shorter label in the navigation while keeping a fuller title for the page itself, and the front matter field menu: makes that possible. Writing menu: Blog on the blog page means the menu displays "Blog" even if the page title reads "Company Blog and News". This keeps navigation crisp without sacrificing descriptive titles for search engines and content clarity.
The Main Menu Loop
The primary navigation iterates over pages.children.visible and prints a link for each top-level page. The active and activeChild flags on each page object let you mark the current location: active matches the page the visitor is on, while activeChild is true on any parent whose descendant is currently being viewed. Testing both together means a top-level item is highlighted, whether the visitor is on that page directly or anywhere beneath it:
<ul id="mainmenu" class="section_list">
  {% for p in pages.children.visible %}
    <li class="{{ (p.active or p.activeChild) ? 'active_class' : '' }}">
      <a href="{{ p.url }}">{{ p.menu }}</a>
    </li>
  {% endfor %}
</ul>
This loop picks up any changes to the page tree automatically, with no further configuration required.
Context-Sensitive Sidebar Headings
Before the navigation blocks, the sidebar can show a contextual heading depending on where the visitor is. On the home page, a page.home check provides one heading, and a route comparison handles a specific page such as /search:
{% if page.home %}
  <h4 class="mt-4 mb-4">Fancy Some Exploration?</h4>
{% endif %}

{% if page.route == '/search' %}
  <h4 class="mt-4 mb-4">Fancy Some More Exploration?</h4>
{% endif %}
These headings appear independently of the secondary navigation block, so they display even when there is no active section with children to list below them.
The Secondary Menu
When a visitor is inside a section that has visible child pages, a secondary menu listing those children is more useful than a dropdown. The approach is to find the active top-level page, referred to here as the owner, by looping through pages.children.visible and checking the same active and activeChild flags:
{% set owner = null %}
{% for top in pages.children.visible %}
  {% if top.active or top.activeChild %}
    {% set owner = top %}
  {% endif %}
{% endfor %}
Once owner is found, its menu label can be used as a section heading and its visible children rendered as a list. Importantly, each child item should test child.active or child.activeChild rather than child.active alone. Without activeChild, a visitor to a grandchild page would see no item highlighted in the secondary nav at all:
{% if owner and owner.children.visible.count > 0 %}
  <h4 class="mt-4 mb-4">{{ owner.menu }}</h4>
  <ul id="secondary-nav" class="section_list">
    {% for child in owner.children.visible %}
      <li class="{{ (child.active or child.activeChild) ? 'active_class' : '' }}">
        <a href="{{ child.url }}">{{ child.menu }}</a>
      </li>
    {% endfor %}
  </ul>
  <h4 class="mt-4 mb-4">Looking Elsewhere?</h4>
{% endif %}
The entire block is conditional on owner existing and having visible children, so it does not render at all on the home page, the search page or any other top-level page without subsections.
Common Troubleshooting Points
There are a few subtleties worth bearing in mind. The most frequent cause of trouble is looping over the wrong collection: using page.children.visible instead of pages.children.visible in the owner-detection loop places you inside the current page's subtree, so nothing will flag as active or activeChild correctly. A second issue affects secondary nav items specifically: using only child.active means a visitor to a grandchild page sees no item highlighted because none of the listed children is the current page. Adding or child.activeChild to the condition resolves this. Clearing the Grav cache is also a worthwhile step during development because stale output can make correct template changes appear to have no effect.
Closing Remarks
In summary, you have learned how Grav assembles navigation from its page tree, how to detect the active section using active and activeChild flags, how to display a secondary menu only when a section has visible children, and how to show context-sensitive headings for specific pages. The result is a sidebar that maintains itself automatically as pages are added or reorganised, with no manual menu configuration required.
Enhancing grammar checking for proofing written content in Grav
For text proofing, I have used LanguageTool in my browser for a while now. It has always performed flawlessly in WordPress and Textpattern, catching errors as I type. When I began to use Grav as a CMS, I expected the same experience in its content editor. However, the project chose CodeMirror, causing me to undertake a search for a better alternative because the LanguageTool extension does not work with that at all.
Why CodeMirror Needed Replacing
Browser extensions such as LanguageTool and Grammarly rely on standard editable elements: <textarea> or elements with contenteditable="true". Both expose text directly in the Document Object Model (DOM), where extensions can access and analyse it.
In contrast, CodeMirror takes a different approach. Built for code editing rather than the writing of prose, it renders text through a JavaScript-managed DOM structure whilst hiding the actual textarea. While I can see how Markdown editing might fit this mode for some, and it claims to facilitate collaborative editing which also has its appeal, the match with content production is uneasy when you lose the functionality of browser spell-check and grammar extensions.
Returning to the Familiar with TinyMCE
Thankfully, there is a way to replace CodeMirror with something that works better for content writing. Moving to the TinyMCE Editor Integration plugin brings a traditional WYSIWYG editor that browser extensions can access. That restores LanguageTool functionality whilst remaining within the Admin interface.
It helps that installation is simple via the Admin plugin interface. For command line installation, make your way to the Grav folder on your web server and issue the following command:
bin/gpm install tinymce-editorTo make TinyMCE treat your Markdown content as plain text, add these parameters in the plugin settings. You will find that by going to Admin → Plugins → TinyMCE Editor Integration → Parameters. Once there, proceed to the Parameters section of the screen, and you can specify these using the Add Item button to create places for the information to go:
| Name | Value |
|---|---|
| forced_root_block | false |
| verify_html | false |
| clean-up | false |
| entity_encoding | raw |
These settings should prevent forced paragraph tags and automatic HTML clean-up that can change your Markdown files in ways that are not desirable. If this still remains a concern, there is another option.
Using VSCode for Editing
The great thing about having access to files is that they can be edited directly, not something that is possible with a database-focussed system like WordPress. Thus, you can use VSCode to create and update any content. This approach may seem unconventional for a code editor, but the availability of the LanguageTool extension makes it viable for this kind of task. In a nutshell, this offers a distraction-free writing and real-time grammar checking, with Git integration that eliminates the need for separate SFTP or rsync uploads, which suits authors who prefer working directly with source files rather than relying on visual editors.
Rounding Things Off
From my experience, it appears that the incompatibility between CodeMirror and browser extensions stems from a fundamental mismatch between code editing and content writing. When CodeMirror abstracts text into a JavaScript model to enable features like syntax highlighting and multiple cursors, browser extensions lose direct DOM access to text fields. These approaches cannot coexist.
For configuration or theme files involving Twig logic or complex modular structures, using the nano editor in an SSH session on a web server remains sufficient. It is difficult to see how CodeMirror would help with this activity and retains direct control with little overhead.
Usefully, we can replace CodeMirror with TinyMCE using the TinyMCE Editor Integration plugin. This restores browser extension compatibility, enables real-time grammar checking and provides a familiar editing interface. The advantages are gained by a quick installation, a little configuration and no workflow changes. If more control is needed, mixing VSCode and Git will facilitate that way of working. It is not as if we do not have options.
Related Reading
Ensuring that website updates make it through every cache layer and onto the web
How Things Used to Be Simple
There was a time when life used to be much simpler when it came to developing, delivering and maintaining websites. Essentially, seeing your efforts online was a matter of storing or updating your files on a web server, and a hard refresh in the browser would render the updates for you. Now we have added caches here, there and everywhere in the name of making everything load faster at the cost of added complexity.
Today, these caches are found in the application layer, the server level and we also have added content delivery network (CDN) systems too. When trying to see a change that you made, you need to flush the lot, especially when you have been a good citizen and added long persistence times for files that should not change so often. For example, a typical Apache configuration might look like this:
<IfModule mod_expires.c>
# Enable expiries
ExpiresActive On
# Default directive
ExpiresDefault "access plus 1 month"
# My favicon
ExpiresByType image/x-icon "access plus 1 year"
# Images
ExpiresByType image/gif "access plus 1 month"
ExpiresByType image/png "access plus 1 month"
ExpiresByType image/jpg "access plus 1 month"
ExpiresByType image/jpeg "access plus 1 month"
# CSS
ExpiresByType text/css "access plus 1 month"
# Javascript
ExpiresByType application/javascript "access plus 1 year"
</IfModule>
These settings tell browsers to keep CSS files for a month and JavaScript for a year. This is excellent for performance, but when you update one of these files, you need to override these instructions at every layer. Note that this configuration only controls what your web server tells browsers. The application layer and CDN have their own separate caching rules.
All this is a recipe for confusion when you want to see how everything looks after making a change somewhere. Then, you need a process to make things appear new again. To understand why you need to flush multiple layers, you do need to see where these caches actually sit in your setup.
Understanding the Pipeline
It means that your files travel through several systems before anyone sees them, with each system storing a copy to avoid repeatedly fetching the same file. The pipeline often looks like this:
| Layer | Examples | Actions |
|---|---|---|
| Your application | Hugo, Grav or WordPress | Reads the static files and generates HTML pages |
| Your web server | Nginx or Apache | Delivers these pages and files |
| Your CDN | Cloudflare | Distributes copies globally |
| Browsers | Chrome, Firefox, Safari | Receive and display the content |
Anything generated dynamically, for example by PHP, can flow through this pipeline freshly on every request. Someone asks for a page, your application generates it, the web server sends it, the CDN passes it along, and the browser displays it. The information flow is more immediate.
Static components like CSS, JavaScript and images work differently. They flow through the pipeline once, then each layer stores a copy. The next time someone requests that file, each layer serves its stored version instead of asking the previous layer. This is faster, but it means your updates do not flow through automatically. HTML itself might be limited by this retardation, but not so much as other components, in my experience.
When you change a static file, you need to tell each layer to fetch the new version. You work through the pipeline in sequence, starting where the information originates.
Step 1: Update the Application Layer
After uploading your new static files to the server, the first system that needs updating is your application. This is where information enters the pipeline, and we consider Hugo, Grav and WordPress in turn, moving from simplest to most complex. Though these are examples, some of the considerations should be useful elsewhere as well.
Hugo
Hugo is a static site generator, which makes cache management simpler than dynamic CMS systems. When you build your site, Hugo generates all the HTML files in the public/ directory. There is no application-level cache to clear because Hugo does not run on the server. After modifying your templates or content, rebuild your site:
hugoThen, upload the new files from public/ to your web server. Since Hugo generates static HTML, the complexity is reduced to just the web server, CDN and browser layers. The application layer refresh is simply the build step on your local machine.
Grav CMS
Grav adds more complexity as it runs on the server and manages its own caching. When Grav reads your static files and combines them, it also compiles Twig templates that reference these files. Once you are in the Grav folder on your web server in an SSH session, issue this command to make it read everything fresh:
bin/grav clear-cacheOr manually:
rm -rf cache/* tmp/*When someone next requests a page, Grav generates HTML that references your new static files. If you are actively developing a Grav theme, you can disable Twig and asset caching to avoid constantly clearing cache. Edit user/config/system.yaml:
cache:
  enabled: true
  check:
    method: file

twig:
  cache: false  # Disable Twig caching
  debug: true
  auto_reload: true

assets:
  css_pipeline: false  # Disable CSS combination
  js_pipeline: false   # Disable JS combination
While this keeps page caching on but disables the caches that interfere with development, do not forget to turn them back on before deploying to production. Not doing so may impact website responsiveness.
WordPress
WordPress introduces the most complexity with its plugin-based architecture. Since WordPress uses plugins to build and store pages, you have to tell these plugins to rebuild so they reference your new static files. Here are some common examples that generate HTML and store it, along with how to make them refresh their cached files:
Page Cache Plugins
| Plugin | How to Clear Cache |
|---|---|
| WP Rocket | Settings > WP Rocket > Clear Cache (or use the admin bar button) |
| W3 Total Cache | Performance > Dashboard > Empty All Caches |
| WP Super Cache | Settings > WP Super Cache > Delete Cache |
| LiteSpeed Cache | LiteSpeed Cache > Dashboard > Purge All |
Redis Object Cache
Redis stores database query results, which are separate from page content. If your static file changes affect database-stored information (like theme options), tell Redis to fetch fresh data.
From the WordPress dashboard, the Redis Object Cache plugin provides: Settings > Redis > Flush Cache. An alternative to do likewise from the command line:
redis-cli FLUSHALLNote this clears everything in Redis. If you are sharing a Redis instance with other applications, use the WordPress plugin interface instead.
Step 2: Refresh the Web Server Cache
Once your application is now reading the new static files, the next system in the pipeline is your web server. Because it has stored copies of files it previously delivered, it has to be told to fetch fresh copies from your application.
Nginx
The first step is to find where Nginx stores files:
grep -r "cache_path" /etc/nginx/This shows you lines like fastcgi_cache_path /var/cache/nginx/fastcgi which tell you the location. Using this information, you can remove the stored copies:
# Clear FastCGI cache
sudo rm -rf /var/cache/nginx/fastcgi/*

# Reload Nginx
sudo nginx -s reload
When Nginx receives a request, it fetches the current version from your application instead of serving its stored copy. If you are using a reverse proxy setup, you might also have a proxy cache at /var/cache/nginx/proxy/* which you can clear the same way.
Apache
Apache uses mod_cache for storing files, and the location depends on your configuration. Even so, common locations are /var/cache/apache2/ or /var/cache/httpd/. Using the following commands, you can find your cache directory:
# Ubuntu/Debian
grep -r "CacheRoot" /etc/apache2/

# CentOS/RHEL
grep -r "CacheRoot" /etc/httpd/
Armed with the paths that you have found, you can remove the stored copies:
# Ubuntu/Debian
sudo rm -rf /var/cache/apache2/mod_cache_disk/*
sudo systemctl reload apache2

# CentOS/RHEL
sudo rm -rf /var/cache/httpd/mod_cache_disk/*
sudo systemctl reload httpd
Alternatively, if you have mod_cache_disk configured with htcacheclean, you can use:
sudo htcacheclean -t -p /var/cache/apache2/mod_cache_disk/When Apache receives a request, it fetches the current version from your application.
Step 3: Update the CDN Layer Cache Contents
After your web server is now delivering the new static files, the next system in the pipeline is your CDN. This has stored copies at edge servers worldwide, which need to be told to fetch fresh copies from your web server. Here, Cloudflare is given as an example.
Cloudflare
First, log into the Cloudflare dashboard and navigate to Caching. Then, click "Purge Everything" and wait a few seconds. Now, when someone requests your files, Cloudflare fetches the current version from your web server instead of serving its stored copy.
If you are actively working on a file and deploying repeatedly, enable Development Mode in the Cloudflare dashboard. This tells Cloudflare to always fetch from your server rather than serving stored copies. Helpfully, it automatically turns itself off after three hours.
Step 4: Refresh What Is Loaded in Your Browser
Having got everything along the pipeline so far, we finally come to the browser. This is where we perform hard refreshing of the content. Perform a forced refresh of what is in your loading browser using appropriate keyboard shortcuts depending on what system you are using. The shortcuts vary, though holding down the Shift key and clicking on the Refresh button works a lot of the time. Naturally, there are other options and here are some suggestions:
| Operating System | Keyboard Shortcut |
|---|---|
| macOS | Command + Shift + R |
| Linux | Control + Shift + R |
| Windows | Control + F5 |
Making use of these operations ensures that your static files come through the whole way so you can see them along with anyone else who visits the website.
Recap
Because a lot of detail has been covered on this journey, let us remind ourselves where we have been with this final run-through. Everything follows sequentially:
- Upload your changed files to the server
- Verify the files uploaded correctly:
ls -l /path/to/your/css/file.cssCheck the modification time matches when you uploaded.
- Refresh your application layer:
# Grav bin/grav clear-cache # WordPress - via WP-CLI wp cache flush # Or use your caching plugin's interface - Refresh Redis (if you use it for object caching):
redis-cli FLUSHALL # Or via WordPress plugin interface - Refresh your web server layer (if using Nginx or Apache):
# Nginx sudo rm -rf /var/cache/nginx/fastcgi/* sudo nginx -s reload # Apache (Ubuntu/Debian) sudo rm -rf /var/cache/apache2/mod_cache_disk/* sudo systemctl reload apache2 - Refresh your CDN layer: Cloudflare dashboard > Purge Everything
- Perform a forced refresh of what is in your loading browser using appropriate keyboard shortcuts depending on what system you are using
- Test the page to confirm the update has come through fully
Any changes become visible because the new files have travelled from your application through each system in the pipeline. Sometimes, this may happen seamlessly without intervention, but it is best to know what to do when that is not how things proceed.
Related Reading
Configuring RSS Feeds in Grav CMS using Collections
While the Feed plugin for Grav CMS provides RSS, Atom and JSON feeds for your site content, setting up a feed in Grav differs from other content management systems because it requires explicit configuration rather than automatic discovery. The key to making feeds work lies in understanding how Grav uses collections to organise and present content.
Understanding Collections
In Grav, content lives in a file tree structure. The feed system works through collections, which tell Grav where to find pages and how to organise them. Collections are essential for feeds because they define exactly which content gets syndicated. Without a properly configured collection, your feed will be empty.
Collections use a specific syntax to target pages in different ways:
| Collection Type | Syntax | What It Does |
|---|---|---|
| All descendants | '@page.descendants': '/blog' |
Gathers a folder and all nested subdirectories recursively |
| Direct children only | '@page.children': '/blog' |
Limits collection to immediate children, excluding deeper nesting |
| By tag | '@taxonomy.tag': 'featured' |
Pulls all pages with a specific tag, regardless of location |
| By category | '@taxonomy.category': 'news' |
Pulls all pages in a specific category, regardless of location |
| Multiple sources | Array of any above | Merges content from multiple folders or taxonomies |
The @page.descendants syntax works well for blog structures where you might have posts organised by year, month or category within subdirectories. The @page.children syntax suits flatter structures where all posts sit directly under a single parent folder.
Taxonomy-based collections using @taxonomy.tag or @taxonomy.category pull pages based on their metadata rather than folder location. This allows you to create feeds for specific topics regardless of where those pages live in your file structure.
The real power emerges when combining multiple collection sources. You can specify an array of different folders or taxonomies, and Grav merges them into a single unified collection. This allows you to aggregate content across your entire site structure, pulling from blogs, articles, news sections or any combination that suits your needs.
Understanding Routes
Before configuring your feed, you need to understand how Grav translates folder paths into routes. This matters because you will reference routes in your collection configuration, not physical folder paths. Getting this wrong means your feed will be empty even when your folders contain content.
Grav stores pages in folders under /user/pages/, but these physical paths differ from the routes you use in configuration. Routes are based on folder names without numeric prefixes:
| Physical Path | Route in Configuration |
|---|---|
/user/pages/03.deliberations/ |
/deliberations |
/user/pages/writings/ |
/writings |
The numeric prefix (such as 03.) determines ordering in navigation but does not appear in the route. This means when you create a folder named 03.deliberations, Grav automatically makes it accessible at the /deliberations route. Similarly, a folder without a numeric prefix like writings becomes the /writings route.
When you specify '@page.descendants': '/deliberations' in your collection configuration, Grav knows to look in the 03.deliberations folder and all its subdirectories. The route system abstracts away the physical folder structure, allowing you to reorganise content by changing numeric prefixes without breaking your feed configuration.
Creating Your Feed Configuration
Creating a feed requires a page that defines which content to include. The simplest approach is to create a file at feed/default.md with a structure like this:
---
title: Site Feed
visible: false

content:
  items:
    '@page.descendants': '/blog'
  order:
    by: date
    dir: desc
  limit: 20

feed:
  title: "My Site Feed"
  description: "Latest posts and updates"
---
Configuration Settings Explained
The visible: false setting ensures the feed page does not appear in navigation.
The content section defines your collection. Here, @page.descendants: '/blog' recursively includes all pages under the /blog folder, including any nested within subdirectories. If you only want immediate children, use @page.children: '/blog' instead.
The order section determines how posts appear in your feed. The example uses by: date with dir: desc to show the newest posts first. Ensure all pages in your collection have a date: field in their front matter:
---
title: My Post
date: 16-02-2026 14:30
---
Alternatively, you can order by folder name using by: folder. This sorts pages alphabetically and proves reliable when pages lack dates or when folder structure determines chronology:
order:
  by: folder
  dir: asc
The limit: 20 setting controls how many items appear in the feed.
The feed section provides metadata for the RSS feed itself, including the title and description that feed readers will display.
Combining Multiple Folders
You can pull content from multiple locations into a single feed:
content:
  items:
    - '@page.descendants': '/blog'
    - '@page.descendants': '/articles'
    - '@page.descendants': '/news'
This merges posts from all three sections into one unified feed. Each section is gathered separately and then combined.
Putting It All Together
Here is a complete working configuration that demonstrates these principles in practice. This example pulls all content from a single folder using folder-based ordering rather than dates:
---
title: Surroundings Feed
visible: false

content:
  items:
    '@page.descendants': '/deliberations'
  order:
    by: folder
    dir: asc
  limit: 20

feed:
  title: "Varied Surroundings, Deliberations"
  description: "Essays and reflections from Deliberations on Assorted Explorations"
  limit: 20
---
This configuration, saved as feed/default.md, pulls all content from the /deliberations folder and its subdirectories. The folder-based ordering uses Grav's numeric prefix system for sorting. Pages in folders named 01.first-post, 02.second-post, 03.third-post will appear in that sequence. The ascending direction means lower numbers appear first in the feed. The feed metadata provides a descriptive title and description that will appear in feed readers.
What the Output Looks Like
Once Grav processes your configuration, it generates an RSS XML file. Here is what the header section looks like using the real-world example above:
<?xml version="1.0" encoding="utf-8"?>
<rss xmlns:atom="http://www.w3.org/2005/Atom" version="2.0">
    <channel>
        <title>Varied Surroundings, Deliberations</title>
        <link>https://www.assortedexplorations.com/surroundings/feed</link>
        <description>Essays and reflections from Deliberations on Assorted Explorations</description>
        <language>en</language>
        <lastBuildDate>Sun, 25 Jan 2026 18:16:13 +0000</lastBuildDate>
Each post appears as an item with its title, link, publication date and content excerpt:
        <item>
            <title>Nation or Nations?</title>
            <link>https://www.assortedexplorations.com/surroundings/deliberations/nation-or-nations</link>
            <guid>https://www.assortedexplorations.com/surroundings/deliberations/nation-or-nations</guid>
            <pubDate>Sun, 25 Jan 2026 17:59:23 +0000</pubDate>
            <description>
                <![CDATA[
                <h2 class="centre mb-5">Nation or Nations?</h2>
                <p style="text-align:center; margin-bottom: 2.5rem;"><img src="../images/51.jpg"></p>
                <p>The nature of the United Kingdom seems to be a source not only of some confusion...</p>
                ]]>
            </description>
        </item>
The Feed plugin handles all XML generation automatically. You simply configure which content to include and how to order it, and Grav produces properly formatted RSS, Atom or JSON feeds.
Accessing Your Feeds
Once configured, your feeds become accessible at /feed.rss, /feed.atom or /feed.json. While this guide focuses on RSS feeds, the collection principles apply much more broadly. Collections power archive pages, tag pages, search results, related posts and sitemaps. Understanding how they work is essential for any feature that lists content on your site. The official documentation provides additional detail on these concepts and advanced configuration options.
Related Reading
Silencing MLX warnings when running Ollama via Homebrew on macOS
While there is an Ollama app on macOS, I chose to install it using Homebrew instead. That worked well enough, even if I kept seeing a warning message like this on macOS Tahoe:
WARN MLX dynamic library not available error="failed to load MLX dynamic library (searched: [/opt/homebrew/Cellar/ollama/0.16.2/bin
For some reason, the MLX integration into ollama is not what it should be, even if it runs without any other issues as things stand. While the native app does not have this issue and warnings like these can be overlooked at the operating system level, my chosen solution was to specify this alias in the .zshrc file:
alias ollama='command ollama "$@" 2> >(grep -v "MLX dynamic library not available" >&2)'
On executing this command to reload the configuration file, the output from ollama to stderr was much cleaner:
source ~/.zshrc
However, the alias itself still needs some unpacking to explain what is happening. Let us proceed piece by piece, focussing on the less obvious parts of the text within the quotes in the alias definition.
command: Starting the whole aliased statement with this keyword stops everything becoming recursive and makes everything safer, even if I have got away with doing that with the ls command elsewhere. If I were to include aliases in functions, the situation could be different, producing an infinite loop in the process.
"$@": Without this, the arguments to the ollama command would not be passed into the alias.
2>: This is the overall redirection to stderr and >(grep -v "MLX dynamic library not available" >&2) where the text removal takes place.
grep -v: Within the filtering statement, this command prints everything that does not match the search string. In this case, that is "MLX dynamic library not available" .
>&2: Here is where the output is sent back to stderr for the messages that appear in the console.
In all of this, it is important to distinguish between stderr (standard error output) and stdout (standard output). For ollama, the latter is how you receive a response from the LLM, while the former is used for application feedback. This surprised me when I first learned of it, yet it is common behaviour in the world of Linux and UNIX, which includes macOS.
This matters here because suppressing stderr means that you get no idea of how an LLM download is proceeding because that goes to that destination, rather than stdout as I might have expected without knowing better as I do now. Hence, the optimal approach is to subset the stderr output instead.
Creating modular pages in Grav CMS
Here is a walkthrough that demonstrates how to create modular pages in Grav CMS. Modular pages allow you to build complex, single-page layouts by stacking multiple content sections together. This approach works particularly well for modern home pages where different content types need to be presented in a specific sequence. The example here stems from building a theme from scratch to ensure sitewide consistency across multiple subsites.
What Are Modular Pages
A modular page is a collection of content sections (called modules) that render together as a unified page. Unlike regular pages that have child pages accessible via separate URL's, modular pages display all their modules on a single URL. Each module is a self-contained content block with its own folder, markdown file and template. The parent page assembles these modules in a specified order to create the final page.
Understanding the Folder Structure
Modular pages use a specific folder structure. The parent folder contains a modular.md file that defines which modules to include and in what order. Module folders sit beneath the parent folder and are identified by an underscore at the start of their names. Numeric prefixes before the underscore control the display order.
Here is an actual folder structure from a travel subsite home page:
/user/pages/01.home/
    01._title/
    02._intro/
    03._call-to-action/
    04._ireland/
    05._england/
    06._scotland/
    07._scandinavia/
    08._wales-isle-of-man/
    09._alps-pyrenees/
    10._american-possibilities/
    11._canada/
    12._dreams-experiences/
    13._practicalities-inspiration/
    14._feature_1/
    15._feature_2/
    16._search/
    modular.md
The numeric prefixes (01, 02, 03) ensure modules appear in the intended sequence. The descriptive names after the prefix (_title, _ireland, _search) make the page structure immediately clear. Each module folder contains its own markdown file and any associated media. The underscore prefix tells Grav these folders contain modules rather than regular pages. Modules are non-routable, meaning visitors cannot access them directly via URLs. They exist only to provide content sections for their parent page.
The Workflow
Step One: Create the Parent Page Folder
Start by creating a folder for your modular page in /user/pages/. For a home page, you might create 01.home. The numeric prefix 01 ensures this page appears first in navigation and sets the display order. If you are using the Grav Admin interface, navigate to Pages and click the Add button, then select "Modular" as the page type.
Create a file named modular.md inside this folder. The filename is important because it tells Grav to use the modular.html.twig template from your active theme. This template handles the assembly and rendering of your modules.
Step Two: Configure the Parent Page
Open modular.md and add YAML front matter to define your modular page settings. Here is an example configuration:
---
title: Home
menu: Home
body_classes: "modular"

content:
    items: '@self.modular'
    order:
        by: default
        dir: asc
        custom:
            - _hero
            - _features
            - _callout
---
The content section is crucial. The items: '@self.modular' instruction tells Grav to collect all modules from the current page. The custom list under order specifies exactly which modules to include and their sequence. This gives you precise control over how sections appear on your page.
Step Three: Create Module Folders
Create folders for each content section you need. Each folder name must begin with an underscore. Add numeric prefixes before the underscore for ordering, such as 01._title, 02._intro, 03._call-to-action. The numeric prefixes control the display sequence. Module names are entirely up to you based on what makes sense for your content.
For multi-word module names, use hyphens to separate words. Examples include 08._wales-isle-of-man, 10._american-possibilities or 13._practicalities-inspiration. This creates readable folder names that clearly indicate each module's purpose. The official documentation shows examples using names like _features and _showcase. It does not matter what names that you choose, as long as you create matching templates. Descriptive names help you understand the page structure when viewing the file system.
Step Four: Add Content to Modules
Inside each module folder, create a markdown file. The filename determines which template Grav uses to render that module. For example, a module using text.md will use the text.html.twig template from your theme's /templates/modular/ folder. You decide on these names when planning your page structure.
Here is an actual example from the 04._ireland module:
---
title: 'Irish Encounters'
content_source: ireland
grid: true
sitemap:
    lastmod: '30-01-2026 00:26'
---
### Irish Encounters {.mb-3}
<p style="text-align:center" class="mt-3"><img class="w-100 rounded" src="https://www.assortedexplorations.com/photo_gallery_images/eire_kerry/small_size/eireCiarraigh_tomiesMountain.jpg" /></p>
From your first arrival to hidden ferry crossings and legendary names that shaped the world, these articles unlock Ireland's layers beyond the obvious tourist trail. Practical wisdom combines with unexpected perspectives to transform a visit into an immersive journey through landscapes, culture and connections you will not find in standard guidebooks.
The front matter contains settings specific to this module. The title appears in the rendered output. The content_source: ireland tells the template which page to link to (as shown in the text.html.twig template example). The grid: true flag signals the modular template to render this module within the grid layout. The sitemap settings control how search engines index the content.
The content below the front matter appears when the module renders. You can use standard Markdown syntax for formatting. You can also include HTML directly in markdown files for precise control over layout and styling. The example above uses HTML for image positioning and Bootstrap classes for responsive sizing.
Module templates can access front matter variables through page.header and use them to generate dynamic content. This provides flexibility in how modules appear and behave without requiring separate module types for every variation.
Step Five: Create Module Templates
Your theme needs templates in /templates/modular/ that correspond to your module markdown files. When building a theme from scratch, you create these templates yourself. A module using hero.md requires a hero.html.twig template. A module using features.md requires a features.html.twig template. The template name must match the markdown filename.
Each template defines how that module's content renders. Templates use standard Twig syntax to structure the HTML output. Here is an example text.html.twig template that demonstrates accessing page context and generating dynamic links:
{{ content|raw }}
{% set raw = page.header.content_source ?? '' %}
{% set route = raw ? '/' ~ raw|trim('/') : page.parent.route %}
{% set context = grav.pages.find(route) %}
{% if context %}
    <p>
        <a href="{{ context.url }}" class="btn btn-secondary mt-3 mb-3 shadow-none stretch">
            {% set count = context.children.visible|length + 1 %}
            Go and Have a Look: {{ count }} {{ count == 1 ? 'Article' : 'Articles' }} to Savour
        </a>
    </p>
{% endif %}
First, this template outputs the module's content. It then checks for a content_source variable in the module's front matter, which specifies a route to another page. If no source is specified, it defaults to the parent page's route. The template finds that page using grav.pages.find() and generates a button linking to it. The button text includes a count of visible child pages, with proper singular/plural handling.
The Grav themes documentation provides guidance on template creation. You have complete control over the design and functionality of each module through its template. Module templates can access the page object, front matter variables, site configuration and any other Grav functionality.
Step Six: Clear Cache and View Your Page
After creating your modular page and modules, clear the Grav cache. Use the command bin/grav clear-cache from your Grav installation directory, or click the Clear Cache button in the Admin interface. The CLI documentation details other cache management options.
Navigate to your modular page in a browser. You should see all modules rendered in sequence as a single page. If modules do not appear, verify the underscore prefix on module folders, check that template files exist for your markdown filenames and confirm your parent modular.md lists the correct module names.
Working with the Admin Interface
The Grav Admin plugin streamlines modular page creation. Navigate to the Pages section in the admin interface and click Add. Select "Add Modular" from the options. Fill in the title and select your parent page. Choose the module template from the dropdown.
The admin interface automatically creates the module folder with the correct underscore prefix. You can then add content, configure settings and upload media through the visual editor. This approach reduces the chance of naming errors and provides a more intuitive workflow for content editors.
Practical Tips for Modular Pages
Use descriptive folder names that indicate the module's purpose. Names like 01._title, 02._intro, 03._call-to-action make the page structure immediately clear. Hyphens work well for multi-word module names such as 08._wales-isle-of-man or 13._practicalities-inspiration. This naming clarity helps when you return to edit the page later or when collaborating with others. The specific names you choose are entirely up to you as the theme developer.
Keep module-specific settings in each module's markdown front matter. Place page-wide settings like taxonomy and routing in the parent modular.md file. This separation maintains clean organisation and prevents configuration conflicts.
Use front matter variables to control module rendering behaviour. For example, adding grid: true to a module's front matter can signal your modular template to render that module within a grid layout rather than full-width. Similarly, flags like search: true or fullwidth: true allow your template to apply different rendering logic to different modules. This keeps layout control flexible without requiring separate module types for every layout variation.
Test your modular page after adding each new module. This incremental approach helps identify issues quickly. If a module fails to appear, check the folder name starts with an underscore, verify the template exists and confirm the parent configuration includes the module in its custom order list.
For development work, make cache clearing a regular habit. Grav caches page collections and compiled templates, which can mask recent changes. Running bin/grav clear-cache after modifications ensures you see current content rather than cached versions.
Understanding Module Rendering
The parent page's modular.html.twig template controls how modules assemble. Whilst many themes use a simple loop structure, you can implement more sophisticated rendering logic when building a theme from scratch. Here is an example that demonstrates conditional rendering based on module front matter:
{% extends 'partials/home.html.twig' %}
{% block content %}
  {% set modules = page.collection({'items':'@self.modular'}) %}
  {# Full-width modules first (search, main/outro), then grid #}
  {% for m in modules %}
    {% if not (m.header.grid ?? false) %}
      {% if not (m.header.search ?? false) %}
            {{ m.content|raw }}
      {% endif %}
    {% endif %}
  {% endfor %}
  <div class="row g-4 mt-3">
    {% for m in modules %}
      {% if (m.header.grid ?? false) %}
        <div class="col-12 col-md-6 col-xl-4">
          <div class="h-100">
            {{ m.content|raw }}
          </div>
        </div>
      {% endif %}
    {% endfor %}
  </div>
  {# Move search box to end of page  #}
  {% for m in modules %}
    {% if (m.header.search ?? false) %}
          {{ m.content|raw }}
    {% endif %}
  {% endfor %}
{% endblock %}
This template demonstrates several useful techniques. First, it retrieves the module collection using page.collection({'items':'@self.modular'}). The template then processes modules in three separate passes. The first pass renders full-width modules that are neither grid items nor search boxes. The second pass renders grid modules within a Bootstrap grid layout, wrapping each in responsive column classes. The third pass renders the search module at the end of the page.
Modules specify their rendering behaviour through front matter variables. A module with grid: true in its front matter renders within the grid layout. A module with search: true renders at the page bottom. Modules without these flags render full-width at the top. This approach provides precise control over the layout whilst keeping content organised in separate module files.
Each module still uses its own template (like text.html.twig or feature.html.twig) to define its specific HTML structure. The modular template simply determines where on the page that content appears and whether it gets wrapped in grid columns. This separation between positioning logic and content structure keeps the system flexible and maintainable.
When to Use Modular Pages
Modular pages work well for landing pages, home pages and single-page sites where content sections need to appear in a specific order. They excel at creating modern, scrollable pages with distinct content blocks like hero sections, feature grids, testimonials and call-to-action areas.
For traditional multipage sites with hierarchical navigation, regular pages prove more suitable because modular pages do not support child pages in the conventional sense. Instead, choose modular pages when you need a unified, single-URL presentation of multiple content sections.
Related Reading
For further information, consult the Grav Modular Pages Documentation, Grav Themes and Templates guide and the Grav Admin Plugin documentation.
Grouping directories first in output from ls commands executed in terminal sessions on macOS and Linux
This enquiry began with my seeing directories and files being sorted by alphabetical order without regard for type in macOS Finder. In Windows and Linux file managers, I am accustomed to directories and files being listed in distinct blocks, albeit within the same listings, with the former preceding the latter. What I had missed was that the ls command and its aliases did what I was seeing in macOS Finder, which perhaps is why the operating system and its default apps work like that.
Over to Linux
On the zsh implementation that macOS uses, there is no way to order the output so that directories are listed before files. However, the situation is different on Linux because of the use of GNU tooling. Here, the --group-directories-first switch is available, and I have started to use this on my own Linux systems, web servers as well as workstations. This can be set up in .bashrc or .bash_aliases like the following:
alias ls='ls  --color=auto --group-directories-first'

alias ll='ls -lh  --color=auto --group-directories-first'
Above, the --color=auto switch adds colour to the output too. Issuing the following command makes the updates available in a terminal session (~ is the shorthand for the home directory below):
source ~/.bashrc
Back to macOS
While that works well on Linux, additional tweaks are needed to implement the same on macOS. Firstly, you have to install Homebrew using this command (you may be asked for your system password to let the process proceed):
/bin/bash -c "$(curl -fsSL https://raw.githubusercontent.com/Homebrew/install/HEAD/install.sh)"
To make it work, this should be added to the .zshrc file in your home folder:
export PATH="/opt/homebrew/opt/coreutils/libexec/gnubin:$PATH"
Then, you need to install coreutils for GNU commands like gls (a different name is used to distinguish it from what comes with macOS) and adding dircolors gives you coloured text output as well:
brew install coreutils

brew install dircolors
Once those were in place, I found that adding these lines to the .zshrc file was all that was needed (note those extra g's):
alias ls='gls  --color=auto --group-directories-first'

alias ll='gls -lh  --color=auto --group-directories-first'
If your experience differs, they may need to be preceded with this line in the same configuration file:
eval "$(dircolors -b)"
The final additions then look like this:
export PATH="/opt/homebrew/opt/coreutils/libexec/gnubin:$PATH"

eval "$(dircolors -b)"

alias ls='gls  --color=auto --group-directories-first'

alias ll='gls -lh  --color=auto --group-directories-first'
Following those, issuing this command will make the settings available in your terminal session:
source ~/.zshrc
Closing Remarks
In summary, you have learned how to list directories before files, and not intermingled as is the default situation. For me, this discovery was educational and adds some extra user-friendliness that was not there before the tweaks. While we may be considering two operating systems and two different shells (bash and zsh), there is enough crossover to make terminal directory and file listing operations function consistently regardless of where you are working.
Security is a behaviour, not a tick-box
Cybersecurity is often discussed in terms of controls and compliance, yet most security failures begin and end with human action. A growing body of practice now places behaviour at the centre, drawing on psychology, neuroscience, history and economics to help people replace old habits with new ones. George Finney's Well Aware Security have built its entire approach around this idea, reframing awareness training as a driver of measurable outcomes rather than a box-ticking exercise, with coaches helping colleagues identify and build upon their existing strengths. It is also personal by design, using insights about how minds work to guide change one habit at a time rather than expecting wholesale transformation overnight.
This emphasis on behaviour is not a dismissal of technical skill so much as a reminder that skill alone is insufficient. Security is not a competency you either possess or lack; it is a behaviour that can be learned, reinforced and normalised. As social beings, we have always gathered for mutual protection, meaning the desire to contribute to collective security is already present in most people. Turning that impulse into daily action requires structure and patience, and it thrives when a supportive culture takes root.
Culture matters because norms are powerful. In a team where speed and convenience consistently override prudence, individuals who try to do the right thing can feel isolated. Conversely, when an organisation embraces cybersecurity at every level, a small group can create sufficient leverage to shift practices across the whole business. Research has found that organisations with below-average culture ratings are significantly more likely to experience a data breach than their peers, and controls alone cannot close that gap when behaviours are pulling in the opposite direction.
This is why advocates of habit-based security speak of changing one step at a time, celebrating progress and maintaining momentum. The same thinking underpins practical measures at home and at work, where small changes in how devices and data are managed can reduce risk materially without making technology difficult to use.
Network-Wide Blocking with Pi-hole
One concrete example of this approach is network-wide blocking of advertising and tracking domains using a DNS sinkhole. Pi-hole has become popular because it protects all devices on a network without requiring any client-side software to be installed on each one. It runs lightly on Linux, blocks content outside the browser (such as within mobile apps and smart TVs) and can optionally act as a DHCP server so that new devices are protected automatically upon joining the network.
Pi-hole's web dashboard surfaces insights into DNS queries and blocked domains, while a command-line interface and an API offer further control for those who need it. It caches DNS responses to speed up everyday browsing, supports both IPv4 and IPv6, and scales from small households to environments handling very high query volumes. The project is free and open source, sustained by donations and volunteer effort.
Choosing What to Block
Selecting what to block is a point at which behaviour and technology intersect. It is tempting to load every available blocklist in the hope of maximum protection, but as Avoid the Hack notes in its detailed guide to Pi-hole blocklists, more is not always better. Many lists draw from common sources, so stacking them can add redundancy without improving coverage and may increase false positives (instances where legitimate sites are mistakenly blocked).
The most effective approach begins by considering what you want to block and why, then balancing that against the requirements of your devices and services. Blocking every Microsoft domain, for instance, could disrupt operating system updates or break websites that rely on Azure. Likewise, blacklisting all domains belonging to a streaming or gaming platform may render apps unusable. Aggressive configurations are possible, but they work best when paired with careful allow-listing of domains essential to your services. Allow lists require ongoing upkeep as services move or change, so they are not a one-off exercise.
Recommended Blocklists
A practical starting point is the well-maintained Steven Black unified hosts file, which consolidates several reputable sources and many users find sufficient straight away. From there, curated collections help tailor coverage further. EasyList provides a widely trusted foundation for blocking advertising and integrates with browser extensions such as uBlock Origin, while its companion list EasyPrivacy can add stronger tracking protection at the cost of occasional breakage on certain sites.
Hagezi maintains a comprehensive set of DNS blocklists, including "multi" variants of different sizes and aggression levels, built from numerous sources. Selecting one of the multi variants is usually preferable to layering many individual category lists, which can reintroduce the overlap you were trying to avoid. Firebog organises its lists by risk: green entries carry a lower risk of causing breakage, while blue entries are more aggressive, giving you the option to mix and match according to your comfort level.
Some projects bundle many sources into a single combination list. OISD is one such option, with its Basic variant focusing mainly on advertisements, Full extending to malware, scams, phishing, telemetry and tracking, and a separate NSFW set covering adult content. OISD updates roughly every 24 hours and is comprehensive enough that many users would not need additional lists. The trade-off is placing a significant degree of trust in a single maintainer and limiting the ability to assign different rule sets to different device groups within Pi-hole, so it is worth weighing convenience against flexibility before committing.
The Blocklist Project organises themed lists covering advertising, tracking, malware, phishing, fraud and social media domains, and these work with both Pi-hole and AdGuard Home. The project completed a full rebuild of its underlying infrastructure, replacing an inconsistent mix of scripts with a properly tested Python pipeline, automated validation on pull requests and a cleaner build process.
Existing list URLs are unchanged, so anyone already using the project's lists need not reconfigure anything. That said, the broader principle holds regardless of which project you use: blocklists can become outdated if not actively maintained, reducing their effectiveness over time.
Using Regular Expressions
For more granular control, Pi-hole supports regular expressions to match domain patterns. Regex entries are powerful and can be applied both to block and to allow traffic, but they reward specificity. Broad patterns risk false positives that break legitimate services, so community-maintained regex recommendations are a safer starting point than writing everything from scratch. Pi-hole's own documentation explains how expressions are evaluated in detail. Used judiciously, regex rules extend what list-based blocking can achieve without turning maintenance into an ongoing burden.
Installing Pi-hole
Installation is straightforward. Pi-hole can be deployed in a Linux container or directly on a supported operating system using an automated installer that asks a handful of questions and configures everything in under ten minutes. Once running, you point clients to use it as their DNS resolver, either by setting DHCP options on your router, so devices adopt it automatically, or by updating network settings on each device individually. Pairing Pi-hole with a VPN extends ad blocking to mobile devices when away from home, so limited data plans go further by not downloading unwanted content. Day-to-day management is handled via the web interface, where you can add domains to block or allow lists, review query logs, view long-term statistics and audit entries, with privacy modes that can be tuned to your environment.
Device-Level Adjustments
Network filtering is one layer in a defence-in-depth approach, and a few small device-level changes can reduce friction without sacrificing safety. Bitdefender's Safepay, for example, is designed to isolate banking and shopping sessions within a hardened browser environment. If its prompts become intrusive, you can turn off notifications by opening the Bitdefender interface, selecting Privacy, then Safepay settings, and toggling off both Safepay notifications and the option to use a VPN with Safepay. Bookmarked sites can still auto-launch Safepay unless you also disable the automatic-opening option. Even with notifications suppressed, you can start Safepay manually from the dashboard whenever you want the additional protection.
On Windows, unwanted prompts from Microsoft Edge about setting it as the default browser can be handled without resorting to arcane steps. The Windows Club covers the full range of methods available. Dismissing the banner by clicking "Not now" several times usually prevents it from reappearing, though a browser update or reset may bring the message back. Advanced users can disable the recommendations via edge://flags, or apply a registry policy under HKEY_CURRENT_USERSoftwarePoliciesMicrosoftEdge by setting DefaultBrowserSettingEnabled to 0. In older environments such as Windows 7, a Group Policy setting exists to stop Edge checking whether it is the default browser. These changes should be made with care, particularly in managed environments where administrators enforce default application associations across the estate.
Knowing What Your Devices Reveal
Awareness also begins with understanding what your devices reveal to the wider internet. Services like WhatIsMyIP.com display your public IP address, the approximate location derived from it and your internet service provider. For most home users, a public IP address is dynamic rather than fixed, meaning it can change when a router restarts or when an ISP reallocates addresses; on mobile networks it may change more frequently still as devices move between towers and routing systems.
Such tools also provide lookups for DNS and WHOIS information, and they explain the difference between public and private addressing. Complementary checks from WhatIsMyBrowser.com summarise your browser version, whether JavaScript and cookies are enabled, and whether known trackers or ad blockers are detected. Sharing that information with support teams can make troubleshooting considerably faster, since it quickly narrows down where problems are likely to sit.
Protecting Your Accounts
Checking for Breached Credentials
Account security is another area where habits do most of the heavy lifting. Checking whether your email address appears in known data breaches via Have I Been Pwned helps you decide when to change passwords or enable stronger protections. The service, created by security researcher Troy Hunt, tracks close to a thousand breached websites and over 17.5 billion compromised accounts, and offers notifications as well as a searchable dataset. Finding your address in a breach does not mean your account has been taken over, but it does mean you should avoid reusing passwords and should enable two-factor authentication wherever it is available.
Two-Factor Authentication
Authenticator apps provide time-based codes that attackers cannot guess, even when armed with a reused password. Aegis Authenticator is a free, open-source option for Android that stores your tokens in an encrypted vault with optional biometric unlock. It offers a clean interface with multiple themes, supports icons for quick identification and allows import and export from a wide range of other apps. Backups can be automatic, and you remain in full control, since the app works entirely offline without advertisements or tracking.
For users who prefer cloud backup and multi-device synchronisation, Authy from Twilio offers a popular alternative that pairs straightforward setup with secure backup and support for using tokens across more than one device. Both approaches strengthen accounts significantly, and the choice often comes down to whether you value local control above all else or prefer the convenience of synchronisation.
Password Management
Strong, unique passwords remain essential even alongside two-factor authentication. KeePassXC is a cross-platform password manager for Windows, macOS and Linux that keeps your credentials in an encrypted database stored wherever you choose, rather than on a vendor's servers. It is free and open source under the GPLv3 licence, and its development process is publicly visible on GitHub.
The project has undergone rigorous external scrutiny. On the 17th of November 2025, KeePassXC version 2.7.9 was awarded a Security Visa by the French National Cybersecurity Agency (ANSSI) under its First-level Security Certification (CSPN) programme, with report number ANSSI-CSPN-2025/16. The certification is valid for three years and is recognised in France and by the German Federal Office for Information Security. More recent releases such as version 2.7.11 focus on bug fixes and usability improvements, including import enhancements, better password-generation feedback and refinements to browser integration. Because data are stored locally, you can place the database in a private or shared cloud folder if you wish to sync between devices, while encryption remains entirely under your control.
Secure Email with Tuta
Email is a frequent target for attackers and a common source of data leakage, so the choice of client can make a meaningful difference. Tuta provides open-source desktop applications for Linux, Windows and macOS that bring its end-to-end encrypted mail and calendar to the desktop with features that go beyond the web interface. The clients are signed so that updates can be verified independently, and Tuta publishes its public key, so users can confirm signatures themselves.
There is a particular focus on Linux, with support for major distributions including Ubuntu, Debian, Fedora, Arch Linux, openSUSE and Linux Mint. Deep operating-system integration enables conveniences such as opening files as attachments directly from context menus on Windows via MAPI, setting Tuta as the default mail handler, using the system's secret storage and applying multi-language spell-checking. Hardware key support via U2F is available across all desktop clients, and offline mode means previously indexed emails, calendars and contacts remain accessible without an internet connection.
Tuta does not support IMAP because downloading and storing messages unencrypted on devices would undermine its end-to-end encryption model. Instead, features such as import and export are built directly into the clients; paid plans including Legend and Unlimited currently include email import that encrypts messages locally before uploading them. The applications are built on Electron to maintain feature parity across platforms, and Tuta offers the desktop clients free to all users to ensure that core security benefits are not gated behind a subscription.
Bringing Culture and Tooling Together
These individual strands reinforce one another when combined. A network-wide blocker reduces exposure to malvertising and tracking while nudging everyone in a household or office towards safer defaults. Small device-level settings cut noise without removing protection, which helps people maintain good habits because security becomes less intrusive. Visibility tools demystify what the internet can see and how browsers behave, which builds confidence. Password managers and authenticator apps make strong credentials and second factors the norm rather than the exception, and a secure email client protects communications by default.
None of these steps requires perfection, and each can be introduced one at a time. The key is to focus on outcomes, think like a coach and make security personal, so that habits take root and last.
There is no single fix that will stop every attack. One approach that does help is consistent behaviour supported by thoughtful choices of software and services. Start with one change that removes friction while adding protection, then build from there. Over time, those choices shape a culture in which people feel they have a genuine role in keeping themselves and their organisations safe, and the technology they rely upon reflects that commitment.