Hardening WordPress on Ubuntu and Apache: A practical layered approach
Protecting a WordPress site rarely depends on a single control. Practical hardening layers network filtering, a web application firewall (WAF), careful browser-side restrictions and sensible log-driven tuning. What follows brings together several well-tested techniques and the precise commands needed to get them working, while also calling out caveats and known changes that can catch administrators out. The focus is on Ubuntu and Apache with ModSecurity and the OWASP Core Rule Set for WordPress, but complementary measures round out a cohesive approach. These include a strict Content Security Policy, Cloudflare or Nginx rules for form spam, firewall housekeeping for UFW and Docker, targeted network blocks and automated abuse reporting with Fail2Ban. Where solutions have moved on, that is noted so you do not pursue dead ends.
The Web Application Firewall
ModSecurity and the OWASP Core Rule Set
ModSecurity remains the most widespread open-source web application firewall and has been under the custodianship of the OWASP Foundation since January 2024, having previously been stewarded by Trustwave for over a decade. It integrates closely with the OWASP Core Rule Set (CRS), which aims to shield web applications from a wide range of attacks including the OWASP Top Ten, while keeping false alerts to a minimum. There are two actively maintained engines: 2.9.x is the classic Apache module and 3.x is the newer, cross-platform variant. Whichever engine you pick, the rule set is the essential companion. One important update is worth stating at the outset: CRS 4 replaces exclusion lists with plugins, so older instructions that toggle CRS 3's exclusions no longer apply as written.
Installing ModSecurity on Ubuntu
On Ubuntu 24.04 LTS, installing the Apache module is straightforward. The universe repository ships libapache2-mod-security2 at version 2.9.7, which meets the 2.9.6 minimum required by CRS 4.x, so no third-party repository is needed. You can fetch and enable ModSecurity with the following commands:
sudo apt install libapache2-mod-security2
sudo a2enmod security2
sudo systemctl restart apache2
It is worth confirming the module is loaded before you proceed:
apache2ctl -M | grep securityThe default configuration runs in detection-only mode, which does not block anything. Copy the recommended file into place and then edit it so that SecRuleEngine On replaces SecRuleEngine DetectionOnly:
sudo cp /etc/modsecurity/modsecurity.conf-recommended /etc/modsecurity/modsecurity.confOpen /etc/modsecurity/modsecurity.conf and make the change, then restart Apache once more to apply it.
Pulling in the Core Rule Set
The next step is to pull in the latest Core Rule Set and wire it up. A typical approach is to clone the upstream repository, move the example setup into place and move the directory named rules into /etc/modsecurity:
cd
git clone https://github.com/coreruleset/coreruleset.git
cd coreruleset
sudo mv crs-setup.conf.example /etc/modsecurity/crs-setup.conf
sudo mv rules/ /etc/modsecurity/
Now adjust the Apache ModSecurity include so that the new crs-setup.conf and all files in /etc/modsecurity/rules are loaded. On Ubuntu, that is governed by /etc/apache2/mods-enabled/security2.conf. Edit this file to reference the new paths, remove any older CRS include lines that might conflict, and then run:
sudo systemctl restart apache2On Ubuntu 26.04 (due for release in April 2026), the default installation includes a pre-existing CRS configuration at /etc/modsecurity/crs/crs-setup.conf. If this is left in place alongside your own cloned CRS, Apache will fail to start with a Found another rule with the same id error. Remove it before restarting:
sudo rm -f /etc/modsecurity/crs/crs-setup.confWordPress-Specific Allowances in CRS 3
WordPress tends to work far better with CRS when its application-specific allowances are enabled. With CRS 3, a variable named tx.crs_exclusions_wordpress can be set in crs-setup.conf to activate those allowances. The commented "exclusions" block in that file includes a template SecAction with ID 900130 that sets application exclusions. Uncomment it and reduce it to the single line that enables the WordPress flag:
SecAction
 "id:900130,
  phase:1,
  nolog,
  pass,
  t:none,
  setvar:tx.crs_exclusions_wordpress=1"
Reload Apache afterwards with sudo service apache2 reload. If you are on CRS 4, do not use this older mechanism. The project has replaced exclusions with a dedicated WordPress rule exclusions plugin, so follow the CRS 4 plugin documentation instead. The WPSec guide to ModSecurity and CRS covers both the CRS 3 and CRS 4 approaches side by side if you need a reference that bridges the two versions.
Log Retention and WAF Tuning
Once the WAF is enforcing, logs become central to tuning. Retention is important for forensics as well as for understanding false positives over time, so do not settle for the default two weeks. On Ubuntu, you can extend Apache's logrotate configuration at /etc/logrotate.d/apache2 to keep weekly logs for 52 weeks, giving you a year of history to hand.
If you see Execution error – PCRE limits exceeded (-8) in the ModSecurity log, increase the following in /etc/modsecurity/modsecurity.conf to give the regular expression engine more headroom:
SecPcreMatchLimit 1000000
SecPcreMatchLimitRecursion 1000000
File uploads can generate an Access denied with code 403 (phase 2). Match of "eq 0" against "MULTIPART_UNMATCHED_BOUNDARY" required error. One remedy used in practice is to comment out the offending check around line 86 of modsecurity.conf and then reload. The built-in Theme Editor can trigger Request body no files data length is larger than the configured limit. Bumping SecRequestBodyLimit to 6000000 addresses that, again followed by a reload of Apache.
Whitelisting Rule IDs for Specific Endpoints
There are occasions where whitelisting specific rule IDs for specific WordPress endpoints is the most pragmatic way to remove false positives without weakening protection elsewhere. Creating a per-site or server-wide include works well; on Ubuntu, a common location is /etc/apache2/conf-enabled/whitelist.conf. For the Theme Editor, adding a LocationMatch block for /wp-admin/theme-editor.php that removes a small set of well-known noisy IDs can help:
<LocationMatch "/wp-admin/theme-editor.php">
  SecRuleRemoveById 300015 300016 300017 950907 950005 950006 960008 960011 960904 959006 980130
</LocationMatch>
For AJAX requests handled at /wp-admin/admin-ajax.php, the same set with 981173 added is often used. This style of targeted exclusion mirrors long-standing community advice: find the rule ID in logs, remove it only where it is truly safe to do so, and never disable ModSecurity outright. If you need help finding noisy rules, the following command (also documented by InMotion Hosting) summarises IDs, hostnames and URIs seen in errors:
grep ModSecurity /usr/local/apache/logs/error_log | grep "[id" |
  sed -E -e 's#^.*[id "([0-9]*).*hostname "([a-z0-9-_.]*)"].*uri "(.*?)".*"#1 2 3#' |
  cut -d" -f1 | sort -n | uniq -c | sort -n
Add a matching SecRuleRemoveById line in your include and restart Apache.
Browser-Side Controls: Content Security Policy
Beyond the WAF, browser-side controls significantly reduce the harm from injected content and cross-site scripting. A Content Security Policy (CSP) is both simple to begin and very effective when tightened. An easy starting point is a report-only header that blocks nothing but shows you what would have been stopped. Adding the following to your site lets you open the browser's developer console and watch violations scroll by as you navigate:
Content-Security-Policy-Report-Only: default-src 'self'; font-src 'self'; img-src 'self'; script-src 'self'; style-src 'self'From there, iteratively allowlist the external origins your site legitimately uses and prefer strict matches. If a script is loaded from a CDN such as cdnjs.cloudflare.com, referencing the exact file or at least the specific directory, rather than the whole domain, reduces exposure to unrelated content hosted there. Inline code is best moved to external files. If that is not possible, hashes can allowlist specific inline blocks and nonces can authorise dynamically generated ones, though the latter must be unpredictable and unique per request. The 'unsafe-inline' escape hatch exists but undermines much of CSP's value and is best avoided.
Once the console is clean, you can add real-time reporting to a service such as URIports (their guide to building a solid CSP is also worth reading) by extending the header:
Content-Security-Policy-Report-Only: default-src 'self'; ...; report-uri https://example.uriports.com/reports/report; report-to defaultPair this with a Report-To header so that you can monitor and prioritise violations at scale. When you are satisfied, switch the key from Content-Security-Policy-Report-Only to Content-Security-Policy to enforce the policy, at which point browsers will block non-compliant content.
Server Fingerprints and Security Headers
While working on HTTPS and header hardening, it is useful to trim server fingerprints and raise other browser defences, and this Apache security headers walkthrough covers the rationale behind each directive clearly. Apache's ServerTokens directive can be set in /etc/apache2/apache.conf to mask version details. Options range from Full to Prod, with the latter sending only Server: Apache. Unsetting X-Powered-By in /etc/apache2/httpd.conf removes PHP version leakage. Adding the following headers in the same configuration file keeps responses out of hostile frames, asks browsers to block detected XSS and prevents MIME type sniffing:
X-Frame-Options SAMEORIGIN
X-XSS-Protection 1;mode=block
X-Content-Type-Options nosniff
These are not replacements for fixes in application code, but they do give the browser more to work with. If you are behind antivirus products or corporate HTTPS interception, bear in mind that these can cause certificate errors such as SEC_ERROR_UNKNOWN_ISSUER or MOZILLA_PKIX_ERROR_MITM_DETECTED in Firefox. Disabling encrypted traffic scanning in products like Avast, Bitdefender or Kaspersky, or ensuring enterprise interception certificates are correctly installed in Firefox's trust store, resolves those issues. Some errors cannot be bypassed when HSTS is used or when policies disable bypasses, which is the intended behaviour for high-value sites.
Contact Form Spam
Contact form spam is a different but common headache. Analysing access logs often reveals that many automated submissions arrive over HTTP/1.1 while legitimate traffic uses HTTP/2 with modern browser stacks, and this GridPane analysis of a real spam campaign confirms the pattern in detail. That difference gives you something to work with.
Filtering by Protocol in Cloudflare
You can block or challenge HTTP/1.x access to contact pages at the edge with Cloudflare's WAF by crafting an expression that matches both the old protocol and a target URI, while exempting major crawlers. A representative filter looks like this:
(http.request.version in {"HTTP/1.0" "HTTP/1.1" "HTTP/1.2"}
  and http.request.uri eq "/contact/"
  and not http.user_agent contains "Googlebot"
  and not http.user_agent contains "Bingbot"
  and not http.user_agent contains "DuckDuckBot"
  and not http.user_agent contains "facebot"
  and not http.user_agent contains "Slurp"
  and not http.user_agent contains "Alexa")
Set the action to block or to a managed challenge as appropriate.
Blocking Direct POST Requests Without a Valid Referrer
Another useful approach is to cut off direct POST requests to /wp-admin/admin-ajax.php and /wp-comments-post.php when the Referer does not contain your domain. In Cloudflare, this becomes:
(http.request.uri contains "/wp-admin/admin-ajax.php"
  and http.request.method eq "POST"
  and not http.referer contains "yourwebsitehere.com")
or
(http.request.uri contains "/wp-comments-post.php"
  and http.request.method eq "POST"
  and not http.referer contains "yourwebsitehere.com")
The same logic can be applied in Nginx with small site includes that set variables based on $server_protocol and $http_user_agent, then return 403 if a combination such as HTTP/1.1 on /contact/ by a non-whitelisted bot is met. It is sensible to verify with Google Search Console or similar that legitimate crawlers are not impeded once rules are live.
Complementary Mitigations Inside WordPress
Three complementary tools work well alongside the server-side measures already covered. The first is WP Armour, a free honeypot anti-spam plugin that adds a hidden field to comment forms, contact forms and registration pages using JavaScript. Because spambots cannot execute JavaScript, the field is never present in a genuine submission, and any bot that attempts to fill it is rejected silently. No CAPTCHA, API key or subscription is required, and the plugin is GDPR-compliant with no external server calls.
The second measure is entirely native to WordPress. Navigate to Settings, then Discussion and tick "Automatically close comments on articles older than X days." Spammers disproportionately target older content because it tends to be less actively monitored, so setting this to 180 days significantly reduces spam without affecting newer posts where discussion is still active. The value can be adjusted to suit the publishing cadence of the site.
The third layer is Akismet, developed by Automattic. Akismet passes each comment through its cloud-based filter and marks likely spam before it ever appears in the moderation queue. It is free for personal sites and requires an API key obtained from the Akismet website. Used alongside WP Armour, the two cover different vectors: WP Armour stops most bot submissions before they are processed at all, while Akismet catches those that reach the comment pipeline regardless of origin. Complementing both, reCAPTCHA v3 or hCaptcha (where privacy demands it) and simple "bot test" questions remain useful additions, though any solution that adds heavy database load warrants testing before large-scale deployment.
Host-Level Firewalls: UFW and Docker
Host-level firewalls remain important, particularly when Docker is in the mix. Ubuntu's UFW is convenient, but Docker's default iptables rules can bypass UFW and expose published ports to the public network even when ufw deny appears to be in place. One maintained solution uses the kernel's DOCKER-USER chain, so UFW regains control without disabling Docker's iptables management.
Appending a short block to /etc/ufw/after.rules that defines ufw-user-forward, a ufw-docker-logging-deny target and a DOCKER-USER chain, then jumps from DOCKER-USER into ufw-user-forward, allows UFW to govern forwarded traffic. Returning early for RELATED,ESTABLISHED connections, dropping invalid ones, accepting docker0-to-docker0 traffic and returning for RFC 1918 source ranges preserves internal communications. New connection attempts from public networks destined for private address ranges are logged and dropped, with a final RETURN handing off to Docker's own rules for permitted flows.
Restart UFW to activate the change:
sudo systemctl restart ufw
# or
sudo ufw reload
From that point, you can allow external access to a container's service port:
ufw route allow proto tcp from any to any port 80Or scope to a specific container IP if needed:
ufw route allow proto tcp from any to 172.17.0.2 port 80UDP rules follow the same pattern. If you prefer not to edit by hand, the UFW-docker helper script can install, check and manage these rules for you. It supports options to auto-detect Docker subnets, supports IPv6 by enabling ip6tables and a ULA (Unique Local Address) range in /etc/docker/daemon.json and can manage Swarm service exposure from manager nodes.
Should you instead use Firewalld, note that it provides a dynamically managed firewall with zones, a D-Bus API and runtime versus permanent configuration separation. It is the default in distributions such as RHEL, CentOS, Fedora and SUSE, and it also works with Docker's iptables backend, though the interaction model differs from UFW's.
Keeping Firewall Rules Tidy
Keeping firewall rules tidy is a small but useful habit. UFW can show verbose and numbered views of its state, as Linuxize's UFW rules guide explains in full:
sudo ufw status verbose
sudo ufw status numbered
Delete rules safely by number or by specification:
sudo ufw delete 4
sudo ufw delete allow 80/tcp
If you are scripting changes, the --force flag suppresses the interactive prompt. Take care never to remove your SSH allow rule when connected remotely, and remember that rule numbers change after deletions, so it is best to list again before removing the next one.
Logging Abusers with Fail2Ban and AbuseIPDB
Logging abusers and reporting them can reduce repeat visits. Fail2Ban watches logs for repeated failures and bans IPs by updating firewall rules for a set period. It can also report to AbuseIPDB via an action that was introduced in v0.10.0 (January 2017), which many installations have today.
Confirm that /etc/fail2ban/action.d/abuseipdb.conf exists and that your /etc/fail2ban/jail.local defines action_abuseipdb = abuseipdb. Within each jail that you want reported, add the following alongside your normal ban action, using categories that match the jail's purpose, such as SSH brute forcing:
%(action_abuseipdb)s[abuseipdb_apikey="my-api-key", abuseipdb_category="18,22"]Reload with fail2ban-client reload and watch your AbuseIPDB reported IPs page to confirm submissions are flowing. If reports do not arrive, check /var/log/fail2ban.log for cURL errors and ensure your API key is correct, bearing in mind default API limits and throttling. Newer Fail2Ban versions (0.9.0 and above) use a persistent database, so re-reported IPs after restart are less of a concern. If you run older releases, a wrapper script can avoid duplicates by checking ban times before calling the API.
Blocking Provider Ranges
Occasionally, administrators choose to block traffic from entire provider ranges that are persistent sources of scanning or abuse. There are scripts such as the AWS-blocker tool that fetch the official AWS IPv4 and IPv6 ranges and insert iptables rules to block them all, and community posts such as this rundown of poneytelecom.eu ranges that shares specific ranges associated with problematic hosts for people who have seen repeated attacks from those networks. Measures like these are blunt instruments that can have side effects, so they warrant careful consideration and ongoing maintenance if used at all. Where possible, it is preferable to block based on behaviour, authentication failures and reputation rather than on broad ownership alone.
Final ModSecurity Notes: Chasing False Positives
Two final ModSecurity notes help when chasing false positives. First, WordPress comments and posting endpoints can trip generic SQL injection protections such as rule 300016 when text includes patterns that appear dangerous to a naive filter, a well-documented occurrence that catches many administrators out. Watching /etc/httpd/logs/modsec_audit.log or the Apache error log immediately after triggering the offending behaviour, and then scoping SecRuleRemoveById lines to the relevant WordPress locations such as /wp-comments-post.php and /wp-admin/post.php, clears real-world issues without turning off protections globally. Second, when very large responses are legitimately expected in parts of wp-admin, increasing SecResponseBodyLimit in an Apache or Nginx ModSecurity context can be more proportionate than whitelisting many checks at once. Always restart or reload Apache after changes so that your edits take effect.
Defence in Depth
Taken together, these layers complement each other well. ModSecurity with CRS gives you broad, configurable protection at the HTTP layer. CSP and security headers narrow the browser's attack surface and put guardrails in place for any client-side content issues. Targeted edge and server rules dampen automated spam without hindering real users or crawlers. Firewalls remain the bedrock, but modern container tooling means integrating UFW or Firewalld with Docker requires a small amount of extra care. Logs feed both your WAF tuning and your ban lists, and when you report abusers you contribute to a wider pool of threat intelligence. None of this removes the need to keep WordPress core, themes and plugins up to date, but it does mean the same attacks are far less likely to succeed or even to reach your application in the first place.
Running LanguageTool locally for privacy and unlimited checking
The search for a Grammarly replacement that offered more flexibility led here: LanguageTool, a capable grammar, spelling and style checker that works across a wide range of platforms. After some research, it emerged as the right fit, and it has been working well in daily use since, covering both browser extensions for general writing and a local instance for editing in VS Code. It supports more than 30 languages and integrates with browsers including Chrome, Chromium, Ungoogled-Chromium, Edge, Firefox and Opera, with mail clients such as Gmail and Thunderbird, and with office suites including LibreOffice, Apache OpenOffice, Microsoft Word and Google Docs. Whilst the service can be used via cloud APIs, there are many reasons to run it locally, among them the removal of text length limits that apply to cloud requests and the benefit of keeping content on the machine in question rather than sending it to remote servers.
The LibreOffice 7.4 Change and Why Local Matters
A change in LibreOffice from version 7.4 highlights why a local server is attractive. LanguageTool stopped being an add-on and became part of LibreOffice's code, but that shift brought constraints. Where the old add-on imposed no text size cap, the integrated checker limits free requests to 10,000 characters and Premium to 100,000 characters, and it sends content to LanguageTool's servers in Germany for processing, which many will consider a privacy concern. Similar cloud-based behaviour is the default for browser and mail client extensions, and running a small HTTP server locally avoids these issues entirely, restoring unlimited text size and keeping all checking on the machine.
Setting Up the Java Server
The simplest way to install LanguageTool on both Linux and macOS is via Homebrew. The formula handles Java automatically, removing the need to install or manage a runtime separately. Two commands are all that is required:
brew install languagetool
brew services start languagetool
The second command registers LanguageTool as a managed service so that it starts automatically at login, with no need for a separate startup script. The server listens on port 8081 by default. Updates are then handled in the same way as any other Homebrew package:
brew update && brew upgrade languagetoolManual Installation via ZIP
For those who prefer not to use Homebrew, the manual route remains available. The Linux Mint forum tutorial linked above covers each step in full. Java 8 or later is required, and the openjdk-11-jre package in Linux Mint's repositories suffices for this purpose. The LanguageTool desktop bundle can be downloaded as LanguageTool-stable.zip, and the archive extracts to a versioned directory such as LanguageTool-5.9. Moving that directory to /home/username/opt and renaming it to LanguageTool simplifies paths considerably.
A file named LTserver.sh in /home/username/opt can then launch the server:
nohup java -cp ~/opt/LanguageTool/languagetool-server.jar org.languagetool.server.HTTPServer --port 8081 --allow-origin > /dev/null 2>&1 &The nohup command at the start and the & at the end keep the service alive after its terminal closes and start it in the background, whilst > /dev/null 2>&1 silences output. Making the script executable and adding it to Startup Applications in a desktop environment such as MATE (with a brief delay after login) produces an automatic launch on sign-in. Those who prefer a manual approach can omit nohup … & and simply close the terminal to stop the server.
Confirming the Server Is Working
A simple request confirms that everything is working. Visiting the test URL in a browser returns JSON output showing the software version and a sample match, explaining that the sentence should begin with an uppercase letter. If the server is not running, the browser will show a connection refused message instead. On one user's hardware, the idle server consumed roughly 816 MB of RAM, which rose slightly during active checking.
With the process confirmed, browser and mail extensions can be directed away from the cloud to the local endpoint by opening their advanced options and selecting the local server at localhost. LibreOffice 7.4 users can also connect the integrated checker to the local service by setting the base URL to http://localhost:8081/v2 under Tools > Options > Languages and Locales > LanguageTool Server.
A Note on Startup Reliability (Manual Installation)
For those using the manual ZIP installation, there is a small operational note worth knowing from community experience. One user reported that the server did not start automatically at login despite the startup entry being present, and adding a short diagnostic to the beginning of the script caused it to start reliably. The following lines served only to write a timestamp to a log file, yet after inserting them the server came up as expected:
dt=$(date '+%d/%m/%Y %H:%M:%S')
echo "LanguageTool started successfully at" "$dt" >> /home/username/bin/LTserver.log
The underlying cause was not identified and could have been a subtle formatting or timing quirk, but the observation may help others encountering the same behaviour. It is worth trying this addition if automatic startup proves unreliable.
Network Security and Keeping the Server Updated
LanguageTool's HTTP server offers further configuration that affects accessibility. A single-user setup should keep the machine's firewall blocking incoming connections so that only localhost can reach the service. If the machine is to host LanguageTool for an internal network, adding --public to the server command line allows access from other devices, making the full command:
nohup java -cp ~/opt/LanguageTool/languagetool-server.jar org.languagetool.server.HTTPServer --port 8081 --allow-origin --public > /dev/null 2>&1 &In that case, the firewall should allow incoming connections to port 8081 from local addresses, whilst denying others. Any instance reachable from the wider internet is best placed behind an Apache or nginx reverse proxy with TLS. Updates are handled by checking the download page periodically, extracting the latest LanguageTool-stable.zip and copying its contents into ~/opt/LanguageTool.
Running LanguageTool via Docker
Those who prefer containerised services can run LanguageTool under Docker and still keep traffic within a home or office network. A widely used image is erikvl87/languagetool, which exposes the HTTP server on port 8010 and accepts optional configuration via environment variables. A concise docker-compose.yml maps the port, binds a volume for optional n-gram data and tunes the Java heap, as shown below:
version: "3"
services:
  languagetool:
    image: erikvl87/languagetool
    ports:
      - 8010:8010
    environment:
      - langtool_languageModel=/ngrams
      - Java_Xms=512m
      - Java_Xmx=1g
    volumes:
      - ./ngrams:/ngrams
The langtool_languageModel=/ngrams environment variable enables the large n-gram data sets for German, English, Spanish, French and Dutch, which help with commonly confused words such as "their" and "there". The image defaults to a 256 MB minimum heap and a 512 MB maximum, and the settings above increase those values. To bind only to the local machine, changing the published port to localhost:8010:8010 prevents remote access. With the compose file in place, sudo docker-compose up -d starts the service in the background.
Integrating with Visual Studio Code
The VS Code integration is the centrepiece of this setup for local editing. A practical walkthrough on GNU/Linux.ch covers exactly this configuration, using the same Docker image described above. In Visual Studio Code, the LanguageTool Linter extension by David L. Day integrates checking into the editor. Installation can be done through the Extensions view or by running ext install davidlday.languagetool-linter from VS Code's command palette (Ctrl+P).
The extension's settings then need the LanguageTool server address, which should be set to http://127.0.0.1:8010 when the container runs on the same machine, or to the server's IP and port (for example http://192.168.0.2:8010) when it runs elsewhere on the local network. For a quick trial without running a server, the public API can be selected, though that brings the same limitations and privacy considerations as any cloud use. With the local endpoint configured, open Markdown files are checked continually, and possible issues are flagged with quick fixes available from within the editor.
Managing Rules and Disabling Checks
LanguageTool allows fine-grained control over which checks are active, and the official guide to enabling and disabling rules sets out five important points before getting into the steps. Rules cover grammar, spelling, punctuation and style, and they are all enabled by default. Some are available only to Premium users. Turning off "Picky Mode" automatically disables certain classes such as style suggestions, so behaviour may change noticeably after doing so. Rules can be disabled in add-ons and extensions, and once turned off there, they can only be re-enabled via those same add-ons.
In LanguageTool's online editor, clicking "Ignore" in the dialogue box that appears will disable a rule only for the current text, and the same applies if "Ignore in this text" is chosen from the list of issues on the right-hand panel. When a permanent toggle is wanted during browser-based use, selecting "Turn off rule everywhere" in the add-on disables it across documents until it is switched back on.
Re-enabling Disabled Rules
Re-enabling rules in an add-on follows a consistent pattern. In the Chrome extension on a Google Doc, clicking the LanguageTool icon or the error indicator opens the panel, and the settings cog at the bottom right leads to configuration. Scrolling down reveals the "Disabled rules" section, and hovering over an entry shows "Click to enable rule", which restores the individual check immediately. If a broad reset is needed, choosing "Enable all" turns everything back on at once, and the same approach applies across the other add-ons even if the precise placement varies slightly.
Command-Line Use for Bulk Text and Automation
For those who want to use LanguageTool on the command line, the Tips and Tricks page documents several switches and workflows that help with bulk text and automation. The tagger can be run without rule checking by adding --taggeronly or -t, which is useful when tagging large corpora. Input can also come from standard input by using - as the filename, so LanguageTool can sit in a pipeline. The following command processes substantial input and has been used with multi-gigabyte text:
java -jar languagetool-commandline.jar -l <language> -c <encoding> -t <corpus_file> > <tagged_corpus_file>Automatic application of suggestions is enabled with --apply or -a, in which case only the first suggestion per rule is used, and the output is the corrected text. Because only a basic check ensures that the original error is still present before a suggestion is applied, it is wise to enable only reliable rules with -e or disable known problematic ones with -d. If a round of changes would introduce issues that other rules would catch, running LanguageTool again on the output resolves them in a second pass.
Collecting matches and tags for separate analysis is equally simple with the following command:
java -jar languagetool-commandline.jar -l <language> -c <encoding> <file> > results.txt 2> tags.txtThis writes rule matches to results.txt and part-of-speech tags to tags.txt. Developers working on rules will find that verbose mode (invoked with -v) prints helpful metadata including the XML line number for a rule or subrule inside a <rulegroup>, which pinpoints the exact location when debugging.
Adding Custom Rules Without Modifying Core Files
Adding or packaging rules for long-term reuse is supported without modifying core files, as the Tips and Tricks page explains in detail. From version 6.0, LanguageTool loads an optional grammar_custom.xml placed alongside a language's grammar.xml, and the custom file can define rules that survive upgrades provided their IDs do not collide with existing ones. Alternatively, an external file can be referenced by declaring an entity near the top of grammar.xml:
<!ENTITY UserRules SYSTEM "file:///path/to/user-rules.xml">Inserting &UserRules; inside an appropriate <category> then pulls in those rules. For external rules, setting external="yes" on each category suppresses the link to community rule details, which would otherwise be shown in the stand-alone GUI.
Writing and Testing Rules
Writing robust rules involves understanding negation and structural nuances. Negation can apply to tokens, to parts of speech, or via exceptions, though care is needed because negating a token with a SENT_END tag will match any end-of-sentence token rather than excluding it. Tokens can be constrained by whether whitespace precedes them using the spacebefore attribute, which helps when matching punctuation or quotation marks. Suggestions can adjust case with case_conversion, and more involved changes can rely on regular expressions inside a <match> element to alter parts of a word whilst preserving intended capitalisation.
Testing rules pays dividends during development. The bundled testrules.sh (or its Windows counterpart) runs unit-style checks and validates XML, and passing a two-letter language code limits the run to a single language. Maven can also be used with mvn clean test. When a suggestion is generated programmatically rather than as a fixed string, adding a correction attribute to an incorrect example asserts what the final suggestion should be and causes a test failure if it diverges. Context-sensitive rules for commonly confused words can avoid false positives by including exceptions for words that indicate the correct usage, as in a Dutch example distinguishing "aanvaart" and "aanvaardt" where the presence of "boot" or "haven" suppresses the warning.
Finding Good Rule Examples with Corpus Tools
Finding good examples for rule development benefits from corpus tools, and the Tips and Tricks page covers this and much more besides. For English, the Google Web 1T 5-Gram Database can be queried by searching for `xyz *` to see common following words or `* xyz` to see common preceding words, which grounds a rule in real usage rather than conjecture. The Corpus of Contemporary American English offers KWIC display to view neighbour words around a query and may request registration after several searches.
Both the 1T data and COCA skew towards American English, however, so those working on British English rules will find the British National Corpus more appropriate, being 100 million words of British English searchable through the same interface. For a broader view across multiple varieties of English, including British, Australian, Irish and South African, the Corpus of Global Web-Based English covers 20 national varieties and is freely available on the same platform. For other languages that LanguageTool supports, corpus availability varies considerably, and the LanguageTool developer documentation is the best starting point for finding suitable resources for a given language.
A Private, Flexible and Useful Toolkit
What began as a search for a more flexible Grammarly alternative has settled into a setup that covers two distinct use cases: browser extensions for everyday writing in web applications, and a local server feeding the VS Code extension for longer-form editing. A local LanguageTool server removes size limits and keeps content on the machine, fitting neatly behind LibreOffice's integrated checker, within browser and mail extensions and inside editors such as VS Code. The sources gathered during those early days of getting this running are what inform this account, and the configuration has been working well enough for the purpose since. Rules can be tuned or switched off where they hinder rather than help, then restored easily when needed. Keeping the server updated and placed behind sensible network boundaries rounds out a setup that serves everyday writing as well as more specialised tasks.
The Fediverse: A decentralised alternative to centralised social media
The Fediverse is not a single platform but a network of interconnected services, each operating independently yet communicating through shared open standards. Rather than centralising power in one company or product, it distributes control across thousands of independently run servers, known as instances, that nonetheless talk to one another through a common language. That language has a longer history than most users realise.
Those with long memories of the federated web may recall Identica, one of the earliest federated microblogging services, which ran on the OStatus protocol. In December 2012, Identica transitioned to new underlying software called pump.io, which took a different architectural approach: rather than relying on OStatus, it used JSON-LD and a REST-based inbox system designed to handle general activity streams rather than simple status updates. In time, pump.io itself eventually would be discontinued, but it was not a dead end. Its data model and design decisions fed directly into the development of what became ActivityPub, the protocol that now underpins the modern Fediverse.
ActivityPub became a W3C Recommendation in January 2018, formalising an approach to federated social networking that Identica and pump.io had helped to pioneer. Through this standard, users on different platforms can follow, reply to and interact with one another across server and software boundaries, in much the same way that email allows a Gmail user to correspond with someone on Outlook.
Microblogging at the Core
At the heart of the Fediverse is a cluster of microblogging platforms, each with its own character and community. Mastodon, the most widely used, mirrors much of what Twitter once offered but with a firm emphasis on community governance and decentralised ownership. Its character limit of 500 characters and the absence of algorithmic ranking set it apart from the mainstream.
Misskey, which enjoys particular popularity in Japan, introduces custom emoji reactions and extensive rich-text formatting, appealing to users who want greater expressiveness than Mastodon provides. Pleroma offers a lightweight alternative with a default character limit of 5,000, making it more suitable for longer posts, while Akkoma (a fork of Pleroma) adds features such as a bubble timeline, local-only posting and improved moderation tooling. Both are well regarded among technically minded administrators who want to run their own servers without the resource demands that Mastodon can place on smaller machines.
Beyond Microblogging
The Fediverse extends well beyond short-form text. PeerTube provides a decentralised video-hosting platform comparable in purpose to YouTube, using peer-to-peer technology so that popular videos gain additional bandwidth as viewership grows. Pixelfed fulfils a similar role for photo sharing, operating as an open and federated counterpart to Instagram, with a focus on privacy and user control.
For forum-style discussion, Lemmy takes the role of a decentralised Reddit, built around threaded community posts, voting and link aggregation. Event coordination is handled by Mobilizon, which provides a federated alternative to Facebook Events and allows communities to publish, share and manage gatherings without relying on any proprietary platform.
Audio is covered by Funkwhale, a federated platform for uploading and sharing music, podcasts and other audio content. It operates through ActivityPub and functions as a community-driven alternative to services such as Spotify, Bandcamp and SoundCloud, allowing instance operators to share their libraries with one another across the network.
Each of these services runs independently on its own set of instances but remains interconnected across the wider Fediverse through ActivityPub, meaning a Mastodon user can, for instance, follow a PeerTube channel and see new video posts appear directly in their timeline.
Social Networking and Multi-Protocol Platforms
Some Fediverse platforms aim less at replicating a single mainstream service and more at providing a broad social networking experience. Friendica is perhaps the most ambitious of these, supporting not only ActivityPub but also the diaspora* and OStatus protocols, as well as RSS feed ingestion and two-way email contacts. The result is a platform that can serve as a hub for a user's entire federated social life, pulling in posts from Mastodon, Pixelfed, Lemmy and other networks into a single, unified timeline. Its Facebook-like interface, with threaded comments and no character limit, makes it a natural fit for users who found Twitter-style microblogging too constraining.
Hubzilla takes a similarly expansive approach, but pushes further still, incorporating file hosting, photo sharing, a calendar and website publishing alongside its social networking features. Its distinguishing characteristic is nomadic identity, a system by which a user's account can exist simultaneously across multiple servers and be migrated or cloned without loss of data or followers. Hubzilla federates over ActivityPub, the diaspora* protocol, OStatus and its own native Zot protocol, giving it an unusually wide reach across the federated web.
Having launched in 2010, diaspora is one of the earliest decentralised social networks. It operates through its own diaspora protocol rather than ActivityPub, making it technically distinct from much of the rest of the Fediverse, though it can still communicate with platforms such as Friendica and Hubzilla that support both standards. Its central design principle is user ownership of data: posts are stored on the user's chosen server (called a pod) and the platform uses an Aspects system to let users control precisely which groups of contacts see any given post, offering fine-grained privacy controls that most other Fediverse platforms do not match.
Infrastructure and Discovery
Navigating the Fediverse is made easier by a range of supporting tools and directories. Fedi.Directory catalogues interesting and active accounts across the network, helping newcomers find communities aligned with their interests. Fediverse.Party offers an overview of the many software projects that make up the ecosystem, acting as a starting point for those deciding which platform or instance to join.
For bloggers who already maintain an RSS feed, tools such as Mastofeed can automatically publish new posts to a Mastodon account, bringing older publishing workflows into the federated network. Those who prefer more control over what gets posted and how it is worded may find a better fit in toot, a command-line and terminal user interface client for Mastodon written in Python. Because toot accepts piped input, it can be combined with a script or an AI model to generate a short, readable announcement for each new article, complete with a link, and post it directly to Mastodon without any manual intervention. This kind of bridging reflects the Fediverse's broader philosophy: existing content and communities should be able to participate without requiring users to abandon what already works for them.
Community Governance and Its Challenges
The challenge of moderating online communities is not new. Website forums, which dominated community discussion through the late 1990s and 2000s, often became ungovernable at scale, with administrators struggling to maintain civility against a tide of bad-faith participation that no small volunteer team could reliably contain. Centralised platforms such as Twitter and Facebook presented themselves as a solution, with algorithmic moderation and corporate policy appearing to offer consistency at scale. That promise has not aged well. Discourse on those platforms has deteriorated markedly, and the tools that were supposed to manage it have proved either ineffective or applied so inconsistently as to erode trust in the platforms themselves.
The Fediverse's instance-based model sits in an instructive position relative to both of those histories. Like the old forum model, each instance is self-governing, with administrators setting their own rules and moderating their own communities. Unlike a standalone forum, however, an instance has a tool that forum administrators never possessed: the ability to defederate, cutting off contact with a badly behaved community entirely rather than having to manage it directly. The European Commission operates its own official Mastodon instance, as does the European Data Protection Supervisor, reflecting a growing interest among public institutions in this kind of platform independence and controlled self-governance.
The model is not without its own difficulties. With no central authority, ensuring consistent moderation across the network is impossible by design. Harmful content that might be removed swiftly on a centralised platform can persist on instances that choose not to act, and defederation, while effective, is a blunt instrument that severs all contact rather than addressing specific behaviour. User experience also varies considerably from one instance to the next, which can make the Fediverse feel fragmented to those accustomed to the uniformity of mainstream social media. Whether that fragmentation is a flaw or a feature depends largely on what one values more: consistency or autonomy.
A Democratic Model for the Open Web
What unifies these varied platforms, tools and governance approaches is a shared commitment to an internet where users are participants rather than products. The Fediverse offers no advertising and no algorithmic manipulation of feeds, and the open-source nature of most of its software means that anyone with the technical means can inspect, fork or improve the code. The network's future will depend on continued developer investment, user education and the willingness of new arrivals to engage with an ecosystem that is deliberately more complex than a single sign-up page.
For now, the Fediverse stands as a working demonstration that a more democratic and user-directed model of online social life is achievable. Whether through microblogging on Mastodon, sharing videos on PeerTube, discovering music on Funkwhale, coordinating events through Mobilizon or managing a rich personal social hub on Friendica, it offers something that centralised platforms structurally cannot: the ability for communities to own their own corner of the internet.
Generating commit messages and summarising text locally with Ollama running on Linux
For generating GitHub commit messages, I use aicommit, which I have installed using Homebrew on macOS and on Linux. By default, this needs access to the OpenAI API using a token for identification. However, I noticed that API usage is heavier than when I summarise articles using Python scripting. In the interest of cutting the load and the associated cost, I began to look at locally run LLM options. Here, I discuss things mainly from a Linux point of view, particularly since I use Linux Mint for daily work.
Hardware Considerations
That led me to Ollama, which also has a local API in the mould of what you get from OpenAI. It also offers a Python interface, which has plenty of uses. This experimentation began on an iMac, where macOS can access all the available memory, offering flexibility when it comes to model selection. On a desktop PC or workstation, the architecture is different, which means that you are dependent on GPU processing for added speed. Should the load fall on the CPU, the lag in performance cannot be missed. The situation can be seen from this command while an LLM is loaded:
ollama ps
That discovery was made at the end of 2024, prompting me to do a system upgrade that only partially addressed the need, even if a quieter cooler case was part of the new machine. Before that, I had tried a new Nvidia GeForce RTX 4060 graphics card with 8 GB of VRAM. That continued in use, though the amount of onboard memory meant that larger models overflowed into system memory, bringing the CPU in use, still substantially slowing processing. Though there are some reasonable models like llama3.1:8b that will fit within 8 GB of VRAM, that has limitations that became apparent with use. Hallucinations were among those, and that also afflicted alternative options.
That led me to upgrade to a GeForce RTX 5060 Ti with 16 GB of VRAM, which meant that larger models could be used. Two of these have become my choices for different tasks: gpt-oss for GitHub commit messages and qwen3:14b for summarising blocks of text (albeit with Anthropic's API for when the output is not to my expectations, not that it happens often). Both fit of these within the available memory, allowing for GPU processing without any CPU involvement.
Generating Commit Messages
To use aicommit with Ollama, the command needs to be changed to use the Ollama API, and it is better to define a function like this:
run_aicommit() { env OPENAI_BASE_URL="http://localhost:11434/v1" OPENAI_API_KEY="ollama" AICOMMIT_MODEL="gpt-oss" /home/linuxbrew/.linuxbrew/bin/aicommit "$@"; }
This avoids having to alter the values of any global variables, with the env command setting up an ephemeral environment within which these are available. Here, using env may not be essential, even if it makes things clearer. The shell variable names should be self-explanatory given the names, and this way of doing things does not clash with any global variables that are set. Since aicommit was added using Homebrew, the full path is defined to avoid any ambiguity for the shell. At the end, "$@" passes any parameters or modifiers like 2>/dev/null, which redirects stderr output so that it does not appear when the function is being called. While you need to watch the volume of what is being passed to it, this approach works well and mostly produces sensible commit messages.
Text Summarisation
For text generation with a Python script, using streaming helps to keep everything in hand. Here is the core code:
chunks = []
for part in ollama.chat(
    model=model,
    messages=[{'role': 'user', 'content': prompt}],
    options={'num_ctx': context, 'temperature': 0.2, 'top_p': 0.9},
    stream=True,
):
    chunks.append(part['message']['content'])

summary = re.sub(r'\s+', ' ', ''.join(chunks)).strip()
Above, a for loop iterates over each streamed chunk as it arrives, extracting the text content from part['message']['content'] and appending it to the chunks list. Once streaming is finished, ''.join(chunks) reassembles all the pieces into a single string. The re.sub(r'\s+', ' ', ...) call then collapses any intermediate sequences of whitespace characters (newlines, tabs, multiple spaces) down to a single space, and .strip() removes any leading or trailing whitespace, storing the cleaned result in summary.
Within the loop itself, an ollama.chat() call initiates an interaction with the specified model (defined as qwen3:14b earlier in the code), passing the user's prompt as a message. This is controlled by a few parameters, with num_ctx controlling the context window size and 4096 as the recommended limit to ensure that everything remains on the GPU. Defining a model temperature of 0.2 grounds the model to keep the output focussed and deterministic, while a top_p value of 0.9 applies nucleus sampling to filter the token pool. Setting stream=True means the model returns its response incrementally as a series of chunks, rather than waiting until generation is complete.
A Beneficial Outcome
Most of the time, local LLM usage suffices for my needs and reserves the use of remote models from the likes of OpenAI or Anthropic for when they add real value. The hardware outlay remains a sizeable investment, though, even if it adds significantly to one's personal privacy. For a long time, graphics cards have not interested me aside from basic functions like desktop display, making this a change from how I used to view such devices before the advent of generative AI.
A survey of commenting systems for static websites
This piece grew out of a practical problem. When building a Hugo website, I went looking for a way to add reader comments. The remotely hosted options I found were either subscription-based or visually intrusive in ways that clashed with the site design. Moving to the self-hosted alternatives brought a different set of difficulties: setup proved neither straightforward nor reliably successful, and after some time I concluded that going without comments was the more sensible outcome.
That experience is, it turns out, a common one. The commenting problem for static sites has no clean solution, and the landscape of available tools is wide enough to be disorienting. What follows is a survey of what is currently out there, covering federated, hosted and self-hosted approaches, so that others facing the same decision can at least make an informed choice about where to invest their time.
Federated Options
At one end of the spectrum sit the federated solutions, which take the most principled approach to data ownership. Federated systems such as Cactus Comments stand out by building on the Matrix open standard, a decentralised protocol for real-time communication governed by the Matrix.org Foundation. Because comments exist as rooms on the Matrix network, they are not siloed within any single server, and users can engage with discussions using an existing Matrix account on any compatible home server, or follow threads using any Matrix client of their choosing. Site owners, meanwhile, retain the flexibility to rely on the public Cactus Comments service or to run their own Matrix home server, avoiding third-party tracking and centralised control alike. The web client is LGPLv3 licensed and the backend service is AGPLv3 licensed, making the entire stack free and open source.
Solutions for Publishers and Media Outlets
For publishers and media organisations, Coral by Vox Media offers a well-established and feature-rich alternative. Originally founded in 2014 as a collaboration between the Mozilla Foundation, The New York Times and The Washington Post, with funding from the Knight Foundation, it moved to Vox Media in 2019 and was released as open-source software. It provides advanced moderation tools supported by AI technology, real-time comment alerts and in-depth customisation through its GraphQL API. Its capacity to integrate with existing user authentication systems makes it a compelling choice for organisations that wish to maintain editorial control without sacrificing community engagement. Coral is currently deployed across 30 countries and in 23 languages, a breadth of adoption that reflects its standing among publishers of all sizes. The team has recently expanded the product to include a live Q&A tool alongside the core commenting experience, and the open-source codebase means that organisations with the technical resources can self-host the entire platform.
A strong alternative for publishers who handle large discussion volumes is GraphComment, a hosted platform developed by the French company Semiologic. It takes a social-network-inspired approach, offering threaded discussions with real-time updates, relevance-based sorting, a reputation-based voting system that enables the community to assist with moderation, and a proprietary Bubble Flow interface that makes individual threads indexable by search engines. All data are stored on servers based in France, which will appeal to publishers with European data-residency requirements. Its client list includes Le Monde, France Info and Les Echos, giving it considerable credibility in the media sector.
Hosted Solutions: Ease of Setup and Performance
Hosted solutions cater to those who prioritise simplicity and page performance above all else. ReplyBox exemplifies this approach, describing itself as 15 times lighter than Disqus, with a design focused on clean aesthetics and fast page loads. It supports Markdown formatting, nested replies, comment upvotes, email notifications and social login via Google, and it comes with spam filtering through Akismet. A 14-day free trial is available with no payment required, and a WordPress plugin is offered for those already on that platform.
Remarkbox takes a similarly restrained approach. Founded in 2014 by Russell Ballestrini after he moved his own blog to a static site and found existing solutions too slow or ad-laden, it is open source, carries no advertising and performs no user tracking. Readers can leave comments without creating an account, using email verification to confirm their identity, and the platform operates on a pay-what-you-can basis that keeps it accessible to smaller sites. It supports Markdown with real-time comment previews and deeply nested replies, and its developer notes that comments that are served through the platform contribute to SEO by making user-generated content indexable by search engines.
The choice between hosted and self-hosted systems often hinges on the trade-off between convenience and control. Staticman was a notable option in this space, acting as a Node.js bridge that committed comment submissions as data files directly to a GitHub or GitLab repository. However, its website is no longer accessible, and the project has been effectively abandoned since around 2020, with its maintainers publicly confirming in early 2024 that neither they nor the original author have been active on it for some time and that no volunteer has stepped forward to take it over. Those with a need for similar functionality are directed by the project's own contributors towards Cloudflare Workers-based alternatives. Utterances remains a viable option in this category, using GitHub Issues as its backend so that all comment data stays within a repository the site owner already controls. It requires some technical setup, but rewards that effort with complete data ownership and no external dependencies.
Open-Source, Self-Hosted Options
For developers who value privacy and data sovereignty above the convenience of a hosted service, open-source and self-hosted options present a natural fit. Remark42 is an actively maintained project that supports threaded comments, social login, moderation tools and Telegram or email notifications. Written in Python and backed by a SQLite database, Isso has been available since 2013 and offers a straightforward deployment with a small resource footprint, together with anonymous commenting that requires no third-party authentication. Both projects reflect a broader preference among privacy-conscious developers for keeping comment data entirely under their own roof.
The Case of Disqus
Valued for its ease of integration and its social features, Disqus remains one of the most widely recognised hosted commenting platform. However, it comes with well-documented drawbacks. Disqus operates as both a commenting service and a marketing and data company, collecting browsing data via tracking scripts and sharing it with third-party advertising partners. In 2021, the Norwegian Data Protection Authority notified Disqus of its intention to issue an administrative fine of approximately 2.5 million euros for processing user data without valid consent under the General Data Protection Regulation. However, following Disqus's response, the authority's final decision in 2024 was to issue a formal reprimand rather than impose the financial penalty. The proceedings nonetheless drew renewed attention to the privacy implications of relying on the platform. Site owners who prefer the convenience of a hosted service without those trade-offs may find more suitable alternatives in Hyvor Talk or CommentBox, both of which are designed around privacy-first principles and minimal setup.
Bridging the Gap: Talkyard and Discourse
Functioning as both a commenting system and a full community forum, Talkyard occupies an interesting position in the landscape. It can be embedded on a blog in the same manner as a traditional commenting widget, yet it also supports standalone discussion boards, making it a viable option for content creators who anticipate their audience outgrowing a simple comment section.
It also happens that Discourse operates on a similar principle but at greater scale, providing a fully featured forum platform that can be embedded as a comment section on external pages. Co-founded by Jeff Atwood (also a co-founder of Stack Overflow), Robin Ward and Sam Saffron, it is an open-source project whose server side is built on Ruby on Rails with a PostgreSQL database and Redis cache, while the client side uses Ember.js. Both Talkyard and Discourse are available as hosted services or as self-hosted installations, and both carry open-source codebases for those who wish to inspect or extend them.
Self-Hosting Discourse With Cloudflare CDN
For those who wish to take the self-hosted route, Discourse distributes an official Docker image that considerably simplifies deployment. The process begins by cloning the official repository into /var/discourse and running the bundled setup tool, which prompts for a hostname, administrator email address and SMTP credentials. A Linux server with at least 2 GB of memory is required, and a SWAP partition should be enabled on machines with only 1 GB.
Pairing a self-hosted instance with Cloudflare as a global CDN is a practical choice, as Cloudflare provides CDN acceleration, DNS management and DDoS mitigation, with a free tier that suits most community deployments. When configuring SSL, the recommended approach is to select Full mode in the Cloudflare SSL/TLS dashboard and generate an origin certificate using the RSA key type for maximum compatibility. That certificate is then placed in /var/discourse/shared/standalone/ssl/, and the relevant Cloudflare and SSL templates are introduced into Discourse's app.yml configuration file.
One important point during initial DNS setup is to leave the Cloudflare proxy status set to DNS only until the Discourse configuration is complete and verified, switching it to Proxied only afterwards to avoid redirect errors during first deployment. Email setup is among the more demanding aspects of running Discourse, as the platform depends on it for user authentication and notifications. The notification_email setting and the disable_emails option both require attention after a fresh install or a migration restore. Once configuration is finalised, running ./launcher rebuild app from the /var/discourse directory completes the build, typically within ten minutes.
Plugins can be added at any time by specifying their Git repository URLs in the hooks section of app.yml and triggering a rebuild. Discourse creates weekly backups automatically, storing them locally under /var/discourse/shared/standalone/backups, and these can be synchronised offsite via rsync or uploaded automatically to Amazon S3 if credentials are configured in the admin panel.
At a Glance
| Solution | Type | Best For |
|---|---|---|
| Cactus Comments | Federated, open source | Privacy-centric sites |
| Coral | Open source, hosted or self-hosted | Publishers and newsrooms |
| GraphComment | Hosted | Enhanced engagement and SEO |
| ReplyBox | Hosted | Simple static sites |
| Remarkbox | Hosted, optional self-host | Speed and simplicity |
| Utterances | Repository-backed | Developer-owned data |
| Remark42 | Self-hosted, open source | Privacy and control |
| Isso | Self-hosted, open source | Minimal footprint |
| Hyvor Talk | Hosted | Privacy-focused ease of use |
| CommentBox | Hosted | Clean design, minimal setup |
| Talkyard | Hosted or self-hosted | Comments and forums combined |
| Discourse | Hosted or self-hosted | Rich discussion communities |
| Disqus | Hosted | Ease of integration (privacy caveats apply) |
Closing Thoughts
None of the options surveyed here is without compromise. The hosted services ask you to accept some degree of cost, design constraint or data trade-off. The self-hosted and repository-backed tools demand technical time that can outweigh the benefit for a small or personal site. The federated approach is principled but asks readers to have, or create, a Matrix account before they can participate. It is entirely reasonable to weigh all of that and, as I did, conclude that going without comments is the right call for now. The landscape does shift, and a solution that is cumbersome today may become more accessible as these projects mature. In the meantime, knowing what exists and where the friction lies is a reasonable place to start.
The Open Worldwide Application Security Project: A cornerstone of digital safety in an age of evolving cybersecurity threats
When Mark Curphey registered the owasp.org domain and announced the project on a security mailing list on the 9th of September 2001, there was no particular reason to expect that it would become one of the defining frameworks in the world of application security. Yet, OWASP, originally the Open Web Application Security Project, has done exactly that, growing from an informal community into a globally recognised nonprofit foundation that shapes how developers, security professionals and businesses think about the security of software. In February 2023, the board voted to update the name to the Open Worldwide Application Security Project, a change that better reflects its modern scope, which now extends beyond web applications to cover IoT, APIs and software security more broadly.
At its heart, OWASP operates on a straightforward principle: knowledge about software security should be free and openly accessible to everyone. The foundation became incorporated as a United States 501(c)(3) nonprofit charity on the 21st of April 2004, when Jeff Williams and Dave Wichers formalised the legal structure in Delaware. What began as an informal mailing list community grew into one of the most trusted independent voices in application security, underpinned by a community-driven model in which volunteers and corporate supporters alike contribute to a shared vision.
The OWASP Top 10
Of all OWASP's contributions, the OWASP Top 10 remains its most widely cited publication. First released in 2003, it is a standard awareness document representing broad consensus among security experts about the most critical risks facing web applications. The list is updated periodically, with a 2025 edition now published, following the 2021 edition.
The 2021 edition reorganised a number of longstanding categories to reflect how the threat landscape has shifted. Broken access control rose to the top position, reflecting its presence in 94 per cent of tested applications, while injection (which encompasses SQL injection and cross-site scripting, among others) fell to third place. Cryptographic failures, previously listed as sensitive data exposure, took second place. By organising risks into categories rather than exhaustive lists of individual vulnerabilities, the Top 10 provides a practical starting point for prioritising security efforts, and it is widely referenced in compliance frameworks and security policies as a baseline. It is, however, designed to be the beginning of a conversation about security rather than the final word.
Projects and Tools
Beyond the Top 10, OWASP maintains a substantial portfolio of open-source projects spanning tools, documentation and standards. Among the most widely used is OWASP ZAP (Zed Attack Proxy), a dynamic application security testing tool that helps developers and security professionals identify vulnerabilities in web applications. Originally created in 2010 by Simon Bennetts, ZAP operates as a proxy between a tester's browser and the target application, allowing it to intercept, inspect and manipulate HTTP traffic. It supports both passive scanning, which observes traffic without modifying it, and active scanning, which simulates real attacks against targets for which the tester has explicit authorisation.
The OWASP Testing Guide is another widely consulted resource, offering a comprehensive methodology for penetration testing web applications. The OWASP API Security Project addresses the distinct risks that face APIs, which have become an increasingly prominent attack surface, and OWASP also maintains a curated directory of API security tools for those working in this area. For teams managing web application firewalls, the OWASP ModSecurity Core Rule Set provides guidance on handling false positives, which is one of the more practically demanding aspects of deploying rule-based defences. OWASP SEDATED, a more specialised project, focuses on preventing sensitive data from being committed to source code repositories, addressing a problem that continues to affect development teams of all sizes. Projects are categorised by their maturity and quality, allowing users to distinguish between stable, production-ready tools and those that are still in active development, and this tiered approach helps organisations make informed decisions about which tools are appropriate for their needs.
Influence on Industry Practice
The reach of OWASP's guidance is considerable. Security teams use its materials to structure risk assessments and threat modelling exercises, while developers integrate its recommendations into code reviews and secure coding training. Auditors and regulators frequently reference OWASP standards during compliance checks, creating a shared vocabulary that helps bridge the gap between technical staff and leadership. This alignment has done much to normalise application security as a core part of the software development lifecycle, rather than a task bolted on after the fact.
OWASP's influence also extends into regulatory and standards environments. Frameworks such as PCI DSS reference the Top 10 as part of their requirements for web application security, lending it a degree of formal weight that few community-produced documents achieve. That said, OWASP is not a regulatory body and has no enforcement powers of its own.
Education and Community
Education remains a central part of OWASP's mission. The foundation runs hundreds of local chapters across the globe, providing forums for knowledge exchange at a local level, as well as global conferences such as Global AppSec that bring together practitioners from across the industry. All of OWASP's projects, tools, documentation and chapter activities are free and open to anyone with an interest in improving application security. This open model lowers barriers for those starting out in the field and fosters collaboration across academia, industry and open-source communities, creating an environment where expertise circulates freely and innovation is encouraged.
Limitations and Appropriate Use
OWASP is not without its limitations, and it is worth acknowledging these clearly. Because it is not a regulatory body, it cannot enforce compliance, and the quality of individual projects can vary considerably. The Top 10, in particular, is sometimes misread as a comprehensive checklist that, once ticked off, certifies an application as secure. It is not. It is an awareness document designed to highlight the most prevalent categories of risk, not to enumerate every possible vulnerability. Treating it as a complete audit framework rather than a starting point for more in-depth analysis is one of the most common mistakes organisations make when engaging with OWASP materials.
The OWASP Top 10 for Large Language Model Applications
As artificial intelligence has moved from research curiosity to production deployment at scale, OWASP has responded with a dedicated framework for the security risks unique to large language models. The OWASP Top 10 for Large Language Model Applications, maintained under the broader OWASP GenAI Security Project, was first published in 2023 as a community-driven effort to document vulnerabilities specific to LLM-powered applications. A 2025 edition has since been released, reflecting how quickly both the technology and the associated threat landscape have evolved.
The list shares the same philosophy as the web application Top 10, using categories to frame risk rather than enumerating every individual attack variant. Its 2025 edition identifies prompt injection as the leading concern, a class of vulnerability in which crafted inputs cause a model to behave in unintended ways, whether by ignoring instructions, leaking sensitive information or performing unauthorised actions. Other entries cover sensitive information disclosure, supply chain risks (including vulnerable or malicious components sourced from model repositories), data and model poisoning, improper output handling, excessive agency (where an LLM is granted more autonomy or permissions than its task requires) and unbounded consumption, which addresses the risk of uncontrolled resource usage leading to service disruption or unexpected cost. Two categories introduced in the 2025 edition, system prompt leakage and vector and embedding weaknesses, reflect lessons learned from real-world RAG deployments, where retrieval-augmented pipelines have introduced new attack surfaces that did not exist in earlier LLM architectures.
The LLM Top 10 is distinct from the web application Top 10 in an important respect: because the threat landscape for AI applications is evolving considerably faster than that of traditional web software, the list is updated more frequently and carries a higher degree of uncertainty about what constitutes best practice. It is best treated as a living reference rather than a settled standard, and organisations deploying LLM-powered applications would do well to monitor the GenAI Security Project's ongoing work on agentic AI security, which addresses the additional risks that arise when models are given the ability to take real-world actions autonomously.
An Ongoing Work
In an era defined by rapid technological change and an ever-expanding threat landscape, OWASP continues to occupy a distinctive and valuable position in the world of application security. Its freely available standards, practical tools and community-driven approach have made it an indispensable reference point for organisations and individuals working to build safer software. The foundation's work is a practical demonstration that security need not be a competitive advantage hoarded by a few, but a collective responsibility shared across the entire industry.
For developers, security engineers and organisations navigating the challenges of modern software development, OWASP represents both a toolkit and a philosophy: that improving the security of software is work best done together, openly and without barriers.
Blocking thin scrollbar styles in Thunderbird on Linux Mint
When you get a long email, you need to see your reading progress as you work your way through it. Then, the last thing that you need is to have someone specifying narrow scrollbars in the message HTML like this:
<html style="scrollbar-width: thin;">
This is what I with an email newsletter on AI Governance sent to me via Substack. Thankfully, that behaviour can be disabled in Thunderbird. While my experience was on Linux Mint, the same fix may work elsewhere. The first step is to navigate the menus to where you can alter the settings: "Hamburger Menu" > Settings > Scroll to the bottom > Click on the Config Editor button.
In the screen that opens, enter layout.css.scrollbar-width-thin.disabled in the search and press the return key. Should you get an entry (and I did), click on the arrows button to the right to change the default value of False to True. Should your search be fruitless, right click anywhere to get a context menu where you can click on New and then Boolean to create an entry for layout.css.scrollbar-width-thin.disabled, which you then set to True. Whichever way you have accomplished the task, restarting Thunderbird ensures that the setting applies.
If the default scrollbar thickness in Thunderbird is not to your liking, returning to the Config Editor will address that. Here, you need to search for or create widget.non-native-theme.scrollbar.size.override. Since this takes a numeric value, pick the appropriate type if you are creating a new entry. Since that was not needed in my case, I pressed the edit button, chose a larger number and clicked on the tick mark button to confirm it. The effect was seen straight and all was how I wanted it.
In the off chance that the above does not work for you, there is one more thing that you can try, and this is specific to Linux. It sends you to the command line, where you issue this command:
gsettings get org.gnome.desktop.interface overlay-scrolling
Should that return a value of true, follow the with this command to change the setting to false:
gsettings set org.gnome.desktop.interface overlay-scrolling false
After that, you need to log off and back on again for the update to take effect. Since I had no recourse to that, it may be the same for you too.
Building a modular Hugo website home page using block-driven front matter
Inspired by building a modular landing page on a Grav-powered subsite, I wondered about doing the same for a Hugo-powered public transport website that I have. It was part of an overall that I was giving it, with AI consultation running shotgun with the whole effort. The home page design was changed from a two-column design much like what was once typical of a blog, to a single column layout with two-column sections.
The now vertical structure consisted of numerous layers. First, there is an introduction with a hero image, which is followed by blocks briefly explaining what the individual sections are about. Below them, two further panels describe motivations and scope expansions. After those, there are two blocks displaying pithy details of recent public transport service developments before two final panels provide links to latest articles and links to other utility pages, respectively.
This was a conscious mix of different content types, with some nesting in the structure. Much of the content was described in page front matter, instead of where it usually goes. Without that flexibility, such a layout would not have been possible. All in all, this illustrates just how powerful Hugo is when it comes to constructing website layouts. The limits essentially are those of user experience and your imagination, and necessarily in that order.
On Hugo Home Pages
Building a home page in Hugo starts with understanding what content/_index.md actually represents. Unlike a regular article file, _index.md denotes a list page, which at the root of the content directory becomes the site's home page. This special role means Hugo treats it differently from a standard single page because the home is always a list page even when the design feels like a one-off.
Front matter in content/_index.md can steer how the page is rendered, though it remains entirely optional. If no front matter is present at all, Hugo still creates the home page at .Site.Home, draws the title from the site configuration, leaves the description empty unless it has been set globally, and renders any Markdown below the front matter via .Content. That minimal behaviour suits sites where the home layout is driven entirely by templates, and it is a common starting point for new projects.
How the Underlying Markdown File Looks
While this piece opens with a description of what was required and built, it is better to look at the real _index.md file. Illustrating the block-driven pattern in practical use, here is a portion of the file:
---
title: "Maximising the Possibilities of Public Transport"
layout: "home"
blocks:
  - type: callout
    text1: "Here, you will find practical, thoughtful insight..."
    text2: "You can explore detailed route listings..."
    image: "images/sam-Up56AzRX3uM-unsplash.jpg"
    image_alt: "Transpennine Express train leaving Manchester Piccadilly train station"
  - type: cards
    heading: "Explore"
    cols_lg: 6
    items:
      - title: "News & Musings"
        text: "Read the latest articles on rail networks..."
        url: "https://ontrainsandbuses.com/news-and-musings/"
      - title: "News Snippets"
        ...
  - type: callout
    heading: "Motivation"
    text2: "Since 2010, British public transport has endured severe challenges..."
    image: "images/joseph-mama-aaQ_tJNBK4c-unsplash.jpg"
    image_alt: "Buses in Leeds, England, U.K."
  - type: callout
    heading: "An Expanding Scope"
    text2: "You will find content here drawn from Ireland..."
    image: "images/snap-wander-RlQ0MK2InMw-unsplash.jpg"
    image_alt: "TGV speeding through French countryside"
---
There are several things that are worth noting here. The title and layout: "home" fields appear at the top, with all structural content expressed as a blocks list beneath them. There is no Markdown body because the blocks supply all the visible content, and the file contains no layout logic of its own, only a description of what should appear and in what order. However, the lack of a Markdown body does pose a challenge for spelling and grammar checking using the LanguageTool extension in VSCode, which means that you need to ensure that proofreading needs to happen in a different way, such as using the editor that comes with the LanguageTool browser extension.
Template Selection and Lookup Order
Template selection is where Hugo's home page diverges most noticeably from regular sections. In Hugo v0.146.0, the template system was completely overhauled, and the lookup order for the home page kind now follows a straightforward sequence: layouts/home.html, then layouts/list.html, then layouts/all.html. Before that release, the conventional path was layouts/index.html first, falling back to layouts/_default/list.html, and the older form remains supported through backward-compatibility mapping. In every case, baseof.html is a wrapper rather than a page template in its own right, so it surrounds whichever content template is selected without substituting for one.
The choice of template can be guided further through front matter. Setting layout: "home" in content/_index.md, as in the example above, encourages Hugo to pick a template named home.html, while setting type: "home" enables more specific template resolution by namespace. These are useful options when the home page deserves its own template path without disturbing other list pages.
The Home Template in Practice
With the front matter established, the template that renders it is worth examining in its own right. It happens that the home.html for this site reads as follows:
<!DOCTYPE html>
{{- partial "head.html" . -}}
<body>
{{- partial "header.html" . -}}
<div class="container main" id="content">
<div class="row">
<h2 class="centre">{{ .Title }}</h2>
{{- partial "blocks/render.html" . -}}
</div>
{{- partial "recent-snippets-cards.html" . -}}
{{- partial "home-teasers.html" . -}}
{{ .Content }}
</div>
{{- partial "footer.html" . -}}
{{- partial "cc.html" . -}}
{{- partial "matomo.html" . -}}
</body>
</html>
This template is self-contained rather than wrapping a base template. It opens the full HTML document directly, calls head.html for everything inside the <head> element and header.html for site navigation, then establishes the main content container. Inside that container, .Title is output as an h2 heading, drawing from the title field in content/_index.md. The block dispatcher partial, blocks/render.html, immediately follows and is responsible for looping through .Params.blocks and rendering each entry in sequence, handling all the callout and cards blocks described in the front matter.
Below the blocks, two further partials render dynamic content independently of the front matter. recent-snippets-cards.html displays the two most recent news snippets as full-content cards, while home-teasers.html presents a compact linked list of recent musings alongside a weighted list of utility pages. After those, {{ .Content }} outputs any Markdown written below the front matter in content/_index.md, though in this case, the file has no body content, so nothing is rendered at that point. The template closes with footer.html, a cookie notice via cc.html and a Matomo analytics snippet.
Notice that this template does not use {{ define "main" }} and therefore does not rely on baseof.html at all. It owns the full document structure itself, which is a legitimate approach when the home page has a sufficiently distinct shape that sharing a base template would add complexity rather than reduce it.
The Block Dispatcher
The blocks/render.html partial is the engine that connects the front matter to the individual block templates. Its full content is brief but does considerable work:
{{ with .Params.blocks }}
  {{ range . }}
    {{ $type := .type | default "text" }}
    {{ partial (printf "blocks/%s.html" $type) (dict "page" $ "block" .) }}
  {{ end }}
{{ end }}
The with .Params.blocks guard means the entire loop is skipped cleanly if no blocks key is present in the front matter, so pages that do not use the system are unaffected. For each block in the list, the type field is read and passed through printf to build the partial path, so type: callout resolves to blocks/callout.html and type: cards resolves to blocks/cards.html. If a block has no type, the fallback is text, so a blocks/text.html partial would handle it. The dict call constructs a fresh context map passing both the current page (as page) and the raw block data (as block) into the partial, keeping the two concerns cleanly separated.
The Callout Blocks
The callout.html partial renders bordered, padded sections that can carry a heading, an image and up to five paragraphs of text. Used for the website introduction, motivation and expanded scope sections, its template is as follows:
{{ $b := .block }}
<section class="mt-4">
  <div class="p-4 border rounded">
    {{ with $b.heading }}<h3>{{ . }}</h3>{{ end }}
    {{ with $b.image }}
      <img
        src="{{ . }}"
        class="img-fluid w-100 rounded"
        alt="{{ $b.image_alt | default "" }}">
    {{ end }}
    <div class="text-columns mt-4">
      {{ with $b.text1 }}<p>{{ . }}</p>{{ end }}
      {{ with $b.text2 }}<p>{{ . }}</p>{{ end }}
      {{ with $b.text3 }}<p>{{ . }}</p>{{ end }}
      {{ with $b.text4 }}<p>{{ . }}</p>{{ end }}
      {{ with $b.text5 }}<p>{{ . }}</p>{{ end }}
    </div>
  </div>
</section>
The pattern here is consistent and deliberate. Every field is wrapped in a {{ with }} block, so fields absent from the front matter produce no output and no empty elements. The heading renders as an h3, sitting one level below the page's h2 title and maintaining a coherent document outline. The image uses img-fluid and w-100 alongside rounded, making it fully responsive and visually consistent with the bordered container. According to the Bootstrap documentation, img-fluid applies max-width: 100% and height: auto so the image scales with its parent, while w-100 ensures it fills the container width regardless of its intrinsic size. The image_alt field falls back to an empty string via | default "" rather than omitting the attribute entirely, which keeps the rendered HTML valid.
Text content sits inside a text-columns wrapper, which allows a stylesheet to apply a CSS multi-column layout to longer passages without altering the template. The numbered paragraph fields text1 through text5 reflect the varying depth of the callout blocks in the front matter: the introductory callout uses two paragraphs, while the Motivation callout uses four. Adding another paragraph field to a block requires only a new {{ with $b.text6 }} line in the partial and a matching text6 key in the front matter entry.
The Section Introduction Blocks
The cards.html partial renders a headed grid of linked blocks, with the column width at large viewports driven by a front matter parameter. This is used for the website section introductions and its template is as follows:
{{ $b := .block }}
{{ $colsLg := $b.cols_lg | default 4 }}
<section class="mt-4">
  {{ with $b.heading }}<h3 class="h4 mb-3">{{ . }}</h3>{{ end }}
  <div class="row">
    {{ range $b.items }}
      <div class="col-12 col-md-6 col-lg-{{ $colsLg }} mb-3">
        <div class="card h-100 ps-2 pe-2 pt-2 pb-2">
          <div class="card-body">
            <h4 class="h5 card-title mt-1 mb-2">
              <a href="{{ .url }}">{{ .title }}</a>
            </h4>
            {{ with .text }}<p class="card-text mb-0">{{ . }}</p>{{ end }}
          </div>
        </div>
      </div>
    {{ end }}
  </div>
</section>
The cols_lg value defaults to 4 if not specified, which produces a three-column grid at large viewports using Bootstrap's twelve-column grid. The transport site's cards block sets cols_lg: 6, giving two columns at large viewports and making better use of the wider reading space for six substantial card descriptions. At medium viewports, the col-md-6 class produces two columns regardless of cols_lg, and col-12 ensures single-column stacking on small screens.
The heading uses the h4 utility class on an h3 element, pulling the visual size down one step while keeping the document outline correct, since the page already has an h2 title and h3 headings in the callout blocks. Each card title then uses h5 on an h4 for the same reason. The h-100 class on the card sets its height to one hundred percent of the column, so all cards in a row grow to match the tallest one and baselines align even when descriptions vary in length. The padding classes ps-2 pe-2 pt-2 pb-2 add a small inset without relying on custom CSS.
Brief Snippets of Recent Public Transport Developments
The recent-snippets-cards.html partial sits outside the blocks system and renders the most recent pair of short transport news posts as full-content cards. Here is its template:
<h3 class="h4 mt-4 mb-3">Recent Snippets</h3>
<div class="row">
  {{ range ( first 2 ( where .Site.Pages "Type" "news-snippets" ) ) }}
    <div class="col-12 col-md-6 mb-3">
      <div class="card h-100">
        <div class="card-body">
          <h4 class="h6 card-title mt-1 mb-2">
            {{ .Date.Format "15:04, January 2" }}<sup>{{ if eq (.Date.Format "2") "2" }}nd{{ else if eq (.Date.Format "2") "22" }}nd{{ else if eq (.Date.Format "2") "1" }}st{{ else if eq (.Date.Format "2") "21" }}st{{ else if eq (.Date.Format "2") "3" }}rd{{ else if eq (.Date.Format "2") "23" }}rd{{ else }}th{{ end }}</sup>, {{ .Date.Format "2006" }}
          </h4>
          <div class="snippet-content">
            {{ .Content }}
          </div>
        </div>
      </div>
    </div>
  {{ end }}
</div>
The where function filters .Site.Pages to the news-snippets content type, and first 2 takes only the two most recently created entries. Notably, this collection does not call .ByDate.Reverse before first, which means it relies on Hugo's default page ordering. Where precise newest-first ordering matters, chaining ByDate.Reverse before first makes the intent explicit and avoids surprises if the default ordering changes.
The date heading warrants attention. It formats the time as 15:04 for a 24-hour clock display, followed by the month name and day number, then appends an ordinal suffix using a chain of if and else if comparisons against the raw day string. The logic handles the four irregular cases (1st, 21st, 2nd, 22nd, 3rd and 23rd) before falling back to th for all other days. The suffix is wrapped in a <sup> element so it renders as a superscript. The year follows as a separate .Date.Format "2006" call, separated from the day by a comma. Each card renders the full .Content of the snippet rather than a summary, which suits short-form posts where the entire entry is worth showing on the home page.
Latest Musings and Utility Pages Blocks
The home-teasers.html partial renders a two-column row of linked lists, one for recent long-form articles and one for utility pages. Its template is as follows:
<div class="row mt-4">
<div class="col-12 col-md-6 mb-3">
<div class="card h-100">
<div class="card-body">
<h3 class="h5 card-title mb-3">Recent Musings</h3>
{{ range first 5 ((where .Site.RegularPages "Type" "news-and-musings").ByDate.Reverse) }}
<p class="mb-2">
<a href="{{ .Permalink }}">{{ .Title }}</a>
</p>
{{ end }}
</div>
</div>
</div>
<div class="col-12 col-md-6 mb-3">
<div class="card h-100">
<div class="card-body">
<h3 class="h5 card-title mb-3">Extras & Utilities</h3>
{{ $extras := where .Site.RegularPages "Type" "extras" }}
{{ $extras = where $extras "Title" "ne" "Thank You for Your Message!" }}
{{ $extras = where $extras "Title" "ne" "Whoops!" }}
{{ range $extras.ByWeight }}
<p class="mb-2">
<a href="{{ .Permalink }}">{{ .Title }}</a>
</p>
{{ end }}
</div>
</div>
</div>
</div>The left column uses .Site.RegularPages rather than .Site.Pages to exclude list pages, taxonomy pages and other non-content pages from the results. The news-and-musings type is filtered, sorted with .ByDate.Reverse and then limited to five entries with first 5, producing a compact, current list of article titles. The heading uses h5 on an h3 for the same visual-scale reason seen in the cards blocks, and h-100 on each card ensures the two columns match in height at medium viewports and above.
The right column builds the extras list through three chained where calls. The first narrows to the extras content type, and the subsequent two filter out utility pages that should never appear in public navigation, specifically the form confirmation and error pages. The remaining pages are then sorted by ByWeight, which respects the weight value set in each page's front matter. Pages without a weight default to zero, so assigning small positive integers to the pages that should appear first gives stable, editorially controlled ordering without touching the template.
Diagnosing Template Choices
Diagnosing which template Hugo has chosen is more reliable with tooling than with guesswork. Running the development server with debug output reveals the selected templates in the terminal logs. Another quick technique is to place a visible marker in a candidate file and inspect the page source.
HTML comments are often stripped during minified builds, and Go template comments never reach the output, so an innocuous meta tag makes a better marker because a minifier will not remove it. If the marker does not appear after a rebuild, either the template being edited is not in use because another file higher in the lookup order is taking precedence, or a theme is providing a matching file without it being obvious.
Front Matter Beyond Layout
Front matter on the home page earns its place when it supplies values that make their way into head tags and structured sections, rather than when it tries to replicate layout logic. A brief description is valuable for metadata and social previews because many base templates output it as a meta description tag. Where a site uses social cards, parameters for images and titles can be added and consumed consistently.
Menu participation also remains available to the home page, with entries in front matter allowing the home to appear in navigation with a given weight. Less common but still useful fields include outputs, which can disable or configure output formats, and cascade, which can provide defaults to child pages when site-wide consistency matters. Build controls can influence whether a page is rendered or indexed, though these are rarely changed on a home page once the structure has settled.
Template Hygiene
Template hygiene pays off throughout this process. Whether the home page uses a self-contained template or wraps baseof.html, the principle is the same: each file should own a clearly bounded responsibility. The home template in the example above does this well, with head.html, header.html and footer.html each handling their own concerns, and the main content area occupied by the blocks dispatcher and the two dynamic partials. Column wrappers are easiest to manage when each partial opens and closes its own structure, rather than relying on a sibling to provide closures elsewhere.
That self-containment prevents subtle layout breakage and means that adding a new block type requires only a small partial in layouts/partials/blocks/ and a new entry in the front matter blocks list, with no changes to any existing template. Once the home page adopts this pattern, the need for CSS overrides recedes because the HTML shape finally expresses intent instead of fighting it.
Bootstrap Utility Classes in Summary
Understanding Bootstrap's utility classes rounds off the technique because these classes anchor the modular blocks without the need for custom CSS. h-100 sets height to one hundred percent and works well on cards inside a flex row so that their bottoms align across a grid, as seen in both the cards block and the home teasers. The h4, h5 and h6 utilities apply a different typographic scale to any element without changing the document outline, which is useful for keeping headings visually restrained while preserving accessibility. img-fluid provides responsive behaviour by constraining an image to its container width and maintaining aspect ratio, and w-100 makes an image or any element fill the container width even if its intrinsic size would let it stop short. Together, these classes produce predictable and adaptable blocks that feel consistent across all viewports.
Closing Remarks
The result of combining Hugo's list-page model for the home, a block-driven front matter design and Bootstrap's light-touch utilities is a home page that reads cleanly and remains easy to extend. New block types become a matter of adding a small partial and a new blocks entry, with the dispatcher handling the rest automatically. Dynamic sections such as recent snippets sit in dedicated partials called directly from the template, updating without any intervention in content/_index.md. Existing sections can be reordered without editing templates, shared structure remains in one place, and the need for brittle CSS customisation fades because the templates do the heavy lifting.
A final point returns to content/_index.md. Keeping front matter purposeful makes it valuable. A title, a layout directive and a blocks list that models the editorially controlled page structure are often enough, as we have seen in this example from my public transport website. More seldom-used fields such as outputs, cascade and build remain available should a site require them, but their restraint reflects the wider approach: let content describe structure, let templates handle layout and avoid unnecessary complexity.
Lessons learned during migrations to Grav CMS from Textpattern
After the most of four years since the arrival of Textpattern 4.8.8, Textpattern 4.9.0 was released. Since, I was running two subsites using the software, I tried one of them out with the new version. That broke an elderly navigation plugin that no longer appears in any repository, prompting a rollback, which was successful. Even so, it stirred some curiosity about alternatives to this veteran of the content management system world, which is pushing on for twenty-two years of age. That might have been just as well, given the subsequent release of Textpattern 4.9.1 because of two reported security issues, one of which affecting all preceding versions of the software.
Well before that came to light, there had been a chat session in a Gemini app on a mobile which travelling on a bus. This started with a simple question about alternatives to Textpattern. The ensuing interaction led me to choose Grav CMS after one other option turned out to involve a subscription charge; A personal website side hustle generating no revenue was not going to become a more expensive sideline than it already was, the same reasoning that stops me paying for WordPress plugins.
Exploring Known Options
Without any recourse to AI capability, I already had options. While WordPress was one of those that was well known to me, the organisation of the website was such that it would be challenging to get everything placed under one instance and I never got around to exploring the multisite capability in much depth. Either way, it would prove to involve quite an amount of restructuring, Even having multiple instances would mean an added amount of maintenance, though I do automate things heavily. The number of attack surfaces because of database dependence is another matter.
In the past, I have been a user of Drupal, though its complexity and the steepness of the associated learning curve meant that I never exploited it fully. Since those were pre-AI days, I wonder how things would differ now. Nevertheless, the need to make parts of a website fit in with each other was another challenge that I failed to overcome in those days. Thus, this content framework approach was not one that I wished to use again. In short, this is an enterprise-grade tool that may be above the level of personal web tinkering, and I never did use its capabilities to their full extent.
The move away from Drupal brought me to Hugo around four years ago. That too presents a learning curve, though its inherent flexibility meant that I could do anything that I want with it once I navigated its documentation and ironed out oversights using web engine searches. This static website generator is what rebuilds a public transport website, a history website comprised of writings by my late father together with a website for my freelancing company. There is no database involved, and you can avoid having any dynamic content creation machinery on the web servers too. Using Git, it is possible to facilitate content publishing from anywhere as well.
Why Grav?
Of the lot, Hugo had a lot going for it. The inherent flexibility would not obstruct getting things to fit with a website wide consistency of appearance, and there is nothing to stop one structuring things how they wanted. However, Grav has one key selling point in comparison: straightforward remote production of content without recourse to local builds being uploaded to a web server. That decouples things from needing one to propagate the build machinery across different locations.
Like Hugo, Grav had an active project behind it and a decent supply of plugins and an architecture that bested Textpattern and its usual languid release cycle. The similarity also extended as far as not having to buy into someone else's theme: any theming can be done from scratch for consistency of appearance across different parts of a website. In Grav's case, that means using the Twig PHP templating engine, another thing to learn and reminiscent of Textpattern's Textile as much as what Hugo itself has.
The centricity of Markdown files was another area of commonality, albeit with remote editing. If you are conversant with page files having a combination of YAML front matter and subsequent page content from Hugo, Grav will not seem so alien to you, even if it has a web interface for editing that front matter. This could help if you need to edit the files directly for any reason.
That is never to say that there were no things to learn, for there was plenty of that. For example, it has its own way of setting up modular pages, an idea that I was to retrofit back into a Hugo website afterwards. This means care with module naming as well as caching, editor choice and content collections, each with their own uniqueness that rewards some prior reading. A learning journey was in the offing, a not attractive part of the experience in any event.
Considerations
There have been a number of other articles published here regarding the major lessons learned during the transitions from Textpattern to Grav. Unlike previous experiences with Hugo, another part of this learning was the use of AI as part of any debugging. At times, there was a need to take things step by step, interacting with the AI instead of trying out a script that it had put my way. There are times when one's own context window gets overwhelmed by the flow of text, meaning that such behaviour needs to be taken in hand.
Another thing to watch is that human consultation of the official documentation is not neglected in a quest for speed that lets the AI do that for you; after all, this machinery is fallible; nothing we ever bring into being is without its flaws. Grav itself also comes from a human enterprise that usefully includes its own Discord community. The GitHub repository was not something to which I had recourse, even if the Admin plugin interface has prompts for reporting issues on there. Here, I provide a synopsis of the points to watch that may add to the help provided elsewhere.
Choosing an Editor
By default, Grav Admin uses CodeMirror as its content editor. While CodeMirror is well-suited to editing code, offering syntax highlighting, bracket matching and multiple cursors, it renders its editing surface in a way that standard browser extension APIs cannot reach. Grammar checkers and spell-check extensions such as LanguageTool rely on native editable elements to detect text, and CodeMirror does not use these. The result is that browser-based writing tools produce no output in Grav Admin at all, which is a confirmed architectural incompatibility rather than a configuration issue documented in the LanguageTool issue tracker.
This can be addressed by replacing CodeMirror using the TinyMCE Editor Integration plugin, installable directly from the Admin plugin interface, which brings a familiar style of editor that browser extensions can access normally. Thus, LanguageTool functionality is restored, the writing workflow stays inside Grav Admin and the change requires only a small amount of configuration to prevent TinyMCE from interfering with Markdown files in undesirable ways. Before coming across the TinyMCE Editor plugin, I was seriously toying with the local editing option centred around a Git-based workflow. Here, using VS Code with the LanguageTool extension like I do for Hugo websites remained a strong possibility. The plugin means that the need to do this is not as pressing as it otherwise might be.
None of this appears to edit Twig templates and other configuration files unless one makes use of the Editor plugin. My brief dalliance with this revealed a clunky interface and interference with the appearance of the website, something that I never appreciated when I saw it with Drupal. Thus, the plugin was quickly removed, and I do not miss it. As it happened, editing and creating files over an SSH connection with a lightweight terminal editor worked well enough for me during the setup phase anyway. If I wanted a nicer editing experience, then a Git-based approach would allow local editing in VSCode before pushing the files back onto the server.
Grav Caching
Unlike WordPress, which requires plugins to do so, Grav maintains its own internal cache for compiled pages and assets. Learning to work with it is part of understanding the platform: changes to CSS, JavaScript and other static assets are served from this cache until it is refreshed. That can be accomplished using the admin panel or by removing the contents of the cache directory directly. Once this becomes second nature, it adds very little overhead to the development process.
Modular Pages
On one of the Textpattern subsites, I had set up the landing page in a modular fashion. This carried over to Grav, which has its own way of handling modular pages. There, the modular page system assembles a single page from the files found within a collection of child folders, each presenting a self-contained content block with its own folder, Markdown file and template.
All modules render together under a single URL; they are non-routable, meaning visitors cannot access them directly. When the parent folder contains a modular.md file, the name tells Grav to use the modular.html.twig template and whose front matter defines which modules to include and in what order.
Module folders are identified by an underscore at the start of their name, and numeric prefixes control the display sequence. The prefix must come before the underscore: _01.main is the correct form. For a home page with many sections this structure scales naturally, with folder names such as 01._title, 04._ireland or 13._practicalities-inspiration making the page architecture immediately readable from the file system alone.
Each module's Markdown filename determines which template renders it: a file named text.md looks for text.html.twig in the theme's modular templates folder. The parent modular.md assembles the modules using @self.modular to collect them, with a custom order list giving precise control over sequence. Once the folder naming convention and the template matching relationship are clear, the system is very workable.
Building Navigation
Given that the original impetus for leaving Textpattern was a broken navigation plugin, ensuring that Grav could replicate the required menu behaviour was a matter of some importance. Grav takes a different approach to navigation from database-driven systems, deriving its menu structure directly from the content directory tree using folder naming conventions and front matter flags rather than a dedicated menu editor.
Top-level navigation is driven by numerically prefixed subfolders within the content directory (pages), so a structure such as 01.home, 02.about and 03.blog yields an ordered working menu automatically. Visibility can be fine-tuned without renaming folders by setting visible: true or visible: false in a page's YAML front matter, and menu labels can be shortened for navigation purposes using the menu: field while retaining a fuller title for the page itself.
The primary navigation loop iterates over the visible children of the pages tree and uses the active and activeChild flags on each page object to highlight the current location, whether the visitor is on a given top-level page directly or somewhere within its subtree. A secondary menu for the current section is assembled by first identifying the active top-level page and then rendering its visible children as a list. Testing for activeChild as well as active in the secondary menu is important, as omitting it means that visitors to grandchild pages see no item highlighted at all. The approach differs from what was possible with Textpattern, where a single composite menu could drill down through the full hierarchy, but displaying one menu for pages within a given section alongside another showing the other sections proves to be a workable and context-sensitive alternative.
Setting Up RSS Feeds
Because Grav does not support the generation of RSS feeds out of the box, it needs a plugin and some extra configuration. The latter means that you need to get your head around the Grav concept of a collection because without it, you will not see anything in your feed. In contrast, database-driven platforms like WordPress or Drupal push out the content by default, which may mean that you are surprised when you first come across how Grav needs you to specify the collections explicitly.
There are two details that make performing configuration of a feed straightforward once understood. The first is that Grav routes do not match physical folder paths: a folder named 03.deliberations on disk is referenced in configuration as /deliberations, since the numeric prefix controls navigation ordering but does not appear in the route, that is the actual web page address. The second is the choice between @page.children, which collects only the immediate children of a folder, and @page.descendants, which collects recursively through all subdirectories. The collection definition belongs in the feed page's front matter, specifying where the content lives, how it should be ordered and in which direction.
Where All This Led
Once I got everything set in place, the end results were pleasing, with much learned along the way. Web page responsiveness was excellent, an experience enhanced by the caching of files. In the above discussion, I hardly mentioned the transition of existing content. For one subsite, this was manual because the scale was smaller, and the Admin plugin's interface made everything straightforward such that all was in place after a few hours of work. In the case of the other, the task was bigger, so I fell on an option used for a WordPress to Hugo migration: Python scripting. That greatly reduced the required effort, allowing me to focus on other things like setting up a modular landing page. The whole migration took around two weeks, all during time outside my client work. There are other places where I can use Grav, which surely will add to what I already have learned. My dalliance with Textpattern is feeling a little like history now.
Resolving a Linux Mint and Windows keyboard shortcut conflict encountered when using SAS Enterprise Guide in a remote Citrix session
Here is a gotcha, slight though it is, that caught me when working in SAS Enterprise Guide on a Windows system to which I was connecting from Linux via Citrix. What I wanted to do was use the keyboard shortcut CTRL + SHIFT + U to convert text to upper case in the program editor, only for it to produce a black square and nothing else.
What I was encountering was a clash in keyboard shortcut assignments. On Linux Mint, CTRL + SHIFT + U activates Unicode character input mode. The black square was there for me to enter a hexadecimal code to add a character that my keyboard would not facilitate in normal circumstances. While the facility clearly has its uses, it was getting in my way and a solution had to be found.
Taking the simple route, I changed the keyboard shortcut to avoid the clash. Though others may want to go further than this, that was enough for me. At the command line, I issued the following command so that I could accomplish this:
ibus-setup
In the application screen that appeared, I navigated to the Emoji tab. To the right of the Unicode code point box, I clicked on the button with four dots. That led me to another dialogue box where I could change the modifier keys. Thus, I unchecked the box for SHIFT and ticked the one for SUPER (the Windows key on many keyboards these days) instead, before clicking on the OK button to confirm the setting. With that completed, I closed the IBus Preferences screen.
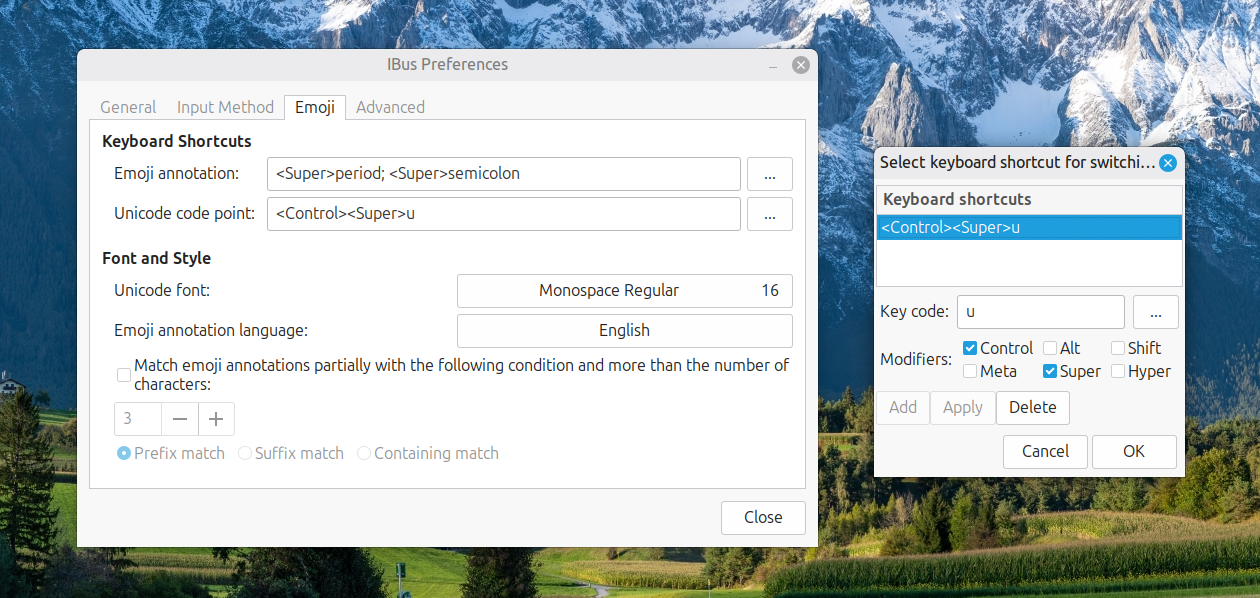
Now, I had CTRL + SUPER + U instead of CTRL + SHIFT + U. This meant that the CTRL + SHIFT + U in Enterprise Guide worked exactly as I expected it to do. A baffling situation had been resolved to leave me working without intrusion.