TOPIC: FIREFOX
Switching from uBlock Origin to AdGuard and Stylus
A while back, uBlock Origin broke this website when I visited it. There was a long AI conversation that left me with the impression that the mix of macOS, Firefox and WordPress presented an edge case that could not be resolved. Thus, I went looking for alternatives because I may not be able to convince else to look into it, especially when the issue could be so niche.
One thing the uBlock Origin makes very easy is the custom blocking of web page elements, so that was one thing that I needed to replace. A partial solution comes in the form of the Stylus extension. Though the CSS rules may need to be defined manually after interrogating a web page structure, the same effects came be achieved. In truth, it is not as slick as using a GUI element selector, but I have learned to get past that.
For automatic ad blocking, I have turned to AdGuard AdBlocker. Thus far, it is doing what I need it to do. One thing to note is that does nothing to stop your registering in website visitor analytics, not that it bothers me at all. That was something that uBlock Origin does out of the box, while my new ad blocker sticks more narrowly to its chosen task, and that suffices for now.
In summary, I have altered my tooling for controlling what websites show me. It is all too easy for otherwise solid tools to register false positives and cause other obstructions. That is why I find myself swapping between them every so often; after all, website code can be far too variable.
Maybe it highlights how challenging it is to make ad blocking and other similar software when your test cases cannot be as extensive as they need to be. Add in something of an arms race between advertisers and ad blockers for the ante to be upped even more. It does not help when we want the things free of charge too.
Resolving a glitch in the ChatGPT interface on Firefox using Tampermonkey
It may be caused either by a new version of Firefox or an update on the OpenAI side, but the ChatGPT prompt box lost its ability to show a cursor while I am entering text. The Ask anything text also disappeared. In Brave, all looked well, and it still persisted in clean Firefox sessions with no extensions loaded. Thus, it was a case of moving browser or getting a fix in Firefox.
The latter has not been needed because I found a fix of sorts. For that, I needed to install the Tampermonkey extension. Then, I could add a new script to override the behaviour that I was seeing:
// ==UserScript==
// @name         ChatGPT Prompt Box Fix (Firefox)
// @namespace    http://tampermonkey.net/
// @version      1.0
// @description  Forces the ChatGPT prompt box textarea to remain visible in Firefox
// @author       You
// @match        https://chatgpt.com/*
// @grant        none
// ==/UserScript==

(function () {
    'use strict';

    const waitForTextarea = () => {
        const textarea = document.querySelector('textarea');
        if (textarea) {
            textarea.style.display = 'block';

            const observer = new MutationObserver(() => {
                if (textarea.style.display === 'none') {
                    console.log('Textarea display:none overridden');
                    textarea.style.display = 'block';
                }
            });

            observer.observe(textarea, { attributes: true, attributeFilter: ['style'] });
        } else {
            setTimeout(waitForTextarea, 300); // Keep retrying until textarea appears
        }
    };

    waitForTextarea();
})();
In short, this deals with a rogue display: none; line in the CSS, which equally well could have been inserted by JavaScript from somewhere that I cannot track down. The extra code is executed within a self-contained function to prevent interference with other elements and is restricted to the ChatGPT domain, which avoids unwanted impacts on the display of other websites.
The first step is to search for the relevant element on the page, retrying at intervals if necessary. Once located, the element's visibility is ensured by explicitly setting its display property to block. Continued monitoring of the element thwarts any dynamic attempts to hide it by changing its style. When such an action is detected, the script automatically overrides such changes to maintain its visibility, thereby ensuring consistent accessibility.
However, challenges with finding the affected element mean that I get the advisory text duplicated. Thus, I see two instances of Ask anything. However, that is a small price to pay for having a flashing cursor telling me where I am in the interface. Such is the nature of modern web coding that its complexity hinders debugging, thus posing the question as to why we are making such things so complicated in the first place.
Enhancing focus and wellbeing by eliminating digital distractions while browsing the web
Such is the state of the world at the moment that I ration my news intake for the sake of my mental wellbeing. That also includes the content that websites present to me. Last November, I was none too please to see Perplexity showing me something unwanted on its home page. However, there appeared to be no way to turn this off, in contrast to the default page shown in a new browser tab. Then, I decided to tolerate the intrusion, only for the practice to develop over time.
Then, I happened on uBlock Origin after finding that it will block unwanted parts of web pages. While it was a bit hit-and-miss to get things going on the Perplexity website, it did the job after some trial and error. Things can change, which means the blocking may need refinement. Even so, I can handle that. When YouTube became another place where I needed to block distractions like previews of other videos during a webinar.
Now, uBlock Origin has become the only ad blocker that and I still use with Firefox. Others like Ghostery broke websites, especially that of the UK Met Office with its cookie blocking; the Ryanair one was another casualty, and became one that fell foul of Pi-hole too. Thus, they were left after me for a single shot approach. Though some websites may complain, anything that cuts out distractions has to help productivity and emotional wellbeing.
How to make Firefox vertical scrollbars more visible on Windows 11
While some articles on the web have reading time added to them, thus the vertical scrollbar of a web browser can act as a hint of the length of a piece. Unfortunately, they are being made less conspicuous for the sake of aesthetics and at the expense of utility. Since Firefox is the browser that I use most of the time, addressing the matter there became a priority for me, Here then is how you configure things on Windows 11.
The first step is to open a new tab before entering about:config in the URL bar and pressing the return key on your keyboard. If doing this for the first time, you will meet a warning screen that you can disable. Agreeing to the warning conveys you to the next screen, where you can enter the string "scrollbar" and use the enter key to bring up a swathe of settings.
There are two that you need to set to false by double-clicking on the pre-existing value of true: widget.windows.overlay-scrollbars.enabled and widget.non-native-theme.win.scrollbar.use-system-size. There is one more setting that you need to tweak: widget.non-native-theme.scrollbar.size.override should have a value greater than zero, the default. Using one of ten did what I wanted once I restarted Firefox. After that, I have things as I want them to be, though you may want to refine the width setting for your needs.
Excluding Google trend suggestions from an address bar search in Firefox
When it comes to learning what is happening in the world, I am more LOMO than FOMO. Thus, I do not appreciate anything that adds content that I did not request. Given the state of the world right now, there is a need to moderate one's intake. When I found trending topics being added to Google search results from the Firefox address bar, I then sought a way of turning that off.

That involved navigating to about:preferences#search in the address bar (you can go to Settings > Search just as well). Once there, it was a matter of looking in the Search Suggestions section and clearing the checkbox for the Show trending search suggestions item. Naturally, this only applies if you choose Google as your default search engine; otherwise it should not apply. For me, the setting change did what was needed.
Get web links from Outlook emails and Teams chats to open in your web browser of choice
By default, web links from either Outlook (here, I am referring to the Classic version and not the newer web appliance version that Microsoft would like us all to use, though many think it to be feature-incomplete) or Teams open in Edge, which may not be everyone's choice of web browser. Many choose Google Chrome, while I mainly use Mozilla Firefox, with Brave being another option that I have.
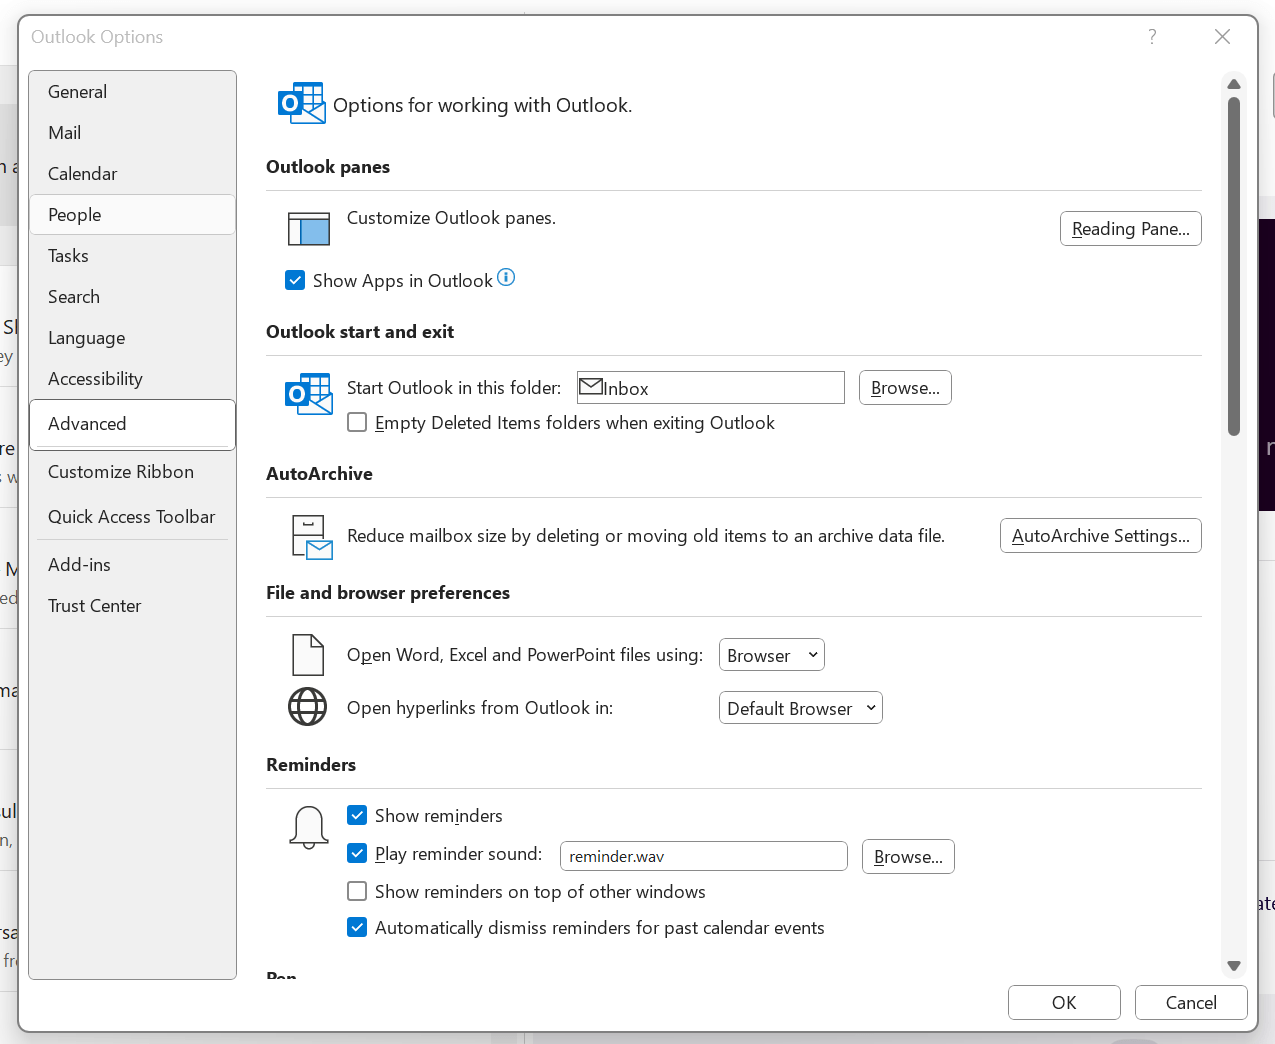
To get both Outlook and Teams to use your default system web browser, go to Outlook and navigate to File > Options > Advanced > File and browser preferences. Once there, look for the line with Open hyperlinks from Outlook in. The dropdown box will show Microsoft Edge by default, but there is another option: Default Browser. Choosing that will change things away from Edge to your chosen browser, assuming that you have set it by default using the Settings application.

If you have not gone there, navigate to Apps > Default apps. Once there, find the entry for the browser that you want to use and click on the Set default button. You also will see a list of file types, where you may need to change the setting for those as well. Once the system default is sorted, that will be honoured by Outlook and Teams as well.
Resolving "repository doesn't support architecture i386" error when checking for updates to Brave Browser on Linux
Recently, I started to observe the following message when doing my usual update routine on Linux Mint (Debian, Ubuntu and their variants are likely affected as well):
N: Skipping acquire of configured file 'main/binary-i386/Packages' as repository 'https://brave-browser-apt-release.s3.brave.com stable InRelease' doesn't support architecture 'i386'
As the message suggests, there was something amiss with the repository set up for Brave, a browser that I added for extra privacy. Since Firefox remains the main one that I use, Brave is something that I have in hand for when I need it. Handily, its installation routine adds in repository information for keeping it up to date. However, there is an issue with what you find in /etc/apt/sources.list.d/brave-browser-release.list. By default, the line appears like thus:
deb [signed-by=/usr/share/keyrings/brave-browser-archive-keyring.gpg] https://brave-browser-apt-release.s3.brave.com/ stable main
To avoid the i386 error, it needs to look like this instead:
deb [signed-by=/usr/share/keyrings/brave-browser-archive-keyring.gpg arch=amd64] https://brave-browser-apt-release.s3.brave.com/ stable main
The difference between the tow is the presence of arch=amd64 in the second version. This stops the search for non-existent i386 files, the 32 bit version in other words. With Y2K2038 in the offing, the days of 32 bit computing architectures are numbered because there is a real limit to the magnitude of the dates that can be represented in any case. Thus, sticking with 64 bit ones is both the present for many and the future for all.
Why all the commas?
In recent times, I have been making use of Grammarly for proofreading what I write for online consumption. That has applied as much to what I write in Markdown form, as it has with what is authored using content management systems like WordPress and Textpattern.
The free version does nag you to upgrade to a paid subscription, but is not my main irritation. That would be its inflexibility because you cannot turn off rules that you think intrusive, at least in the free version. This comment is particularly applicable to the unofficial plugin that you can install in Visual Studio Code. To me, the add-on for Firefox feels less scrupulous.
There are other options though, and one that I have encountered is LanguageTool. This also offers a Firefox add-on, but there are others not only for other browsers but also Microsoft Word. Recent versions of LibreOffice Writer can connect to a LanguageTool server using in-built functionality, too. There are also dedicated editors for iOS, macOS or Windows.
The one operating that does not get specific add-on support is Linux, but there is another option there. That uses an embedded HTTP server that I installed using Homebrew and set to start automatically using cron. This really helps when using the LanguageTool Linter extension in Visual Studio Code because it can connect to that instead of the public API, which bans your IP address if you overuse it. The extension is also configurable with the ability to add exceptions (both grammatical and spelling), though I appear to have enabled smart formatting only to have it mess up quotes in a Markdown file that then caused Hugo rendering to fail.
Like Grammarly, there is an online editor that offers more if you choose an annual subscription. That is cheaper than the one from Grammarly, so that caused me to go for that instead to get rephrasing suggestions both in the online editor and through a browser add-on. It is better not to get nagged all the time...
The title may surprise you, but I have been using co-ordinating conjunctions without commas for as long as I can remember. Both Grammarly and LanguageTool pick up on these, so I had to do some investigation to find a gap in my education, especially since LanguageTool is so good at finding them. What I also found is how repetitive my writing style can be, which also means that rephrasing has been needed. That, after all, is the point of a proofreading tool, and it can rankle if you have fixed opinions about grammar or enjoy creative writing.
Putting some off-copyright texts from other authors triggers all kinds of messages, but you just have to ignore these. Turning off checks needs care, even if turning them on again is easy to do. There, however, is the danger that artificial intelligence tools could make writing too uniform, since there is only so much that these technologies can do. They should make you look at your text more intently, though, which is never a bad thing because computers still struggle with meaning.
Stopping Firefox from launching on the wrong virtual desktop on Linux Mint
During the summer, I discovered that Firefox was steadfastly opening on the same virtual desktop on Linux Mint (the Cinnamon version) regardless of the one on which it was started. Being a creature of habit who routinely opens Firefox within the same virtual desktop all the time, this was not something that I had noticed until the upheaval of a system rebuild. The supposed cause is setting the browser to reopen tabs from the preceding session. The settings change according to the version of Firefox, but it is found in Settings > General in the version in which I am writing these words (Firefox Developer Edition 94.0b4) and the text beside the tick box is "Open previous windows and tabs".
While disabling the aforementioned setting could work, there is another less intrusive solution. This needs the opening of a new tab and the entering of the address about:config in the address bar. If you see a warning message about the consequences of proceeding further, accept responsibility using the interface as you do just that. In the resulting field marked Search preference name, enter the text widget.disable-workspace-management and toggle the setting from false to true to activate it. Then, Firefox should open on the desktop where you want it and not some other default location.
Installing Firefox Developer Edition in Linux Mint
Having moved beyond the slow response and larger memory footprint of Firefox ESR, I am using Firefox Developer Edition in its place, even if it means living without a status bar at the bottom of the window. Hopefully, someone will create an equivalent of the old add-on bar extensions that worked before the release of Firefox Quantum.
Firefox Developer Edition may be pre-release software with some extras for web developers like being able to drill into an HTML element and see its properties, but I am finding it stable enough for everyday use. It is speedy too, which helps, and it has its own profile so it can co-exist on the same machine as regular releases of Firefox like its ESR and Quantum variants.
Installation takes a little added effort though and there are various options available. My chosen method involved Ubuntu Make. Installing this involves setting up a new PPA as the first step and the following commands added the software to my system:
sudo add-apt-repository ppa:ubuntu-desktop/ubuntu-make

sudo apt-get update

sudo apt-get install ubuntu-make
With the above completed, it was simple to install Firefox Developer edition using the following command:
umake web firefox-dev
Where things got a bit more complicated was getting entries added to the Cinnamon Menu and Docky. While the former was sorted using the cinnamon-menu-editor command, the latter needed some tinkering with my firefox-developer.desktop file found in .local/share/applications/ within my user area to get the right icon shown. Discovering this took me into .gconf/apps/docky-2/Docky/Interface/DockPreferences/%gconf.xml where I found the location of the firefox-developer.desktop that needed changing. Once this was completed, there was nothing else to do from the operating system side.
Within Firefox itself, I opted to turn off warnings about password logins on non-HTTPS websites by going to about:config using the address bar, then looking for security.insecure_field_warning.contextual.enabled and changing its value from True to False. While some may decry this, there are some local websites on my machine that need attention at times. Otherwise, Firefox is installed with user access so I can update it as if it were a Windows or macOS application, and that is useful given that there are frequent new releases. All is going as I want it so far.