TOPIC: WINDOWS XP
Four technical portals that still deliver after decades online
The early internet was built on a different kind of knowledge sharing, one driven by individual expertise, community generosity and the simple desire to document what worked. Four informative websites that started in that era, namely MDN Web Docs, AskApache, WindowsBBS and Office Watch, embody that spirit and remain valuable today. They emerged at a time when technical knowledge was shared through forums, documentation and personal blogs rather than social media or algorithm-driven platforms, and their legacy persists in offering clarity and depth in an increasingly fragmented digital landscape.
MDN Web Docs
MDN Web Docs stands as a cornerstone of modern web development, offering comprehensive coverage of HTML, CSS, JavaScript and Web APIs alongside authoritative references for browser compatibility. Mozilla started the project in 2005 under the name Mozilla Developer Centre, and it has since grown into a collaborative effort of considerable scale. In 2017, Mozilla announced a formal partnership with Google, Microsoft, Samsung and the W3C to consolidate web documentation on a single platform, with Microsoft alone redirecting over 7,700 of its MSDN pages to MDN in that year.
For developers, the site is not merely a reference tool but a canonical guide that ensures standards are adhered to and best practices followed. Its tutorials, guides and learning paths make it indispensable for beginners and seasoned professionals alike. The site's community-driven updates and ongoing contributions from browser vendors have cemented its reputation as the primary source for anyone building for the web.
AskApache
AskApache is a niche but invaluable resource for those managing Apache web servers, built by a developer whose background lies in network security and penetration testing on shared hosting environments. The site grew out of the founder's detailed study of .htaccess files, which, unlike the main Apache configuration file httpd.conf, are read on every request and offer fine-grained, per-directory control without requiring root access to the server. That practical origin gives the content its distinctive character: these are not generic tutorials, but hard-won techniques born from real-world constraints.
The site's guides on blocking malicious bots, configuring caching headers, managing redirects with mod_rewrite and preventing hot-linking are frequently cited by system administrators and WordPress users. Its specificity and longevity have made it a trusted companion for those maintaining complex server environments, covering territory that mainstream documentation rarely touches.
WindowsBBS
WindowsBBS offers a clear window into the era when online forums were the primary hub for technical support. Operating in the tradition of classic bulletin board systems, the site has long been a resource for users troubleshooting Windows installations, hardware compatibility issues and malware removal. It remains completely free, sustained by advertisers and community donations, which reflects the ethos of mutual aid that defined early internet culture.
During the Windows XP and Windows 7 eras, community forums of this kind were essential for solving problems that official documentation often overlooked, with volunteers providing detailed answers to questions that Microsoft's own support channels would not address. While the rise of social media and centralised support platforms has reduced the prominence of such forums, WindowsBBS remains a testament to the power of community-driven problem-solving. Its straightforward structure, with users posting questions and experienced volunteers providing answers, mirrors the collaborative spirit that made the early web such a productive environment.
Office Watch
Office Watch has served as an independent source of Microsoft Office news, tips and analysis since 1996, making it one of the longer-running specialist publications of its kind. Its focus on Microsoft Office takes in advanced features and hidden tools that are seldom documented elsewhere, from lesser-known functions in Excel to detailed comparisons between Office versions and frank assessments of Microsoft's product decisions. That independence gives it a voice that official resources cannot replicate.
The site serves power users seeking to make the most of the software they use every day, with guides and books that extend its reach beyond the website itself. In an era where software updates are frequent and often poorly explained, Office Watch provides the kind of context and plain-spoken clarity that official documentation rarely offers.
The Enduring Value of Depth and Community
These four sites share a common thread: they emerged when technical knowledge was shared openly by experts and enthusiasts rather than filtered through algorithms or paywalls, and they retain the value that comes from that approach. Their continued relevance speaks to what depth, specificity and community can achieve in the digital world. While platforms such as Stack Overflow and GitHub Discussions have taken over many of the roles these sites once played, the original resources remain useful for their historical context and the quality of their accumulated content.
As the internet continues to evolve, the lessons from these sites are worth remembering. The most useful knowledge is often found at the margins, where dedicated individuals take the time to document, explain and share what they have learned. Whether you are a developer, a server administrator or an everyday Office user, these resources are more than archives: they are living repositories of expertise, built by people who cared enough to write things down properly.
Executing PowerShell scripts in Windows 11
Recently, I have added the capability to update a Hugo-driven website from a laptop running Windows 11. Compared to what you get with Linux, I do feel a little like a fish out of water when it comes to using Windows for tasks that I accomplish more often on the former. That includes running PowerShell scripts instead of their BASH counterparts. While Linux Subsystem for Windows could be an option, my machine runs Windows 11 Home, where it is unavailable. Learning the ways of the Windows Terminal cannot do any harm in any case.
The default action of not executing PowerShell scripts is not a bad approach when it comes to keeping machines secure for less technical users. For the rest, you need to learn how to use the Set-ExecutionPolicy commandlet. Doing this in a safe means doing it in a restrictive manner. Thus, I chose the following command and executed it in a terminal running with admin privileges:
Set-ExecutionPolicy -ExecutionPolicy Unrestricted -Scope CurrentUser
The scope here is for the currently logged-in user, instead of allowing every user the same capability. Some undoubtedly might suggest an execution policy of AllSigned and that adds effort that I was unwilling to expend, hence the choice that I made. This is not that critical a machine, so that is why I made the choice that I did. There was nothing too complicated about the script logic anyway.
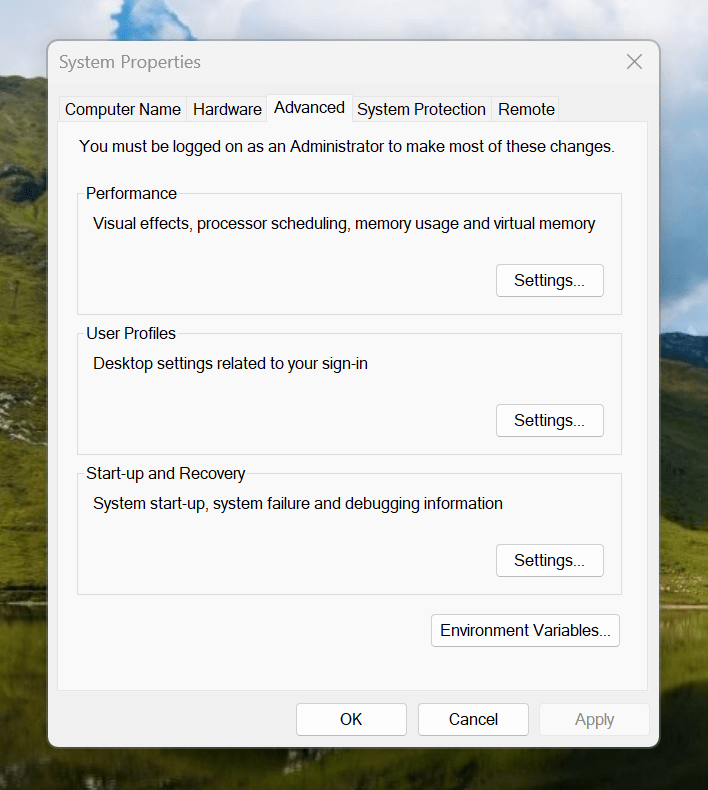
Making the script available without needing to specify the path to it was my next step. In my case, I added a new location to the Path environment variable. To accomplish that, you need to find the Control Panel, open it and go to System and Security. Then, move to System (Control Panel\System and Security\System) and click on Advanced System Settings. In the new dialogue box that appears, click on the Environment Variables... button. Next, select the Path entry and click on the Edit button. That spawns another dialogue box where I added the new path. Clicking the OK button in each dialogue box closes them all, one at a time, to get back to the Control Panel window again. That too can be closed, and any open terminals shut down and a new one opened. The process is clunky, yet it works once you know what to do.
At the end of all this, I had a scripted process for updating a Hugo-driven website. It was not as sleek as what I have on my Linux system, yet it works well enough to allow more flexibility. In time, I may refine things further.
Making the LanguageTool embedded HTTP Server work on Windows 11
My choice of Markdown editor is VS Code or VSCodium, the latter being a fork of the former with Microsoft telemetry removed. In either case, I use the LanguageTool Linter extension for the required grammar and spelling checks. Pointing that to the remote web service offered by LanguageTool could get punitive, even if I am a subscriber. Thus, I use a locally installed equivalent instead.
In my usual Linux system, that is how I work. However, I have replicated the set-up on a Windows laptop for added flexibility. The needed the JRE, so that was downloaded from the Oracle website and then installed. The next step is to download the LanguageTool embedded HTTP Server zip file and decompress it to a chosen location. To run the server, the command like the following is issued from the Windows Terminal (the single line may break over two here):
java -cp "[Chosen Location]\LanguageTool-stable\LanguageTool-6.4\languagetool-server.jar" org.languagetool.server.HTTPServer --port 8081 --allow-origin
That is enough to get things going because it fulfils the default settings of the LanguageTool Linter extension in VS Code or VSCodium. The fastText application is unavailable for Windows, so I did without it. So far, things are operating acceptably, even if there is a way to address more memory should that be required.
Lessons learned on managing Windows Taskbar and Start Menu colouring in VirtualBox virtual machines
In the last few weeks, I have had a few occasions when the colouration of the Windows 10 taskbar and its Star Menu has departed from my expectations. At times, this happened in VirtualBox virtual machine installations and both the legacy 5.2.x versions and the current 6.x ones have thrown up issues.
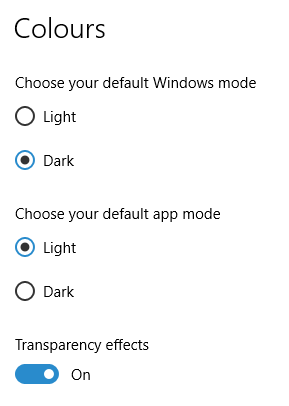

The first one actually happened with a Windows 10 installation in VirtualBox 5.2.x when the taskbar changed colour to light grey and there was no way to get it to pick up the colour of the desktop image to become blue instead. The solution was to change the Windows from Light to Dark in order for the desired colouration to be applied, and the settings above are taken from the screen that appears on going to Settings > Personalisation > Colours.
The second issue appeared in Windows 10 Professional installation in VirtualBox 6.0.x when the taskbar and Start Menu turned transparent after an updated. This virtual machine is used to see what is coming in the slow ring of Windows Insider, so some rough edges could be expected. The solution here was to turn off 3D acceleration in the Display pane of the VM settings after shutting it down. Starting it again showed that all was back as expected.
Both resolutions took a share of time to find and there was a deal of experimentation needed too. Once identified, they addressed the issues as desired. Hence, I am recording them here for use by others as much as future reference for myself.
Forcing an upgrade to Windows 10 Anniversary Update
There remain people who advise those on Windows 7 or 8.x to hold fire on upgrading to Windows 10. Now that the free upgrade no longer is available, that advice may hold more weight than it did. Even so, there are those among us who jumped ship who are open to having the latest versions of things at no monetary cost to see what is available, and I must admit to being one of those.
After all, I do have a virtual machine with a pre-release version of the next update to Windows 10 installed on there to see what might be coming our way and to get a sense of what changes that may bring so that I am ready for those. Otherwise, I am usually happy to wait, but I noticed that the Windows 10 Anniversary Update only came to my HP Pavilion dm4 laptop and not other machines with Windows 10 installed, so I started to wonder why there was a lag when it came to automatic upgrades.
So that these things do not arrive when it is least convenient, I took advantage of a manual method to choose my timing. This did not involve installation from a disk image, but was in-situ. The first part of the process is standard enough in that the Settings app was started and the Update & security item chosen. That dropped me onto the Windows Update, and I first clicked on the Check for updates button to see what would happen. When nothing came of that, the Learn more link was clicked to bring me onto part of the Microsoft support website where I found that the Windows 10 Anniversary Update installer could be downloaded, so I duly did just that.
Running it produced a screen asking whether I wanted to proceed. Since I wanted to go ahead, the appropriate button was clicked and the machine left alone until the process completed. Because the installer purely is a facilitator, the first stage is to download the rest of the files needed, and that will take a while on any connection. Once downloading was completed, the actual process of installation commenced with several restarts before a log-in screen was again on offer. On logging in to the machine, the last part of the process started.
Though the process took quite a while, it seemingly worked without a hitch. If there was anything that I needed to do, it was the re-installation of VirtualBox Guest Additions to restore access to shared folders, as well as dealing with a self-inflicted irritation. Otherwise, I have found that previously installed software worked as expected and no file has been missed. Waiting a while may have had its advantages too because initial issues with the Anniversary Update will have been addressed, though it is best not to leave it too long, or you could have the feeling of being forgotten. A happy balance needs striking.
Getting rid of Windows 10 notifications about disabling start-up applications
On several Windows 10 machines, I have been seeing messages appearing in its Action Centre pane with the heading Disable apps to help improve performance. It appeared again recently, so I decided to look further into the matter.
What I found was that the solution first involves opening up the Control Panel, which takes a little finding in Windows 10. You could use Cortana to get to it or right-clicking on the Start Menu and left-clicking on the Control Panel menu. Using the Windows key + X will produce the same menu, and choosing the same entry will have the same effect.
Once the Control Panel is open, it makes life a little easier if you change to the Large icons view using the drop-down menu under the Search Control Panel box on the right-hand side. Then, what you need to do is click on the Security and Maintenance icon.
Once in that Security and Maintenance section, you are presented with two subheadings, one for Security and one for Maintenance. So long as you have not dismissed the message in the action centre, you will see a corresponding entry under the Maintenance section. At the bottom of that entry, there will be a link that turns off these messages permanently, and clicking on this will have the desired effect.
Successfully migrating to Windows 10 on physical devices and virtual machines
While I have had preview builds of Windows 10 in various virtual machines for the most of twelve months, actually upgrading physical and virtual devices that you use for more critical work is a very different matter. Also, Windows 10 is set to be a rolling release with enhancements coming on an occasional basis, so I would like to see what comes before it hits the actual machines that I need to use. That means that a VirtualBox instance of the preview build is being retained to see what happens to that over time.
While some might call it incautious, I have taken the plunge and completely moved from Windows 8.1 to Windows 10. The first machine that I upgraded was more expendable, and success with that encouraged me to move onto others before even including a Windows 7 machine to see how that went. The 30-day restoration period allows an added degree of comfort when doing all this. The list of machines that I upgraded were a VMware VM with 32-bit Windows 8.1 Pro (itself part of a 32-bit upgrade cascade involving Windows 7 Home and Windows 8 Pro), a VirtualBox VM with 64-bit Windows 8.1, a physical PC that dual booted Linux Mint 17.2 and 64-bit Windows 8.1 and an HP Pavilion dm4 laptop (Intel Core i3 with 8 GB RAM and a 1 TB SSHD) with Windows 7.
The main issue that I uncovered with the virtual machines is that the Windows 10 update tool that is downloaded onto Windows 7 and 8.x does not accept the graphics capability on there. This is a bug because the functionality works fine on the Windows Insider builds. The solution was to download the appropriate Windows 10 ISO image for use in the ensuing upgrade. There are 32-bit and 64-bit disk images with Windows 10 and Windows 10 Pro installation files on each. My own actions used both disk images.
During the virtual machine upgrades, most of the applications that considered important were carried over from Windows 8.1 to Windows without a bother. Anyone would expect Microsoft's own software like Word, Excel and others to make the transition, but others like Adobe's Photoshop and Lightroom made it too, as did Mozilla's Firefox, albeit requiring a trip to Settings to set it as the default option for opening web pages. Less well-known desktop applications like Zinio (digital magazines) or Mapyx Quo (maps for cycling, walking and the like) were the same. Classic Shell was an exception but the Windows 10 Start Menu suffices for now anyway. Also, there was a need to reinstate Bitdefender Antivirus Plus using its new Windows 10 compatible installation file. Still, the experience was a big change from the way things used to be in the days when you used to have to reinstall nearly all your software following a Windows upgrade.
The Windows 10 update tool worked well for the Windows 8.1 PC, so no installation disks were needed. Neither was the bootloader overwritten so the Windows option needed selecting from GRUB every time there was a system reboot as part of the installation process, a temporary nuisance that was tolerated since booting into Linux Mint was preserved. Again, no critical software was lost in the process apart from Kaspersky Internet Security, which needed the Windows 10 compatible version installed, much like Bitdefender, or Epson scanning software that I found was easy to reinstall anyway. Usefully, Anquet's Outdoor Map Navigator (again used for working with walking and cycling maps) continued to function properly after the changeover.
For the Windows 7 laptop, it was much the same story, albeit with the upgrade being delivered using Windows Update. Then, the main Windows account could be connected to my Outlook account to get everything tied up with the other machines for the first time. Before the obligatory change of background picture, the browns in the one that I was using were causing interface items to appear in red, not exactly my favourite colour for application menus and the like. Now they are in blue, and all the upheaval surrounding the operating system upgrade had no effect on the Dropbox or Kaspersky installations that I had in place before it all started. If there is any irritation, it is that unpinning of application tiles from the Start Menu or turning off live tiles is not always as instantaneous as I would have liked, and that is all done now anyway.
While writing the above, I could not help thinking that more observations on Windows 10 may follow, but these will do for now. Microsoft had to get this upgrade process right, and it does appear that they have, so credit is due to them for that. So far, I have Windows 10 to be stable and will be seeing how things develop from here, especially when those new features arrive occasionally as is the promise that has been made to us users. Hopefully, that will be as painless as it needs to be to ensure trust is retained.
Fixing Windows Update errors by clearing the SoftwareDistribution folder
Following a recent family death, I have ended up with the laptop belonging to the deceased and, since it has been offline most of its life, I set to getting it updated. The McAfee security suite was straightforward enough but trying Windows Update produced errors suggesting that it was not working and that a system restart was needed. Doing that did nothing, so a little further investigation was needed.
The solution turned out to be stopping the Windows Update service and clearing a certain folder before starting it again. To stop the service, I typed in services.msc into the search box on the Start Menu and clicked on the entry that appeared, which was called Services. Then I sought out the Windows Update entry, selected it and clicked on the Stop link on the left-hand side. After that, I used Windows Explorer to navigate C:\Windows\SoftwareDistribution and deleted everything in there. The, I went back to the Services window and started Windows Update again. That sorted the problem and the system began to be updated as needed.
All of this was on Windows 7, hence the mention of the Start Menu, and the machine is a Toshiba Satellite C660 from 2011 with an AMD E-300 APU, 4 GB of RAM and a 320 GB hard drive. Those specs may not be the most impressive, but it feels spritely enough and is far better than the lethargic Toshiba Equium A200-1VO that I acquired in 2008, though the HP Pavilion dm4 that I bought in November 2011 probably will travel more often than either of these if truth be told. After all, it now has 8 GB of RAM and a 1 TB Samsung SSHD along with its Core i3 CPU, so it should serve me for a while yet.
Initial impressions of Windows 10
Being ever curious on the technology front, the release of the first build of a Technical Preview of Windows 10 was enough to get me having a look at what was on offer. The furore regarding Windows 8.x added to the interest, so I went to the download page to get a 64-bit installation ISO image.
That got installed into a fresh VirtualBox virtual machine and the process worked smoothly to give something not so far removed from Windows 8.1. However, it took until release 4.3.18 of VirtualBox before the Guest additions had caught up with the Windows prototype, so I signed up for the Windows Insider program and got a 64-bit ISO image to install the Enterprise preview of Windows 10 into a VMware virtual machine since and that supported full screen display of the preview while VirtualBox caught up with it.
Of course, the most obvious development was the return of the Start Menu, and it works exactly as expected too. Initially, the apparent lack of an easy way to disable App panels had me going to Classic Shell for an acceptable Start Menu. It was only later that it dawned on me that unpinning these panels would deliver to me the undistracting result that I wanted.
Another feature that attracted my interest is the new virtual desktop functionality. Here I was expecting something like what I have used on Linux and UNIX. There, each workspace is a distinct desktop, with only the applications open in a given workspace showing on a panel in there. Windows does not work that way with all applications visible on the taskbar regardless of what workspace they occupy, which causes clutter. Another deficiency is not having a desktop indicator on the taskbar instead of the Task View button. On Windows 7 and 8.x, I have been a user of VirtuaWin and this still works largely in the way that I expect of it too, except for any application windows that have some persistence associated with them; the Task Manager is an example and I include some security software in the same category too.
Even so, here are some keyboard shortcuts for anyone who wants to take advantage of the Windows 10 virtual desktop feature:
- Create a new desktop: Windows key + Ctrl + D
- Switch to previous desktop: Windows key + Ctrl + Left arrow
- Switch to next desktop: Windows key + Ctrl + Right arrow
Otherwise, stability is excellent for a preview of a version of Windows that is early on its road to final release. An upgrade to a whole new build went smoothly when initiated following a prompt from the operating system itself. All installed applications were retained, and a new taskbar button for notifications made its appearance alongside the existing Action Centre icon. So far, I am unsure what this does and whether the Action Centre button will be replaced in the fullness of time, yet I am happy to await where things go with this.
All is polished up to now, and there is nothing to suggest that Windows 10 will not be to 8.x what 7 was to Vista. The Start Screen has been dispatched after what has proved to be a misadventure for Microsoft. Regardless of what was hyped a few years ago, the PC still is with us; touchscreen devices like tablets are augmenting it instead of replacing it for any tasks involving some sort of creation. If anything, we have seen the PC evolve with laptops perhaps becoming more like the Surface Pro, at least when it comes to hybrid devices. However, we are not as happy to smudge our PC screens quite like those on phones and tablets, so a return to a more keyboard and mouse centred approach for some devices is welcome.
What I have here are just a few observations; there are more elsewhere, including a useful article by Ed Bott on ZDNet. All in all, we are early in the process for Windows 10 and, though it looks favourable so far, I will continue to keep an eye on how it progresses. The need to be less experimental than Windows 8.x is being fulfilled: so far, it certainly is less schizophrenic and should not be a major jump for users of Windows 7.
A reappraisal of Windows 8 and 8.1 licensing
With the release of Windows 8 around this time last year, I thought that the full retail version that some of us got for fresh installations on PC's, real or virtual, had become a thing of the past. In fact, it did seem that every respecting technology news website and magazine was saying just that. The release that you would buy from Microsoft or from mainstream computer stores was labelled as an upgrade. That made it look as if you needed the OEM or System Builder edition for those PC's that needed a new Windows installation, and that the licence that you bought was then attached to the machine from when it got installed on there.
As is usual with Microsoft, the situation is less clear-cut than that. For instance, there was some back-pedalling to allow OEM editions of Windows to be licensed for personal use on real or virtual PC's. With Windows 7 and its predecessors, it even was possible to be able to install afresh on a PC without Windows by first installing on inactivated copy on there and then upgrading that as if it were a previous version of Windows. Of course, an actual licence was of the previous version of Windows was needed for full compliance, if not the actual installation. At times, Microsoft muddies waters to keep its support costs down.
Even with Microsoft's track record in mind, it still surprised me when I noticed that Amazon was selling what appeared to be full versions of both Windows 8.1 and Windows 8.1 Pro. Having set up a 64-bit VirtualBox virtual machine for Windows 8.1, I got to discover the same for software purchased from the Microsoft website. However, unlike the DVD versions, you do need an active Windows installation if you fancy a same day installation of the downloaded software. For those without Windows on a machine, this can be as simple as downloading either the 32-bit or the 64-bit 90-day evaluation editions of Windows 8.1 Enterprise and using that as a springboard for the next steps. Though this not only be an actual in-situ installation, there are options to create an ISO or USB image of the installation disk for later installation.
In my case, I created a 64-bit ISO image and used that to reboot the virtual machine that had Windows 8.1 Enterprise on there before continuing with the installation. By all appearances, there seemed to be little need for a pre-existing Windows instance for it to work, so it looks as if upgrades have fallen by the wayside and only full editions of Windows 8.1 are available now. The OEM version saves money so long as you are happy to stick with just one machine, and most users probably will do that. As for the portability of the full retail version, that is not something that I have tested, so I am unsure that I will go beyond what I have done already.
My main machine has seen a change of motherboard, CPU and memory, so it could have deactivated a pre-existing Windows licence. However, I run Linux as my main operating system and, apart possibly from one surmountable hiccup, this proves surprisingly resilient in the face of such major system changes. For running Windows, I turn to virtual machines and there were no messages about licence activation during the changeover either. Microsoft is anything but confiding when it comes to declaring what hardware changes inactivate a licence. Changing a virtual machine from VirtualBox to VMware or vice versa definitely does it, so I tend to avoid doing that. One item that is fundamental to either a virtual or a real PC is the motherboard, and I have seen suggestions that this is the critical component for Windows licence activation, which would make sense if that was the case.
However, this rule is not hard and fast either, since there appears to be room for manoeuvre should your PC break. It might be worth calling Microsoft after a motherboard replacement to see if they can help you, and I have noticed that it is. All in all, Microsoft often makes what appear to be simple rules only to override them when faced with what happens in the real world. Is that why they can be unclear about some matters at times? Do they still hanker after how they want things to be, even when they are impossible to keep like that?