TOPIC: MICROSOFT WINDOWS
Locking your computer screen faster using keyboard shortcuts
When you are doing paid work on a computer, locking one's screen is a healthy practice for ensuring privacy and confidentiality while you are away from your desk for a short while. For years, I have been doing this on Windows using the WIN (Windows key) + L keyboard combination. It is possible on a Mac too, albeit using a different set of keys: CTRL (Control) + CMD (Command) + Q. While the Lock Screen item on the Apple menu will accomplish the same result, a simple keyboard shortcut works much, much faster. On Linux, things are a lot more varied with different desktop environments working in their own way, even making terminal commands a way to go if you can use a heavily abbreviated alias.
Keyboard remapping on macOS with Karabiner-Elements for cross-platform work
This is something that I have been planing to share for a while; working across macOS, Linux and Windows poses a challenge to muscle memory when it comes to keyboard shortcuts. Since the macOS set up varies from the others, it was that which I set to harmonise with the others. Though the result is not full compatibility, it is close enough for my needs.
The need led me to install Karabiner-Elements and Karabiner-EventViewer. The latter has its uses for identifying which key is which on a keyboard, which happens to be essential when you are not using a Mac keyboard. While it is not needed all the time, the tool is a godsend when doing key mappings.
Karabiner-Elements is what holds the key mappings and needs to run all the time for them to be activated. Some are simple and others are complex; it helps the website is laden with examples of the latter. Maybe that is how an LLM can advise on how to set up things, too. Before we come to the ones that I use, here are the simple mappings that are active on my Mac Mini:
left_command → left_control
left_comtrol → left_command
This swaps the left-hand Command and Control keys while leaving their right-hand ones alone. It means that the original functionality is left for some cases when changing it for the keys that I use the most. However, I now find that I need to use the Command key in the Terminal instead of the Control counterpart that I used before the change, a counterintuitive situation that I overlook given how often the swap is needed in other places like remote Linux and Windows sessions.
grave_accent_and_tilde → non_us_backslash
non_us_backslash → non_us_pound
non_us_pound → grave_accent_and_tilde
It took a while to get this three-way switch figured out, and it is a bit fiddly too. All the effort was in the name of getting backslash and hash (pound in the US) keys the right way around for me, especially in those remote desktop sessions. What made the thing really tricky was the need to deal with Shift key behaviour, which necessitated the following script:
{
    "description": "Map grave/tilde key to # and ~ (forced behaviour, detects Shift)",
    "manipulators": [
        {
            "conditions": [
                {
                    "name": "shift_held",
                    "type": "variable_if",
                    "value": 1
                }
            ],
            "from": {
                "key_code": "grave_accent_and_tilde",
                "modifiers": { "optional": ["any"] }
            },
            "to": [{ "shell_command": "osascript -e 'tell application \"System Events\" to keystroke \"~\"'" }],
            "type": "basic"
        },
        {
            "conditions": [
                {
                    "name": "shift_held",
                    "type": "variable_unless",
                    "value": 1
                }
            ],
            "from": {
                "key_code": "grave_accent_and_tilde",
                "modifiers": { "optional": ["any"] }
            },
            "to": [
                {
                    "key_code": "3",
                    "modifiers": ["option"]
                }
            ],
            "type": "basic"
        },
        {
            "from": { "key_code": "left_shift" },
            "to": [
                {
                    "set_variable": {
                        "name": "shift_held",
                        "value": 1
                    }
                },
                { "key_code": "left_shift" }
            ],
            "to_after_key_up": [
                {
                    "set_variable": {
                        "name": "shift_held",
                        "value": 0
                    }
                }
            ],
            "type": "basic"
        },
        {
            "from": { "key_code": "right_shift" },
            "to": [
                {
                    "set_variable": {
                        "name": "shift_held",
                        "value": 1
                    }
                },
                { "key_code": "right_shift" }
            ],
            "to_after_key_up": [
                {
                    "set_variable": {
                        "name": "shift_held",
                        "value": 0
                    }
                }
            ],
            "type": "basic"
        }
    ]
}
Here, I resorted to AI to help get this put in place. Even then, there was a deal of toing and froing before the setup worked well. After that, it was time to get the quote (") and at (@) symbols assigned to what I was used to having on a British English keyboard:
{
    "description": "Swap @ and \" keys (Shift+2 and Shift+quote)",
    "manipulators": [
        {
            "from": {
                "key_code": "2",
                "modifiers": {
                    "mandatory": ["shift"],
                    "optional": ["any"]
                }
            },
            "to": [
                {
                    "key_code": "quote",
                    "modifiers": ["shift"]
                }
            ],
            "type": "basic"
        },
        {
            "from": {
                "key_code": "quote",
                "modifiers": {
                    "mandatory": ["shift"],
                    "optional": ["any"]
                }
            },
            "to": [
                {
                    "key_code": "2",
                    "modifiers": ["shift"]
                }
            ],
            "type": "basic"
        }
    ]
}
The above possibly was one of the first changes that I made, and took less time than some of the others that came after it. There was another at the end that was even simpler again: neutralising the Caps Lock key. That came up while I was perusing the Karabiner-Elements website, so here it is:
{
    "manipulators": [
        {
            "description": "Change caps_lock to command+control+option+shift.",
            "from": {
                "key_code": "caps_lock",
                "modifiers": { "optional": ["any"] }
            },
            "to": [
                {
                    "key_code": "left_shift",
                    "modifiers": ["left_command", "left_control", "left_option"]
                }
            ],
            "type": "basic"
        }
    ]
}
That was the simplest of the lot to deploy, being a simple copy and paste effort. It also halted mishaps when butter-fingered actions on the keyboard activated capitals when I did not need them. While there are occasions when the facility would have its uses, it has not noticed its absence since putting this in place.
At the end of all the tinkering, I now have a set-up that works well for me. While possible enhancements may include changing the cursor positioning and corresponding highlighting behaviours, I am happy to leave these aside for now. Compatibly with British and Irish keyboards together with smoother working in remote sessions was what I sought, and I largely have that. Thus, I have no complaints so far.
A portable software repository comparison: PortableApps versus Portapps for Windows users
Moving between computers remains a fact of life for many people, whether working across office desktops and home laptops, studying in shared facilities or visiting clients and public spaces. Installing the same software repeatedly, then recreating familiar settings, can become a routine that wastes time and raises permission hurdles. Portable software aims to sidestep that friction by running without traditional installation, carrying preferences along for the ride, and leaving little behind on host machines.
Two notable projects occupy this space for Windows users: PortableApps.com and Portapps. Each offers a different route to a similar destination, and together they show how far the idea has progressed since the early days of USB sticks and limited storage. Both platforms enable users to create self-contained software environments that can travel between machines whilst maintaining settings and data integrity.
PortableApps.com: The Established Platform
PortableApps.com is often the first name people encounter, and with good reason. It has grown into a platform as much as a collection, providing a launcher that helps manage the entire portable environment. The project began in the early 2000s, created by John T. Haller, and has remained free and open source since then.
Core Architecture
The premise is straightforward. Applications are repackaged so they can live within a self-contained folder structure that can sit on removable storage or inside a cloud-synchronised folder. When launched from that location, they behave as if they were installed locally, only their configuration and data reside in the portable directory rather than the Windows registry or system folders. As a result, moving the folder to another machine brings the software and its settings along, keeping the host computer cleaner and reducing the need for elevated privileges.
The Platform Ecosystem
Much of the appeal lies in the PortableApps.com Platform, a menu and suite that acts as a hub. Rather than scattering shortcuts across the desktop, the platform collects everything in one place with a menu that can sit on a USB drive or a cloud drive. From here, users can run applications, group them in folders, mark favourites and initiate updates, all with a consistent interface.
The catalogue has grown substantially, now featuring over 1,400 portable packages spanning multiple categories: Accessibility, Development, Education, Games, Graphics & Pictures, Internet, Music & Video, Office, Security and Utilities. This includes major applications like LibreOffice, Firefox, GIMP, VLC media player, and hundreds of specialised tools across every computing category. That breadth helps the platform function as a complete environment rather than a one-off fix for a particular program. A person could keep a preferred browser with extensions and bookmarks, a document editor for quick edits, an image viewer for photos and a handful of diagnostic tools, all launched from the same menu.
Because the platform is designed to operate from cloud-synchronised locations as well, some forgo physical drives and keep their PortableApps directory inside providers like Dropbox or Google Drive. That way, the same set of tools appears on every machine where the cloud client is installed, with settings following through the sync client.
Portapps: The Modular Approach
Running alongside PortableApps is Portapps, an independent collection that also repackages Windows software to run portably, albeit with a different structure. Portapps distributes applications either as portable set-up files or as 7-Zip archives. Each title typically includes a small wrapper executable, named with a "-portable.exe" suffix, that orchestrates the portability layer.
Technical Implementation
That wrapper is written in Go and handles redirection of paths, environment configuration and other adjustments required to run the original application without leaving permanent traces on the host. The project is open source under the MIT licence, and many of its components live on GitHub, where users can watch releases and inspect how builds are constructed.
Usage and Transparency
Running a Portapps package is uncomplicated. After downloading the portable version of a supported application from the Portapps site or the relevant GitHub repository, the user extracts the files and launches the wrapper executable. The wrapper ensures that configuration and data reside in the portable directory and that the program operates without installing into Windows.
Portapps emphasises transparency around its build process. Properties and scripts are published, so observers can see how original sources are obtained and how wrappers are applied. Releases are versioned and binaries are provided, with wrappers scanned on VirusTotal to provide added confidence. The maintainers acknowledge that heuristic scanning can sometimes trigger false positives because of how the wrappers work, a reality that users should weigh against their own antivirus alerts and verification habits.
Application Focus and Updates
Portapps maintains a more selective catalogue of 54 applications, focusing primarily on modern software and developer tools. The collection includes popular applications like Discord, Visual Studio Code, Brave browser, VLC media player, Postman, IntelliJ IDEA, and various communication tools. The project targets contemporary software, particularly applications built with frameworks like Electron, and emphasises quality over quantity in its selections.
Recent releases continue actively, with regular updates to maintained applications. However, some applications are discontinued when the original projects become abandoned or when maintenance becomes unfeasible, demonstrating the project's pragmatic approach to software curation.
Comparison: Platform vs Modular
The distinction between the two projects emerges in how they are structured and managed, rather than in their core aim. This creates different advantages for different use cases.
PortableApps.com Advantages
PortableApps offers a full platform anchored by a launcher. It provides centralised update notifications and the ability to upgrade installed portable applications whilst preserving data. It integrates back-up functions and a customisable interface that collects everything into a single, recognisable menu. This arrangement suits anyone who wants a managed, coherent environment that travels intact from one machine to another, whether on a drive or inside a cloud-synchronised folder.
The platform's maturity shows in its comprehensive feature set: automatic updates, integrated back-up systems, theme customisation and extensive language support. The sheer size of its catalogue (over 1,400 applications across 10 categories) means users can often find portable versions of most common applications they need, from basic utilities to professional software suites.
Portapps Advantages
Portapps takes a per-application approach centred on wrappers. It does not bundle a unified menu or a site-wide update mechanism. Instead, it focuses on packaging individual programs so that each can run on its own from a portable directory. For some, that modularity is appealing because it keeps each application independent and allows for granular control over what gets updated and when.
The transparency of Portapps is particularly notable. All source code, build scripts and packaging processes are openly available on GitHub. This makes it easier for technically inclined users to understand exactly how applications are made portable and to contribute improvements or fixes. The project's focused approach means its 54 applications are typically modern, well-maintained packages that target contemporary software needs, particularly in development and communication tools.
Trade-offs and Limitations
Both approaches share similar constraints. Performance can lag when running from slow USB flash drives, especially with applications that read and write frequently. A modern external SSD or high-quality USB 3.x drive mitigates this, but older media can make the difference noticeable.
Compatibility relies in part on the host Windows installation. Some portable programs require certain components to be present or struggle if the operating system is old or tightly locked down by policy. Security considerations apply to both: a portable device can be lost or stolen, so using encryption or secure storage matters if sensitive data are involved.
Another constraint is access to system-level features. Programs that need drivers, system services or administrative rights may not function as expected in portable form. Updates in Portapps require more manual intervention compared to PortableApps' centralised update system.
Which to Choose
The choice often comes down to preferences and requirements. Those who want a curated catalogue with a central launcher, integrated updates and back-up features will likely benefit from the PortableApps.com Platform. It reduces administrative overhead by keeping everything in one place and by handling upgrades whilst leaving settings untouched.
Those who prefer to choose individual portable packages, appreciate the transparency of wrapper-based builds, or focus on a subset of modern applications may lean towards Portapps. Both coexist comfortably because their aims overlap, yet their methods differ, and nothing stops a user from mixing them if that suits a particular workflow, though running two separate structures does introduce more to manage.
Practical Implementation
Setting up a portable environment generally begins with choosing where it will live. A fast USB 3.x flash drive or an external SSD keeps load times brisk and reduces frustration. If removable media is not desirable, a folder inside a cloud synchronisation service provides similar flexibility, just without the need to carry hardware.
PortableApps Setup
In the case of PortableApps, installing the platform to the chosen location yields a menu that can then be populated with software drawn from the catalogue. Updates can be triggered from within the platform and back-ups made as snapshots of the entire environment. The integrated app store makes discovering and installing new portable applications straightforward.
Portapps Setup
For Portapps, the process is more manual. Individual applications are selected from the website or GitHub, downloaded either as portable set-ups or archives, unpacked to a chosen directory, then started using the "-portable.exe" wrapper. Keeping track of updates often means revisiting the releases page for each application or subscribing to notifications.
Security Considerations
Security merits attention at the outset. Losing a drive can mean losing data, so encrypting the portable directory is wise, whether by encrypting the entire device with tools like BitLocker To Go or by placing the portable environment inside a container created with software such as VeraCrypt. Public or shared machines can carry malware risks, so scanning hosts when possible and treating sensitive actions with caution remains sensible.
Verifying downloads by checking hashes or signatures when provided, and scanning portable applications with antivirus software, adds another layer of reassurance. It is also useful to remember that even well-designed portable applications may leave temporary traces because Windows itself writes certain entries as part of normal operation. The objective is to limit permanent change, not to circumvent the operating system's behaviour entirely.
Performance Optimisation
Performance can be improved with a few choices. Using faster storage makes the largest difference, particularly for larger applications that read and write many files. Keeping the portable directory in a location that remains consistently available to a cloud client avoids sync stalls, and selecting a machine's local drive rather than a slow network path reduces latency. Ensuring that the portable environment is not subject to aggressive antivirus scanning on every read can sometimes help, though that has to be balanced against security policies.
Final Remarks
Portable software has matured from a niche convenience into a practical way of working that respects the realities of shared and changing environments. By focusing on containment, reducing dependency on installation and making updates and back-ups straightforward, projects like PortableApps and Portapps make it easier to carry a personal toolkit across diverse Windows machines.
The two platforms serve overlapping but distinct needs. PortableApps.com excels as a comprehensive, managed environment suitable for users who want everything integrated and maintained through a single interface. Its extensive catalogue and automated features make it particularly attractive for those building complete portable computing environments.
Portapps appeals to users who prefer transparency, modularity and direct control over individual applications. Its open development model and focused approach to specific modern applications make it valuable for technically minded users or those with specific software requirements.
Use cases abound for both approaches. Students and professionals who switch between school, work and home can keep a consistent environment without altering each machine. Technicians often carry diagnostic and repair tools that run without installation so they can assist on any PC they encounter. Travellers value having a browser and email client with their own preferences ready to use on shared computers.
With thought given to security, performance and management, both PortableApps and Portapps can add consistency to a computing life that is increasingly spread across locations and devices, all without imposing on the host systems that make it possible. The choice between them depends on whether one prioritises integrated management or modular control, but both represent mature approaches to an enduring challenge in modern computing.
From convex to concave: reflections on decades of computer monitor usage
Within the last week, I changed my monitor and am without an Iiyama in my possession for the first time since 1997. The first one was a 17" CRT screen that accompanied my transition from education into work. Those old screens were not long-lasting, though, especially since it replaced a 15" Dell screen that had started to work less well than I needed; the larger size was an added attraction after I saw someone with a 21" Iiyama at the university where I was pursuing a research degree.
Work saw me using a 21" Philips screen myself for a time before Eizo flat screen displays were given to us as part of a migration to Windows 2000. That inspired me to get a 17" Iiyama counterpart to what I had at work. Collecting that sent me on an errand to a courier's depot on the outskirts of Macclesfield. The same effort may have been accompanied by my dropping my passport, which I was using for identification. That thankfully was handed into the police, so I could get it back from them, even if I was resigned to needing a new one. More care has been taken since then to avoid a repeat.
The screen worked well, though I kept the old one as a backup for perhaps far too long. It took some years to pass before I eventually hauled it to the recycling centre; these days, I might try a nearby charity shop before setting off on such a schlep. In those times, LCD screens lasted so well that they could accumulate if you were not careful. The 17" Iiyama accompanied my migration from Windows to Linux and a period of successful and ill-fated PC upgrades, especially a run of poor luck in 2009.
2010 saw me change my place of work, and a 24" Iiyama was acquired just before then. Again, its predecessor was retained in case anything went awry and eventually went to a charity shop from where I could go into a new life. There was no issue with the new acquisition, and it went on to do nearly twelve years of work for me. A 34" Iiyama replaced it a few years ago, yet I wonder if that decision was the best. Apart from more than a decade of muck on the screen, nothing else was amiss. Even a major workstation upgrade in 2021 did little to challenge it. Even so, it too went to a charity shop searching for a new home.
This year's workstation overhaul did few favours to that 34" successor. While it was always sluggish to wake, it did nothing like going into a cycle of non-responsiveness that it had on numerous occasions in the last few months. Compatibility with a Mac Mini could be better, too. The result is that I am writing these words using a Philips B346C1 instead, and it has few of the issues that beset the Iiyama, save for needing to remove and insert an HDMI cable for a Mac Mini at times.
Screen responsiveness is a big improvement, especially when switching between machines using a KVMP switch. Wake up times are noticeably shorter, and there is much better reliability. However, it did take a deal of time to optimise its settings to my liking. The OSD may be more convenient than the Iiyama, yet having Windows software that did the same thing made configuration at lot easier. While getting acceptable output across Windows, Linux and macOS has been a challenge, there is a feeling that things are nearly there.
Another matter is the fact that this is a curved screen. In some ways, that is akin to the move from a 24" screen to a 34" one when fonts and other items needing enlarging for the bigger screen. After a burst of upheaval, eventually things do settle down and acclimatisation ensues. Even though further tinkering cannot be ruled out, there is a sounder base for computing after the changeover.
Using third-party tools to make an Evoluent mouse work as needed on macOS
Now having a new location from which I can work, I acquired an all-in-one desktop computer for use while there. While tempted by an HP option that runs Windows, I ended up choosing an iMac instead. That gained me extra disk space and more memory at a cost. Having UNIX-style command line capability was another attraction. After living with the Windows terminal for a while, its limitations were all too apparent to me.
While I started off desktop computing on a Macintosh Classic and having owned a MacBook Pro in the more recent past, there still was a learning curve. One of these related to the configuration of the mouse supplied with the system. Whatever about only having one button and needing to learn gestures, it was the speed at which the pointer goes that really got me reaching for my more usual Evoluent. Even so, the subsequent discovery of LinearMouse makes things much more bearable once all the requisite permissions were assigned.
Getting the Evoluent configured to my liking needed another third-party application: USB Overdrive. If Evoluent's own software fitted the bill, that would have done. However, they have done some finger pointing at Apple instead of updating it to work with the latest Mac technology. There may be truth in the accusations, but it is striking that another piece of software works when theirs does not. Nevertheless, the other option worked once it got the permissions to detect the hardware. Then, it was a matter of working out which button was which on the mouse, so I could have them assigned as I wished.
After that, I could settle into the new system and get used to its idiosyncrasies. Adding Parallels got me a Windows 11 virtual machine for business compatibility, while I got going with setting up some automation using the macOS terminal. All is becoming more settled than working out of a laptop.
Needing third-party software does have a catch, though: underlying changes to macOS could scupper things. It was the sort of thing that made me move away from GNOME Shell as my Linux desktop. The extensions on which I was depending kept getting obsoleted by every new release. It is something to watch, even if macOS evolves less dramatic than GNOME 3 in its various forms.
Opening up Kindle for PC in a maximised window on Windows 11
One irritation with the Windows app for Amazon Kindle is that it does not open in a maximised window, and it scarcely remembers your size settings from session to session. Finding a solution to this sizing issue is no easy task, so I happened on one of my own that I previously used with File Explorer folder shortcuts.
The first step is to find the actual location of the Start Menu shortcut. Trying C:\Users\[User Name]\AppData\Roaming\Microsoft\Windows\Start Menu\Programs\Amazon\Amazon Kindle should do that.
Next, right-click on the Kindle icon and choose Properties from the context menu that appears. In the dialogue box that causes to appear on the screen, look for the "Run:" setting. By default, this appears as "Normal Window" but you can change this to "Maximised", which is what I did before clicking on Apply before doing the same for the OK button to dismiss the dialogue box.
If you have pinned the shortcut to the taskbar or elsewhere, you may need to unpin it and pin it again to carry over the change. After that, I found that the Kindle app opened up in a maximised window as I wanted.
Making the LanguageTool embedded HTTP Server work on Windows 11
My choice of Markdown editor is VS Code or VSCodium, the latter being a fork of the former with Microsoft telemetry removed. In either case, I use the LanguageTool Linter extension for the required grammar and spelling checks. Pointing that to the remote web service offered by LanguageTool could get punitive, even if I am a subscriber. Thus, I use a locally installed equivalent instead.
In my usual Linux system, that is how I work. However, I have replicated the set-up on a Windows laptop for added flexibility. The needed the JRE, so that was downloaded from the Oracle website and then installed. The next step is to download the LanguageTool embedded HTTP Server zip file and decompress it to a chosen location. To run the server, the command like the following is issued from the Windows Terminal (the single line may break over two here):
java -cp "[Chosen Location]\LanguageTool-stable\LanguageTool-6.4\languagetool-server.jar" org.languagetool.server.HTTPServer --port 8081 --allow-origin
That is enough to get things going because it fulfils the default settings of the LanguageTool Linter extension in VS Code or VSCodium. The fastText application is unavailable for Windows, so I did without it. So far, things are operating acceptably, even if there is a way to address more memory should that be required.
Getting Adobe Lightroom Classic to remember the search filters that you have set
With Windows 10 support to end in October 2025 and VirtualBox now offering full support for Windows 11, I have moved onto Windows 11 for personal use while retaining Windows 10 for professional work, at least for now. Of course, a lot could happen before 2025 with rumours of a new Windows version, the moniker Windows 12 has been mooted, but all that is speculation for now.
As part of the changeover, I moved the Adobe apps that I have in an ongoing subscription, Lightroom Classic and Photoshop are the main ones for me, to the new virtual machine. That meant that some settings from the previous one were lost and needed reinstating.
One of those was the persistence of Library Filters, so I had to find out how to get that sorted. If my memory is not fooling me, this seemed to be a default action in the past, and that meant that I was surprised by the change in behaviour.
Nevertheless, I had to go to the File menu, select Library Filters (it is near the bottom of the menu in the current version at the time of writing) and switch on Lock Filters by clicking on it to get a tick mark preceding the text. There is another setting called Remember Each Source's Filters Separately in the same place that can be set in the same manner if so desired, and I am experimenting with that at the moment, even though I have not bothered with this in the past.
Fixing Windows 11 freezing issues in VirtualBox with KVM paravirtualisation
Recently, I have been trying to get Windows 11 to run smoothly within a VirtualBox virtual machine, and there has been a lot of experimentation along the way. This was to eradicate intermittent freezes that escalated CPU usage and necessitated hard restarts. If I were to use Windows 11 as a long-term replacement for Windows 10, these needed to go.
An internet search showed that others faced the same predicament, yet a range of proposed solutions did nothing for me. The suggestion of enabling 3D graphics capability did nothing but produce a black screen at startup time, so that was not a runner. It might have been the combination of underlying graphics hardware and the drivers on my Linux Mint machine that hindered me when it helped others.
In the end, a look at the bug tracker for Windows guest operating systems running on VirtualBox sent me in another direction. The Paravirtualisation interface also may have caused issues with Windows 10 virtual machines, since these were all set to KVM. Doing the same for Windows 11 seems to have stopped the freezing behaviour so far. It meant going to the virtual machine settings, navigating to System > Acceleration and changing the dropdown menu value from Default to KVM before clicking on the OK button.
Before that, I have been blaming the newness of VirtualBox 7 (it is best not to expect too much of a fresh release bringing such major changes) and even the way that I installed Windows 11 using the streamlined installation or licensing issues. Now that things are going better, it may have been a lesson from Windows 10 that I had forgotten. The EFI, Secure Boot and TPM 2.0 requirements of Windows 11 also blind sided me, especially given the long wait for VirtualBox to add such compatibility, but that is behind me at this stage.
Given that Windows 11 is not perfect, Start11 makes it usable and the October 2025 expiry for Windows 10 also focuses my mind. It is time to move over for the sake of future-proofing if nothing else. In time, we may get a better operating system as Windows 11 matures and some minds surely are thinking of a "Windows 12". Depending on how things go, we may get to a point where something vintage in the nature of Windows XP, Windows 7 or Windows 10 appears. Those older versions of Windows became like old gold during their lives.
Lessons learned on managing Windows Taskbar and Start Menu colouring in VirtualBox virtual machines
In the last few weeks, I have had a few occasions when the colouration of the Windows 10 taskbar and its Star Menu has departed from my expectations. At times, this happened in VirtualBox virtual machine installations and both the legacy 5.2.x versions and the current 6.x ones have thrown up issues.
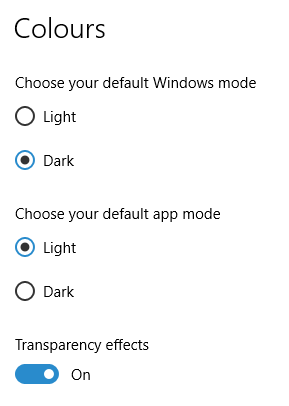

The first one actually happened with a Windows 10 installation in VirtualBox 5.2.x when the taskbar changed colour to light grey and there was no way to get it to pick up the colour of the desktop image to become blue instead. The solution was to change the Windows from Light to Dark in order for the desired colouration to be applied, and the settings above are taken from the screen that appears on going to Settings > Personalisation > Colours.
The second issue appeared in Windows 10 Professional installation in VirtualBox 6.0.x when the taskbar and Start Menu turned transparent after an updated. This virtual machine is used to see what is coming in the slow ring of Windows Insider, so some rough edges could be expected. The solution here was to turn off 3D acceleration in the Display pane of the VM settings after shutting it down. Starting it again showed that all was back as expected.
Both resolutions took a share of time to find and there was a deal of experimentation needed too. Once identified, they addressed the issues as desired. Hence, I am recording them here for use by others as much as future reference for myself.