Yet another useful Windows shortcut
11th December 2011During the week, I needed to go to a client to upgrade the laptop that they’d given me for doing work for them. The cause was their migration from Windows XP to Windows 7. Office 2010 also came with the now set up and they replace the machines with new ones too. As part of doing this, they carried out upgrade training and this is when I got to learn a thing or two.
While I may have been using Windows 7 since the beta releases first were made available, I am under no illusions that I know all there is to be known about the operating system. Included among the things of which I wasn’t aware was a shortcut key combination for controlling display output from the HP laptop that I’d been given. This is the Windows key + P. This brings up a dialogue screen from which you can select the combination that you need and that includes extending the display across two different screens, such as that of the laptop and an external monitor. Going into the display properties will fine tune things such as what is the main display and the placement of the desktops; there’s no point in having Windows thinking that the external screen is to your left when in fact it is at the right.
Another interesting shortcut is the Windows key + TAB. This affects the Aero application view and repeating the combination cycles through the open applications or you can use a mouse wheel to achieve the same end. With ALT + TAB and the taskbar still about, this might appear more of a curiosity but some may still find it handy so I’ve shared it here too.
All in all, it’s best never to think that you know enough about something because there’s always something new to be learned and it’s always the smallest of things that proves to be the most helpful. With every release of Windows, that always seems to be the case and Windows 8 should not be any different, even if all the talk is about its Metro interface. A beta release is due in the spring of 2012 so we’ll have a chance to find out then. You never can stop learning about this computing business.
Smoother use of more than one SAS DMS session at a time
11th March 2012Unless you have access to SAS Enterprise Guide, being able to work on one project at a time can be a little inconvenient. It is possible to open up more than one Display Manager System (DMS, the traditional SAS programming interface) session at a time but you can get a pop up window for SAS documentation for second and subsequent sessions and you don’t get your settings shared across them either.
The cause of both of the above is the locking of the SASUSER directory files by the first SAS session. However, it is possible to set up a number of directories and set the -sasuser option to point at different ones for different sessions.
On Windows, the command in the SAS shortcut becomes:
C:\Program Files\SAS\SAS 9.1\sas.exe -sasuser "c:\sasuser\session 1\"
On UNIX or Linux, it would look similar to this:
sas -sasuser "~/sasuser/session1/"
The “session1” in the folder paths above can be replaced with whatever you need and you can have as many as you want too. It might not seem much of a need but synchronising the SASUSER folders every now and again can give you a more consistent set of settings across each and you don’t get intrusive pop up boxes or extra messages in the log either.
Installing the Cinnamon Desktop Environment on Sabayon Linux
26th January 2013During the week, I did an update on my Sabayon system and GNOME 3.6 came on board without to much of a bother. There was no system meltdown or need for an operating system re-installation. However, there was one matter that rankled: adding and updating extensions from extensions. gnome.org was impossible. The process would create a new folder in ~/.local/share/gnome-shell/extensions/ but not fill it with anything at all. Populating from another my Ubuntu GNOME Remix 12.10 machine didn’t seem to achieve the needful and I am left wondering if it is down to the version of GNOME Shell being 3.6.2. However, even adding an entry for the current version of GNOME Shell to metadata.json for one plugin didn’t appear to do what I wanted so resolving this issue needs further enquiry.
In the meantime, I added the Cinnamon desktop environment using the following command and will be using that from now on. If the GNOME Shell extension issue ever gets sorted I may move back but there is no rush. GNOME 3.8 sounds like it’s bringing an interesting option that makes use of the approach Linux Mint took for version 12 of that distribution and I can await that, especially if it avoids the need for adding extension on a personal basis like now.
sudo equo update && sudo equo install cinnamon
With the installation completed by the above command, it was a matter of logging out and choosing the Cinnamon entry (there is a 2D version too) from the session dropdown menu on the login screen to get it going. Then, it was a matter of tweaking Cinnamon to my heart’s content. Getting a two panel layout required logging out and in again as well as choosing the appropriate setting in the Cinnamon Panel options tab. Next, I decided to check on what themes are available at cinnamon.linuxmint.org before settling on Cinnamint 1.6. It all feels very comfortable apart from not having an automatically growing list of workspaces that are a default offering in GNOME Shell. That goes against the design principles of Cinnamon though so only hopes of someone making an extension that does that are left.
A look at Ubuntu GNOME 13.10
12th October 2013With its final release being near at hand, I decided to have a look at the beta release of Ubuntu GNOME 13.10 to get a sense of what might be coming. A misstep along the way had me inadvertently download and install the 64-bit edition of 13.04 into a VirtualBox virtual machine. The intention to update that to its soon to be released successor was scuppered by instability so I never did get to try out an in situ upgrade to 13.10. What I had in mind was to issue the following command:
gksu update-manager -d
However, I found another one when considering how Ubuntu Server might be upgraded without the GUI application that is the Update Manager. To update to a development version, the following command is what you need:
sudo do-release-upgrade -d
To upgrade to a final release of of a new version of Ubuntu, drop the -d switch from the above to use the following:
sudo do-release-upgrade
There is one further option that isn’t recommended for moving between Ubuntu versions but I use it to get updates such as new kernel subversions that are released:
sudo apt-get dist-upgrade
Rather than trying out the above, I downloaded the latest ISO image for the beta release of Ubuntu GNOME 13.10 and installed onto a VM that instead. Though it is the 32 bit version of the distro that is installed on my main home PC, it has been the 64 bit version that I have been trying. So far, that seems to be behaving itself even if it feels a little sluggish but that could be down to the four year old PC that hosts the virtual machine. For a while, I have been playing with the possibility of an upgrade involving an Intel Core i5 4670K CPU and 16 GB of RAM (useful for running multiple virtual machines at a time) along with any motherboard that supports those so looking at a 64 bit operating system has its uses.
The Linux kernel may be 3.11 but that is not my biggest concern. Neither is the fact that LibreOffice 4.1.2.3 was included and GIMP wasn’t, especially when that could be added easily anyway and it is version 2.8.6 that you get. The move to GNOME Shell 3.8 was what drew me to seeing what was coming because I have been depending on a number extensions. As with WordPress and plugins, GNOME Shell seems to have a tempestuous relationship with some of its extensions and I wanted to see which ones still worked. There also has been a change to the backstage application view in that you either get all installed applications displayed when you browse them or you have to start typing the name of the one you want to select it. Losing the categorical view that has been there until GNOME Shell 3.6 is a step backwards and I hope that version 3.10 has seen some sort of a reinstatement. There is a way to add these categories and the result is not as it once was either; also, it shouldn’t be necessary for anyone to dive into a systems innards to address things like this. With all the constant change, it is little wonder that Cinnamon has become a standalone entity with the release of its version 2.0 and that Debian’s toyed with not going with GNOME for its latest version (7.1 at the time of writing and it picked a good GNOME Shell version in 3.4).
Having had a look at other distribution that already have GNOME Shell 3.8, I knew that a few of my extensions worked with it. The list includes Frippery Bottom Panel, Frippery Move Clock, Places Status Indicator, Removable Drive Menu, Remove Rounded Corners (not really needed with the GNOME Shell theme that I use, Elementary Luna 3.4, but I retain it anyway), Show Desktop Button, User Themes and Ignore_Request_Hide_Titlebar. Because of the changes to the backstage view, I added Frippery Applications Menu in preference to Applications Menu because I have found that to be unstable. Useful new discoveries have included Curtains Up and GNOME Shell Open Terminal while Shell Restart User Menu Entry has made a return and found a use this time around too.
There have been some extensions that were not updated to work with GNOME Shell 3.8 that I have got working. In some cases, it was as simple as updating the metadata.json file for an extension with new version numbers of 3.8 and 3.84 to the list associated with the shell version property. All extensions are to be found in the .local/share/gnome-shell/extensions location in your home directory and each has a dedicated file containing the aforementioned file.
With others, it was a matter of looking in the Looking Glass (execute lg in the box that ALT + F2 brings up on your screen to access this) and seeing what error messages were to be found in there before attempting to correct these in either the extensions’ extension.js files or whatever JavaScript (*.js) file was causing the problem. With either or both of these remedies, I managed to port the four extensions below to GNOME Shell 3.8. In fact, you can download these zip files and install them yourself to see how you get on with them.
Advanced Settings in User Menu
There is a Remove Panel App Menu that works with GNOME Shell 3.8 but I found that it got rid of the Places menu instead of the panel’s App Menu so I tried porting the older extension to see if it behaved itself and it does. With these in place, I have bent Ubuntu GNOME 13.10 to my will ahead of its final release next week and that includes customising Nautilus too. Other than a new version of GNOME Shell, it looks as if it will come with less in the way of drama and a breather like that is no bad thing given that personal computing continues to remain in a state of flux these days.
Forcing an upgrade to Windows 10 Anniversary Update
6th September 2016There remain people who advise those on Windows 7 or 8.x to hold fire on upgrading to Windows 10. Now that the free upgrade no longer is available, that advice may hold more weight than it did. Even so, there are those among us who jumped ship who do not mind having the latest versions of things at no monetary cost to see what is available and I must admit to being one of those.
After all, I do have a virtual machine with a pre-release version of the next update to Windows 10 installed on there to see what might be coming our way and to get a sense of what changes that may bring so that I am ready for those. Otherwise, I usually am happy to wait but I noticed that the Windows 10 Anniversary Update only came to my HP Pavilion dm4 laptop and not other machines with Windows 10 installed so I started to wonder why there was a lag when it came to automatic upgrades.
So that these things do not arrive when it is least convenient, I took advantage of a manual method in order to choose my timing. This did not involve installation from a disk image but was in-situ. The first part of the process is standard enough in that the Settings app was started and the Update & security item chosen. That dropped me onto the Windows Update and I first clicked on the Check for updates button to see what would happen. When nothing came of that, the Learn more link was clicked to bring me onto part of the Microsoft support website where I found that the Windows 10 Anniversary Update installer could be downloaded so I duly did just that.
Running it produced a screen asking whether or not I wanted to proceed. Since I wanted to go ahead, the appropriate button was clicked and the machine left alone until the process complete. Because the installer purely is a facilitator, the first stage is to download the rest of the files needed and that will take a while on any connection. Once downloading was completed, the actual process of installation commenced with several restarts before a log-in screen was again on offer. On logging in to the machine, the last part of the process started.
The process took quite a while but seemingly worked without a hitch. If there was anything that I needed to do, it was the re-installation of VirtualBox Guest Additions to restore access to shared folders as well as dealing with a self-inflicted irritation. Otherwise, I have found that previously installed software worked as expected and no file has been missed. Waiting a while may have had its advantages too because initial issues with the Anniversary Update will have been addressed but it is best not to leave it too long or you could have the feeling of being forgotten. A happy balance needs striking.
Installing Firefox Developer Edition in Linux Mint
22nd April 2018Having moved beyond the slow response and larger memory footprint of Firefox ESR, I am using Firefox Developer Edition in its place even if it means living without a status bar at the bottom of the window. Hopefully, someone will create an equivalent of the old add-on bar extensions that worked before the release of Firefox Quantum.
Firefox Developer Edition may be pre-release software with some extras for web developers like being able to to drill into an HTML element and see its properties but I am finding it stable enough for everyday use. It is speedy too, which helps, and it has its own profile so it can co-exist on the same machine as regular releases of Firefox like its ESR and Quantum variants.
Installation takes a little added effort though and there are various options available. My chosen method involved Ubuntu Make. Installing this involves setting up a new PPA as the first step and the following commands added the software to my system:
sudo add-apt-repository ppa:ubuntu-desktop/ubuntu-make
 sudo apt-get update
 sudo apt-get install ubuntu-make
With the above completed, it was simple to install Firefox Developer edition using the following command:
umake web firefox-dev
Where things got a bit more complicated was getting entries added to the Cinnamon Menu and Docky. The former was sorted using the cinnamon-menu-editor command but the latter needed some tinkering with my firefox-developer.desktop file found in .local/share/applications/ within my user area to get the right icon shown. Discovering this took me into .gconf/apps/docky-2/Docky/Interface/DockPreferences/%gconf.xml where I found the location of the firefox-developer.desktop that needed changing. Once this was completed, there was nothing else to do from the operating system side.
Within Firefox itself, I opted to turn off warnings about password logins on non-https websites by going to about:config using the address bar, then looking for security.insecure_field_warning.contextual.enabled and changing its value from True to False. Some may decry this but there are some local websites on my machine that need attention at times. Otherwise, Firefox is installed with user access so I can update it as if it were a Windows or MacOS application and that is useful given that there are frequent new releases. All is going as I want it so far.
Updating Flatpack applications on Linux Mint 19
10th August 2018Since upgrading to Linux Mint 19, I have installed some software from Flatpack. The cause for my curiosity was that you could have the latest versions of applications like GIMP or Libreoffice without having to depend on a third-party PPA. Installation is straightforward given the support built into Linux Mint. You just need to download the relevant package from the Flatpack website and running the file through the GUI installer. Because the packages come with extras to ensure cross-compatibility, more disk space is used but there is no added system overhead beyond that from what I have seen. Updating should be as easy as running the following single command too:
flatpack update
However, I needed to do a little extra work before this was possible. The first step was to update the configuration file at ~/.local/share/flatpak/repo/config to add the following lines:
[remote "flathub"]
 gpg-verify=true
 gpg-verify-summary=true
 url=https://flathub.org/repo/
 xa.title=Flathub
Once that was completed, I ran the following commands to import the required GPG key:
wget https://flathub.org/repo/flathub.gpg
 flatpak --user remote-modify --gpg-import=flathub.gpg flathub
With this complete, I was able to run the update process and update any applications as necessary. After that first run, it has been integrated in to my normal processes by adding the command to the relevant alias definition.
Lessons learned on managing Windows Taskbar and Start Menu colouring in VirtualBox virtual machines
9th December 2019In the last few weeks, I have had a few occasions when the colouration of the Windows 10 taskbar and its Star Menu has departed from my expectations. At times, this happened in VirtualBox virtual machine installations and both the legacy 5.2.x versions and the current 6.x ones have thrown up issues.
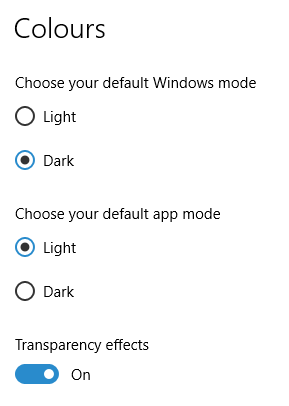

The first one actually happened with a Windows 10 installation in VirtualBox 5.2.x when the taskbar changed colour to light grey and there was no way to get it to pick up the colour of the desktop image to become blue instead. The solution was to change the Windows from Light to Dark in order for the desired colouration to be applied and the settings above are taken from the screen that appears on going to Settings > Personalisation > Colours.
The second issue appeared in Windows 10 Professional installation in VirtualBox 6.0.x when the taskbar and Start Menu turned transparent after an updated. This virtual machine is used to see what is coming in the slow ring of Windows Insider so some rough edges could be expected. The solution here was to turn off 3D acceleration in the Display pane of the VM settings after shutting it down. Starting it again showed that all was back as expected.
Both resolutions took a share of time to find and there was a deal of experimentation needed too. Once identified, they addressed the issues as desired so I am recording here for use by others as much as future reference for myself.
Getting rid of the Windows Resizing message from a Manjaro VirtualBox guest
27th July 2020Like Fedora, Manjaro also installs a package for VirtualBox Guest Additions when you install the Linux distro in a VirtualBox virtual machine. However, it does have certain expectations when doing this. On many systems and my own is one of these, Linux guests are forced to use the VMSVGA virtual graphics controller while Windows guests are allowed to use the VBoxSVGA one. It is the latter that Manjaro expects so you get a message like the following appearing when the desktop environment has loaded:
Windows Resizing
 Set your VirtualBox Graphics Controller to enable windows resizing
After ensuring that gcc, make, perl and kernel headers are installed, I usually install VirtualBox Guest Additions myself from the included ISO image and so I did the same with Manjaro. Doing that and restarting the virtual machine got me extra functionality like screen resizing and being able to copy and paste between the VM and elsewhere after choosing the Bidirectional setting in the menus under Devices > Shared Clipboard.
That still left an unwanted message popping up on startup. To get rid of that, I just needed to remove /etc/xdg/autostart/mhwd-vmsvga-alert.desktop. It can be deleted but I just moved it somewhere else and a restart proved that the message was gone as needed. Now everything is working as I wanted.
Disabling the SSL connection requirement in MySQL Workbench
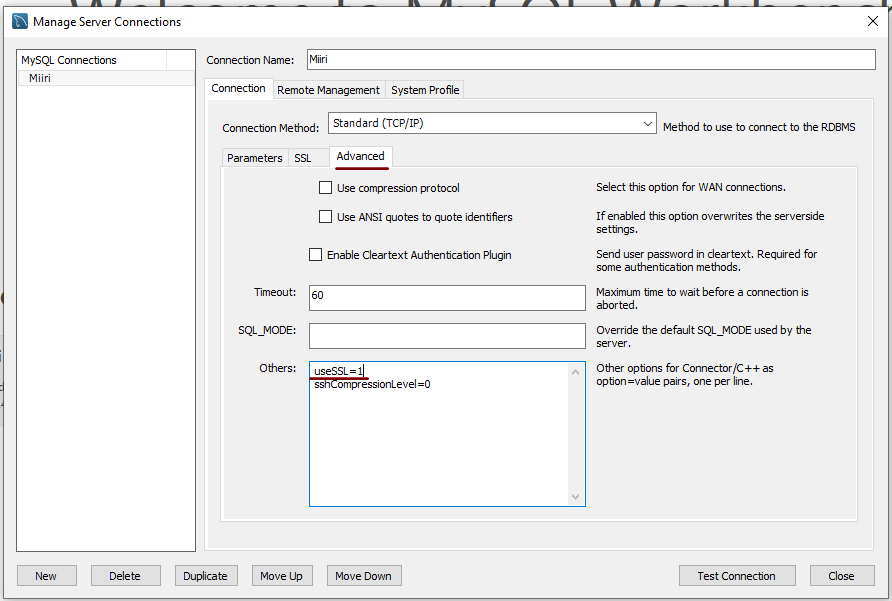
7th November 2022A while ago, I found that MySQL Workbench would only use SSL connections and that was stopping it from connecting to local databases so I looked for a way to override this. The cure was to go to Database > Manage Connections… in the menus for the application’s home tab. in the dialogue box that appeared, I chose the connection of interest and went to the Advanced panel under Connection and removed the line useSSL=1 from the Others field. The screenshot below shows you what things look like before the change is made. Naturally, the best practice would be to secure a remote database connection using SSL so this approach is best reserved for remote non-production databases. However, it may be that this does not happen now but I thought I would share this in case the problem persists for anyone.