Do we need dongles anymore?
12th March 2012Recent exposure to both the HTC Wildfire S and the HTC Desire S has me wondering if we need mobile broadband dongles anymore. The reason for my asking this is that both Android devices can act as mobile wi-fi hubs and they work very well as these too. Even the dedicated T-Mobile mobile wi-fi hub that I picked up in the closing months of 2011 now looks a little obsolete though it retains a cost advantage in its favour.
In the case of both HTC phones, it thankfully is possible to use high security encryption and a pass key too. However, it is best to change the default key before any activation of wi-fi signal, if only to ensure that you don’t end up with a very nasty bill. The Wi-Fi Hotspot App has all the settings that you need and up to five connections can be supported at a time, just like that T-Mobile hub that I mentioned earlier.
That replaced a defunct dongle from the same company; the USB connection appeared to have failed and was ailing for a while. Now, it might be that the more transparent use of an actual mobile phone might be usurping that as well, especially when I have been wondering why it has been doing so well with internet connectivity while using it on the move. This voyage into the world of what smartphones and similar devices can do is throwing up its share of surprises as I go along.
Installing the Cinnamon Desktop Environment on Sabayon Linux
26th January 2013During the week, I did an update on my Sabayon system and GNOME 3.6 came on board without to much of a bother. There was no system meltdown or need for an operating system re-installation. However, there was one matter that rankled: adding and updating extensions from extensions. gnome.org was impossible. The process would create a new folder in ~/.local/share/gnome-shell/extensions/ but not fill it with anything at all. Populating from another my Ubuntu GNOME Remix 12.10 machine didn’t seem to achieve the needful and I am left wondering if it is down to the version of GNOME Shell being 3.6.2. However, even adding an entry for the current version of GNOME Shell to metadata.json for one plugin didn’t appear to do what I wanted so resolving this issue needs further enquiry.
In the meantime, I added the Cinnamon desktop environment using the following command and will be using that from now on. If the GNOME Shell extension issue ever gets sorted I may move back but there is no rush. GNOME 3.8 sounds like it’s bringing an interesting option that makes use of the approach Linux Mint took for version 12 of that distribution and I can await that, especially if it avoids the need for adding extension on a personal basis like now.
sudo equo update && sudo equo install cinnamon
With the installation completed by the above command, it was a matter of logging out and choosing the Cinnamon entry (there is a 2D version too) from the session dropdown menu on the login screen to get it going. Then, it was a matter of tweaking Cinnamon to my heart’s content. Getting a two panel layout required logging out and in again as well as choosing the appropriate setting in the Cinnamon Panel options tab. Next, I decided to check on what themes are available at cinnamon.linuxmint.org before settling on Cinnamint 1.6. It all feels very comfortable apart from not having an automatically growing list of workspaces that are a default offering in GNOME Shell. That goes against the design principles of Cinnamon though so only hopes of someone making an extension that does that are left.
Command Line Processing of EXIF Image Metadata
8th July 2013There is a bill making its way through the U.K. parliament at the moment that could reduce the power of copyright when it comes to images placed on the web. The current situation is that anyone who creates an image automatically holds the copyright for it. However, the new legislation will remove that if it becomes law as it stands. As it happens, the Royal Photographic Society is doing what it can to avoid any changes to what we have now. There may be the barrier of due diligence but how many of us take steps to mark our own intellectual property? For one, I have been less that attentive to this and now wonder if there is anything more that I should be doing. Others may copyleft their images but I don’t want to find myself unable to share my own photos because another party is claiming rights over them. There’s watermarking them but I also want to add something to the image metadata too.
That got me wondering about adding metadata to any images that I post online that assert my status as the copyright holder. It may not be perfect but any action is better than doing nothing at all. Given that I don’t post photos where EXIF metadata is stripped as part of the uploading process, it should be there to see for anyone who bothers to check and there may not be many who do.
Because I also wanted to batch process images, I looked for a command line tool to do the needful and found ExifTool. Being a Perl library, it is cross-platform so you can use it on Linux, Windows and even OS X. To install it on a Debian or Ubuntu based Linux distro, just use the following command:
sudo apt-get install libimage-exiftool-perl
The form of the command that I found useful for adding the actual copyright information is below:
exiftool -p “-copyright=(c) John …” -ext jpg -overwrite_original
The -p switch preserves the timestamp of the image file while the -overwrite_original one ensures that you don’t end up with unwanted backup files. The copyright message goes within the quotes along with the -copyright option. With a little shell scripting, you can traverse a directory structure and change the metadata for any image files contained in different sub-folders. If you wish to do more than this, there’s always the user documentation to be consulted.
Get in Touch
25th May 2018Please feel free to use this form to ask anything about what you find here or if you have a constructive comment to share. Also, please refrain from making unsolicited offers of articles or of web development services (including search engine optimisation) since these are unneeded.
Lessons learned on managing Windows Taskbar and Start Menu colouring in VirtualBox virtual machines
9th December 2019In the last few weeks, I have had a few occasions when the colouration of the Windows 10 taskbar and its Star Menu has departed from my expectations. At times, this happened in VirtualBox virtual machine installations and both the legacy 5.2.x versions and the current 6.x ones have thrown up issues.
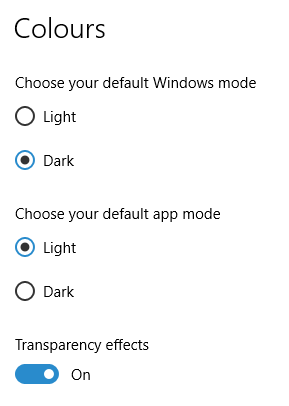

The first one actually happened with a Windows 10 installation in VirtualBox 5.2.x when the taskbar changed colour to light grey and there was no way to get it to pick up the colour of the desktop image to become blue instead. The solution was to change the Windows from Light to Dark in order for the desired colouration to be applied and the settings above are taken from the screen that appears on going to Settings > Personalisation > Colours.
The second issue appeared in Windows 10 Professional installation in VirtualBox 6.0.x when the taskbar and Start Menu turned transparent after an updated. This virtual machine is used to see what is coming in the slow ring of Windows Insider so some rough edges could be expected. The solution here was to turn off 3D acceleration in the Display pane of the VM settings after shutting it down. Starting it again showed that all was back as expected.
Both resolutions took a share of time to find and there was a deal of experimentation needed too. Once identified, they addressed the issues as desired so I am recording here for use by others as much as future reference for myself.
Getting rid of the Windows Resizing message from a Manjaro VirtualBox guest
27th July 2020Like Fedora, Manjaro also installs a package for VirtualBox Guest Additions when you install the Linux distro in a VirtualBox virtual machine. However, it does have certain expectations when doing this. On many systems and my own is one of these, Linux guests are forced to use the VMSVGA virtual graphics controller while Windows guests are allowed to use the VBoxSVGA one. It is the latter that Manjaro expects so you get a message like the following appearing when the desktop environment has loaded:
Windows Resizing
 Set your VirtualBox Graphics Controller to enable windows resizing
After ensuring that gcc, make, perl and kernel headers are installed, I usually install VirtualBox Guest Additions myself from the included ISO image and so I did the same with Manjaro. Doing that and restarting the virtual machine got me extra functionality like screen resizing and being able to copy and paste between the VM and elsewhere after choosing the Bidirectional setting in the menus under Devices > Shared Clipboard.
That still left an unwanted message popping up on startup. To get rid of that, I just needed to remove /etc/xdg/autostart/mhwd-vmsvga-alert.desktop. It can be deleted but I just moved it somewhere else and a restart proved that the message was gone as needed. Now everything is working as I wanted.
Limiting Google Drive upload & synchronisation speeds using Trickle
9th October 2021Having had a mishap that lost me some photos in the early days of my dalliance with digital photography, I have been far more careful since then and that now applies to other files as well. Doing regular backups is a must that you find reiterated by many different authors and the current computing climate makes doing that more vital than it ever was.
So, as well as having various local backups, I also have remote ones in the form of OneDrive, Dropbox and Google Drive. These more correctly are file synchronisation services but disciplined use can make them useful as additional storage facilities in the interests of maintaining added resilience. There also are dedicated backup services that I have seen reviewed in the likes of PC Pro magazine but I have to make use of those.
Insync
Part of my process for dealing with new digital photo files is to back them up to Google Drive and I did that with a Windows client in the early days but then moved to Insync running on Linux Mint. One drawback to the approach is that this hogs the upload bandwidth of an internet connection that has yet to move to fibre from copper cabling. Having fibre connections to a local cabinet helps but a 100 KiB/s upload speed is easily overwhelmed and digital photo file sizes keep increasing. It does not help that I insist on using more flexible raw formats like DNG, CR2 or CR3 either.
Making fewer images could help to cut the load but I still come away from an excursion with many files because I get so besotted with my surroundings. This means that upload sessions take numerous hours and can extend across calendar days. Ultimately, this makes my internet connection far less usable so I want to throttle upload speed much like what is possible in the Transmission BitTorrent client or in the Dropbox client. Unfortunately, this is not available in Insync so I have tried using the trickle command instead and an example is below:
trickle -d 2000 -u 50 insync
Here, the upload speed is limited to 50 KiB/s while the download speed is limited to 2000 KiB/s. In my case, the latter of these hardly matters while the former leaves me with acceptable internet usability. Insync does not work smoothly with this, however, so occasional restarts are needed to keep file uploads progressing and CPU load also is higher. As rough as the user experience feels, uploads can continue in parallel with other work.
gdrive
One other option that I am exploring is the use of the command-line tool gdrive and this appears to work well with trickle. After downloading and installing the tool, getting going is a matter of issuing the following command and following the instructions:
gdrive about
On web servers, I even have the tool backing up things to Google Drive on a scheduled basis. Because of a Google Drive limitation that I have encountered not only with gdrive but also with Insync and Google’s own Windows Google Drive client, synchronisation only can happen with two new folders, one local and the other remote. Handily, gdrive supports the usual bash style commands for working with remote directories so something like the following will create a directory on Google Drive:
gdrive mkdir ttdc [ID for parent folder]
Here, the ID for the parent folder may be omitted but it can be obtained by going to Google Drive online and getting a link location by right-clicking on a folder and choosing the appropriate context menu item. This gets you something like the following and the required identifier is found between the last slash and the first question mark in the address string (so as not to share any real links, I made the address more general below):
https://drive.google.com/drive/folders/[remote folder ID]?usp=sharing
Then, synchronisation uses a command like the following:
gdrive sync upload [local folder or file path] [remote folder ID]
There also is the option to do a one-way upload and this is the form of the command used:
gdrive upload [local folder or file path] -p [remote folder ID]
Because every file or folder object has its own ID on Google Drive, it is possible to create two objects on there that appear to have the same name though that is sure to cause confusion even if you know what is happening. It is possible in each of the above to throttle them using trickle as well:
trickle -d 2000 -u 50 gdrive sync upload [local folder or file path] [remote folder ID]
 trickle -d 2000 -u 50 gdrive upload [local folder or file path] -p [remote folder ID]
Handily, this works without the added drama seen with Insync and lends itself to scripting as well so it could be something that I will incorporate into my current workflow. One thing that needs to be watched is file upload failures but there may be ways to catch those and retry them so that would another thing that needs doing. This is built into Insync and it would be a learning opportunity if I was to stick with gdrive instead.
Disabling the SSL connection requirement in MySQL Workbench
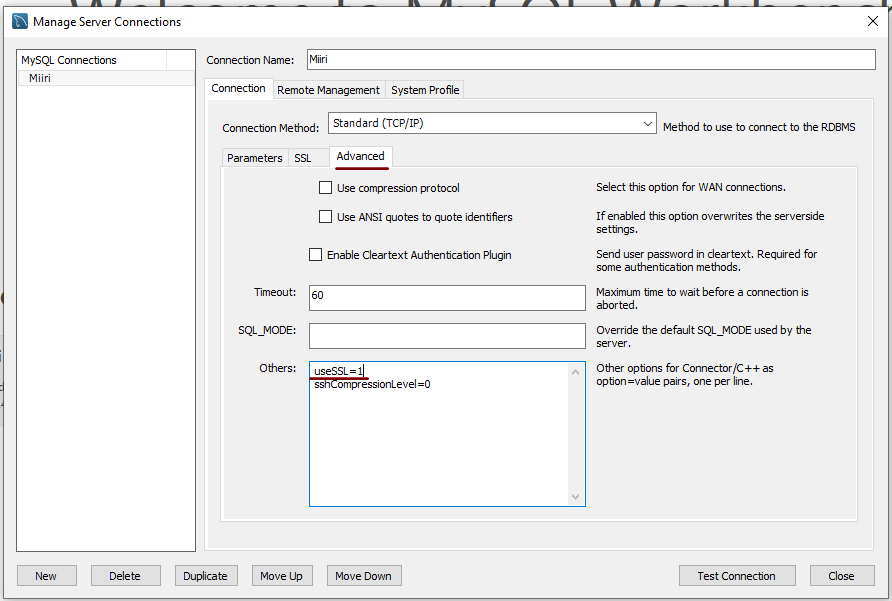
7th November 2022A while ago, I found that MySQL Workbench would only use SSL connections and that was stopping it from connecting to local databases so I looked for a way to override this. The cure was to go to Database > Manage Connections… in the menus for the application’s home tab. in the dialogue box that appeared, I chose the connection of interest and went to the Advanced panel under Connection and removed the line useSSL=1 from the Others field. The screenshot below shows you what things look like before the change is made. Naturally, the best practice would be to secure a remote database connection using SSL so this approach is best reserved for remote non-production databases. However, it may be that this does not happen now but I thought I would share this in case the problem persists for anyone.
Adding titles and footnotes to Excel files created using SAS
14th August 2023Using the Excel and ExcelXP destinations in the Output Delivery System (ODS), SAS can generate reports as XLSX workbooks with one or more worksheets. Recently, I was updating a SAS Macro that created one of these and noticed that there were no footnotes. The fix was a simple: add to the options specified on the initial ODS Excel statement.
ods excel file="&outdir./&file_name..xlsx" options(embedded_titles="yes" embedded_footnotes="yes");
Notice in the code above that there are EMBEDDED_TITLES and EMBEDDED_FOOTNOTES options. Without both of these being set to YES, no titles or footnotes will appear in a given worksheet even if they have been specified in a program using TITLE or FOOTNOTE statements. In my case, it was the EMBEDDED_FOOTNOTES option that was missing, so adding that set things to rights.
The thing applies to the ExcelXP tag set as you will find from a code sample that SAS has shared on their website. That was what led me to the solution to what was happening in the Excel ODS destination in my case.
New domain name
25th January 2007I have registered the domain technologytales.com for this blog yesterday and have since got the DNS configuration completed. I used Easily.co.uk for the registration; they also host my other domain name and have done so since I first registered it. Easily allowed me to transfer to the WordPress.com namespace servers and $10 secured the rest of the setting up and $10 every year at renewal time with keep things in place. There is more about doing all of this on the WordPress FAQ.