Moves to Hugo
30th November 2022What amazes me is how things can become more complicated over time. As long as you knew HTML, CSS and JavaScript, building a website was not as onerous as long as web browsers played ball with it. Since then, things have got easier to use but more complex at the same time. One example is WordPress: in the early days, themes were much simpler than they are now. The web also has got more insecure over time, and that adds to complexity as well. It sometimes feels as if there is a choice to make between ease of use and simplicity.
It is against that background that I reassessed the technology that I was using on my public transport and Irish history websites. The former used WordPress, while the latter used Drupal. The irony was that the simpler website was using the more complex platform, so the act of going simpler probably was not before time. Alternatives to WordPress were being surveyed for the first of the pair, but none had quite the flexibility, pervasiveness and ease of use that WordPress offers.
There is another approach that has been gaining notice recently. One part of this is the use of Markdown for web publishing. This is a simple and distraction-free plain text format that can be transformed into something more readable. It sees usage in blogs hosted on GitHub, but also facilitates the generation of static websites. The clutter is absent for those who have no need of the Gutenberg Editor on WordPress.
With the content written in Markdown, it can be fed to a static website generator like Hugo. Using defined templates and fixed assets like CSS together with images and other static files, it can slot the content into HTML files very speedily since it is written in the Go programming language. Once you get acclimatised, there are no folder structures that cannot be used, so you get full flexibility in how you build out your website. Sitemaps and RSS feeds can be built at the same time, both using the same input as the HTML files.
In a nutshell, it automates what once needed manual effort used a code editor or a visual web page editor. The use of HTML snippets and layouts means that there is no necessity for hand-coding content, like there was at the start of the web. It also helps that Bootstrap can be built in using Node, so that gives a basis for any styling. Then, SCSS can take care of things, giving even more automation.
Given that there is no database involved in any of this, the required information has to be stored somewhere, and neither the Markdown content nor the layout files contain all that is needed. The main site configuration is defined in a single TOML file, and you can have a single one of these for every publishing destination; I have development and production servers, which makes this a very handy feature. Otherwise, every Markdown file needs a YAML header where titles, template references, publishing status and other similar information gets defined. The layouts then are linked to their components, and control logic and other advanced functionality can be added too.
Because static files are being created, it does mean that site searching and commenting, or contact pages cannot work like they would on a dynamic web platform. Often, external services are plugged in using JavaScript. One that I use for contact forms is Getform.io. Then, Zapier has had its uses in using the RSS feed to tweet site updates on Twitter when new content gets added. Though I made different choices, Disqus can be used for comments and Algolia for site searching. Generally, though, you can find yourself needing to pay, particularly if you need to remove advertising or gain advanced features.
Some comments service providers offer open source self-hosted options, but I found these difficult to set up and ended up not offering commenting at all. That was after I tried out Cactus Comments only to find that it was not discriminating between pages, so it showed the same comments everywhere. There are numerous alternatives like Remark42, Hyvor Talk, Commento, FastComments, Utterances, Isso, Mouthful, Muut and HyperComments but trying them all out was too time-consuming for what commenting was worth to me. It also explains why some static websites even send readers to Twitter if they have something to say, though I have not followed this way of working.
For searching, I added a JavaScript/JSON self-hosted component to the transport website, and it works well. However, it adds to the size of what a browser needs to download. That is not a major issue for desktop browsers, but the situation with mobile browsers is such that it has a sizeable effect. Testing with PageSpeed and Lighthouse highlighted this, even if I left things as they are. The solution works well in any case.
One thing that I have yet to work out is how to edit or add content while away from home. Editing files using an SSH connection is as much a possibility as setting up a Hugo publishing setup on a laptop. After that, there is the question of using a tablet or phone, since content management systems make everything web based. These are points that I have yet to explore.
As is natural with a code-based solution, there is a learning curve with Hugo. Reading a book provided some orientation, and looking on the web resolved many conundrums. There is good documentation on the project website, while forum discussions turn up on many a web search. Following any research, there was next to nothing that could not be done in some way.
Migration of content takes some forethought and took quite a bit of time, though there was an opportunity to carry some housekeeping as well. The history website was small, so copying and pasting sufficed. For the transport website, I used Python to convert what was on the database into Markdown files before refining the result. That provided some automation, but left a lot of work to be done afterwards.
The results were satisfactory, and I like the associated simplicity and efficiency. That Hugo works so fast means that it can handle large websites, so it is scalable. The new Markdown method for content production is not problematical so far apart from the need to make it more portable, and it helps that I found a setup that works for me. This also avoids any potential dealbreakers that continued development of publishing platforms like WordPress or Drupal could bring. For the former, I hope to remain with the Classic Editor indefinitely, but now have another option in case things go too far.
More user interface font scaling options in Adobe Lightroom Classic
25th November 2022Earlier in the year, I upgraded my monitor to a 34-inch widescreen Iiyama XUB3493WQSU. At the time, I was in wonderment at what I was doing even if I have grown used to it now. For one thing, it made the onscreen text too small so I ended up having to scale things up in both Linux and Windows. The former proved to be more malleable than the latter and that impression also applies to the main subject of this piece.
What I also found is that I needed to scale the user interface font sizes within Adobe Lightroom Classic running within a Windows virtual machine on VirtualBox. That can be done by going to Edit > Preferences through the menus and then going to the Interface tab in the dialogue box that appears where you can change the Font Size setting using the dropdown menu and confirm changes using the OK button.
However, the range of options is limited. Medium appears to be the default setting while the others include Small, Large, Larger and Largest. Large scales by 150%, Larger by 200% and Largest by 250%. Of these, Large was the setting that I chose though it always felt too big to me.
Out of curiosity, I decided to probe further only to find extra possibilities that could be selected by direct editing of a configuration file. This file can be found in C:\Users\[user account]\AppData\Roaming\Adobe\Lightroom\Preferences and is called Lightroom Classic CC 7 Preferences.agprefs. In there, you need to find the line containing AgPanel_baseFontSize and change the value enclosed within quotes and save the file. Taking a backup beforehand is wise even if the modification is not a major one.
The available choices are scale125, scale140, scale150, scale175, scale180, scale200 and scale250. Some of these may be recognisable as those available through the Lightroom Classic user interface. In my case, I chose the first on the list so the line in the configuration file became:
AgPanel_baseFontSize="scale125"
There may be good reasons for the additional options not being available through the user interface but things are working out OK for me for now. It is another tweak that helps me to get used to the larger screen size and its higher resolution.
Building a sitemap in XML
24th November 2022While there are many tools that will build XML site maps, there is some satisfaction to be had in creating your own. This is in spite of there being a multitude of search engine optimisation plugins for content management systems like WordPress or what is built into static site generators like Hugo. Sometimes, building your own allows for added simplicity and that is shared with recent efforts in WordPress theme development.
The sitemap XML protocol is simple enough to offer a short coding project. The basis was what Hugo generates and I used Python to create the XML files. The only libraries that I needed were configparser, SQLAlchemy and pandas. the first two of these allowed databases to be queried and the last on the list was used for data processing. Otherwise, it was a case of using what is built into the Python language like file writing and looping.
Once the scripts were ready, they could be uploaded to web servers and executed by scheduled jobs using CRON to keep things up to date. along the way, I also uncovered a way to publicise the locations of the sitemap files to search engine bots using robots.txt. The structure of the instruction is the following:
User-agent: *
 Sitemap: sitemap.xml
This means that it announces to all bots the location of the sitemap file. In my case, I always included the full URL for the XML file and that clearly varies by website location.
Getting a Windows 11 Guest to run smoothly on VirtualBox
23rd November 2022In recent days, I have been trying to get Windows 11 to run smoothly within a VirtualBox virtual machine, and there has been a lot of experimentation along the way. This was to eradicate intermittent freezes that escalated CPU usage and necessitated hard restarts. If I was to use Windows 11 as a long-term replacement for Windows 10, these needed to go.
An internet search showed that others faced the same predicament but a range of proposed solutions did nothing for me. The suggestion of enabling 3D graphics capability did nothing but produce a black screen at startup time so that was not a runner. It might have been the combination of underlying graphics hardware and the drivers on my Linux Mint machine that hindered me when it helped others.
In the end, a look at the bug tracker for Windows guest operating systems running on VirtualBox sent me in another direction. The Paravirtualisation interface also may have caused issues with Windows 10 virtual machines since these were all set to KVM. Doing the same for Windows 11 seems to have stopped the freezing behaviour so far. It meant going to the virtual machine settings, navigating to System > Acceleration and changing the dropdown menu value from Default to KVM before clicking on the OK button.
Before that, I have been blaming the newness of VirtualBox 7 (it is best not to expect too much of a fresh release bringing such major changes) and even the way that I installed Windows 11 using the streamlined installation or licensing issues. Now that things are going better, it may have been a lesson from Windows 10 that I had forgotten. The EFI, Secure Boot and TPM 2.0 requirements of Windows 11 also blindsided me, especially given the long wait for VirtualBox to add such compatibility, but that is behind me at this stage.
Windows 11 is not perfect but Start11 makes it usable and the October 2025 expiry for Windows 10 also focuses my mind. It is time to move over for sake of future-proofing if nothing else. In time, we may get a better operating system as Windows 11 matures and some minds surely are thinking of a “Windows 12”. However things go, it may be that we get to a point where something vintage in the nature of Windows XP, Windows 7 or Windows 10 appears. Those older versions of Windows became like old gold during their lives.
Resolving a clash between Homebrew and Python
22nd November 2022For reasons that I cannot recall now, I installed the Hugo static website generator on my Linux system and web servers using Homebrew. The only reason that I suggest is that it might have been a way to get the latest version at the time since Linux Mint only does major changes every two years, keeping it in line with long-term support editions of Ubuntu.
When Homebrew was installed, it changed the lookup path for command line executables by adding the following line to my .bashrc file:
eval "$(/home/linuxbrew/.linuxbrew/bin/brew shellenv)"
This executed the following lines:
export HOMEBREW_PREFIX="/home/linuxbrew/.linuxbrew";
 export HOMEBREW_CELLAR="/home/linuxbrew/.linuxbrew/Cellar";
 export HOMEBREW_REPOSITORY="/home/linuxbrew/.linuxbrew/Homebrew";
 export PATH="/home/linuxbrew/.linuxbrew/bin:/home/linuxbrew/.linuxbrew/sbin${PATH+:$PATH}";
 export MANPATH="/home/linuxbrew/.linuxbrew/share/man${MANPATH+:$MANPATH}:";
 export INFOPATH="/home/linuxbrew/.linuxbrew/share/info:${INFOPATH:-}";
While the result suits Homebrew, it changed the setup of Python and its packages on my system. Eventually, this had undesirable consequences like messing up how Spyder started so I wanted to change this. There are other things that I have automated using Python and these were not working either.
One way that I have seen suggested is to execute the following command but I cannot vouch for this:
brew unlink python
What I did was to comment out the offending line in .bashrc and replace it with the following:
export PATH="$PATH:/home/linuxbrew/.linuxbrew/bin:/home/linuxbrew/.linuxbrew/sbin"
export HOMEBREW_PREFIX="/home/linuxbrew/.linuxbrew";
 export HOMEBREW_CELLAR="/home/linuxbrew/.linuxbrew/Cellar";
 export HOMEBREW_REPOSITORY="/home/linuxbrew/.linuxbrew/Homebrew";
export MANPATH="/home/linuxbrew/.linuxbrew/share/man${MANPATH+:$MANPATH}:";
 export INFOPATH="${INFOPATH:-}/home/linuxbrew/.linuxbrew/share/info";
The first of these adds the Homebrew paths to the end of the PATH variable instead of the start of the same as was the case before. This means that system folders get searched for executable files before the Homebrew ones. It also means that Python packages are loaded from my user area and not the Homebrew one as was the case under its own terms. There are other things to remember with Python packages such as not having a version installed at the system level and another at the user one since these will conflict with one another.
So far, the result of the Homebrew changes is not unsatisfactory and I will watch for any rough edges that need addressing. If something comes up, then I will set things up in another way.
A look at the Julia programming language
19th November 2022Several open-source computing languages get mentioned when talking about working with data. Among these are R and Python, but there are others; Julia is another one of these. It took a while before I got to check out Julia because I felt the need to get acquainted with R and Python beforehand. There are others like Lua to investigate too, but that can wait for now.
With the way that R is making an incursion into clinical data reporting analysis following the passage of decades when SAS was predominant, my explorations of Julia are inspired by a certain contrariness on my part. Alongside some small personal projects, there has been some reading in (digital) book form and online. Concerning the latter of these, there are useful tutorials like Introduction to Data Science: Learn Julia Programming, Maths & Data Science from Scratch or Julia Programming: a Hands-on Tutorial. Like what happens with R, there are online versions of published books available free of charge, and they include Julia Data Science and Interactive Visualization and Plotting with Julia. Video learning can help too and Jane Herriman has recorded and shared useful beginner’s guides on YouTube that start with the basics before heading onto more advanced subjects like multiple dispatch, broadcasting and metaprogramming.
This piece of learning has been made of simple self-inspired puzzles before moving on to anything more complex. That differs from my dalliance with R and Python, where I ventured into complexity first, not least because of testing them out with public COVID data. Eventually, I got around to doing that with Julia too though my interest was beginning to wane by then, and Julia’s abilities for creating multipage PDF files were such that PDF Toolkit was needed to help with this. Along the way, I have made use of such packages as CSV.jl, DataFrames.jl, DataFramesMeta, Plots, Gadfly.jl, XLSX.jl and JSON3.jl, among others. After that, there is PrettyTables.jl to try out, and anyone can look at the Beautiful Makie website to see what Makie can do. There are plenty of other packages creating graphs such as SpatialGraphs.jl, PGFPlotsX and GRUtils.jl. For formatting numbers, options include Format.jl and Humanize.jl.
So far, my primary usage has been with personal financial data together with automated processing and backup of photo files. The photo file processing has taken advantage of the ability to compile Julia scripts for added speed because just-in-time compilation always means there is a lag before the real work begins.
VS Code is my chosen editor for working with Julia scripts, since it has a plugin for the language. That adds the REPL, syntax highlighting, execution and data frame viewing capabilities that once were added to the now defunct Atom editor by its own plugin. While it would be nice to have a keyboard shortcut for script execution, the whole thing works well and is regularly updated.
Naturally, there have been a load of queries as I have gone along and the Julia Documentation has been consulted as well as Julia Discourse and Stack Overflow. The latter pair have become regular landing spots on many a Google search. One example followed a glitch that I encountered after a Julia upgrade when I asked a question about this and was directed to the XLSX.jl Migration Guides where I got the information that I needed to fix my code for it to run properly.
There is more learning to do as I continue to use Julia for various things. Once compiled, it does run fast like it has been promised. The syntax paradigm is akin to R and Python, but there are Julia-specific features too. If you have used the others, the learning curve is lessened but not eliminated completely. This is not an object-oriented language as such, but its functional nature makes it familiar enough for getting going with it. In short, the project has come a long way since it started more than ten years ago. There is much for the scientific programmer, but only time will tell if it usurped its older competitors. For now, I will remain interested in it.
A desktop Markdown editing environment
8th November 2022Earlier this year, I changed over two websites from dynamic versions using content management systems to static ones by using Hugo to build them from Markdown files. That meant that I needed to look at the editing of MarkDown even if it is a fairly simple file format. For one thing, Grammarly can be incorporated into WordPress so I did not want to lose something like that.
The latter point meant that I was steered away from plain text editors. Otherwise, there are online ones like StackEdit and Dillinger but the Firefox Grammarly plugin only appears to work on the first of these, and even then only partially in my experience. Dillinger does offer connections to online file storage providers like Google, Dropbox and OneDrive but I wanted to store files on my desktop for upload to a web server. It also works with Github but I prefer to use another web hosting provider.
There are various specialised MarkDown editors for desktop usage like Typora, ReText, Formiko or Ghostwriter but I chose none of these. My actual choice may surprise many: it was Visual Studio Code. The availability of a Grammarly plug-in was what swayed it for me even if it did need to be switched on for MarkDown files. In many ways, it does work as smoothly as elsewhere because it gets fooled by links and other code-like pieces of text. Also, having the added ability to add words to a custom dictionary would be ideal. Some rule overriding is available but I am not sure that everything is covered even if the list of options is lengthy. Some time is needed to inspect all of them before I proceed any further. Thus far, things are working well enough for me.
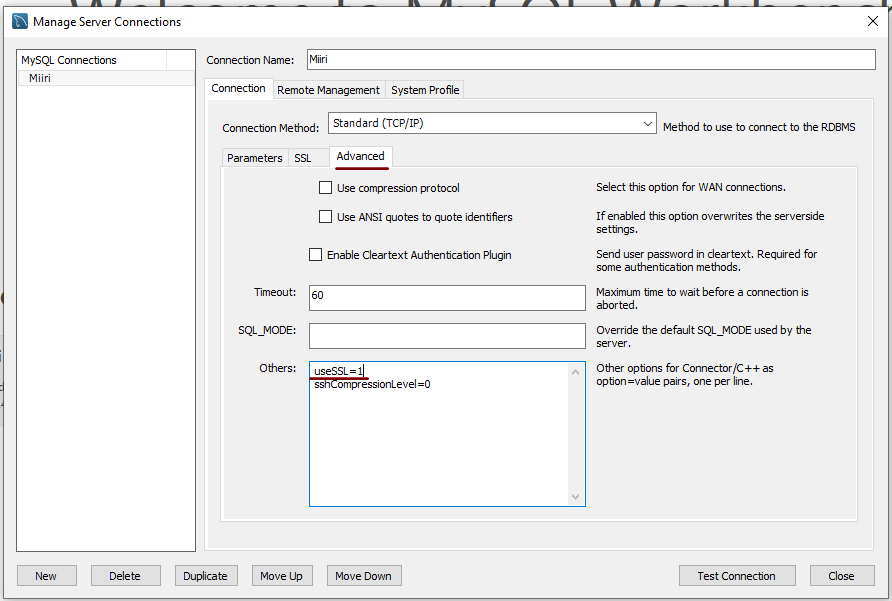
Disabling the SSL connection requirement in MySQL Workbench
7th November 2022A while ago, I found that MySQL Workbench would only use SSL connections and that was stopping it from connecting to local databases so I looked for a way to override this. The cure was to go to Database > Manage Connections… in the menus for the application’s home tab. in the dialogue box that appeared, I chose the connection of interest and went to the Advanced panel under Connection and removed the line useSSL=1 from the Others field. The screenshot below shows you what things look like before the change is made. Naturally, the best practice would be to secure a remote database connection using SSL so this approach is best reserved for remote non-production databases. However, it may be that this does not happen now but I thought I would share this in case the problem persists for anyone.
Converting QEMU disk images to VirtualBox images on Linux Mint 21
30th October 2022Recently, VirtualBox gained fuller support for Windows 11 and I successively set up a new Windows 11 virtual machine that I hope will supplant a Windows 10 counterpart in time. The setup itself was streamlined but I ran into such stability issues that I set the new VM aside until a new version of VirtualBox got released. That has happened with the appearance of version 7.0.2 but Windows 11 remains prone to freezing on my Linux Mint machine. Thankfully, that now is much less frequent but the need for added stability remains outstanding.
While I was thinking about trying our Virtualbox 7.0.0, I remembered a QEMU machine that I had running Windows 11. Though QEMU proved more limited than VirtualBox when it came to having easy availability of functionality like moving data in and out of the virtual machine or support for sound, there was no problem with TPM support or system stability. Since it did contain some useful data, I wondered about converting its virtual hard disk to VirtualBox format and it is easy to do. First, you need to install qemu-img and other utilities as follows:
sudo apt-get install qemu-utils
With that in place, executing a command like the following performs the required conversion. Here, the -O switch specifies the required file type of vdi in this case.
qemu-img convert -O vdi [virtual hard disk].qcow2 [virtual hard disk].vdi
While I have yet to mount it on the new Virtualbox Windows 11 virtual machine, it is good to have the old virtual hard disk available for doing so. The thought of using it as a boot drive in VirtualBox did enter my mind but the required change of drivers and other incompatibilities dissuaded me from doing so.
Removing redundant kernels from Ubuntu
29th October 2022Recently, a message appear on some web servers that I have that exhorted me to upgrade to Ubuntu 22.04.1 using the do-release-upgrade command. In the interests of remaining current, I did just that to get another message, one like the following:
The upgrade needs a total of [amount of space with units] free space on disk `/boot`.
 Please free at least an additional [amount of space with units] of disk space on `/boot`.
 Empty your trash and remove temporary packages of former installations
 using `sudo apt-get clean`.
Using sudo apt-get clean did not resolve the problem so the advice given was of no use. The actual problem was that there were too many old kernels cluttering up /boot and searching around the web provided that wisdom. What also came up was a single command for fixing the problem. However, removing the wrong kernel can trash a system so I took a more cautious approach. First, I listed the kernels to be removed and checked that they did not include the currently running one. This was done with the following command (broken up over several lines for clarity using the backslash character to denote continuation) and running uname -r found the details of the running kernel:
dpkg -l linux-{image,headers}-"[0-9]*" \
| awk '/ii/{print $2}' \
| grep -ve "$(uname -r \
| sed -r 's/-[a-z]+//')"
The dpkg command listed the installed kernels with awk, grep and sed filtering out unwanted sections of the text. The awk command takes the tabular output from dpkg and turns it into a list. The -v switch on the grep command gets the lines that do not match the search expression created by the sed command, while the -e switch makes grep look for patterns. The sed command removes all letters from the output of the uname command, where the -r switch produces the kernel release details, to leave on the release number of the current kernel. On being satisfied that nothing untoward would happen, the full command below (also broken up over several lines for clarity using the backslash character to denote continuation) could be executed.
sudo apt purge $(dpkg -l linux-{image,headers}-"[0-9]*" \
| awk '/ii/{print $2}' \
| grep -ve "$(uname -r \
| sed -r 's/-[a-z]+//')")
This apt to purge the unwanted kernels, thus freeing up enough space for the upgrade to continue. That happened without significant incident though there were some remediations needed on the PHP side to get the website working smoothly again.