Pondering travel device consolidation using an Apple iPad Pro 12.9″
18th September 2016It was a change of job in 2010 that got me interested in using devices with internet connectivity on the go. Until then, the attraction of smartphones had not been strong, but I got myself a Blackberry on a pay as you go contract, but the entry device was painfully slow, and the connectivity was 2G. It was a very sluggish start.
It was supplemented by an Asus Eee PC that I connected to the internet using broadband dongles and a Wi-Fi hub. This cumbersome arrangement did not work well on short journeys and the variability of mobile network reception even meant that longer journeys were not all that successful either. Usage in hotels and guest houses though went better and that has meant that the miniature laptop came with me on many a journey.
In time, I moved away from broadband dongles to using smartphones as Wi-Fi hubs and that largely is how I work with laptops and tablets away from home unless there is hotel Wi-Fi available. Even trips overseas have seen me operate in much the same manner.
One feature is that we seem to carry quite a number of different gadgets with us at a time and that can cause inconvenience when going through airport security since they want to screen each device separately. When you are carrying a laptop, a tablet, a phone and a camera, it does take time to organise yourself and you can meet impatient staff, as I found recently when returning from Oslo. Checking in whatever you can as hold luggage helps to get around at least some of the nuisance and it might be time for the use of better machinery to cut down on having to screen everything separately.
When you come away after an embarrassing episode as I once did, the attractions of consolidating devices start to become plain. In fact, most probably could get with having just their phone. It is when you take activities like photography more seriously that the gadget count increases. After all, the main reason a laptop comes on trips beyond Britain and Ireland at all is to back up photos from my camera in case an SD card fails.
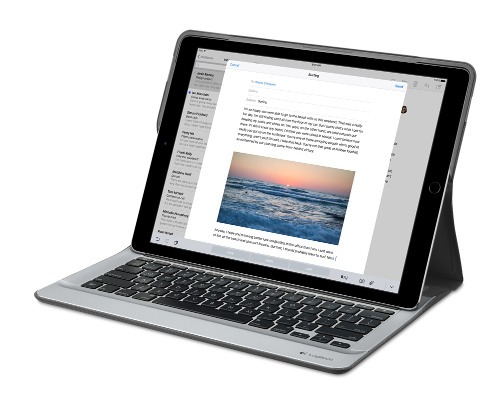
Parking that thought for a while, let’s go back to March this year when temptation overcame what should have been a period of personal restraint. The result was that a 32 GB 12.9″ Apple iPad Pro came into my possession along with an Apple Pencil and a Logitech CREATE Backlit Keyboard Case. It should have done so, but the size of the screen did not strike me until I got it home from the Apple Store. That was one of the main attractions because maps can be shown with a greater field of view in a variety of apps, a big selling point for a hiker with a liking for maps, who wants more than what is on offer from Apple, Google or even Bing. The precision of the Pencil is another boon that makes surfing the website so much easier and the solid connection between the case and the iPad means that keyboard usage is less fiddly than it would if it used Bluetooth. Having tried them with the BBC iPlayer app, I can confirm that the sound from the speakers is better than any other mobile device that I have used.
Already, it has come with me on trips around England and Scotland. These weekend trips saw me leave the Asus Eee PC stay at home when it normally might have come with me and taking just a single device along with a camera or two had its uses too. The screen is large for reading on a train but I find that it works just as well so long as you have enough space. Otherwise, combining use of a suite of apps with recourse to the web does much of the information seeking needed while on a trip away and I was not found wanting. Battery life is good too, which helps.
Those trips allowed for a little light hotel room blog post editing too and the iPad Pro did what was needed, though the ergonomics of reaching for the screen with the Pencil meant that my arm was held aloft more than was ideal. Another thing that raised questions in my mind is the appearance of word suggestions at the bottom of the screen as if this were a mobile phone since I wondered if these were more of a hindrance than a help given that I just fancied typing and not pointing at the screen to complete words. Copying and pasting works too but I have found the screen-based version a little clunky so I must see if the keyboard one works just as well, though the keyboard set up is typical of a Mac so that affects word selection. You need to use the OPTION key in the keyboard shortcut that you use for this and not COMMAND or CONTROL as you might do on a PC.
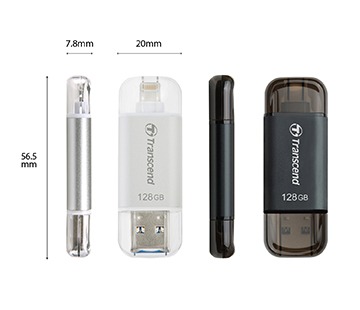
Even with these eccentricities, I was left wondering if it had any utility when it came to backing up photos from digital cameras and there is an SD card adapter that makes this possible. A failure of foresight on my part meant that the 32 GB capacity now is an obvious limitation but I think I might have hit on a possible solution that does not need to upload to an iCloud account. It involves clearing off the photos onto a 128 GB Transcend JetDrive Go 300 so they do not clog up the iPad Pro’s storage. That the device has both Lightning and USB connectivity means that you can plug it into a laptop or desktop PC afterwards too. If that were to work as I would hope, then the laptop/tablet combination that I have been using for all overseas trips could be replaced to allow a weight reduction as well as cutting the hassle at airport security.
Trips to Ireland still may see my sticking with a tried and tested combination though because I often have needed to do some printing while over there. While I have been able to print a test document from an iPad Mini on my home network-connected printer, not every model supports this and that for NFC or Air Print is not universal either. If this were not an obstacle, apps like Pages, Numbers and Keynote could have their uses for business-related work and there are web-based offerings from Google, Microsoft and others too.
In conclusion, I have found that my iPad Pro does so much of what I need on a trip away that retiring the laptop/tablet combination for most of these is not as outrageous as it once would have seemed. In some ways, iOS has a way to go yet before it could take over from macOS but it remains in development so it will be interesting to see what happens next. All the while, hybrid devices running Windows 10 are becoming more pervasive and that might provide Apple with the encouragement that it needs.
Upgrading a 2012 Google Nexus 7 to Android 5.0
19th November 2014Today, I was lured into upgrading my 2012 Google (ASUS) Nexus 7 to the final version of Android 5.0 (also known as Lollipop) by an icon in the device’s top panel. Initially, it felt as it was working OK but a certain sluggish could not be overlooked and there have been complaints about this with some questioning the sense of what Google have done. However, there would have been comments about grandfathering the device if they had not left us have the latest release of Android so there was no victory either way. We humans are fickle creatures and there is an example of exactly that in a well observed double-ended short story by the Irish writer Maura Laverty.
My impressions of how the upgrade had lumbered the tablet had me wondering about replacing the thing with either an Apple iPad Mini 2 or a Google (HTC) Nexus 9 but a much less expensive option came to mind: doing a full factory reset of the device using its recovery mode. That may sound drastic but much of what I had on there was in the cloud anyway so there was nothing to lose. So these are the instructions from Google themselves and I will leave you to use them at your own risk:
- If your tablet is on, turn it off.
- Press and hold the Volume Down button, then press and hold the Power button at the same time until the tablet turns on. You’ll see the word “Start” with an arrow around it.
- Press the Volume Down button twice to highlight “Recovery mode”.
- Press the Power button to start Recovery mode. You’ll see an image of an Android robot with a red exclamation mark and the words “No command.”
- While holding down the Power button, press the Volume Up button.
- Use the volume buttons to scroll to “wipe data/factory reset,” then press the Power button to select it.
- Scroll down to “Yes -- erase all user data,” then press the Power button to select it.
Note: If your tablet becomes unresponsive at any point during these steps, you can restart it by holding down the Power button for several seconds.
Once that was completed and the tablet restarted, the set-up routine began and took around an hour to reinstate the various apps that had been lost by the rest. Much of that was down to the time taken for re-installation rather than that taken by the actual downloads themselves over a wired broadband connection. The wait was worth it because the Nexus 7 feels more responsive again. While there times when little lags are noticeable, they are nothing next to the slowdown that I had witnessed before the rest. It might have been a better option than attempting to return to Android 4.4.4 using a factory image, which was another option that I was considering. So long as there is no deterioration in speed, the effort expended to do a reset will have been worthwhile.
A need to update graphics hardware
16th June 2013Not being a gaming enthusiast, having to upgrade graphics cards in PC’s is not something that I do very often or even rate as a priority. However, two PC’s in my possession have had that very piece of hardware upgraded on them and it’s not because anything was broken either. My backup machine has seen quite a few Linux distros on there since I built it nearly four years ago. The motherboard is an ASRock K10N78 that sourced from MicroDirect and it has onboard an NVIDIA graphics chip that has performed well if not spectacularly. One glitch that always existed was a less than optimal text rendering in web browsers but that never was enough to get me to add a graphics card to the machine.
More recently, I ran into trouble with Sabayon 13.04 with only the 2D variant of the Cinnamon desktop environment working on it and things getting totally non-functional when a full re-installation of the GNOME edition was attempted. Everything went fine until I added the latest updates to the system when a reboot revealed that it was impossible to boot into a desktop environment. Some will relish this as a challenge but I need to admit that I am not one of those. In fact, I tried out two Arch-based distros on the same PC and got the same results following a system update on each. So, my explorations of Antergos and Manjaro have to continue in virtual machines instead.
To get a working system, I gave Linux Mint 15 Cinnamon a go and that worked a treat. However, I couldn’t ignore that the cutting edge distros that I tried before it all took exception to the onboard NVIDIA graphics. systemd has been implemented in all of these and it seems reasonable to think that it is coming to Linux Mint at some stage in the future so I went about getting a graphics card to add into the machine. Having had good experiences with ATi’s Radeon in the past, I stuck with it even though it now is in the hands of AMD. Not being that fussed so long there was Linux driver support, I picked up a Radeon HD 6450 card from PC World. Adding it into the PC was a simpler of switching off the machine, slotting in the card, closing it up and powering it on again. Only later on did I set the BIOS to look for PCI Express graphics before anything else and I could have got away without doing that. Then, I made use of the Linux Mint Additional Driver applet in its setting panel to add in the proprietary driver before restarting the machine to see if there were any visual benefits. To sort out the web browser font rendering, I used the Fonts applet in the same settings panel and selected full RGBA hinting. The improvement was unmissable if not still like the appearance of fonts on my main machine. Overall, there had been an improvement and a spot of future proofing too.
That tinkering with the standby machine got me wondering about what I had on my main PC. As well as onboard Radeon graphics, it also gained a Radeon 4650 card for which 3D support wasn’t being made available by Ubuntu GNOME 12.10 or 13.04 to VMware Player and it wasn’t happy about this when a virtual machine was set to have 3D support. Adding the latest fglrx driver only ensured that I got a command line instead of a graphical interface. Issuing one of the following commands and rebooting was the only remedy:
sudo apt-get remove fglrx
sudo apt-get remove fglrx-updates
Looking at the AMD website revealed that they no longer support 2000, 3000 or 4000 series Radeon cards with their latest Catalyst driver the last version that did not install on my machine since it was built for version 3.4.x of the Linux kernel. A new graphics card then was in order if I wanted 3D graphics in VWware VM’s and both GNOME and Cinnamon appear to need this capability. Another ASUS card, a Radeon HD 6670, duly was acquired and installed in a manner similar to the Radeon HD 6450 on the standby PC. Apart from not needing to alter the font rendering (there is a Font tab on Gnome Tweak Tool where this can be set), the only real exception was to add the Jockey software to my main PC for installation of the proprietary Radeon driver. The following command does this:
sudo apt-get install jockey-kde
When that was done I issue the jockey-kde command and selected the first entry on the list. The machine worked as it should on restarting apart from an AMD message at the bottom right hand corner bemoaning unrecognised hardware. There had been two entries on that Jockey list with exactly the same name so it was time to select the second of these and see how it went. On restarting, the incompatibility message had gone and all was well. VMware even started virtual machines with 3D support without any messages so the upgrade did the needful there.
Hearing of someone doing two PC graphics card upgrades in a weekend may make you see them as an enthusiast but my disinterest in computer gaming belies this. Maybe it highlights that Linux operating systems need 3D more than might be expected. The Cinnamon desktop environment now issues messages if it is operating in 2D mode with software 3D rendering and GNOME always had the tendency to fall back to classic mode, as it had been doing when Sabayon was installed on my standby PC. However, there remain cases where Linux can rejuvenate older hardware and I installed Lubuntu onto a machine with 10 year old technology on there (an 1100 MHz Athlon CPU, 1GB of RAM and 60GB of hard drive space in case dating from 1998) and it works surprisingly well too.
It seems that having fancier desktop environments like GNOME Shell and Cinnamon means having the hardware on which it could run. For a while, I have been tempted by the possibility of a new PC since even my main machine is not far from four years old either. However, I also spied a CPU, motherboard and RAM bundle featuring an Intel Core i5-4670 CPU, 8GB of Corsair Vengence Pro Blue memory and a Gigabyte Z87-HD3 ATX motherboard included as part of a pre-built bundle (with a heatsink and fan for the CPU) for around £420. Even for someone who has used AMD CPU’s since 1998, that does look tempting but I’ll hold off before making any such upgrade decisions. Apart from exercising sensible spending restraint, waiting for Linux UEFI support to mature a little more may be no bad idea either.
Update 2013-06-23: The new graphics card in my main machine is working as it should and has reduced the number of system error report messages turning up too; maybe Ubuntu GNOME 13.04 didn’t fancy the old graphics card all that much. A rogue .fonts.conf file was found in my home area on the standby machine and removing it has improved how fonts are displayed on there immeasurably. If you find one on your system, it’s worth doing the same or renaming it to see if it helps. Otherwise, tinkering with the font rendering settings is another beneficial act and it even helps on Debian 6 too and that uses GNOME 2! Seeing what happens on Debian 7.1 could be something that I go testing sometime.
Piggybacking an Android Wi-Fi device off your Windows PC’s internet connection
16th March 2013One of the disadvantages of my Google/Asus Nexus 7 is that it needs a Wi-Fi connection to use. Most of the time this is not a problem since I also have a Huawei mobile WiFi hub from T-Mobile and this seems to work just about anywhere in the U.K. Away from the U.K. though, it won’t work because roaming is not switched on for it and that may be no bad thing with the fees that could introduce. My HTC Desire S could deputise but I need to watch costs with that too.
There’s also the factor of download caps and those apply both to the Huawei and to the HTC. Recently, I added Anquet‘s Outdoor Map Navigator (OMN) to my Nexus 7 through the Google Play store for a fee of £7 and that allows access to any walking maps that I have bought from Anquet. However, those are large downloads so the caps start to come into play. Frugality would help but I began to look at other possibilities that make use of a laptop’s Wi-Fi functionality.
Looking on the web, I found two options for this that work on Windows 7 (8 should be OK too): Connectify Hotspot and Virtual Router Manager. The first of these is commercial software but there is a Lite edition for those wanting to try it out; that it is not a time limited demo is not something that I can confirm though that did not seem to be the case since it looked as if only features were missing from it that you’d get if you paid for the Pro variant. The second option is an open source one and is free of charge apart from an invitation to donate to the project.
Though online tutorials show the usage of either of these to be straightforward, my experiences were not all that positive at the outset. In fact, there was something that I needed to do and that is why this post has come to exist at all. That happened even after the restart that Conectify Hotspot needed as part of its installation; it runs as a system service so that’s why the restart was needed. In fact, it was Virtual Router Manager that told me what the issue was and it needed no reboot. Neither did it cause network disconnection of a laptop like the Connectify offering did on me and that was the cause of its ejection from that system; limitations in favour of its paid addition aside, it may have the snazzier interface but I’ll take effective simplicity any day.
Using Virtual Router Manager turns out to be simple enough. It needs a network name (also known as an SSID), a password to restrict who accesses the network and the internet connection to be shared. In my case, the was Local Area Connection on the drop down list. With all the required information entered, I was ready to start the router using the Start Network Router button. The text on this changes to Stop Network Router when the hub is operational or at least it should have done for me on the first time that I ran it. What I got instead was the following message:
The group or resource is not in the correct state to perform the requested operation.
The above may not say all that much but it becomes more than ample information if you enter it into the likes of Google. Behind the scenes, Virtual Router Manager is using native Windows functionality is create a WiFi hub from a PC and it appears to be the Microsoft Virtual Wi-Fi Miniport Adapter from what I have seen. When I tried setting up an adhoc Wi-Fi network from a laptop to the Nexus 7 using Windows’ own network set up capability via its Control Panel, it didn’t do what I needed so there might be something that third party software can do. So, the interesting thing about the solution to my Virtual Router Manager problem was that it needed me to delve into the innards of Windows a little.
Firstly, there’s running Command Prompt (All Programs > Accessories) from the Start Menu with Administrator privileges. It helps here if the account with which you log into Windows is in the Administrators group since all you have to do then is right click on the Start Menu entry and choose Run as administrator entry in the pop-up context menu. With a command line window now open, you then need to issue the following command:
netsh wlan set hostednetwork mode=allow ssid=[network name] key=[password] keyUsage=persistent
When that had done its thing, Virtual Router Manager worked without a hitch though it did turn itself after a while and that may be no bad thing from the security standpoint. On the Android side, it was a matter of going in Settings > Wi-Fi and choose the new network that have been creating on the laptop. This sort of thing may apply to other types of tablet (Dare I mention iPads?) so you could connect anything to the hub without needing to do any more on the Windows side.
For those wanting to know what’s going on behind the scenes on Windows, there’s a useful tutorial on Instructables that shows what third party software is saving you from having to do. Even if I never go down the more DIY route, I probably have saved myself having to buy a mobile Wi-Fi hub for any trips to Éire. For now, the Irish 3G dongle that I already have should be enough.
A little more freedom
10th December 2011A few weeks ago, I decided to address the fact that my Toshiba laptop have next to useless battery life. The arrival of an issue of PC Pro that included a review of lower cost laptops was another spur and I ended up looking on the web to see what was in stock at nearby chain stores. In the end, I plumped for an HP Pavilion dm4 and it was Argos that supplied yet another piece of computing kit to me. In fact, they seem to have a wider range of laptops than PC World!
The Pavillion dm4 seems to come in two editions and I opted for the heavier of these though it still is lighter than my Toshiba Equium as I found on a recent trip away from home. Its battery life is a revelation for someone who never has got anything better than three hours from a netbook. Having more than five hours certainly makes it suitable for those longer train journeys away from home and I have seen remaining battery life being quoted as exceeding seven hours from time to time though I wouldn’t depend on that.
Of course, having longer battery life would be pointless if the machine didn’t do what else was asked of it. It comes with the 64-bit of Windows 7 and this thought me that this edition of the operating system also runs 32-bit software, a reassuring discovering. There’s a trial version of Office 2010 on there too and, having a licence key for the Home and Student edition, I fully activated it. Otherwise, I added a few extras to make myself at home such as Dropbox and VirtuaWin (for virtual desktops as I would in Linux). While I playing with the idea of adding Ubuntu using Wubi, I am not planning to set up dual booting of Windows and Linux like I have on the Toshiba. Little developments like this can wait.
Regarding the hardware, the CPU is an Intel Core i3 affair and there’s 4 MB of memory on board. The screen is a 14″ one and that makes for a more compact machine without making it too diminutive. The keyboard is of the scrabble-key variety and works well too as does the trackpad. There’s a fingerprint scanner for logging in and out without using a password but I haven’t got to checking how this works so far. It all zips along without any delays and that’s all that anyone can ask of a computer.
There is one eccentricity in my eyes though and it seems that the functions need to be used in combination with Fn for them to work like they would on a desktop machine. That makes functions like changing the brightness of the screen, adjusting the sound of the speakers and turning the WiFi on and off more accessible. My Asus Eee PC netbook and the Toshiba Equium both have things the other way around so I found this set of affairs unusual but it’s just a point to remember rather than being a nuisance.
HP may have had its wobbles regarding its future in the PC making business but the Pavilion feels well put together and very solidly built. It commanded a little premium over the others on my shortlist but it seems to have been worth it. If HP does go down the premium laptop route as has been reported recently, this is the kind of quality that they would need to deliver to just higher prices. Saying that, is this the time to do such a thing would other devices challenging the PC’s place in consumer computing? It would be a shame to lose the likes of the Pavilion dm4 from the market to an act of folly.
Battery life
2nd October 2011In recent times, I have lugged my Toshiba Equium with me while working away from home; I needed a full screen laptop of my own for attending to various things after work hours so it needs to come with me. It’s not the most portable of things with its weight and the lack of battery life. Now that I think of it, I reckon that it’s more of a desktop PC replacement machine than a mobile workhorse. After all, it only lasts an hour on its own battery away from a power socket. Virgin Trains’ tightness with such things on their Pendolinos is another matter…
Unless my BlackBerry is discounted, battery life seems to be something with which I haven’t had much luck because my Asus Eee PC isn’t too brilliant either. Without decent power management, two hours seems to be as good as I get from its battery. However, three to four hours become possible with better power management software on board. That makes the netbook even more usable though there are others out there offering longer battery life. Still, I am not tempted by these because the gadget works well enough for me that I don’t need to wonder about how money I am spending on building a mobile computing collection.
While I am not keen on spending too much cash or having a collection of computers, the battery life situation with my Toshiba is more than giving me pause for thought. The figures quoted for MacBooks had me looking at them though they aren’t at all cheap. Curiosity about the world of the Mac may make them attractive to me but the prices forestalled that and the concept was left on the shelf.
Recently, PC Pro ran a remarkably well-timed review of laptops offering long battery life (in issue 205). The minimum lifetime in this collection was over five hours so the list of reviewed devices is an interesting one for me. In fact, it even may become a shortlist should I decide to spend money on buying a more portable laptop than the Toshiba that I already have. The seventeen hour battery life for a Sony VAIO SB series sounds intriguing even if you need to buy an accessory to gain this. That it does over seven hours without the extra battery slice makes it more than attractive anyway. The review was food for thought and should come in handy if I decide that money needs spending.
Extending ASUS Eee PC Battery Life Without Changing From Ubuntu 11.04
25th May 2011It might just be my experience of the things but I do tend to take claims about laptop or netbook battery life with a pinch of salt. After all, I have a Toshiba laptop that only lasts an hour or two away from the mains and that runs Windows 7. For a long time, my ASUS Eee PC netbook was looking like that too but a spot of investigation reveals that there is something that I could do to extend the length of time before the battery ran out of charge. For now, the solution would seem to be installing eee-control and here’s what I needed to do that for Ubuntu 11.04, which has gained a reputation for being a bit of a power hog on netbooks if various tests are to be believed.
Because eee-control is not in the standard Ubuntu repositories, you need to add an extra one for install in the usual way. To make this happen, launch Synaptic and find the Repositories entry on the Settings menu and click on it. If there’s no sign of it , then Software Sources (this was missing on my ASUS) needs to be installed using the following command:
sudo apt-get install software-properties-gtk
Once Software Sources opens up after you entering your password, go to the Other Software tab. The next step is to click on the Add button and enter the following into the APT Line box before clicking on the Add Source button:
ppa:eee-control/eee-control
With that done, all that’s need is to issue the following command before rebooting the machine on completion of the installation:
sudo apt-get install eee-control
When you are logged back in to get your desktop, you’ll notice a new icon in your top with the Eee logo and clicking on this reveals a menu with a number of useful options. Among these is the ability to turn off a number of devices such as the camera, WiFi or card reader. After that there’s the Preferences entry in the Advanced submenu for turning on such things as setting performance to Powersave for battery-powered operation or smart fan control. The notifications issued to you can be controlled too as can be a number of customisable keyboard shortcuts useful for quickly starting a few applications.
So far, I have seen a largely untended machine last around four hours and that’s around double what I have been getting until now. Of course, what really is needed is a test with constant use to see how it gets on. Even if I see lifetimes of around 3 hours, this still will be an improvement. Nevertheless, being of a sceptical nature, I will not scotch the idea of getting a spare battery just yet.
Manually adding an entry for Windows 7 to an Ubuntu GRUB2 menu
21st November 2010A recent endeavour of mine has been to set up a dual-booting arrangement on my Toshiba Equium laptop with Ubuntu 10.10 and Windows 7 side by side on there. However, unlike the same attempt with my Asus Eee PC where Windows XP coexists with Ubuntu, there was no menu entry on the GRUB (I understand that Ubuntu has had version 2 of this since 9.04 though the internal version is of the form 1.9x; you can issue grub-install -v at the command line to find out what version you have on your system) menu afterwards. Thankfully, I eventually figured out how to do this and the process is shared here in a more coherent order than the one in which I discovered all the steps.
The first step is to edit /etc/grub.d/40_custom (using SUDO) and add the following lines to the bottom of the file:
menuentry 'Windows 7' {
 set root='(hd0,msdos2)'
 chainloader +1
 }
Since the location of the Windows installation can differ widely, I need to explain the “set root” line because (hd0,msdos2) refers to /dev/sda2 on my machine. More generally, hd0 (or /dev/sda elsewhere) refers to the first hard disk installed in any PC with hd1 (or /dev/sdb elsewhere) being the second and so on. While I was expecting to see entries like (hd0,6) in /boot/grub/grub.cfg, what I saw were ones like (hd0,msdos6) instead with the number in the text after the comma being the partition identifier; 1 is the first (sda1), 2 (sda2) is the second and so on. The next line (staring with chainloader) tells GRUB to load the first sector of the Windows drive so that it can boot. After all that decoding, my final remark on what’s above is a simple one: the text “Windows 7” is what will appear in the GRUB menu so you can change this as you see fit.
After saving 40_custom, the next step is to issue the following command to update grub.cfg:
sudo update-grub2
Once that has done its business, then you can look into /boot/grub/grub.cfg to check that the text added into 40_custom has found its way in there. That is important because this is the file read by GRUB2 when it builds the menu that appears at start-up time. A system reboot will prove conclusively that the new entry has been added successfully. Then, there’s the matter of selectively to see if Windows loads properly like it did for me, once I chose the correct disk partition for the menu entry, that is!
Why go elsewhere when you can get it at Argos?
21st October 2010It is perhaps a sign of the technological times in which we live that even mainstream stores like Argos stock computing equipment these days. For instance, last weekend, I bought a Seagate Expansion 2 GB external hard drive in there for backing up my digital photo collection and never got to a local independent computer shop like I had planned to do. Maybe, it was the convenience and lack of fuss with a catalogue shop that swung it for me but the largest size at the other place was 1 GB according to its website anyway.
Other items bought from the pervasive chain have included a BlackBerry, a Vodafone mobile broadband dongle and an Asus Eee PC. All have done what I have asked of them and without any trouble but it does make me wonder about the threat to the specialist PC stores from their more mainstream competitors and it isn’t just Argos either. Tesco also tempt folk into their stores with technological goods and I must own up to having a cheap DVD player from there.
In former times, I might have been lured into purchasing at online stores until the reality of dealing with inflexible delivery services took away the shine after a few years. After all, I’d prefer not to burden neighbours with taking delivery of any purchases. My current job offers the possibility of some home working so that might be an option for those things that do need delivering but there remains a certain immediacy to going into a real shop for what you need and bringing it away on the day (having paid for it, of course) that is difficult to beat.
While I tend to decide what to get using my mind after doing some research, others may prefer the idea of getting some advice in a shop and that’s where the specialists score. In fact, it may be the only way that they are going to cope with the onslaught from megastores like Argos and Tesco. All this reminds me that going to a local independent shop next time is in order because they cannot be doing brilliantly in these cash-straightened times.
An Eee PC
7th October 2010Having had an Asus Eee PC 1001 HA for a few weeks now, I thought that it might be opportune to share a few words about the thing on here. The first thing that struck me when I got it was the size of the box in which it came. Being accustomed to things coming in large boxes meant the relatively diminutive size of the package was hard not to notice. Within that small box was the netbook itself along with the requisite power cable and not much else apart from warranty and quickstart guides; so that’s how they kept things small.
Though I was well aware of the size of a netbook from previous bouts of window shopping, the small size of something with a 10″ screen hadn’t embedded itself into my consciousness. In spite of that, it came with more items that reflect desktop computing than might be expected. First, there’s a 160 GB hard disk and 1 GB of memory, neither of which is disgraceful and the memory module sits behind a panel opened by loosening a screw so I am left wondering about adding more. Sockets for network and VGA cables are included along with three USB ports and sockets for a set of headphones and for a microphone. Portability starts to come to the fore with the inclusion of an Intel Atom CPU and a socket for an SD card. Unusual inclusions come in the form of an onboard webcam and microphone, both of which I plan on leaving off for sake of privacy. Wi-Fi is another networking option so you’re not short of features. The keyboard is not too compromised either and the mouse trackpad is the sort of thing that you’d find on full size laptops. With the latter, you can use gestures too so I need to learn what ones are available.

The operating system that comes with the machine is Windows XP and there are some extras bundled too. These include a trial of Trend Micro as an initial security software option as well as Microsoft Works and a trial of Microsoft Office 2007. Then, there are some Asus utilities too though they are not so useful to me. All in all, none of these burden the processing power too much and IE8 comes installed too. Being a tinkerer, I have put some of the sorts of things that I’d have on a full size PC on there. Examples include Mozilla Firefox, Google Chrome, Adobe Reader and Adobe Digital Editions. Pushing the boat out further, I used Wubi to get Ubuntu 10.04 on there in the same way as I have done with my 15″ Toshiba laptop. So far, nothing seems to overwhelm the available processing power though I am left wondering about battery life.
The mention of battery life brings me to mulling over how well the machine operates. So far, I am finding that the battery lasts around three hours, much longer than on my Toshiba but nothing startling either. Nevertheless, it does preserve things by going into sleep mode when you leave it unattended for long enough. Still, I’d be inclined to find a socket if I was undertaking a long train journey.
According to the specifications, it is suppose to weight around 1.4 kg and that seems not to be a weight that has been a burden to carry so far and the smaller size makes it easy to pop into any bag. It also seems sufficiently robust to allow its carrying by bicycle though I wouldn’t be inclined to carry it over too many rough roads. In fact, the manufacturer advises against carrying it anywhere (by bike or otherwise) with switching it off first but that’s a common sense precaution.
Start-up times are respectable though you feel the time going by when you’re on a bus for a forty minute journey and shutdown needs some time set aside near the end. Screen resolution can be increased to 1024×600 and the shallowness can be noticed, reminding you that you are using a portable machine. Because of that, there have been times when I hit the F11 key to get a full screen web browser session. Coupled with the Vodafone mobile broadband dongle that I have, it has done some useful things for me while on the move so long as there is sufficient signal strength (seeing the type of connection change between 3G, EDGE and GPRS is instructive). All in all, it’s not a chore to use so long as Internet connections aren’t temperamental.