Getting rid of the Windows Resizing message from a Manjaro VirtualBox guest
27th July 2020Like Fedora, Manjaro also installs a package for VirtualBox Guest Additions when you install the Linux distro in a VirtualBox virtual machine. However, it does have certain expectations when doing this. On many systems and my own is one of these, Linux guests are forced to use the VMSVGA virtual graphics controller while Windows guests are allowed to use the VBoxSVGA one. It is the latter that Manjaro expects so you get a message like the following appearing when the desktop environment has loaded:
Windows Resizing
 Set your VirtualBox Graphics Controller to enable windows resizing
After ensuring that gcc, make, perl and kernel headers are installed, I usually install VirtualBox Guest Additions myself from the included ISO image and so I did the same with Manjaro. Doing that and restarting the virtual machine got me extra functionality like screen resizing and being able to copy and paste between the VM and elsewhere after choosing the Bidirectional setting in the menus under Devices > Shared Clipboard.
That still left an unwanted message popping up on startup. To get rid of that, I just needed to remove /etc/xdg/autostart/mhwd-vmsvga-alert.desktop. It can be deleted but I just moved it somewhere else and a restart proved that the message was gone as needed. Now everything is working as I wanted.
Contents not displaying for Shared Folders on a Fedora 32 guest instance in VirtualBox
26th July 2020While some Linux distros like Fedora install VirtualBox drivers during installation time, I prefer to install the VirtualBox Guest Additions themselves. Before doing this, it is best to remove the virtualbox-guest-additions package from Fedora to avoid conflicts. After that, execute the following command to ensure that all prerequisites for the VirtualBox Guest Additions are in place prior to mounting the VirtualBox Guest Additions ISO image and installing from there:
sudo dnf -y install gcc automake make kernel-headers dkms bzip2 libxcrypt-compat kernel-devel perl
During the installation, you may encounter a message like the following:
ValueError: File context for /opt/VBoxGuestAdditions-<VERSION>/other/mount.vboxsf already defined
This is generated by SELinux so the following commands need executing before the VirtualBox Guest Additions installation is repeated:
sudo semanage fcontext -d /opt/VBoxGuestAdditions-<VERSION>/other/mount.vboxsf
 sudo restorecon /opt/VBoxGuestAdditions-<VERSION>/other/mount.vboxsf
Without doing the above step and fixing the preceding error message, I had an issue with mounting of Shared Folders whereby the mount point was set up but no folder contents were displayed. This happened even when my user account was added to the vboxsf group and it proved to be the SELinux context issue that was the cause.
Restoring the menu bar on GNOME Terminal in a GNOME Shell session
25th July 2020By default, a GNOME Terminal instance does not display a menu bar and that applies not only in GNOME Shell but also on the Cinnamon Desktop environment. In the latter, it is easy enough to display the menu bar using the context menu produced by right clicking in the window before going to Edit > Preferences and ticking the box for Show menubar by default in new terminals in the General section. After closing the Preferences dialogue, every new GNOME Terminal session will show the menu bar.
Unfortunately, it is not so easy in GNOME Shell though the context menu route does allow you to unhide the menu bar on a temporary basis. That is because the requisite tickbox is missing from the Preferences dialogue box displayed after navigating to Edit > Preferences in the menus. To address, you need the execute the following command in a terminal session:
gsettings set org.gnome.Terminal.Legacy.Settings headerbar false
This not only adds the menu bar on a permanent basis but it also adds the missing tickbox, populated as required. GNOME Shell may be minimalist in some ways but making this action harder looks like going a little too far.
Removing obsolete libraries from Flatpak
1st February 2020Along with various pieces of software, Flatpak also installs KDE and GNOME libraries needed to support them. However, it does not always remove obsolete versions of those libraries whenever software gets updated. One result is that messages regarding obsolete versions of GNOME may be issued and this has been known to cause confusion because there is the GNOME instance that is part of a Linux distro like Ubuntu and using Flatpak adds another one for its software packages to use. My use of Linux Mint may lesson the chances of misunderstanding.
Thankfully, executing a single command will remove any obsolete Flatpak libraries so the messages no longer appear and there then is no need to touch your actual Linux installation. This then is the command that sorted it for me:
flatpak uninstall --unused && sudo flatpak repair
The first part that removes any unused libraries is run as a normal user so there is no error in the above command. Administrative privileges are needed for the second section that does any repairs that are needed. It might be better if Flatpak did all this for you using the update command but that is not how the thing works. At least, there is a quick way to address this state of affairs and there might be some good reasons for having things work as they do.
Lessons learned on managing Windows Taskbar and Start Menu colouring in VirtualBox virtual machines
9th December 2019In the last few weeks, I have had a few occasions when the colouration of the Windows 10 taskbar and its Star Menu has departed from my expectations. At times, this happened in VirtualBox virtual machine installations and both the legacy 5.2.x versions and the current 6.x ones have thrown up issues.
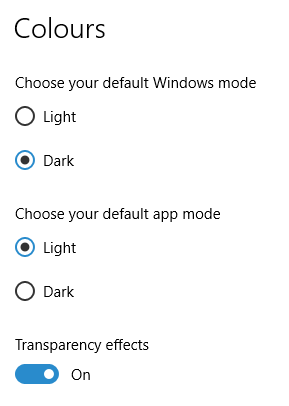

The first one actually happened with a Windows 10 installation in VirtualBox 5.2.x when the taskbar changed colour to light grey and there was no way to get it to pick up the colour of the desktop image to become blue instead. The solution was to change the Windows from Light to Dark in order for the desired colouration to be applied and the settings above are taken from the screen that appears on going to Settings > Personalisation > Colours.
The second issue appeared in Windows 10 Professional installation in VirtualBox 6.0.x when the taskbar and Start Menu turned transparent after an updated. This virtual machine is used to see what is coming in the slow ring of Windows Insider so some rough edges could be expected. The solution here was to turn off 3D acceleration in the Display pane of the VM settings after shutting it down. Starting it again showed that all was back as expected.
Both resolutions took a share of time to find and there was a deal of experimentation needed too. Once identified, they addressed the issues as desired so I am recording here for use by others as much as future reference for myself.
Shrinking title bar search box in Microsoft Office 365 applications
6th December 2019
It might be a new development but I only recently spotted the presence of a search box in the titles of both Microsoft Word and Microsoft Excel that I have as part of an Office 365 subscription. Though handy for searching file contents and checking on spelling and grammer, I also realised that the boxes take up quite a bit of space and decided to see if hiding them was possible.
![]()
In the event, I found that they could be shrunk from a box to an icon that expanded to pop up a box when you clicked on them. Since I did not need the box to be on view all the time, that outcome was sufficient for my designs though it may not satisfy others who want to hide this functionality completely.
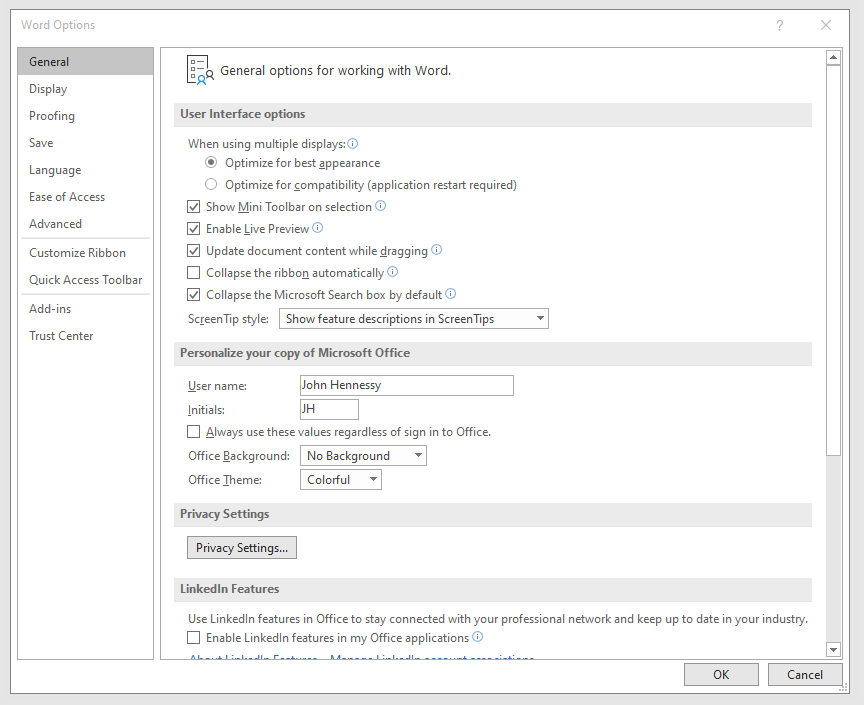
To get it, it was a matter of going to File > Options and putting a tick in the box next to the Collapse the Microsoft Search box by default entry in the General tab before clicking on the OK button. Doing that freed up some title bar space as desired and searching is only a button press away.
Ensuring that Flatpak remains up to date on Linux Mint 19.2
25th October 2019The Flatpak concept offers a useful way of getting the latest version of software like LibreOffice or GIMP on Linux machines because repositories are managed conservatively when it comes to the versions of included software. Ubuntu has Snaps, which are similar in concept. Both options bundle dependencies with the packaged software so that its operation can use later versions of system libraries that what may be available with a particular distribution.
However, even Flatpak depends on what is available through the repositories for a distribution as I found when a software update needed a version of the tool. The solution was to add PPA using the following command and agreeing to the prompts that arise (answering Y, in other words):
sudo add-apt-repository ppa:alexlarsson/flatpak
With the new PPA instated, the usual apt commands were used to update the Flatpak package and continue with the required updates. Since then, all has gone smoothly as expected.
Shared folders not automounting on an Ubuntu 18.04 guest in a VirtualBox virtual machine
1st October 2019Over the weekend, I finally got to fixing a problem that has affected Ubuntu 18.04 virtual machine for quite a while. The usual checks on Guest Additions installation and vboxsf group access assignment were performed but were not causing the issue. Also, no other VM (Windows (7 & 10) and Linux Mint Debian Edition) on the same Linux Mint 19.2 machine was experiencing the same issue. The latter observation made the problem intrinsic to the Ubuntu VM itself.
Because I install the Guest Additions software from the included virtual CD, I executed the following command to open the relevant file for editing:
sudo systemctl edit --full vboxadd-service
If I had installed installed virtualbox-guest-dkms and virtualbox-guest-utils from the Ubuntu repositories instead, then this would have been the command that I needed to execute instead of the above.
sudo systemctl edit --full virtualbox-guest-utils
Whichever configuration gets opened, the line that needs attention is the one beginning with Conflicts (line 6 in the file on my system). The required edit removes systemd-timesync.service from the list following the equals sign. It is worth checking that file paths include the correct version number for the Guest Additions software that is installed in case this was not the case. The only change that was needed on my Ubuntu VM was to the Conflicts line and rebooting it got the Shared Folder automatically mounted under the /media directory as expected.
Creating a VirtualBox virtual disk image using the Linux command line
9th September 2019Much of the past weekend was spent getting a working Debian 10 installation up and running in a VirtualBox virtual machine. Because I chose the Cinnamon desktop environment, the process was not as smooth as I would have liked so a minimal installation was performed before I started to embellish as I liked. Along the way, I got to wondering if I could create virtual hard drives using the command line and I found that something like the following did what was needed:
VBoxManage createmedium disk --filename <full path including file name without extension> -size <size in MiB> --format VDI --variant Standard
Most of the options are self-explanatory part from the one named variant. This defines whether the VDI file expands to the maximum size specified using the size parameter or is reserved with the size defined in that parameter. Two VDI files were created in this way and I used these to replace their Debian 8 predecessors and even to save a bit of space too. If you want, you can find out more in the user documentation but this post hopefully gets you started anyway.
Getting Eclipse to start without incompatibility errors on Linux Mint 19.1
12th June 2019Recent curiosity about Java programming and Groovy scripting got me trying to start up the Eclipse IDE that I had install on my main machine. What I got instead of a successful application startup was a message that included the following:
!MESSAGE Exception launching the Eclipse Platform:
 !STACK
 java.lang.ClassNotFoundException: org.eclipse.core.runtime.adaptor.EclipseStarter
 at java.base/java.net.URLClassLoader.findClass(URLClassLoader.java:466)
 at java.base/java.lang.ClassLoader.loadClass(ClassLoader.java:566)
 at java.base/java.lang.ClassLoader.loadClass(ClassLoader.java:499)
 at org.eclipse.equinox.launcher.Main.invokeFramework(Main.java:626)
 at org.eclipse.equinox.launcher.Main.basicRun(Main.java:584)
 at org.eclipse.equinox.launcher.Main.run(Main.java:1438)
 at org.eclipse.equinox.launcher.Main.main(Main.java:1414)
The cause was a mismatch between Eclipse and the installed version of Java that it needed in order to run. After all, the software itself is written in the Java language and the installed version from the usual software repositories was too old for Java 11. The solution turned out to be installing a newer version as a Snap (Ubuntu’s answer to Flatpak). The following command did the needful since Snapd already was running on my machine:
sudo snap install eclipse --classic
The only part of the command that warrants extra comment is the --classic switch since that is needed for a tool like Eclipse that needs to access a host file system. On executing, the software was downloaded from Snapcraft and then installed within its own bundle of dependencies. The latter adds a certain detachment from the underlying Linux installation and ensures that no messages appear because of incompatibilities like the one near the start of this post.