Rethinking photo editing
17th April 2018Photo editing has been something that I have been doing since my first-ever photo scan in 1998 (I believe it was in June of that year but cannot be completely sure nearly twenty years later). Since then, I have been using a variety of tools for the job and wondered how other photos can look better than my own. What cannot be excluded is my preference for being active in the middle of the day when light is at its bluest as well as a penchant for using a higher ISO of 400. In other words, what I do when making photos affects how they look afterwards as much as the weather that I had encountered.
My reason for mentioning the above aspects of photographic craft is that they affect what you can do in photo editing afterwards, even with the benefits of technological advancement. My tastes have changed over time, so the appeal of re-editing old photos fades when you realise that you only are going around in circles and there always are new ones to share, so that may be a better way to improve.
When I started, I was a user of Paint Shop Pro but have gone over to Adobe since then. First, it was Photoshop Elements, but an offer in 2011 lured me into having Lightroom and the full version of Photoshop. Nowadays, I am a Creative Cloud photography plan subscriber so I get to see new developments much sooner than once was the case.
Even though I have had Lightroom for all that time, I never really made full use of it and preferred a Photoshop-based workflow. Lightroom was used to select photos for Photoshop editing, mainly using adjustments for such things as tones, exposure, levels, hue and saturation. Removal of dust spots, resizing and sharpening were other parts of a still minimalist approach.
What changed all this was a day spent pottering about the 2018 Photography Show at the Birmingham NEC during a cold snap in March. That was followed by my checking out the Adobe YouTube Channel afterwards where there were videos of the talks featured every day of the four-day event. Here are some shortcuts if you want to do some catching up yourself: Day 1, Day 2, Day 3, and Day 4. Be warned though that these videos are long in that they feature the whole day and there are enough gaps that you may wish to fast-forward through them. Even so, there is quite a bit of variety of things to see.
Of particular interest were the talks given by the landscape photographer David Noton who sensibly has a philosophy of doing as little to his images as possible. It helps that his starting points are so good that adjusting black and white points with a little tonal adjustment does most of what he needs. Vibrancy, clarity and sharpening adjustments are kept to a minimum while some work with graduated filters evens out exposure differences between skies and landscapes. It helps that all this can be done in Lightroom, so that set me thinking about trying it out for size and the trick of using the backslash (\) key to switch between raw and processed views is a bonus granted by non-destructive editing. Others may have demonstrated the creation of composite imagery, but simplicity is more like my way of working.
Confusingly, we now have the cloud-based Lightroom CC while the previous desktop counterpart is known as Lightroom Classic CC. Though the former may allow for easy dust spot removal among other things, it is the latter that I prefer because the idea of wholesale image library upload does not appeal to me for now and I already have other places for off-site image backup like Google Drive and Dropbox. The mobile app does look interesting since it allows capturing images on a such a device in Adobe’s raw image format DNG. Still, my workflow is set to be more Lightroom-based than it once was and I quite fancy what new technology offers, especially since Adobe is progressing its Sensai artificial intelligence engine. The fact that it has access to many images on its systems due to Lightroom CC and its own stock library (Adobe Stock, formerly Fotolia) must mean that it has plenty of data for training this AI engine.
A display of brand loyalty
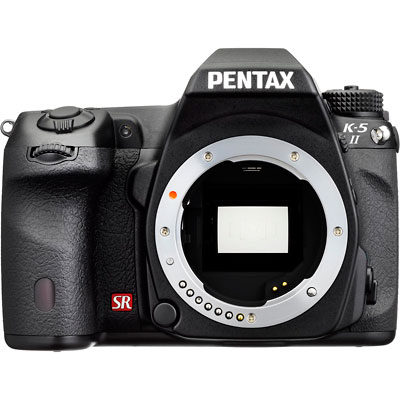
12th July 2013Since 2007, my main camera has been a Pentax K10D DSLR and it has gone on many journeys with me. In fact, more than 15,000 images have been captured with it and I have classed it as an unfailing servant. The autofocus may not be the fastest but my subjects tend to be stationary: landscapes, architecture, flora and transport. Even any bus and train photos have included parked vehicles rather than moving ones so there never have been issues. The hint of underexposure in any photos always can be sorted because DNG files are what I create, with all the raw capture information that is possible to retain. In fact, it has been hard to justify buying another SLR because the K10D has done so well for me.
In recent months, I have looking at processed photos and asking myself if time has moved along for what is not far from being a six year old camera. At various times, I have been looking at higher members of the Pentax while wondering if an upgrade would be a good idea. First, there was the K7 and then the K5 before the K5 II got launched. Even though its predecessor is still to be found on sale, it was the newer model that became my choice.
My move to Pentax in 2007 was a case of brand disloyalty since I had been a Canon user from when I acquired my first SLR, an EOS 300. Even now, I still have a Powershot G11 that finds itself slipped into a pocket on many a time. Nevertheless, I find that Canon images feel a little washed out prior to post processing and that hasn’t been the case with the K10D. In fact, I have been hearing good things about Nikon cameras delivering punchy results so one of them would be a contender were it not for how well the Pentax performed.
So, what has my new K5 II body gained me that I didn’t have before? For one thing, the autofocus is a major improvement on that in the K10D. It may not stop me persevering with manual focusing for most of the time but there are occasions the option of solid autofocus is good to have. Other advances include a 16.3 megapixel sensor with a much larger ISO range. The advances in sensor technology since when the K10D appeared may give me better quality photos and noise is something that my eyes may have begun to detect in K10D photos even at my usual ISO of 400.
There have been innovations that I don’t need too. Live View is something that I use heavily with the Powershot G11 because it has such a pitiful optical viewfinder. The K5 II has a very bright and sharp one so that function lays dormant, especially when I witnessed dodgy autofocus performance with it in use; manual focusing should be OK, I reckon. By default too, the screen stays on all the time and that’s a nuisance for an optical viewfinder user like me so I looked through the manual and the menus to switch off the thing. My brief flirtation with the image level display met an end for much the same reason though it’s good that it’s there. There is some horizon auto-correction available as a feature and this is left on to see what it offers since there have been a multitude of times when I needed to sort out crooked horizons caused by my handholding the camera.
The K5 II may have a 3″ screen on its back but it has done nothing to increase the size of the camera. If anything, it is smaller that the K10D and that usefully means that I am not on the lookout for a new camera holster. Not having a bigger body also means there is little change in how the much camera feels in the hand compared with the older one.
In many ways, the K5 II works very like the K10D once I took control over settings that didn’t suit me. Both have Shake Reduction in their camera bodies though the setting has been moved into the settings menu in the new camera when the older one had a separate switch on its body. Since I’d be inclined to leave it on all the time and prefer not to have it knocked off accidentally, this is not an issue. Otherwise, many of the various switches are in the same places so it’s not that hard to find my way around them.
That’s not to say that there aren’t other changes like the addition of a lock to the mode dial but I have used Canon EOS camera bodies with that feature so I do not consider it a step backwards. The exposure compensation button has been moved to the top of the camera where I found it very easily and have been using perhaps more than on the K10D; it’s also something that I use on the G11 so the experimentation is being brought across to the K5 II now as well. Beside it, there’s a new ISO button so further experimentation can be attempted with that to see how it does.
If I have any criticism, it’s about the clutter of the menus on the K5 II. The long lists through you scrolled on the K10D have been replaced with a series of extra tabs so that on-screen scrolling is not needed as before. However, I reckon that this breaks up things too much and makes working through the settings look more foreboding to anyone who is not so technical in mindset. Nevertheless, settings such as the the type of file to capture are there and I continue to use RAW DNG files as is usual for me though JPEG and Pentax’s own RAW format also are there. For a while, I forgot to set the date, soon found out what I did and the situation was remedied. The same sort of thing applied to storing files in different folders according to the capture date. For my own reasons, I turned this off to put everything into a single PENTX directory to suit my own workflow. My latest discovery among the menus was the ability to add photographer and copyright holder information to the EXIF metadata attached to the image files created by the camera. With legislative proposals that dilute the automatic rights of copyright holders going through the U.K. parliament, this seems a very timely inclusion even if most would prefer that there was no change to copyright law.
Of course, the worth of any camera is in the images that it produces and I have been happy with what I have been getting so far. The bigger files mean less images fit on a memory card as before. Thankfully, SDHC card capacities have grown even if I don’t wish to machine gun my photography altogether. While out and about, I was surprised to apertures like F/14 and F/18 when I was more accustomed to a progression like F/11, F/13, F/16, F/19, F/22, etc. Most of those older values still are there though so there hasn’t been a complete break with convention. The same comment applies to shutter speeds where ones like 1/100 and 1/160 made there appearance where I might have expected just ones like 1/90, 1/125, 1/250 and so on. The extra possibilities, and that is what they are, do allow more flexibility I suppose and may even make it easier to make correct exposures though any judgement of correctness has to be in the eye of a photographer and not what a computer algorithm in a camera determines. For much of the time until now, I have stuck with an ISO of 400 apart from a little testing in a woodland area of an evening soon after the camera arrived.
Since the K5 II came my way a few months ago, I have been meaning to collect my thoughts on here and there has been a delay while I brought mu thinking to a sensible close.At one point, it felt like there was so much to say that the piece became larger in my mind that even what you have been reading now. After all, there are other things that I can adjust to see how the resulting images look and white balance is but one of these.The K10D isn’t beyond experimentation either, especially since I discovered that shake reduction was switched off and it has me asking if that lacking in quality that I mentioned earlier has another explanation. Of course, actually making use of my tripod would be another good suggestion so it’s safe to say that yet more photographic explorations await.
Presenting more than one plot on a page using SAS ODS PDF
12th November 2012If you had asked me about getting two or more graphs on a page using SAS/GRAPH procedures, I might have suggested PROC GREPLAY as the means to achieve it. However, I recently came across another way to do the same thing by using ODS. It helped that the graphs were being produced using the PDF destination because I don’t think that what follows will work with the RTF one.
For this three plots on a page example, I first set the orientation to landscape so that the plots can be arranged side by side in a single row:
options orientation=landscape;
Next, the PDF destination was opened with page breaks turned off for the required output file using the STARTPAGE option:
ods pdf file="c:\test.pdf" startpage=off;
The listing destination was turned off as well since it is not needed:
ods listing close;
With that complete, a page or region break gets inserted. This could have been repeated before every procedure to get it popped into the next region on the page but that is the default behaviour for any extra procedural step so it wasn’t needed.
ods pdf startpage=now;
Then, the ODS LAYOUT feature is started so that the layout can be defined on the page:
ods layout start;
For the first plot and the one at the left of the triptych, a region was defined absolutely (grid layouts are available but I didn’t make use of them here) using ODS REGION. Since all plots were to be of the same size, the width was defined as being a third of the page and the bottom left hand corner of the region defined to be the same as that of the plot area on the page. Titles and footnotes usefully lie outside this region in the way that SAS arranges things so there is no further messing. With the region define, it’s a matter of running the required SAS/GRAPH procedure. In my case, this was GPLOT but I am certain that others would work as well. The height was defined as the full possible plot height. This could have a use if I wanted more than one row of graphs on a page with a trellis plot being an example of that sort of arrangement.
ods region x=0pct y=0pct width=33pct height=100pct;
<< SAS/GRAPH Procedure >>
For the middle plot, the starting position is moved a third of the way along the page while the section area has the same dimensions as before. Using percentages in these definitions does make their usage easier.
ods region x=33pct y=0pct width=33pct height=100pct;
<< SAS/GRAPH Procedure >>
Lastly, the right-hand plot has a starting position two-thirds of the width of the page and the other dimensions are as per the other panels:
ods region x=66pct y=0pct width=33pct height=100pct;
<< SAS/GRAPH Procedure >>
With the last graph created, it is time to close ODS LAYOUT and the PDF destination. Then, the listing destination is reopened again.
ods layout end;
 ods pdf close;
 ods listing;
Update 2012-12-08: Since writing the above, I have learned that ODS LAYOUT and ODS REGION have yet to become production features of SAS with 9.3 as the latest version. However, I have encountered an alternative that uses the STARTPAGE=NEVER ODS PDF option to turn off page breaks and GOPTIONS statements to control the regions occupied by plots. It’s Sample 48569 on the SAS website. Having a production equivalent is better since pre-production features are best avoided in production code. If I had realised the status, I would have used PROC GREPLAY to achieve what I needed to do.
Converting from CGM to Postscript
24th November 2009On thing that I recently had to investigate was the possibility of converting CGM vector graphics files into Postscript and from there into PDF. Having used ImageMagick for converting images before, that was an obvious option. However, that cannot process CGM files on its own and needs a delegate or helper application as well. This is the case with raw digital camera files too with UFRaw being the program chosen. For CGM images, the more obscure RALCGM is what’s needed and tracking it down is a bit of an art. The history is that it was developed at the U.K.’s Rutherford Appleton Laboratory but it seems that it was left go off into the wilderness rather than someone keeping an eye on things. With that in mind, here are the installation packages for Windows and Linux (RPM):
RALCGM is a handy command line tool that can covert from CGM to Postscript on its own without any need for ImageMagick at all. From what I have seen, fonts on graphical output may look greyer than black but it otherwise does its job well. However, considering that it is a freely available tool, one cannot complain too much. There are other packages for doing vector to raster conversion and the ones that I have seen do have GUI‘s but the freedom to look at for cost software wasn’t mine to have. The required command looks something like the following:
ralcgm -d PS -oL test.cgm test.ps
The switch -d PS uses the software’s Postscript driver and -oL specifies landscape orientation. If you want to find out more, here’s a PDF rendition of the help file that comes with the thing: