More thinking on travelling without a laptop
10th December 2016When it comes to the technology that I carry with me on trips away, I have begun to start weighing devices on my kitchen scales. The results are a little revealing. The HP Pavilion dm5 that has gone with me to Ireland and other places weighs between 2.5 and 3 kg while my Apple iPad Mini 2 comes in at 764 grams. My 12.9″ iPad Pro with its Logitech keyboard weighs between these at 110 to 1200 grams. The idea of consolidating computing devices for travel has been discussed on here before now and the main thing stopping my just going with the iPad Pro was the viewing of photos without filling up its 32 GB of storage space.
Since then, I just may have found a workaround and it is another gadget, this time weighing only a few hundred grams: a 1 TB WD My Passport Wireless portable hard drive. Aside from having a SD card slot that allows the automatic backup of photos, it also can connect with tablets and phones using WiFi broadband.
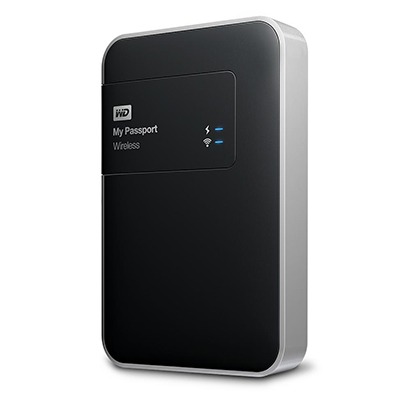
It is the WD My Cloud app that makes the connections to mobile devices useful and it works smoothly on iOS and Android devices too. Nevertheless, there is more functionality on the latter ones such as DNG file support and an added slide show feature that works with JPEG files. Both of these are invaluable for viewing photos and I feel a little short-changed that they are not available on iOS. Hopefully, that will get resolved sooner rather than later.
Thankfully, my Pentax K5 II DSLR camera can be persuaded to save DNG and JPEG files simultaneously so that they can be viewed full screen on both types of devices without having to transfer them onto the tablet first as you would with Apple’s SD card reader. Usefully, that gets around my oversight in buying iPads with only 32 GB of storage each. That now looks like a false economy given what I am trying now.
Such is the weight difference, just taking along my Apple iPad Pro and the WD device will save around 1 kg and there is less fuss at airport security screening too. While my HTC phone would suffice for seeing photos as slide shows, I am wondering if my battered Google Nexus 9 could come too. The only dilemma then would be how to pack things since I am not sure how a large iPad screen would seem to cabin crew or other passengers during take off and landing. That makes using the Nexus 9 onboard more of a proposition and the iPad might go into the hold luggage to make life a little easier. Still, that choice is a minor concern now that I can try travelling overseas without a laptop to see how I get along.
Batch conversion of DNG files to other file types with the Linux command line
8th June 2016At the time of writing, Google Drive is unable to accept DNG files, the Adobe file type for RAW images from digital cameras. The uploads themselves work fine but the additional processing at the end that I believe is needed for Google Photos appears to be failing. Because of this, I thought of other possibilities like uploading them to Dropbox or enclosing them in ZIP archives instead; of these, it is the first that I have been doing and with nothing but success so far. Another idea is to convert the files into an image format that Google Drive can handle and TIFF came to mind because it keeps all the detail from the original image. In contrast, JPEG files lose some information because of the nature of the compression.
Handily, a one line command does the conversion for all files in a directory once you have all the required software installed:
find -type f | grep -i “DNG” | parallel mogrify -format tiff {}
The find and grep commands are standard with the first getting you a list of all the files in the current directory and sending (piping) these to the grep command so the list only retains the names of all DNG files. The last part uses two commands for which I found installation was needed on my Linux Mint machine. The parallel package is the first of these and distributes the heavy workload across all the cores in your processor and this command will add it to your system:
sudo apt-get install parallel
The mogrify command is part of the ImageMagick suite along with others like convert and this is how you add that to your system:
sudo apt-get install imagemagick
In the command at the top, the parallel command works through all the files in the list provided to it and feeds them to mogrify for conversion. Without the use of parallel, the basic command is like this:
mogrify -format tiff *.DNG
In both cases, the -format switch specifies the output file type with tiff triggering the creation of TIFF files. The *.DNG portion itself captures all DNG files in a directory but {} does this in the main command at the top of this post. If you wanted JPEG ones, you would replace tiff with jpg. Shoudl you ever need them, a full list of what file types are supported is produced using the identify command (also part of ImageMagick) as follows:
identify -list format
A display of brand loyalty
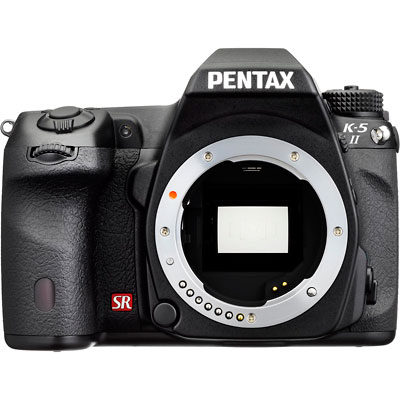
12th July 2013Since 2007, my main camera has been a Pentax K10D DSLR and it has gone on many journeys with me. In fact, more than 15,000 images have been captured with it and I have classed it as an unfailing servant. The autofocus may not be the fastest but my subjects tend to be stationary: landscapes, architecture, flora and transport. Even any bus and train photos have included parked vehicles rather than moving ones so there never have been issues. The hint of underexposure in any photos always can be sorted because DNG files are what I create, with all the raw capture information that is possible to retain. In fact, it has been hard to justify buying another SLR because the K10D has done so well for me.
In recent months, I have looking at processed photos and asking myself if time has moved along for what is not far from being a six year old camera. At various times, I have been looking at higher members of the Pentax while wondering if an upgrade would be a good idea. First, there was the K7 and then the K5 before the K5 II got launched. Even though its predecessor is still to be found on sale, it was the newer model that became my choice.
My move to Pentax in 2007 was a case of brand disloyalty since I had been a Canon user from when I acquired my first SLR, an EOS 300. Even now, I still have a Powershot G11 that finds itself slipped into a pocket on many a time. Nevertheless, I find that Canon images feel a little washed out prior to post processing and that hasn’t been the case with the K10D. In fact, I have been hearing good things about Nikon cameras delivering punchy results so one of them would be a contender were it not for how well the Pentax performed.
So, what has my new K5 II body gained me that I didn’t have before? For one thing, the autofocus is a major improvement on that in the K10D. It may not stop me persevering with manual focusing for most of the time but there are occasions the option of solid autofocus is good to have. Other advances include a 16.3 megapixel sensor with a much larger ISO range. The advances in sensor technology since when the K10D appeared may give me better quality photos and noise is something that my eyes may have begun to detect in K10D photos even at my usual ISO of 400.
There have been innovations that I don’t need too. Live View is something that I use heavily with the Powershot G11 because it has such a pitiful optical viewfinder. The K5 II has a very bright and sharp one so that function lays dormant, especially when I witnessed dodgy autofocus performance with it in use; manual focusing should be OK, I reckon. By default too, the screen stays on all the time and that’s a nuisance for an optical viewfinder user like me so I looked through the manual and the menus to switch off the thing. My brief flirtation with the image level display met an end for much the same reason though it’s good that it’s there. There is some horizon auto-correction available as a feature and this is left on to see what it offers since there have been a multitude of times when I needed to sort out crooked horizons caused by my handholding the camera.
The K5 II may have a 3″ screen on its back but it has done nothing to increase the size of the camera. If anything, it is smaller that the K10D and that usefully means that I am not on the lookout for a new camera holster. Not having a bigger body also means there is little change in how the much camera feels in the hand compared with the older one.
In many ways, the K5 II works very like the K10D once I took control over settings that didn’t suit me. Both have Shake Reduction in their camera bodies though the setting has been moved into the settings menu in the new camera when the older one had a separate switch on its body. Since I’d be inclined to leave it on all the time and prefer not to have it knocked off accidentally, this is not an issue. Otherwise, many of the various switches are in the same places so it’s not that hard to find my way around them.
That’s not to say that there aren’t other changes like the addition of a lock to the mode dial but I have used Canon EOS camera bodies with that feature so I do not consider it a step backwards. The exposure compensation button has been moved to the top of the camera where I found it very easily and have been using perhaps more than on the K10D; it’s also something that I use on the G11 so the experimentation is being brought across to the K5 II now as well. Beside it, there’s a new ISO button so further experimentation can be attempted with that to see how it does.
If I have any criticism, it’s about the clutter of the menus on the K5 II. The long lists through you scrolled on the K10D have been replaced with a series of extra tabs so that on-screen scrolling is not needed as before. However, I reckon that this breaks up things too much and makes working through the settings look more foreboding to anyone who is not so technical in mindset. Nevertheless, settings such as the the type of file to capture are there and I continue to use RAW DNG files as is usual for me though JPEG and Pentax’s own RAW format also are there. For a while, I forgot to set the date, soon found out what I did and the situation was remedied. The same sort of thing applied to storing files in different folders according to the capture date. For my own reasons, I turned this off to put everything into a single PENTX directory to suit my own workflow. My latest discovery among the menus was the ability to add photographer and copyright holder information to the EXIF metadata attached to the image files created by the camera. With legislative proposals that dilute the automatic rights of copyright holders going through the U.K. parliament, this seems a very timely inclusion even if most would prefer that there was no change to copyright law.
Of course, the worth of any camera is in the images that it produces and I have been happy with what I have been getting so far. The bigger files mean less images fit on a memory card as before. Thankfully, SDHC card capacities have grown even if I don’t wish to machine gun my photography altogether. While out and about, I was surprised to apertures like F/14 and F/18 when I was more accustomed to a progression like F/11, F/13, F/16, F/19, F/22, etc. Most of those older values still are there though so there hasn’t been a complete break with convention. The same comment applies to shutter speeds where ones like 1/100 and 1/160 made there appearance where I might have expected just ones like 1/90, 1/125, 1/250 and so on. The extra possibilities, and that is what they are, do allow more flexibility I suppose and may even make it easier to make correct exposures though any judgement of correctness has to be in the eye of a photographer and not what a computer algorithm in a camera determines. For much of the time until now, I have stuck with an ISO of 400 apart from a little testing in a woodland area of an evening soon after the camera arrived.
Since the K5 II came my way a few months ago, I have been meaning to collect my thoughts on here and there has been a delay while I brought mu thinking to a sensible close.At one point, it felt like there was so much to say that the piece became larger in my mind that even what you have been reading now. After all, there are other things that I can adjust to see how the resulting images look and white balance is but one of these.The K10D isn’t beyond experimentation either, especially since I discovered that shake reduction was switched off and it has me asking if that lacking in quality that I mentioned earlier has another explanation. Of course, actually making use of my tripod would be another good suggestion so it’s safe to say that yet more photographic explorations await.
ImageMagick and Ubuntu 9.04
5th May 2009Using a command line tool like ImageMagick for image processing may sound a really counter-intuitive thing to do but there’s no need to do everything on a case by case interactive basis. Image resizing and format conversion come to mind here. Helper programs are used behind the scenes too with Ghostscript being used to create Postscript files, for example.
The subject of helper programs brings me to an issue that has hampered me recently. While I am aware that there are tools like F-Spot available, I am also wont to use a combination of shell scripting (BASH & KSH), Perl and ImageMagick for organising my digital photos. My preference for using Raw camera files (DNG & CRW) means that ImageMagick cannot access these without a little helper. In the case of Ubuntu, it’s UFRaw. However, Jaunty Jackalope appears to have seen UFRaw updated to a version that is incompatible with the included version of ImageMagick (6.4.5 as opposed to 3.5.2 at the time of writing). The result is that the command issued by ImageMagick to UFRaw -- issue the command man ufraw-batch to see the details -- is not accepted by the included version of the latter, 0.15 if you’re interested. It seems that an older release of UFRaw accepted the output device ppm16 (16-bit PPM files) but this should now be specified as ppm for the output device and 16 for the output depth. In a nutshell, where the parameter output-type did the lot, you now need both output-type and output-depth.
I thought of decoupling things by using UFRaw to create 16-bit PPM files for processing by ImageMagick but to no avail. The identify command wouldn’t return the date on which the image was taken. I even changed the type to 8-bit JPEG’s with added EXIF information but no progress was made. In the end, a mad plan came to mind: creating a VirtualBox VM running Debian. The logic was that if Debian deserves its reputation for solidity, dependencies like ImageMagick and UFRaw shouldn’t be broken and I wasn’t wrong. To make it fly though, I needed to see if I could get Guest Additions installed on Debian. Out of the box, the supported kernel version must be at least 2.6.27 and Debian’s is 2.6.26 so additional work was on the cards. First, GCC, Make and the correct kernel header files need to be installed. Once those are in place, the installation works smoothly and a restart sets the goodies in motion. To make the necessary Shared folder to be available, a command like the following was executed:
mount -t vboxfs [Shared Folder name] [mount point]
Once that deed was done and ImageMagick instated, the processing that I have been doing for new DSLR images was reinstated. Ironically, Debian’s version of ImageMagick, 6.3.7, is even older than Ubuntu’s but it works and that’s the main thing. There is an Ubuntu bug report for this on Launchpad so I hope that it gets fixed at some point in the near future. However, that may mean awaiting 9.10 or Karmic Koala so I’m glad to have the workaround in the meantime.
Online favicon.ico creation
21st January 2008I recently updated the icon that appears beside this blog’s address in the address bar and bookmarks menus of some browsers. I gave it a go in GIMP but I seemed to get no joy. I pottered out on the web to discover what I might have done wrong only to find Dynamic Drive offering online favicon.ico creation. Out of curiosity, I decided to give the thing a whirl and download the result to upload onto my web server. GIF’s, JPG’s PNG’s and BMP’s with a size less than 150 KB are accepted and it did work for me.
Photoshop CS2 workout
8th March 2007
I am in the process of adding new photos to my online photo gallery at the moment and the exercise is giving my Photoshop CS2 trial version a good amount of use. And the experience also adding a few strings to my bow in graphics editing terms, something that is being helped along by the useful volume that is The Focal Easy Guide to Photoshop CS2.
The most significant change that has happened is that to my workflow. Previously, it took the following form:
- Acquire image from scanner/camera
- For a camera image, do some exposure compensation
- Create copy of image in software’s own native file format (PSPIMAGE/PSP for Paint Shop Pro and PSD/PSB for Photoshop)
- Clean up image with clone stamp tool: removes scanner artefacts or sensor dust from camera images; I really must get my EOS 10D cleaned (the forecast for the coming weekend is hardly brilliant to I might try sending it away).
- Save a new version of the image following clean-up.
- Reduce the size of the digital camera image to 600×400 and create a new file.
- Boost colours of original image with hue/saturation/lightness control; save new version of file.
- Sharpen the image and save another version.
- For web images, save a new file with a descriptive name
- Create JPEG version
- Copy JPEG to Apache web server folders
- Create thumbnail from original JPEG
The new workflow is based upon this:
- Acquire image from scanner/camera
- For a camera image, do some exposure compensation; there is a lot of pre-processing that you can do in Camera Raw
- Create copy of image in software’s own native file format
- Clean up the image with the clone stamp tool and create a new file with _cleaned as its filename suffix. I tried the spot healing brush but didn’t seem to have that much success with it. Maybe I need to try again…
- Add adjustment layer for level correction and save file with _level suffix in its name.
- Add adjustment layer for curves correction
- Add adjustment layer for boosting colours with hue/saturation/lightness control
- Flatten layers and save new image with _flatten suffix in its name
- Sharpen flattened image and create a new version with _sharpened suffix in its name
- For web images, save a new file with a descriptive name
- Create JPEG versions in Apache web server folders; carry out any resizing using bi-cubic sharpening at this point.
Some improvements remain. For instance, separation of raw, intermediate and final photos by storing them in different directories is perhaps one possibility that I should consider. But there are other editing tricks that I have yet to use as well: merged and blended layers. Bi-cubic smoothing for expanding images is another possibility but it is one that requires a certain amount of caution. And I am certain that I will encounter others as I make my way through my reading.