TOPIC: DEBIAN
Early impressions of Ubuntu 9.10
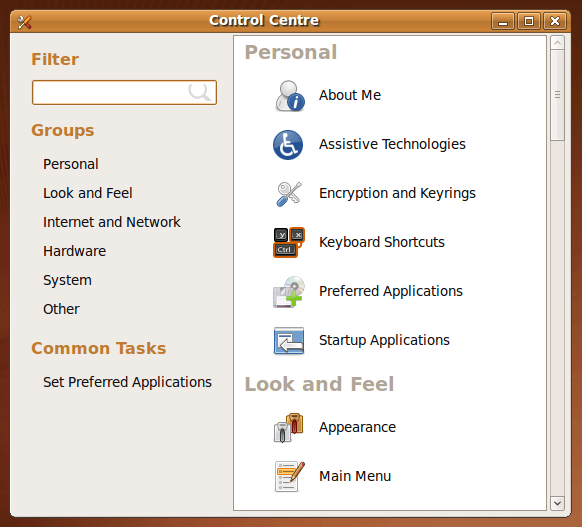
5th August 2009Even if the twice a year release means that changes to Ubuntu are evolutionary rather than revolutionary, that isn't to imply that curiosity doesn't get the better of me from time to time. The result is that an early alpha version (3 at the time of writing) of the Linux distro has found a home in a VirtualBox VM on my main system. The most noticeable change so far is the inclusion of GNOME 2.27.5 with its Fedora-esque log-in screen and the movement of the shutdown and log-off paraphernalia to the System menu, which is where you find it in Debian or Fedora. On the account settings menu, there lives a link to an equivalent of the Windows Control Panel called Control Centre; the menu item is named System Preferences. For the record, I have seen it in Fedora 11 too, so it does look as if Ubuntu's GNOME implementation is looking more like a brown equivalent of Fedora. Whether this stays like this is anyone's guess, but a new messaging arrangement is coming into being, too.

Otherwise, there appears to be no real drama on the surface, with Firefox staying at 3.0.x for now and OpenOffice moving to 3.1. Personally speaking, I'd be very surprised to see Firefox 3.5.x being left out, though I did run into a spot of bother with the Preferences dialogue crashing it on Windows XP. Under the bonnet, the kernel is at release 2.6.31 and things seem reasonably stable at this stage. Saying that, there is a crash report icon that appears every session, but that has no effect apart from the visual side of things. VirtualBox Guest Additions work as they should, better than they in Windows guests if my experience provides any sort of benchmark (the display does odd things unless you keep jogging the graphics memory up and down). All in all, things appear usable if undramatic at this stage, and there are a few months to go before the final release anyway.
Installing MS TrueType Core Fonts on Fedora
28th July 2009Once you have enabled the appropriate software repository, you can install the msttcorefonts (Microsoft TrueType core fonts like Arial, Times Roman, Verdana, Georgia, etc.) package on Debian and Ubuntu. With Fedora, it surprisingly isn't so straightforward. There is a recipe using the command line that worked for me, and I'm not going to repeat it here, so I'll leave you to go where I found it. In fact, it forms part of a wider unofficial Fedora FAQ that may be of more interest to you than solving this.
Update for Fedora 12 (2009-11-24):
You also need chkfontpath so the following needs doing before the final part of the command sequence, changing the filename as appropriate for your situation:
yum install xfs

rpm -ivh http://dl.atrpms.net/all/chkfontpath-1.10.1-2.fc12.i686.rpm
Making Nautilus work like it does in Ubuntu for any other GNOME-using distro
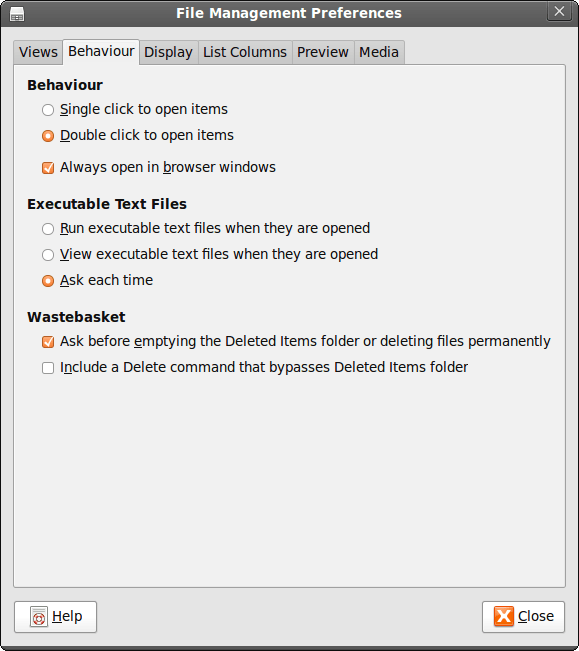
26th July 2009While It's a personal preference, I like the way that Nautilus (GNOME's default file manager if you need to know) is set to work on Ubuntu by default. For some tastes, it might look too similar to Windows Explorer, but having all the action happening in the same window is a convenience that users of other GNOME using distributions may not realise is there at all. By default, Debian and Fedora use what is called spatial mode, with each double-clicking action on a folder icon firing up a new window. Personally, I think that clutters the desktop without good cause, yet it's easy to change. All that's needed is to go to Edit>Preferences in a Nautilus window, proceed to the Behaviour tab and toggle the Always open in browser windows tick box as shown below. Quite why this is not the default in all GNOME using distributions is beyond me, but others may prefer what I dislike and Linux is all about choice, after all. Well, you can decide to use Gnome Commander instead and there are times when I do the same along with being a command line user too.

Adding Microsoft core fonts to Debian
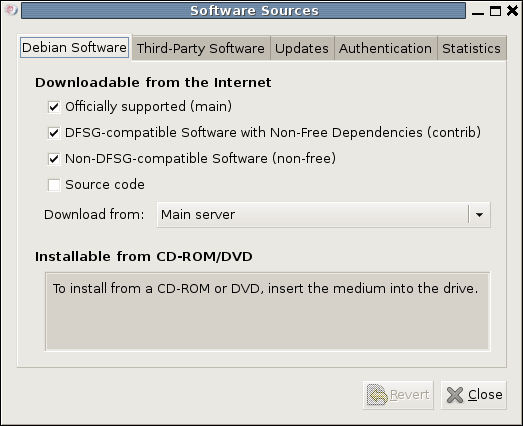
18th June 2009When setting up Ubuntu, I usually add in Microsoft's core fonts by installing the msttcorefonts package using either Synaptic or apt-get. Though I am not sure why I didn't try doing the same thing for Debian until now, it's equally feasible. Just pop over to System > Administration > Software Sources and ensure that the check-boxes for the contrib and non-free categories are checked like you see below.

You could also achieve the same end by editing /etc/apt/sources.list and adding the non-free and contrib keywords to make lines look like these before issuing the command apt-get update as root:
deb http://ftp.debian.org/debian/ lenny main non-free contrib

deb-src http://ftp.debian.org/debian/ lenny main non-free contrib
All that you are doing with the manual editing route is performing the same operations that the more friendly front end would do for you anyway. After that, it's a case of going with the installation method of your choice and restarting Firefox or IceWeasel to see the results.
Is a spot of bother with computer self-building a case of the reverse Midas touch?
18th May 2009Last week, a power outage put my main home PC out of action. While it may have been recoverable if that silly accident of a few weeks back hadn't happened, a troubled rebuild is progressing. Despite the challenges, I somehow manage to remain hopeful that an avenue of exploration will yield some fruit. Even so, thoughts of throwing in the towel and calling in professionals rather than throwing good money after bad are gathering. The saga is causing me to question the sense of self building in place of buying something ready built. Saying that, they can have their off days too.
Meanwhile, I have been displaced onto the spare desktop PC and the laptop. In other words, my home computing needs are being fulfilled to a point, though the feeling of frustrated displacement and partial disconnection from my data remains; because I have been able to extricate most of my digital photos and my web building, things are far from being hopeless. With every disappointment, there remains an opportunity or two. Since the spare desktop runs Debian, I have been spending some time seeing if I can bend that to my will, which can be done, sometimes after a fashion.
A few posts should result from this period, not least regarding working with Debian. On the subject of hardware, I will not elaborate until the matter comes to a more permanent resolution. From past attempts (all were successful in the end), I know that the business of PC building can feel like a dark art: you are left there wondering why none of your efforts summon a working system to life work until it all comes together in the blink of an eye leaving you to wonder why all the effort was expended. The best analogy that I can offer is awaiting a bus or train; it often seems that the waiting takes longer than the journey. Restoring my home computing to what it was before is a mere triviality compared to what some people have to suffer, but resolution of a problem always puts a spring in my step.
Getting Fedora working in VirtualBox
12th May 2009After a hiatus induced by disk errors seen on start up, I have gone having a go with Fedora again. In the world of real PC's, its place has been taken by Debian, so virtualisation was brought into play for my most recent explorations. I could have gone with 10, the current stable version, but curiosity got the better of me and I downloaded a pre-release version of 11 instead.
On my way to getting that instated, I encountered two issues. The first of these was boot failure with the message like this:
FATAL: INT18: BOOT FAILURE
As it turned out, that was easily sorted. I was performing the installation from a DVD image mounted as if it were a real DVD, and laziness or some other similar reason had me rebooting with it still mounted. Though there is an option to load the hard disk variant, it wasn't happening, resulting in the message that's above. A complete shutdown and replacement of the virtual DVD with a real one set matters to rights.
The next trick was to get Guest Additions added, but Fedora's 2.6.29 was not what VirtualBox was expecting, and it demanded the same ransom as Debian: gcc, make and kernel header files. Unfamiliarity had me firing up Fedora's software installation software, only to find that Synaptic seems to beat it hands down in the search department. Turning to Google dredged up the following command to be executed, which got me further:
yum install binutils gcc make patch libgomp glibc-headers glibc-devel kernel-headers kernel-devel
However, the installed kernel headers didn't match the kernel, but a reboot fixed that once the kernel was updated. Then, the Guest Additions installed themselves as intended, with necessary compilations to match the installed kernel.
The procedures that I have described here would, it seems, work for Fedora 10; well, they certainly have bequeathed me a working system. I have had a little poke and a beta of Firefox 3.5 is included, and I saw sign of OpenOffice 3.1 too. So, it looks very cutting edge, easily so in comparison with Ubuntu and Debian. Apart from one or niggles, it seems to run smoothly too. Firstly, don't use the command shutdown -h now to close the thing down, or you'll cause VirtualBox to choke. Using the usual means ensures that all goes well, though. The other irritation is that it doesn't connect to the network without a poke from me. Whether SELinux is to blame for this or not, I cannot tell, but it might be something for consideration by the powers than be. That these are the sorts of things that I have noticed should be telling you that I have no major cause for complaint. While I have mulled over a move to Fedora in the past and that option remains as strong as ever, Ubuntu is not forcing me to look at an alternative and the fact that I know how to achieve what I need is resulting in inertia anyway.
Taming raw images with ImageMagick: A virtual workaround for Ubuntu 9.04
5th May 2009While using a command line tool like ImageMagick for image processing may sound a really counter-intuitive thing to do, there's no need to do everything on a case by case interactive basis. Image resizing and format conversion come to mind here. Helper programs are used behind the scenes too, with Ghostscript being used to create Postscript files, for example.
The subject of helper programs brings me to an issue that has hampered me recently. While I am aware that there are tools like F-Spot available, I am also wont to use a combination of shell scripting (BASH & KSH), Perl and ImageMagick for organising my digital photos. My preference for using Raw camera files (DNG & CRW) means that ImageMagick cannot access these without a little helper. In the case of Ubuntu, it's UFRaw. However, Jaunty Jackalope appears to have seen UFRaw updated to a version that is incompatible with the included version of ImageMagick (6.4.5 as opposed to 3.5.2 at the time of writing). The result is that the command issued by ImageMagick to UFRaw - issue the command man ufraw-batch to see the details - is not accepted by the included version of the latter, 0.15 if you're interested. It appears that an older release of UFRaw accepted the output device ppm16 (16-bit PPM files) but this should now be specified as ppm for the output device and 16 for the output depth. In a nutshell, where the parameter output-type did the lot, you now need both output-type and output-depth.
While I thought of decoupling things by using UFRaw to create 16-bit PPM files for processing by ImageMagick, it was to no avail. The identify command wouldn't return the date on which the image was taken. Though I even changed the type to 8-bit JPEG's with added EXIF information, no progress was made. In the end, a mad plan came to mind: creating a VirtualBox VM running Debian. The logic was that if Debian deserves its reputation for solidity, dependencies like ImageMagick and UFRaw shouldn't be broken, and I wasn't wrong. To make it work well, I needed to see if I could get Guest Additions installed on Debian. Out of the box, the supported kernel version must be at least 2.6.27 and Debian's is 2.6.26, so additional work was on the cards. First, GCC, Make and the correct kernel header files need to be installed. Once those are in place, the installation works smoothly and a restart sets the goodies in motion. To make the necessary shared folder to be available, a command like the following was executed:
mount -t vboxfs [Shared Folder name] [mount point]
Once that deed was done and ImageMagick instated, the processing that I have been doing for new DSLR images was reinstated. Ironically, Debian's version of ImageMagick, 6.3.7, is even older than Ubuntu's, but it works and that's the main thing. Since there is an Ubuntu bug report for this on Launchpad, I hope that it gets fixed at some point in the near future. However, that may mean awaiting 9.10 or Karmic Koala, so I'm glad to have this workaround for now.
Ubuntu 9.04 and Tracker
30th April 2009Shortly after it was released, I did the upgrade shuffle very painlessly, and it didn't take up so much time either. There was only one issue: Tracker falling over, complaining about corrupted indices. That got it removed from my system using apt-get remove (apt-get purge is another option, especially if you need to rid yourself of nefarious configuration files). After having a bit of a dig around the web, I found that I wasn't the only one seeing the problem. To me, it looks as if the upgrade to 9.04 doesn't work so well when it comes to Tracker, and it needs to be removed and reinstalled to ensure that all required dependencies are correctly set in place. Since I restored it on my system, all is working without complaint. Other than the Tracker issue, it has been a case of another uneventful upgrade. Though the evolutionary path that Ubuntu is following may disappoint anyone looking for excitement, no one would upgrade every six months if they knew that disruptive damage or upheaval might be caused. While I may do a clean installation at some point, that is well down the priority list right now.
Forcing Ubuntu (and Debian) to upgrade to a newer distribution version
8th October 2008
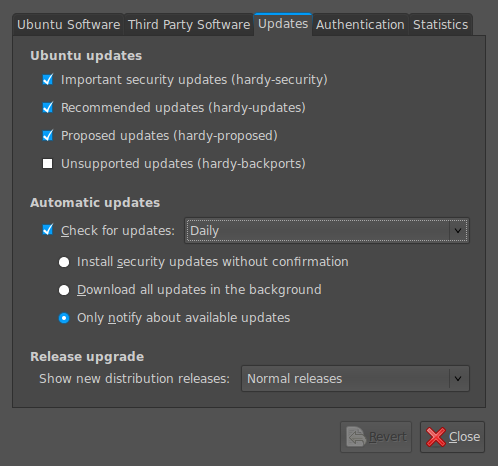
Ubuntu is usually good at highlighting the existence of a new version of the distribution through its Update Manager. That means that 8.10 should be made available to you at the end of the month, so long as you have sorted the relevant setting for 8.04 to realise what has happened. That lives in System > Administration > Software Sources > Updates. If you haven't done that, then 8.04 will continue regardless, since it is a long term supported release.
Otherwise, it's over to the command line to sort you out. One of the ones below will do, with the first just carrying out a check for a new stable version of Ubuntu and the second going all the way:
sudo update-manager -c
sudo update-manager -p
if you are feeling more adventurous, you can always try the development version and this checks for one of those (I successfully used this to try out the beta release of Intrepid Ibex from within a Wubi instance on my laptop):
sudo update-manager -d
Neither of the above are available on Debian, so they seem to be Ubuntu enhancements. That is not to imply that you cannot force the issue with Debian; it's just that the more generic variant is used and, unless, you have gone fiddling with visudo, you will need to run this as root (it works in Ubuntu too):
update-manager --dist-upgrade
A quick way to do an update
8th August 2008Here's a quick way to get the latest updates on your PC using the command line if you are using Ubuntu or Debian:
sudo apt-get update && sudo apt-get upgrade
Of course, you can split these commands up if you prefer to look before you leap. At the very least, it's so much slicker than the GUI route.