AttributeError: module ‘PIL’ has no attribute ‘Image’
11th March 2024One of my websites has an online photo gallery. This has been a long-term activity that has taken several forms over the years. Once HTML and JavaScript based, it then was powered by Perl before PHP and MySQL came along to take things from there.
While that remains how it works, the publishing side of things has used its own selection of mechanisms over the same time span. Perl and XML were the backbone until Python and Markdown took over. There was a time when ImageMagick and GraphicsMagick handled image processing, but Python now does that as well.
That was when the error message gracing the title of this post came to my notice. Everything was working well when executed in Spyder, but the message appears when I tried running things using Python on the command line. PIL is the abbreviated name for the Python 3 pillow package; there was one called PIL in the Python 2 days.
For me, pillow loads, resizes and creates new images, which is handy for adding borders and copyright/source information to each image as well as creating thumbnails. All this happens in memory and that makes everything go quickly, much faster than disk-based tools like ImageMagick and GraphicsMagick.
Of course, nothing is going to happen if the package cannot be loaded, and that is what the error message is about. Linux is what I mainly use, so that is the context for this scenario. What I was doing was something like the following in the Python script:
import PIL
Then, I referred to PIL.Image when I needed it, and this could not be found when the script was run from the command line (BASH). The solution was to add something like the following:
from PIL import Image
That sorted it, and I must have run into trouble with PIL.ImageFilter too, since I now load it in the same manner. In both cases, I could just refer to Image or ImageFilter as I required and without the dot syntax. However, you need to make sure that there is no clash with anything in another loaded Python package when doing this.
Getting Adobe Lightroom Classic to remember the search filters that you have set
23rd April 2023With Windows 10 support to end in October 2025 and VirtualBox now offering full support for Windows 11, I have moved onto Windows 11 for personal use while retaining Windows 10 for professional work, at least for now. Of course, a lot could happen before 2025 with rumours of a new Windows version, the moniker Windows 12 has been mooted, but all that is speculation for now.
As part of the changeover, I moved the Adobe apps that I have in an ongoing subscription, Lightroom Classic and Photoshop are the main ones for me, to the new virtual machine. That meant that some settings from the previous one were lost and needed reinstating.
One of those was the persistence of Library Filters, so I had to find out how to get that sorted. If my memory is not fooling me, this seemed to be a default action in the past and that meant that I was surprised by the change in behaviour.
Nevertheless, I had to go to the File menu, select Library Filters (it is near the bottom of the menu in the current version at the time of writing) and switch on Lock Filters by clicking on it to get a tick mark preceding the text. There is another setting called Remember Each Source’s Filters Separately in the same place that can be set in the same manner if so desired, and I am experimenting with that at the moment, even though I have not bothered with this in the past.
More user interface font scaling options in Adobe Lightroom Classic
25th November 2022Earlier in the year, I upgraded my monitor to a 34-inch widescreen Iiyama XUB3493WQSU. At the time, I was in wonderment at what I was doing even if I have grown used to it now. For one thing, it made the onscreen text too small so I ended up having to scale things up in both Linux and Windows. The former proved to be more malleable than the latter and that impression also applies to the main subject of this piece.
What I also found is that I needed to scale the user interface font sizes within Adobe Lightroom Classic running within a Windows virtual machine on VirtualBox. That can be done by going to Edit > Preferences through the menus and then going to the Interface tab in the dialogue box that appears where you can change the Font Size setting using the dropdown menu and confirm changes using the OK button.
However, the range of options is limited. Medium appears to be the default setting while the others include Small, Large, Larger and Largest. Large scales by 150%, Larger by 200% and Largest by 250%. Of these, Large was the setting that I chose though it always felt too big to me.
Out of curiosity, I decided to probe further only to find extra possibilities that could be selected by direct editing of a configuration file. This file can be found in C:\Users\[user account]\AppData\Roaming\Adobe\Lightroom\Preferences and is called Lightroom Classic CC 7 Preferences.agprefs. In there, you need to find the line containing AgPanel_baseFontSize and change the value enclosed within quotes and save the file. Taking a backup beforehand is wise even if the modification is not a major one.
The available choices are scale125, scale140, scale150, scale175, scale180, scale200 and scale250. Some of these may be recognisable as those available through the Lightroom Classic user interface. In my case, I chose the first on the list so the line in the configuration file became:
AgPanel_baseFontSize="scale125"
There may be good reasons for the additional options not being available through the user interface but things are working out OK for me for now. It is another tweak that helps me to get used to the larger screen size and its higher resolution.
Useful Python packages for working with data
14th October 2021My response to changes in the technology stack used in clinical research is to develop some familiarity with programming and scripting platforms that complement and compete with SAS, a system with which I have been programming since 2000. One of these has been R but Python is another that has taken up my attention and I now also have Julia in my sights as well. There may be others to assess in the fullness of time.
While I first started to explore the Data Science world in the autumn of 2017, it was in the autumn of 2019 that I began to complete LinkedIn training courses on the subject. Good though they were, I find that I need to actually use a tool in order to better understand it. At that time, I did get to hear about Python packages like Pandas, NumPy, SciPy, Scikit-learn, Matplotlib, Seaborn and Beautiful Soup though it took until of spring of this year for me to start gaining some hands-on experience with using any of these.
During the summer of 2020, I attended a BCS webinar on the CodeGrades initiative, a programming mentoring scheme inspired by the way classical musicianship is assessed. In fact, one of the main progenitors is a trained classical musician and teacher of classical music who turned to Python programming when starting a family so as to have a more stable income. The approach is that a student selects a project and works their way through it with mentoring and periodic assessments carried out in a gentle and discursive manner. Of course, the project has to be engaging for the learning experience to stay the course and that point came through in the webinar.
That is one lesson that resonates with me with subjects as diverse as web server performance and the ongoing pandemic pandemic supplying data and there are other sources of public data to examine as well before looking through my own personal archive gathered over the decades. Some subjects are uplifting while others are more foreboding but the key thing is that they sustain interest and offer opportunities for new learning. Without being able to dream up new things to try, my knowledge of R and Python would not be as extensive as it is and I hope that it will help with learning Julia too.
In the main, my own learning has been a solo effort with consultation of documentation along with web searches that have brought me to the likes of Real Python, Stack Abuse, Data Viz with Python and R and others for longer tutorials as well as threads on Stack Overflow. Usually, the web searching begins when I need a steer on a particular or a way to resolve a particular error or warning message but books always are worth reading even if that is the slower route. Those from the Dummies series or from O’Reilly have proved must useful so far but I do need to read them more completely than I already have; it is all too tempting to go with the try the “programming and search for solutions as you go” approach instead.
To get going, many choose the Anaconda distribution to get Jupyter notebook functionality but I prefer a more traditional editor so Spyder has been my tool of choice for Python programming and there are others like PyCharm as well. Spyder itself is written in Python so it can be installed using pip from PyPi like other Python packages. It has other dependencies like Pylint for code management activities but these get installed behind the scenes.
The packages that I first met in 2019 may be the mainstays for doing data science but I have discovered others since then. It also seems that there is porosity between the worlds of R an Python so you get some Python packages aping R packages and R has the Reticulate package for executing Python code. There are Python counterparts to such Tidyverse stables as dply and ggplot2 in the form of Siuba and Plotnine, respectively. The syntax of these packages are not direct copies of what is executed in R but they are close enough for there to be enough familiarity for added user friendliness compared to Pandas or Matplotlib. The interoperability does not stop there for there is SQLAlchemy for connecting to MySQL and other databases (PyMySQL is needed as well) and there also is SASPy for interacting with SAS Viya.
Pyhton may not have the speed of Julia but there are plenty of packages for working with larger workloads. Of these, Dask, Modin and RAPIDS all have there uses for dealing with data volumes that make Pandas code crawl. As if to prove that there are plenty of libraries for various forms of data analytics, data science, artificial intelligence and machine learning, there also are the likes of Keras, TensorFlow and NetworkX. These are just a selection of what is available and there is no need not to check out more. It may be tempting to stick with the most popular packages all the time, especially when they do so much, but it never hurst to keep an open mind either.
Lightening of desktop background images on Linux Mint Debian Edition running in Virtualbox
22nd October 2018After a recent upgrade to Linux Mint Debian Edition 3 in a VirtualBox virtual machine that I had running its predecessor, I began to notice that background images were being loaded with more washed out of faded colours. This happened at startup so selecting another background image worked as intended until the same thing happened to that after a system restart.
This problem is not new and has affected the Cinnamon desktop in the main Linux Mint variant (the one that is based on Ubuntu) and issuing the following command in a terminal session is a suggested solution:
gsettings set org.cinnamon.muffin background-transition fade-in
In my case, that solved the problem and desktop background image display is as it should be since I executed the above. All it took was a change to a system setting.
Changing monitor brightness using the Linux command line
11th August 2018Recently, I felt the need to reduce the brightness of my monitor but did not persuade the hardware buttons to do the job so I started wondering about other means and found that the xrandr command did the trick. The first step was to find out what my display was being called so I executed the following command to retrieve the information using the -q query switch:
xrandr -q | grep " connected"
The output from this looked like this:
DVI-D-0 connected primary 1920x1080+0+0 (normal left inverted right x axis y axis) 521mm x 293mm
My device name appeared as the first block of characters in the above so I plugged that into the second command below to achieve the desired adjustment.
xrandr --output DVI-D-0 --brightness 0.9
Any value between 0.0 and 1.0 is acceptable but I went with 0.9 for 90% brightness. The required dimming and brightening then is only a command away.
Fixing Background Image Display in GNOME Shell 3.10
2nd May 2014On upgrading from Ubuntu GNOME 13.10 to Ubuntu GNOME 14.04, a few rough edges were to be noticed. One was the display of my chosen background image: it was garbled. Later, I discovered that there is a maximum width of 2560 px for background images in GNOME Shell these days and that things get messy beyond that.
In my case, the image width was around 6000 px and I was used to its getting resized in GNOME Shell 3.8 and its predecessors. It seems that the functionality got removed after that though so the workaround of manual image resizing in the GIMP needed to be employed. Though having big images open in memory creates an additional overhead, not handling them very well at all looks like a bug caused by setting 2560 px as a maximum screen width for the GNOME Shell panel and the complete removal of Nautilus from desktop rendering duties. Let’s hope that sense is seen with ever larger screen sizes and resolutions coming our way.
It’s the sort of thing that did get me looking at adding on Cinnamon 2.2 for a while before setting background image scaling using the indispensable GNOME Tweak Tool was discovered. LinuxG.net has a useful tutorial on this for anyone with such an adventurous streak in them. For now though, I am OK with my set up but the GNOME project’s focus on minimalism could affect us in other ways so I can see why Clem Lefebvre started the Cinnamon one primarily for Linux Mint and the desktop environment is appearing elsewhere too. After all, Gedit lost its menu bar in GNOME 3.12 so it’s just as well that we have alternative choices.
Update 2014-05-06: It seems that the desktop image bug that afflicts GNOME Shell 3.10 got sorted for GNOME Shell 3.12. At least, that is the impression that an Antergos instance in a VirtualBox virtual machine gives me.
A display of brand loyalty
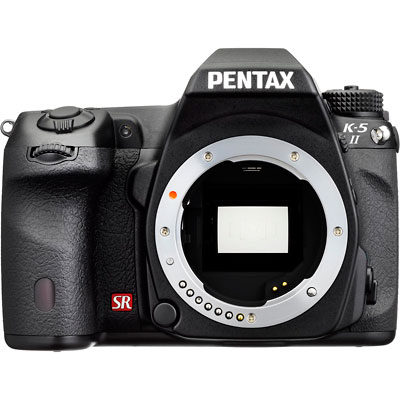
12th July 2013Since 2007, my main camera has been a Pentax K10D DSLR and it has gone on many journeys with me. In fact, more than 15,000 images have been captured with it and I have classed it as an unfailing servant. The autofocus may not be the fastest but my subjects tend to be stationary: landscapes, architecture, flora and transport. Even any bus and train photos have included parked vehicles rather than moving ones so there never have been issues. The hint of underexposure in any photos always can be sorted because DNG files are what I create, with all the raw capture information that is possible to retain. In fact, it has been hard to justify buying another SLR because the K10D has done so well for me.
In recent months, I have looking at processed photos and asking myself if time has moved along for what is not far from being a six year old camera. At various times, I have been looking at higher members of the Pentax while wondering if an upgrade would be a good idea. First, there was the K7 and then the K5 before the K5 II got launched. Even though its predecessor is still to be found on sale, it was the newer model that became my choice.
My move to Pentax in 2007 was a case of brand disloyalty since I had been a Canon user from when I acquired my first SLR, an EOS 300. Even now, I still have a Powershot G11 that finds itself slipped into a pocket on many a time. Nevertheless, I find that Canon images feel a little washed out prior to post processing and that hasn’t been the case with the K10D. In fact, I have been hearing good things about Nikon cameras delivering punchy results so one of them would be a contender were it not for how well the Pentax performed.
So, what has my new K5 II body gained me that I didn’t have before? For one thing, the autofocus is a major improvement on that in the K10D. It may not stop me persevering with manual focusing for most of the time but there are occasions the option of solid autofocus is good to have. Other advances include a 16.3 megapixel sensor with a much larger ISO range. The advances in sensor technology since when the K10D appeared may give me better quality photos and noise is something that my eyes may have begun to detect in K10D photos even at my usual ISO of 400.
There have been innovations that I don’t need too. Live View is something that I use heavily with the Powershot G11 because it has such a pitiful optical viewfinder. The K5 II has a very bright and sharp one so that function lays dormant, especially when I witnessed dodgy autofocus performance with it in use; manual focusing should be OK, I reckon. By default too, the screen stays on all the time and that’s a nuisance for an optical viewfinder user like me so I looked through the manual and the menus to switch off the thing. My brief flirtation with the image level display met an end for much the same reason though it’s good that it’s there. There is some horizon auto-correction available as a feature and this is left on to see what it offers since there have been a multitude of times when I needed to sort out crooked horizons caused by my handholding the camera.
The K5 II may have a 3″ screen on its back but it has done nothing to increase the size of the camera. If anything, it is smaller that the K10D and that usefully means that I am not on the lookout for a new camera holster. Not having a bigger body also means there is little change in how the much camera feels in the hand compared with the older one.
In many ways, the K5 II works very like the K10D once I took control over settings that didn’t suit me. Both have Shake Reduction in their camera bodies though the setting has been moved into the settings menu in the new camera when the older one had a separate switch on its body. Since I’d be inclined to leave it on all the time and prefer not to have it knocked off accidentally, this is not an issue. Otherwise, many of the various switches are in the same places so it’s not that hard to find my way around them.
That’s not to say that there aren’t other changes like the addition of a lock to the mode dial but I have used Canon EOS camera bodies with that feature so I do not consider it a step backwards. The exposure compensation button has been moved to the top of the camera where I found it very easily and have been using perhaps more than on the K10D; it’s also something that I use on the G11 so the experimentation is being brought across to the K5 II now as well. Beside it, there’s a new ISO button so further experimentation can be attempted with that to see how it does.
If I have any criticism, it’s about the clutter of the menus on the K5 II. The long lists through you scrolled on the K10D have been replaced with a series of extra tabs so that on-screen scrolling is not needed as before. However, I reckon that this breaks up things too much and makes working through the settings look more foreboding to anyone who is not so technical in mindset. Nevertheless, settings such as the the type of file to capture are there and I continue to use RAW DNG files as is usual for me though JPEG and Pentax’s own RAW format also are there. For a while, I forgot to set the date, soon found out what I did and the situation was remedied. The same sort of thing applied to storing files in different folders according to the capture date. For my own reasons, I turned this off to put everything into a single PENTX directory to suit my own workflow. My latest discovery among the menus was the ability to add photographer and copyright holder information to the EXIF metadata attached to the image files created by the camera. With legislative proposals that dilute the automatic rights of copyright holders going through the U.K. parliament, this seems a very timely inclusion even if most would prefer that there was no change to copyright law.
Of course, the worth of any camera is in the images that it produces and I have been happy with what I have been getting so far. The bigger files mean less images fit on a memory card as before. Thankfully, SDHC card capacities have grown even if I don’t wish to machine gun my photography altogether. While out and about, I was surprised to apertures like F/14 and F/18 when I was more accustomed to a progression like F/11, F/13, F/16, F/19, F/22, etc. Most of those older values still are there though so there hasn’t been a complete break with convention. The same comment applies to shutter speeds where ones like 1/100 and 1/160 made there appearance where I might have expected just ones like 1/90, 1/125, 1/250 and so on. The extra possibilities, and that is what they are, do allow more flexibility I suppose and may even make it easier to make correct exposures though any judgement of correctness has to be in the eye of a photographer and not what a computer algorithm in a camera determines. For much of the time until now, I have stuck with an ISO of 400 apart from a little testing in a woodland area of an evening soon after the camera arrived.
Since the K5 II came my way a few months ago, I have been meaning to collect my thoughts on here and there has been a delay while I brought mu thinking to a sensible close.At one point, it felt like there was so much to say that the piece became larger in my mind that even what you have been reading now. After all, there are other things that I can adjust to see how the resulting images look and white balance is but one of these.The K10D isn’t beyond experimentation either, especially since I discovered that shake reduction was switched off and it has me asking if that lacking in quality that I mentioned earlier has another explanation. Of course, actually making use of my tripod would be another good suggestion so it’s safe to say that yet more photographic explorations await.
Command Line Processing of EXIF Image Metadata
8th July 2013There is a bill making its way through the U.K. parliament at the moment that could reduce the power of copyright when it comes to images placed on the web. The current situation is that anyone who creates an image automatically holds the copyright for it. However, the new legislation will remove that if it becomes law as it stands. As it happens, the Royal Photographic Society is doing what it can to avoid any changes to what we have now. There may be the barrier of due diligence but how many of us take steps to mark our own intellectual property? For one, I have been less that attentive to this and now wonder if there is anything more that I should be doing. Others may copyleft their images but I don’t want to find myself unable to share my own photos because another party is claiming rights over them. There’s watermarking them but I also want to add something to the image metadata too.
That got me wondering about adding metadata to any images that I post online that assert my status as the copyright holder. It may not be perfect but any action is better than doing nothing at all. Given that I don’t post photos where EXIF metadata is stripped as part of the uploading process, it should be there to see for anyone who bothers to check and there may not be many who do.
Because I also wanted to batch process images, I looked for a command line tool to do the needful and found ExifTool. Being a Perl library, it is cross-platform so you can use it on Linux, Windows and even OS X. To install it on a Debian or Ubuntu based Linux distro, just use the following command:
sudo apt-get install libimage-exiftool-perl
The form of the command that I found useful for adding the actual copyright information is below:
exiftool -p “-copyright=(c) John …” -ext jpg -overwrite_original
The -p switch preserves the timestamp of the image file while the -overwrite_original one ensures that you don’t end up with unwanted backup files. The copyright message goes within the quotes along with the -copyright option. With a little shell scripting, you can traverse a directory structure and change the metadata for any image files contained in different sub-folders. If you wish to do more than this, there’s always the user documentation to be consulted.
Changing from to Nvidia Graphics Drivers on Linux Mint Debian Edition 64-bit
22nd April 2012One way of doing this is to go to the Nvidia website and download the latest file from the relevant page on there. Then, the next stage is to restart your PC and choose rescue mode instead of the more usual graphical option. This drops you onto a command shell that is requesting your root password. Once this is done, you can move onto the next stage of the exercise. Migrate to the directory where the *.run file is located and issuing a command similar to the following:
bash NVIDIA-Linux-x86_64-295.40.run
The above was the latest file available at the time of writing so the name may have changed by the time that you read this. If the executable asks to modify your X configuration file, I believe that the best course is to let it do that. Editing it yourself or running nvidia-xconfig are alternative approaches if you so prefer.
Proprietary Nvidia drivers are included the repositories for Linux Mint Debian Edition so that may be a better course of action since you will get updates through normal system update channels. Then, the course of action is to start by issuing the following installation comands:
sudo apt-get install module-assistant
sudo apt-get install nvidia-kernel-common
sudo apt-get install nvidia-glx
sudo apt-get install kernel-source-NVIDIA
sudo apt-get install nvidia-xconfig
Once those have completed, issuing the following in turn will complete the job ahead of a reboot:
sudo m-a a-i nvidia
sudo modprobe nvidia
sudo nvidia-xconfig
If you reboot before running the above like I did, you will get a black screen with a flashing cursor instead of a full desktop because X failed to load. Then, the remedy is to reboot the machine and choose the rescue mode option, provide the root password and issue the three commands (at this point, the sudo prefix can be dropped because it’s unneeded) then. Another reboot will see order restored and the new driver in place. Running the following at that point will do a check on things as will be the general appearance of everything:
glxinfo | grep render