TOPIC: VM
Shared folders not automounting on an Ubuntu 18.04 guest in a VirtualBox virtual machine
Over the weekend, I finally got to resolve a problem that has affected Ubuntu 18.04 virtual machine for quite a while. The usual checks on Guest Additions installation and vboxsf group access assignment were performed but were not causing the issue. Also, no other VM (Windows (7 & 10) and Linux Mint Debian Edition) on the same Linux Mint 19.2 machine was experiencing the same issue. The latter observation made the problem intrinsic to the Ubuntu VM itself.
Because I install the Guest Additions software from the included virtual CD, I executed the following command to open the relevant file for editing:
sudo systemctl edit --full vboxadd-service
If I had installed virtualbox-guest-dkms and virtualbox-guest-utils from the Ubuntu repositories instead, then this would have been the command that I needed to execute instead of the above.
sudo systemctl edit --full virtualbox-guest-utils
Whichever configuration gets opened, the line that needs attention is the one beginning with "Conflicts" (line 6 in the file on my system). The required edit removes systemd-timesync.service from the list following the equals sign. It is worth checking that file paths include the correct version number for the Guest Additions software that is installed, in case this is not how things are. The only change that was needed on my Ubuntu VM was to the Conflicts line, and rebooting it got the Shared Folder automatically mounted under the /media directory as expected.
Enlarging a VirtualBox VDI virtual disk
It is remarkable how the Windows folder manages to grow on your C drive, and one in a Windows 7 installation was the cause of my needing to expand the VirtualBox virtual machine VDI disk on which it was installed. After trying various ways to cut down the size, an enlargement could not be avoided. In all of this, it was handy that I had a recent backup for restoration after any damage.
The same thing meant that I could resort to enlarging the VDI file with more peace of mind than otherwise might have been the case. This needed use of the command line once the VM was shut down. The form of the command that I used was the following:
VBoxManage modifyhd <filepath/filename>.vdi --resize 102400
It appears that this also would work on a Windows host, but mine was Linux, and it did what I needed. The next step was to attach it to an Ubuntu VM and use GParted to expand the main partition to fill the newly available space. That does not mean that it takes up 100 GiB on my system just yet because these things can be left to grow over time and there is a way to shrink them too if you ever need to do just that. As ever, having a backup made before any such operation may have its uses if anything goes awry.
Migrating a virtual machine from VirtualBox to VMware Player on Linux
The progress of Windows 10 is something that I have been watching. Early signs have been promising, and the most recent live event certainly contained its share of excitement. The subsequent build that was released was another step in the journey, though the new Start Menu appears more of a work in progress than it did in previous builds. Keeping up with these advances sometimes steps ahead of VirtualBox support for them, and I discovered that again in the last few days. VMware Player seems unaffected, so I thought that I'd try a migration of the VirtualBox VM with Windows 10 onto there. In the past, I did something similar with a 32-bit instance of Windows 7 that subsequently got upgraded all the way up to 8.1, but that may not have been as slick as the latest effort, so I thought that I would share it here.
The first step was to export the virtual machine as an OVF appliance, and I used File > Export Appliance... only to make a foolish choice regarding the version of OVF. The one that I picked was 2.0 only to subsequently discover that 1.0 was the better option. The equivalent command line would look like the following (there are two dashes before the ovf10 option below):
VboxManage export [name of VM] -o [name of file].ova --ovf10
VMware has a tool for extracting virtual machines from OVF files that will generate a set of files that will work with Player and other similar products of theirs. It goes under the unsurprising name of OVF Tool and usefully works from a command line session. When I first tried it with an OVF 2.0 files, I got the following error, and it stopped doing anything as a result:
Line 2: Incorrect namespace http://schemas.dmtf.org/ovf/envelope/2 found.
The only solution was to create a version 1.0 file and use a command like the following:
ovftool --lax [name of file].ova [directory location of VM files]/[name of file].vmx
The --lax option is needed to ensure successful execution, even with an OVF 1.0 file as the input. Once I had done this on my Ubuntu GNOME system, the virtual machine could be opened up on VMware Player and I could use the latest build of Windows 10 at full screen, something that was not possible with VirtualBox. This may be how I survey the various builds of the operating that appear before its final edition is launched later this year.
Creating a test web server using Ubuntu Server 13.04 and VirtualBox
Having seen Linux Format cover tools like Vagrant and Puppet that manage virtual machines, I have been attracted by the prospect of a virtual web server running on my own PC. Certainly, having the LAMP software stack in a VM means that the corresponding tools don't need to be added to a host system should its operating system need a fresh installation.
As intriguing as tools like Vagrant may be, I decided that I needed to learn a bit more about getting server instances set up in VirtualBox anyway. Thus, I went and downloaded the latest version of Ubuntu Server and gave that a go. One lesson that I learned was that Bridged Networking needs to be added to the VM before installation of the operating system, unless you fancy overcoming the challenge of getting Ubuntu Server to recognise an altered or additional network interface. In my case, I added an extra adapter for the Bridged Networking and left the original in place as NAT. The reason for having Bridged Networking set up is that it allows access to the virtual web server from the host once you know the IP address and that information can be obtained by executing the ifconfig command on the virtual machine.
With the networking sorted, the next step was to install the 64-bit edition of Ubuntu Server. Unlike its desktop counterpart, this is all driven by text menus but remains fairly intuitive and there is hardly anything there that you wouldn't see with another Linux distribution. A useful addition is the addition of a menu to select the types of server services that you'd like to see installed. From this, I chose the web server and SSH options, and I seem to remember that there was a database server option too. If there was an FTP server option, I would have chosen that too, but it was no ordeal to add Proftpd later on anyway.
All of this set was done through the VirtualBox GUI, just to keep life more straightforward. Even so, I only selected 12 MB of video memory and was tempted to cut the overall memory back from 512 MB but leaving things be for now. However, what I have begun to do is start and stop the virtual machine from the command line, since servers are headless operations anyway. With SSH enabled, there is little need to have the VirtualBox GUI going. The command for starting the server is below:
VBoxManage startvm "Ubuntu Server" --type=headless
There is a VBoxHeadless command for the same end too, but VBoxManage does what I need. The startvm option is what tells VBoxManage to start the server, and the virtual machine's name is enclosed in quotes. The --type=headless ensures that no window pops up. To stop the virtual web server cleanly, a command like the following is needed:
VBoxManage controlvm "Ubuntu Server" acpipowerbutton
Again, the VBoxManage command gets used and the acpipowerbutton option ensures that a clean shutdown is performed. Not doing so results in the server not fully starting up, according to my experiences thus far. Getting the virtual web server to start and stop with the host machine itself starting and stopping, but this looks more complex, so I plan to leave things a while before trying that experiment.
Migrating a Windows 7 Virtual Machine from VirtualBox to VMware Player
Seeing how well Windows 8 was running in a VMware Player virtual machine and that was without installing VMware Tools in the guest operating system, I was reminded about how sluggish my Windows 7 VirtualBox VM had become. Therefore, I decided to try a migration of the VM from VirtualBox to VMware. My hope was this: it would be as easy as exporting to an OVA file (File > Export Appliance... in VirtualBox) and importing that into VMware (File > Open a VM in Player). However, even selecting OVF compatibility was insufficient for achieving this, and the size of the virtual disks meant that the export took a while to run as well. The solution was to create a new VM in VirtualBox from the OVA file and use the newly created VMDK files with VMware. That worked successfully to give me a speedier, more responsive Windows 7 VM for my pains.
Access to host directories needed reinstatement using a combination of the VMware Shared Folders feature and updating drive mappings in Windows 7 itself to use what appeared to it as network drives in the Shared Folders directory on the \\vmware-host domain. For that to work, VMware Tools needed to be installed in the guest OS (go to Virtual Machine > Install VMware Tools to make available a virtual CD from which the installation can be done) as I discovered when trying the same thing with my Windows 8 VM, where I dare not instate VMware Tools due to their causing trouble when I last attempted it.
Moving virtual machine software brought about its side effects, though. Software like Windows 7 detects that it's on different hardware, so reactivation can be needed. While Windows 7 reactivation was a painless online affair, it wasn't the same for Photoshop CS5. That meant that I needed help from Adobe's technical support people top get past the number of PC's for which the software already had been activated. In hindsight, deactivation should have been done before the move, but that's a lesson that I know well now. Technical support sorted my predicament politely and efficiently while reinforcing the aforementioned learning point. Moving virtual machine platform is very like moving from one PC to the next, and it hadn't clicked with me quite how real those virtual machines can be when it comes to software licensing.
Apart from that and figuring out how to do it, the move went smoothly. An upgrade to the graphics driver on the host system and getting Windows 7 to recheck the capabilities of the virtual machine even gained me a fuller Aero experience than I had before then. Full-screen operation is quite reasonable too (the CTRL + ALT + ENTER activates and deactivates it) and photo editing now feels less boxed in too.
Installing VMware Player 4.04 on Linux Mint 13
Curiosity about the Release Preview of Windows 8 saw me running into bother when trying to see what it's like in a VirtualBox VM. While doing some investigations on the web, I saw VMware Player being suggested as an alternative. Before discovering VirtualBox, I did have a licence for VMware Workstation and was interested in seeing what Player would have to offer. The, it was limited to running virtual machines that were created using Workstation. Now, it can create and manage them itself and without any need to pay for the tool either. Registration on VMware's website is a must for downloading it, though, but that's no monetary cost.
Once I had downloaded Player from the website, I needed to install it on my machine. There are Linux and Windows versions; it was the former that I needed, and there are 32-bit and 64-bit variants, so you need to know what your system is running. With the file downloaded, you need to set it as executable and the following command should do the trick once you are in the right directory:
chmod +x VMware-Player-4.0.4-744019.i386.bundle
Then, it needs execution as a superuser. With sudo access for my user account, it was a matter of issuing the following command and working through the installation screens to instate the Player software on the system:
sudo ./VMware-Player-4.0.4-744019.i386.bundle
Those screens proved easy for me to follow, so life would have been good if that were all that was needed to get Player working on my PC. Having Linux Mint 13 means that the kernel is of the 3,2 stock and that means using a patch to finish off the Player installation because the required VMware kernel modules seem to silently fail to compile during the installation process. This only manifests itself when you attempt to start VMware Player afterwards to find a module installation screen appear. That wouldn't be an issue of itself were it not for the compilation failure of the vmnet module and subsequent inability to start VMware services on the machine. There is a prompt to peer into the log file for the operation, and that is a little uninformative for the non-specialist.
Rummaging around the web brought me to the requisite patch, and it works for Player 4.0.3 and Workstation 8.0.2 by default. Doing some tweaking allowed me to make it work for Player 4.04 too. My first step was to extract the contents of the tarball to /tmp where I could edit patch-modules_3.2.0.sh. Line 8 was changed to the following:
plreqver=4.0.4
With the amendment saved, it was time to execute the shell script as a superuser, having made it executable beforehand. This can be accomplished using the following command:
chmod +x patch-modules_3.2.0.sh && sudo ./patch-modules_3.2.0.sh
With that completed successfully, VMware Player ran as it should. An installation of Windows 8 into a new VM ran very smoothly, and I was impressed with the performance and responsiveness of the operating system within a Player VM. There are a few caveats, though. First, it doesn't run at all well with VMware Tools, so it's best to leave them uninstalled since it doesn't seem to need them either; it was possible to set the resolution to the same as my screen and use the CTRL+ALT+ENTER shortcut to drop in and out of full screen mode anyway. Second, the unattended Windows installation wasn't the way forward for setting up the VM, but it was no big deal to have that experiment thwarted. The feature remains an interesting one, though.
With Windows 8 running so well in Player, I was reminded of the sluggish nature of my Windows 7 VM and an issue with a Fedora 17 one too. The result was that I migrated the Windows 7 VM from VirtualBox to VMware, and all is so much more responsive. Getting it there took not a little tinkering, so that's a story for another entry. Based on my experiences so far, I reckon that VMware Player will remain useful to me for a little while yet. Resolving the installation difficulty was worth that extra effort.
Anquet and VirtualBox Shared Folders: Solving Virtual Machine storage issues between Linux and Windows
For a while now, I have had Anquet installed in a virtual machine instance of Windows XP, but it has been throwing errors continuously on start up. Perhaps surprisingly, it only dawned upon me recently what might have been the cause. A bit of fiddling revealed that my storing the mapping data Linux side and sharing it into the VM wasn't helping, and copying it to a VM hard drive set things to rights.
This type of thing can also cause problems when it comes to getting Photoshop to save files using VirtualBox's Shared Folders feature too. Untangling the situation is a multi-layered exercise. On the Linux side, permissions need to be in order and that involves some work with chmod (775 is my usual remedy) and chgrp to open things up to the vboxusers group.
Adding in Windows' foibles when it comes to networked drives and their mapping to drive letters brings extra complexity; any shared folders are made visible to Windows in a path of this form: \\vboxsvr\shared_folder_name\. The solution is either a lot of rebooting, extensive use of the net use command, or both. It induces the sort of going and coming that causes copying things over and back as needed to look less involved and more sensible, if a little more manual than might be liked.
Watch where you store your virtual machines when using VMware on Linux
My experience is with Ubuntu on this one, but I have found that you need to be careful as regards the file system used by the drive where you keep your virtual machines. If it is NTFS, VMware can fail to start a VM because it cannot create a virtual memory file while it presents as physical memory to a guest operating system. Use ext2 or ext3 and there should be no problem, even if that means formatting a drive to fulfil the need. That's what I did and all was well thereafter.
Is Apple ditching Windows 2000?
Having had a brainwave of using my Windows 2000 VM to play music without impacting the rest of my PC's working, I made the discovery that a bit of digging was required to find a version of iTunes and QuickTime that work with Win2K. Google delivered the goods, so here are the links:
It all reminds me of a post that I wrote a few months back, but iTunes is now working and, thanks to VMware's Shared Folders functionality, using the host PC's digital music collection. I'll be seeing how the ring-fencing goes...
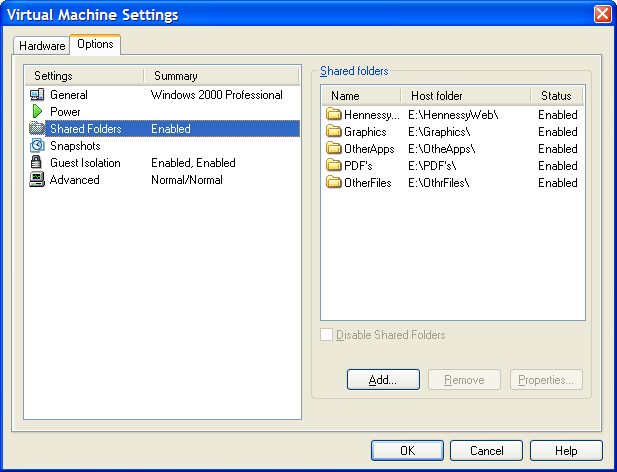
How to access host files in VMware Virtual Machines using Shared Folders
I am very surprised at myself for not realising until recently that there is a way to make host data visible to a guest operating system installed in a VMware virtual machine other than resorting to using flash drives, CD's, DVD's and the like. Though you can copy and paste from the host into the VM, I have found that to be hit-and-miss at times. It was a revelation to find VMware's Shared Folders function. My suspicion is that you need VMware Tools installed in the guest operating system to make it work, which may not be trivial for some Linux distributions or UNIX. However, I was using it with a Windows 2000 guest and a Windows XP host, and it worked like a dream.
What you see below are the shared folder settings in the host's VMware interface for that virtual machine. Just clicking on the Add... button brings up a wizard that will set up the shared folder for you; it's all very user-friendly. Look for the Edit virtual machine settings link on the VM configuration page, click that and pop over to the Options tab and this what you can get.
The result of the above spot of configuration appears in Windows Explorer like it does below. Not only are the shared folders accessible in this way, but you can also map drive letters as if they were network resources, a very nice feature. It is definitely more accessible than working out Windows networking and getting things to happen that way.
