Technology Tales

Adventures & experiences in contemporary technology

Running cron jobs using the www-data system account

22nd December 2018

When you set up your own web server or use a private server (virtual or physical), you will find that web servers run using the www-data account. That means that website files need to be accessible to that system account if not owned by it. The latter is mandatory if you you want WordPress to be able to update itself with needing FTP details.

It also means that you probably need scheduled jobs to be executed using the privileges possess by the www-data account. For instance, I use WP-CLI to automate spam removal and updates to plugins, themes and WordPress itself. Spam removal can be done without the www-data account but the updates need file access and cannot be completed without this. Therefore, I got interested in setting up cron jobs to run under that account and the following command helps to address this:

sudo -u www-data crontab -e

For that to work, your own account needs to be listed in /etc/sudoers or be assigned to the sudo group in /etc/group. If it is either of those, then entering your own password will open the cron file for www-data and it can be edited as for any other account. Closing and saving the session will update cron with the new job details.

In fact, the same approach can be taken for a variety of commands where files only can be access using www-data. This includes copying, pasting and deleting files as well as executing WP-CLI commands. The latter issues a striking message if you run a command using the root account, a pervasive temptation given what it allows. Any alternative to the latter has to be better from a security standpoint.

Moving a website from shared hosting to a virtual private server

24th November 2018

This year has seen some optimisation being applied to my web presences guided by the results of GTMetrix scans. It was then that I realised how slow things were, so server loads were reduced. Anything that slowed response times, such as WordPress plugins, got removed. Usage of Matomo also was curtailed in favour of Google Analytics while HTML, CSS and JS minification followed. What had yet to happen was a search for a faster server. Now, another website has been moved onto a virtual private server (VPS) to see how that would go.

Speed was not the only consideration since security was a factor too. After all, a VPS is more locked away from other users than a folder on a shared server. There also is the added sense of control, so Let’s Encrypt SSL certificates can be added using the Electronic Frontier Foundation’s Certbot. That avoids the expense of using an SSL certificate provided through my shared hosting provider and a successful transition for my travel website may mean that this one undergoes the same move.

For the VPS, I chose Ubuntu 18.04 as its operating system and it came with the LAMP stack already in place. Have offload development websites, the mix of Apache, MySQL and PHP is more familiar to me than anything using Nginx or Python. It also means that .htaccess files become more useful than they were on my previous Nginx-based platform. Having full access to the operating system by means of SSH helps too and should mean that I have fewer calls on technical support since I can do more for myself. Any extra tinkering should not affect others either, since this type of setup is well known to me and having an offline counterpart means that anything riskier is tried there beforehand.

Naturally, there were niggles to overcome with the move. The first to fix was to make the MySQL instance accept calls from outside the server so that I could migrate data there from elsewhere and I even got my shared hosting setup to start using the new database to see what performance boost it might give. To make all this happen, I first found the location of the relevant my.cnf configuration file using the following command:

find / -name my.cnf

Once I had the right file, I commented out the following line that it contained and restarted the database service afterwards using another command to stop the appearance of any error 111 messages:

bind-address 127.0.0.1
service mysql restart

After that, things worked as required and I moved onto another matter: uploading the requisite files. That meant installing an FTP server so I chose proftpd since I knew that well from previous tinkering. Once that was in place, file transfer commenced.

When that was done, I could do some testing to see if I had an active web server that loaded the website. Along the way, I also instated some Apache modules like mod-rewrite using the a2enmod command, restarting Apache each time I enabled another module.

Then, I discovered that Textpattern needed php-7.2-xml installed, so the following command was executed to do this:

apt install php7.2-xml

Then, the following line was uncommented in the correct php.ini configuration file that I found using the same method as that described already for the my.cnf configuration and that was followed by yet another Apache restart:

extension=php_xmlrpc.dll

Addressing the above issues yielded enough success for me to change the IP address in my Cloudflare dashboard so it pointed at the VPS and not the shared server. The changeover happened seamlessly without having to await DNS updates as once would have been the case. It had the added advantage of making both WordPress and Textpattern work fully.

With everything working to my satisfaction, I then followed the instructions on Certbot to set up my new Let’s Encrypt SSL certificate. Aside from a tweak to a configuration file and another Apache restart, the process was more automated than I had expected so I was ready to embark on some fine-tuning to embed the new security arrangements. That meant updating .htaccess files and Textpattern has its own, so the following addition was needed there:

RewriteCond %{HTTPS} !=on
RewriteRule ^ https://%{HTTP_HOST}%{REQUEST_URI} [R=301,L]

This complemented what was already in the main .htaccess file and WordPress allows you to include http(s) in the address it uses, so that was another task completed. The general .htaccess only needed the following lines to be added:

RewriteCond %{SERVER_PORT} 80
RewriteRule ^(.*)$ https://www.assortedexplorations.com/$1 [R,L]

What all these achieve is to redirect insecure connections to secure ones for every visitor to the website. After that, internal hyperlinks without https needed updating along with any forms so that a padlock sign could be shown for all pages.

With the main work completed, it was time to sort out a lingering niggle regarding the appearance of an FTP login page every time a WordPress installation or update was requested. The main solution was to make the web server account the owner of the files and directories, but the following line was added to wp-config.php as part of the fix even if it probably is not necessary:

define('FS_METHOD', 'direct');

There also was the non-operation of WP Cron and that was addressed using WP-CLI and a script from Bjorn Johansen. To make double sure of its effectiveness, the following was added to wp-config.php to turn off the usual WP-Cron behaviour:

define('DISABLE_WP_CRON', true);

Intriguingly, WP-CLI offers a long list of possible commands that are worth investigating. A few have been examined but more await attention.

Before those, I still need to get my new VPS to send emails. So far, sendmail has been installed, the hostname changed from localhost and the server restarted. More investigations are needed but what I have not is faster than what was there before, so the effort has been rewarded already.

Killing a hanging SSH session

20th April 2018

My web hosting provider offers SSH access that I often use for such things as updating Matomo and Drupal together with more intensive file moving than an FTP session can support. However, I have found in recent months that I no longer can exit cleanly from such sessions using the exit command.

Because this produces a locked terminal session, I was keen to find an alternative to shutting down the terminal application before starting it again. Handily, there is a keyboard shortcut that does just what I need.

It varies a little according to the keyboard that you have. Essentially, it combines the carriage return key with ones for the tilde (~) and period (.) characters. The tilde may need to be produced by the combining the shift and backtick keys on some keyboard layouts but that is not needed on mine. So far, I have found that the <CR>+~+. combination does what I need until SSH sessions start exiting as expected.

Turning off seccomp sandbox in vsftpd

21st September 2013

Within the last week, I set up virtual web server using Arch Linux to satisfy my own curiosity since the DIY nature of Arch means that you can build up exactly what you need without having any real constraints put upon you. What didn’t surprise me about this was that it took me more work than the virtual server that I created using Ubuntu Server but I didn’t expect ProFTPD to be missing from the main repositories. The package can be found in the AUR but I didn’t fancy the prospect of dragging more work on myself so I went with vsftpd (Very Secure FTP Daemon) instead. In contrast to ProFTPD, this is available in the standard repositories and there is a guide to its use in the Arch user documentation.

However, while vsftpd worked well just after installation, connections to the virtual FTP soon failed with FileZilla  began issuing uninformative messages. In fact, it was the standard command line FTP client on my Ubuntu machine that was more revealing. It issued the following message that let me to the cause after my engaging the services of Google:

500 OOPS: priv_sock_get_cmd

With version 3.0 of vsftpd, a new feature was introduced and it appears that this has caused problems for a few people. That feature is seccomp sandboxing and it can turned off by adding the following line in /etc/vsftpd.conf:

seccomp_sandbox=NO

That solved my problem and version 3.0.2 of vsftpd should address the issue with seccomp sandboxing anyway. In case, this solution isn’t as robust as it should be because seccomp isn’t supported in the Linux kernel that you are using, turning off the new feature still needs to be an option though.

A waiting game

20th August 2011

Having been away every weekend in July, I was looking forward to a quiet one at home to start August. However, there was a problem with one of my websites hosted by Fasthosts that was set to occupy me for the weekend and a few weekday evenings afterwards.

The issue appeared to be slow site response so I followed advice given to me by second line support when this website displayed the same type of behaviour: upgrade from Apache 1.3 to 2.2 using the control panel. Unfortunately for me, that didn’t work smoothly at all and there seemed to be serious file loss as a result. Raising a ticket with the support desk only got me the answer that I had to wait for completion and I now have come to the conclusion that the migration process may have got stuck somewhere along the way. Maybe another ticket is in order.

There were a number of causes of the waiting that gave rise to the title of this post. Firstly, support for low costing isn’t exactly timely and I do wonder if it’s any better for more prominent websites. Restoration of websites by FTP is another activity that takes up plenty of time as does rebuilding databases and populating them with data. Lastly, there’s changing the DNS details for a website. In hindsight, there may be ways of reducing the time demands of these. For instance, contacting a support team by telephone may be quicker unless there is a massive queue awaiting attention and there was a wait of several hours one night when a security changeover affected a multitude of Fasthosts users. Of course, it is not a panacea at the best of times as we have known since all those stories began to do the rounds in the middle of the 1990’s. Doing regular backups would help the second though the ones that I was using for the restoration weren’t too bad at all. Nevertheless, they weren’t complete so there was unfinished business that required resolution later. The last of these is helped along by more regular PC restarts so that unexpected discovery will remain a lesson for the future though I don’t plan on moving websites around for a while. After all, getting DNS details propagated more quickly really is a big help.

While awaiting a response from Fasthosts, I began to ponder the idea of using an alternative provider. Perusal of the latest digital edition of .Net (I now subscribe to the non-paper edition so as to cut down on the clutter caused by having paper copies about the place) ensued before I decided to investigate the option of using Webfusion. Having decided to stick with shared hosting, I gave their Unlimited Linux option a go. For someone accustomed to monthly billing, it was unusual to see annual biannual and triannual payment schemes too. The first of these appears to be the default option so a little care and attention is needed if you want something else. In order to encourage you to stay with Webfusion longer, the per month is on sliding scale: the longer the period you buy, the lower the cost of a month’s hosting.

Once the account was set up, I added a database and set to the long process of uploading files from my local development site using FileZilla. Having got a MySQL backup from the Fasthosts site, I used the provided PHPMyAdmin interface to upload the data in pieces not exceeding the 8 MB file size limitation. It isn’t possible to connect remotely to the MySQL server using the likes of MySQL Administrator so I bear with this not so smooth process. SSH is another connection option that isn’t available but I never use it much on Fasthosts sites anyway. There were some questions to the support people along and the first of these got a timely answer though later ones took longer before I got an answer. Still, getting advice on the address of the test website was a big help while I was sorting out the DNS changeover.

Speaking of the latter, it took a little doing and not little poking around Webfusion’s FAQ’s before I made it happen. First, I tried using name servers that I found listed in one of the articles but this didn’t seem to achieve the end that I needed. Mind you, I would have seen the effects of this change a little earlier if I had rebooted my PC earlier than I did than I did but it didn’t occur to me at the time. In the end, I switched to using my domain provider’s name servers and added the required information to them to get things going. It was then that my website was back online in some fashion so I could any outstanding loose ends.

With the site essentially operating again, it was time to iron out the rough edges. The biggest of these was that MOD_REWRITE doesn’t seem to work the same on the Webfusion server like it does on the Fasthosts ones. This meant that I needed to use the SCRIPT_URI CGI variable instead of PATH_INFO in order to keep using clean URL’s for a PHP-powered photo gallery that I have. It took me a while to figure that out and I felt much better when I managed to get the results that I needed. However, I also took the chance to tidy up site addresses with redirections in my .htaccess file in an attempt to ensure that I lost no regular readers, something that I seem to have achieved with some success because one such visitor later commented on a new entry in the outdoors blog.

Once any remaining missing images were instated or references to them removed, it was then time to do a full backup for sake of safety. The first of these activities was yet another consumer while the second didn’t take so long and I need to do this more often in case anything happens. Hopefully though, the relocated site’s performance continues to be as solid as it is now.

The question as to what to do with the Fasthosts webspace remains outstanding. Currently, they are offering free upgrades to existing hosting packages so long as you commit for a year. After my recent experience, I cannot say that I’m so sure about doing that kind of thing. In fact, the observation leaves me wondering if instating that very extension was the cause of breaking my site. In fact, it appears that the migration from Apache 1.3 to 2.2 seems to have got stuck for whatever reason. Maybe another ticket should be raised but I am not decided on that yet. All in all, what happened to that Fasthosts website wasn’t the greatest of experiences but the service offered by Webfusion is rock solid thus far. While wondering if the service from Fasthosts wasn’t as good as it once was, I’ll keep an open mind and wait to see if my impressions change over time.

Recursive FTP with the command line

6th August 2008

Here’s a piece of Linux/UNIX shell scripting code that will do a recursive FTP refresh of a website for you:

lftp <<~/Tmp/log_file.tmp 2>>~/Tmp/log_file.tmp

open ${HOSTNAME}

user ${USER} ${PSSWD}

mirror -R -vvv “${REP_SRC}” “${REP_DEST}”

EndFTP

When my normal FTP scripting approach left me with a broken WordPress installation and an invalid ticket in the project’s TRAC system that I had to close, I turned to looking for a more robust way of achieving the website updates and that’s what led me to seek out the options available for FTP transfers that explicitly involve directory recursion. The key pieces in the code above are the use of lftp in place of ftp, my more usual tool for the job, and the invocation of the mirror command that comes with lftp. The -R switch ensures that file transfer is from local to remote (vice versa is the default) and -vvv turns on maximum verbosity, a very useful thing when you find that it takes longer than more usual means. It’s all much slicker than writing your own script to do the back-work of ploughing through the directory structure and ensuring that the recursive transfers take place. Saying that, it is possible to have a one line variant of the above but the way that I have set things up might be more familiar to users of ftp.

Automating FTP II: Windows

15th April 2008

Having thought about automating command line FTP on UNIX/Linux, the same idea came to me for Windows too and you can achieve much the same results, even if the way of getting there is slightly different. The first route to consider is running a script file with the ftp command at the command prompt (you may need %windir%system32ftp.exe to call the right FTP program in some cases):

ftp -s:script.txt

The contents of script are something like the following:

open ftp.server.host
user
password
lcd destination_directory
cd source_directory
prompt
get filename
bye

It doesn’t take much to turn your script into a batch file that takes the user name as its first input and your password as its second for sake of enhanced security and deletes any record thereof for the same reason:

echo open ftp.server.host >  script.txt
echo %1 >> script.txt
echo %2 >> script.txt
echo cd htdocs >> script.txt
echo prompt >> script.txt
echo mget * >> script.txt
echo bye >> script.txt
%windir%system32ftp.exe -s:script.txt
del script.txt

The feel of the Windows command line (in Windows 2000, it feels very primitive but Windows XP is better and there’s PowerShell now too) can leave a lot to be desired by someone accustomed to its UNIX/Linux counterpart but there’s still a lot of tweaking that you can do to the above, given a bit of knowledge of the Windows batch scripting language. Any escape from a total dependence on pointing and clicking can only be an advance.

Automating FTP I: UNIX and Linux

11th April 2008

Having got tired of repeated typing in everything at the prompt of an interactive command line FTP session and doing similar things via the GUI route, I started to wonder if there was a scripting alternative and, lo and behold, I found it after a spot of googling. There are various opportunities for its extension such as prompting for username and password instead of the risky approach of including them in a script or cycling through a directory structure but here’s the foundation stone for such tinkering anyway:

HOSTNAME='ftp.server.host'
USER='user'
PSSWD='password'
REP_SRC='source_directory'
REP__DEST='destination_directory'
FILENAME='*'

rm -rf log_file.tmp

cd "${REP_DEST}"

ftp -i -n -v <<EndFTP >>log_file.tmp 2>>log_file.tmp
open ${HOSTNAME}
user ${USER} ${PSSWD}
prompt
cd "${REP_SRC}"
mget "${FILENAME}"
EndFTP

cd ~

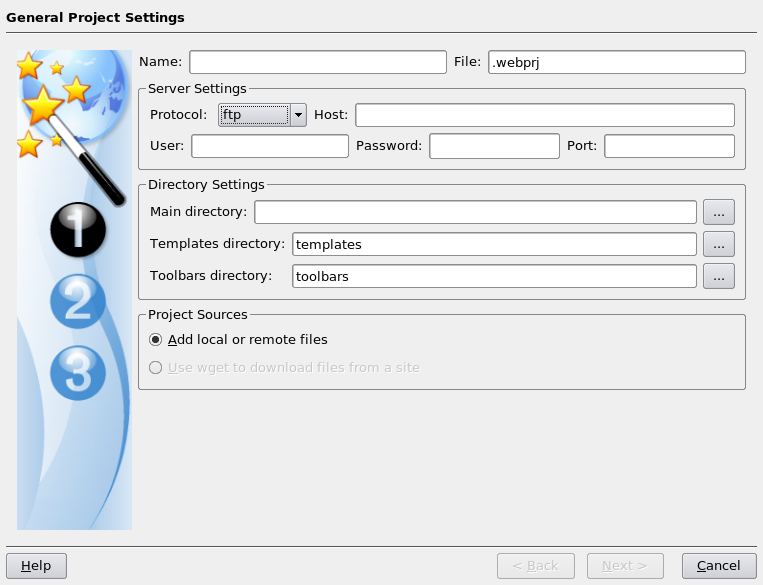
Setting up Quanta Plus to edit files on your web server

3rd December 2007

On Saturday, my hillwalking and photo gallery website suffered an outage thanks to Fasthosts, the site’s hosting provider, having a security breach and deciding to change all my passwords. I won’t bore you with the details here but I had to change the password for my MySQL database from their unmemorable suggestion and hence the configuration file for the hillwalking blog. To do this, I set up Quanta Plus to edit the requisite file on the server itself. That was achieved by creating a new project, setting the protocol as FTP and completing the details in the wizard, all relatively straight forward stuff. I have a habit of doing this from Dreamweaver so it’s nice to see that an open source alternative provides the same sort of functionality.

New project using FTP protocol in Quanta Plus

Using SAS FILENAME statement to extract directory file listings into SAS

30th May 2007

The filename statement’s pipe option allows you to direct the output of operating system commands into SAS for further processing. Usefully, the Windows dir command (with its /s switch) and the UNIX and Linux equivalent ls allow you get a file listing into SAS. For example, here’s how you extract the list of files in your UNIX or Linux home directory into SAS:

filename DIRLIST pipe 'ls ~';
data dirlist;
length filename $200;
infile dirlist length=reclen;
input buffer $varying200. reclen;
run;

Using the ftp option on the filename statement allows you to get a list of the files in a directory on a remote server, even one with a different operating system to that used on the client (PC or server), very useful for cases where cross-platform systems are involved. Here’s some example code:

filename dirlist ftp ' ' ls user='user' host='host' prompt;
data _null_;
length filename $200;
infile dirlist length=reclen;
input buffer $varying200. reclen;
run;

The PROMPT option will cause SAS to ask you for a password and the null string is where you would otherwise specify the name of a file.

  • All the views that you find expressed on here in postings and articles are mine alone and not those of any organisation with which I have any association, through work or otherwise. As regards editorial policy, whatever appears here is entirely of my own choice and not that of any other person or organisation.

  • Please note that everything you find here is copyrighted material. The content may be available to read without charge and without advertising but it is not to be reproduced without attribution. As it happens, a number of the images are sourced from stock libraries like iStockPhoto so they certainly are not for abstraction.

  • With regards to any comments left on the site, I expect them to be civil in tone of voice and reserve the right to reject any that are either inappropriate or irrelevant. Comment review is subject to automated processing as well as manual inspection but whatever is said is the sole responsibility of the individual contributor.