TOPIC: WINDOWS KEY
Resolving a Linux Mint and Windows keyboard shortcut conflict encountered when using SAS Enterprise Guide in a remote Citrix session
Here is a gotcha, slight though it is, that caught me when working in SAS Enterprise Guide on a Windows system to which I was connecting from Linux via Citrix. What I wanted to do was use the keyboard shortcut CTRL + SHIFT + U to convert text to upper case in the program editor, only for it to produce a black square and nothing else.
What I was encountering was a clash in keyboard shortcut assignments. On Linux Mint, CTRL + SHIFT + U activates Unicode character input mode. The black square was there for me to enter a hexadecimal code to add a character that my keyboard would not facilitate in normal circumstances. While the facility clearly has its uses, it was getting in my way and a solution had to be found.
Taking the simple route, I changed the keyboard shortcut to avoid the clash. Though others may want to go further than this, that was enough for me. At the command line, I issued the following command so that I could accomplish this:
ibus-setup
In the application screen that appeared, I navigated to the Emoji tab. To the right of the Unicode code point box, I clicked on the button with four dots. That led me to another dialogue box where I could change the modifier keys. Thus, I unchecked the box for SHIFT and ticked the one for SUPER (the Windows key on many keyboards these days) instead, before clicking on the OK button to confirm the setting. With that completed, I closed the IBus Preferences screen.
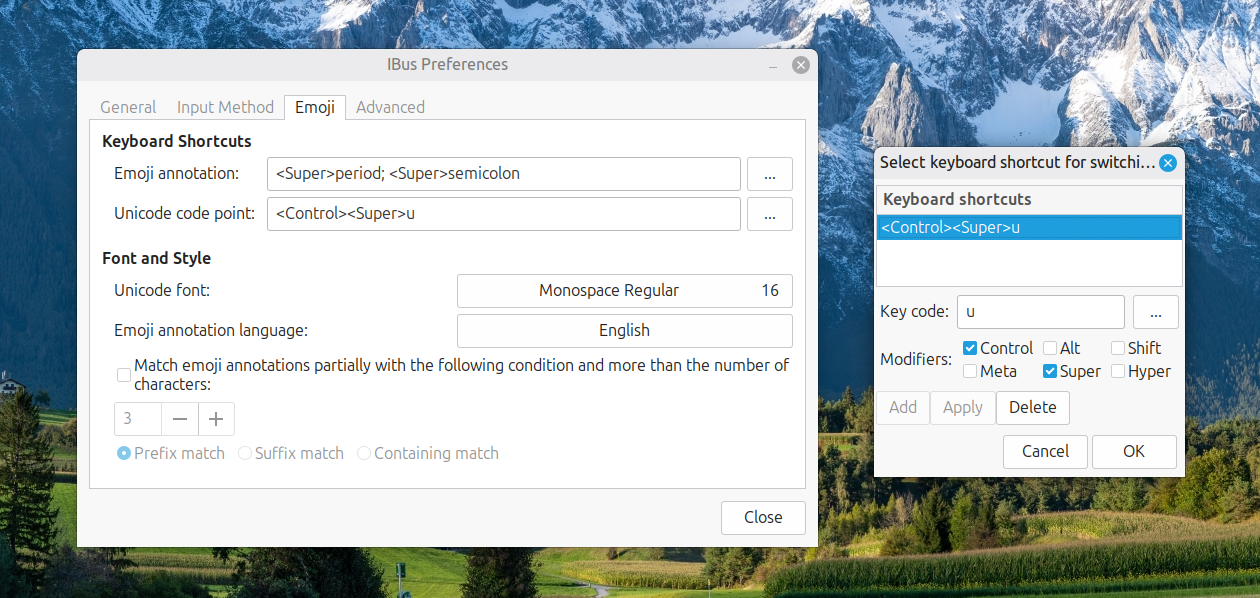
Now, I had CTRL + SUPER + U instead of CTRL + SHIFT + U. This meant that the CTRL + SHIFT + U in Enterprise Guide worked exactly as I expected it to do. A baffling situation had been resolved to leave me working without intrusion.
Locking your computer screen faster using keyboard shortcuts
When you are doing paid work on a computer, locking one's screen is a healthy practice for ensuring privacy and confidentiality while you are away from your desk for a short while. For years, I have been doing this on Windows using the WIN (Windows key) + L keyboard combination. It is possible on a Mac too, albeit using a different set of keys: CTRL (Control) + CMD (Command) + Q. While the Lock Screen item on the Apple menu will accomplish the same result, a simple keyboard shortcut works much, much faster. On Linux, things are a lot more varied with different desktop environments working in their own way, even making terminal commands a way to go if you can use a heavily abbreviated alias.
Keyboard remapping on macOS with Karabiner-Elements for cross-platform work
This is something that I have been planing to share for a while; working across macOS, Linux and Windows poses a challenge to muscle memory when it comes to keyboard shortcuts. Since the macOS set up varies from the others, it was that which I set to harmonise with the others. Though the result is not full compatibility, it is close enough for my needs.
The need led me to install Karabiner-Elements and Karabiner-EventViewer. The latter has its uses for identifying which key is which on a keyboard, which happens to be essential when you are not using a Mac keyboard. While it is not needed all the time, the tool is a godsend when doing key mappings.
Karabiner-Elements is what holds the key mappings and needs to run all the time for them to be activated. Some are simple and others are complex; it helps the website is laden with examples of the latter. Maybe that is how an LLM can advise on how to set up things, too. Before we come to the ones that I use, here are the simple mappings that are active on my Mac Mini:
left_command → left_control
left_comtrol → left_command
This swaps the left-hand Command and Control keys while leaving their right-hand ones alone. It means that the original functionality is left for some cases when changing it for the keys that I use the most. However, I now find that I need to use the Command key in the Terminal instead of the Control counterpart that I used before the change, a counterintuitive situation that I overlook given how often the swap is needed in other places like remote Linux and Windows sessions.
grave_accent_and_tilde → non_us_backslash
non_us_backslash → non_us_pound
non_us_pound → grave_accent_and_tilde
It took a while to get this three-way switch figured out, and it is a bit fiddly too. All the effort was in the name of getting backslash and hash (pound in the US) keys the right way around for me, especially in those remote desktop sessions. What made the thing really tricky was the need to deal with Shift key behaviour, which necessitated the following script:
{
    "description": "Map grave/tilde key to # and ~ (forced behaviour, detects Shift)",
    "manipulators": [
        {
            "conditions": [
                {
                    "name": "shift_held",
                    "type": "variable_if",
                    "value": 1
                }
            ],
            "from": {
                "key_code": "grave_accent_and_tilde",
                "modifiers": { "optional": ["any"] }
            },
            "to": [{ "shell_command": "osascript -e 'tell application \"System Events\" to keystroke \"~\"'" }],
            "type": "basic"
        },
        {
            "conditions": [
                {
                    "name": "shift_held",
                    "type": "variable_unless",
                    "value": 1
                }
            ],
            "from": {
                "key_code": "grave_accent_and_tilde",
                "modifiers": { "optional": ["any"] }
            },
            "to": [
                {
                    "key_code": "3",
                    "modifiers": ["option"]
                }
            ],
            "type": "basic"
        },
        {
            "from": { "key_code": "left_shift" },
            "to": [
                {
                    "set_variable": {
                        "name": "shift_held",
                        "value": 1
                    }
                },
                { "key_code": "left_shift" }
            ],
            "to_after_key_up": [
                {
                    "set_variable": {
                        "name": "shift_held",
                        "value": 0
                    }
                }
            ],
            "type": "basic"
        },
        {
            "from": { "key_code": "right_shift" },
            "to": [
                {
                    "set_variable": {
                        "name": "shift_held",
                        "value": 1
                    }
                },
                { "key_code": "right_shift" }
            ],
            "to_after_key_up": [
                {
                    "set_variable": {
                        "name": "shift_held",
                        "value": 0
                    }
                }
            ],
            "type": "basic"
        }
    ]
}
Here, I resorted to AI to help get this put in place. Even then, there was a deal of toing and froing before the setup worked well. After that, it was time to get the quote (") and at (@) symbols assigned to what I was used to having on a British English keyboard:
{
    "description": "Swap @ and \" keys (Shift+2 and Shift+quote)",
    "manipulators": [
        {
            "from": {
                "key_code": "2",
                "modifiers": {
                    "mandatory": ["shift"],
                    "optional": ["any"]
                }
            },
            "to": [
                {
                    "key_code": "quote",
                    "modifiers": ["shift"]
                }
            ],
            "type": "basic"
        },
        {
            "from": {
                "key_code": "quote",
                "modifiers": {
                    "mandatory": ["shift"],
                    "optional": ["any"]
                }
            },
            "to": [
                {
                    "key_code": "2",
                    "modifiers": ["shift"]
                }
            ],
            "type": "basic"
        }
    ]
}
The above possibly was one of the first changes that I made, and took less time than some of the others that came after it. There was another at the end that was even simpler again: neutralising the Caps Lock key. That came up while I was perusing the Karabiner-Elements website, so here it is:
{
    "manipulators": [
        {
            "description": "Change caps_lock to command+control+option+shift.",
            "from": {
                "key_code": "caps_lock",
                "modifiers": { "optional": ["any"] }
            },
            "to": [
                {
                    "key_code": "left_shift",
                    "modifiers": ["left_command", "left_control", "left_option"]
                }
            ],
            "type": "basic"
        }
    ]
}
That was the simplest of the lot to deploy, being a simple copy and paste effort. It also halted mishaps when butter-fingered actions on the keyboard activated capitals when I did not need them. While there are occasions when the facility would have its uses, it has not noticed its absence since putting this in place.
At the end of all the tinkering, I now have a set-up that works well for me. While possible enhancements may include changing the cursor positioning and corresponding highlighting behaviours, I am happy to leave these aside for now. Compatibly with British and Irish keyboards together with smoother working in remote sessions was what I sought, and I largely have that. Thus, I have no complaints so far.
Building an email summariser for Apple Mail using both OpenAI and Shortcuts
One thing that I am finding useful in Outlook is the ability to summarise emails using Copilot, especially for those that I do not need to read in full. While Apple Mail does have something similar, I find it to be very terse in comparison. Thus, I started to wonder about just that by using the OpenAI API and the Apple Shortcuts app. All that follows applies to macOS Sequoia, though the Tahoe version is with us too.
Prerequisite
While you can have the required OpenAI API key declared within the Shortcut, that is a poor practice from a security point of view. Thus, you will need this to be stored in the macOS keychain, which can be accomplished within a Terminal session and issuing a command like the following:
security add-generic-password -a openai -s openai_api_key -w [API Key]
In the command above, you need to add the actual API key before executing it to ensure that it is available to the steps that follow. To check that all is in order, issue the following command to see the API key again:
security find-generic-password -a openai -s openai_api_key -w
This process also allows you to rotate credentials without editing the workflow, allowing for a change of API keys should that ever be needed.
Building the Shortcut
With the API safely stored, we can move onto the actual steps involved in setting up the Email Summarisation Shortcut that we need.
Step 1: Collect Selected Email Messages
First, open the Shortcuts app and create a new Shortcut. Then, add a Run AppleScript action and that contains the following code:
tell application "Mail"
    set selectedMessages to selection
    set collectedText to ""
    repeat with msg in selectedMessages
        set msgSubject to subject of msg
        set msgBody to content of msg
        set collectedText to collectedText & "Subject: " & msgSubject & return & msgBody & return & return
    end repeat
end tell
return collectedText
This script loops through the selected Mail messages and combines their subjects and bodies into a single text block.
Step 2: Retrieve the API Key
Next, add a Run Shell Script action and paste this command:
security find-generic-password -a openai -s openai_api_key -w | tr -d 'n'This reads the API key from the keychain and strips any trailing newline characters that could break the authentication header, the first of several gotchas that took me a while to sort.
Step 3: Send the Request to GPT-5
The, add a Get Contents of URL action and configure it as follows:
URL: https://api.openai.com/v1/chat/completions
Method: POST
Headers:
- Authorization:
Bearer [Shell Script result] - Content-Type:
application/json
Request Body (JSON):
{
  "model": "gpt-5",
  "temperature": 1,
  "messages": [
    {
      "role": "system",
      "content": "Summarise the following email(s) clearly and concisely."
    },
    {
      "role": "user",
      "content": "[AppleScript result]"
    }
  ]
}
When this step is executed, it replaces [Shell Script result] with the output from Step 2, and [AppleScript result] with the output from Step 1. Here, GPT-5 only accepts a temperature value of 1 (a lower value would limit the variability in the output if it could be used), unlike other OpenAI models and what you may see documented elsewhere.
Step 4: Extract the Summary from the Response
The API returns a JSON response that you need to parse, an operation that differs according to the API; Anthropic Claude has a different structure, for example. To accomplish this for OpenAI's gateway, add these actions in sequence to replicate what is achieved using in Python by loading completion.choices[0].message.content:
- Get Dictionary from Input (converts the response to a dictionary)
- Get Dictionary Value for key "choices"
- Get Item from List (select item 1)
- Get Dictionary Value for key "message"
- Get Dictionary Value for key "content"
One all is done (and it took me a while to get that to happen because of the dictionary → list → dictionary → dictionary flow; figuring out that not everything in the nesting was a dictionary took some time), click the information button on this final action and rename it to Summary Text. This makes it easier to reference in later steps.
Step 5: Display the Summary
Add a Show action and select the Summary Text variable. This shows the generated summary in a window with Close and Share buttons. The latter allows you to send to output to applications like Notes or OneNote, but not to Pages or Word. In macOS Sequoia, the list is rather locked down, which means that you cannot extend it beyond the available options. In use or during setup testing, beware of losing the open summary window behind others if you move to another app because it is tricky to get back to without using the CTRL + UP keyboard shortcut to display all open windows at once.
Step 6: Copy to Clipboard
Given the aforementioned restrictions, there is a lot to be said for adding a Copy to Clipboard action with the Summary Text variable as input. This allows you to paste the summary immediately into other apps beyond those available using the Share facility.
Step 7: Return Focus to Mail
After all these, add another Run AppleScript action with this single line:
tell application "Mail" to activateThis brings the Mail app back to the front, which is particularly useful when you trigger the Shortcut via a keyboard shortcut or if you move to another app window.
Step 8: Make the New Shortcut Available for Use
Lastly, click the information button at the top of your Shortcut screen. One useful option that can be activated is the Pin in Menu Bar one, which adds a menu to the top bar with an entry for the new Email Summary Shortcut in there. Ticking the box for the Use as Quick Action option allows you to set a keyboard shortcut. Until, the menu bar option appealed to me, that did have its uses. You just have to ensure that what you select does not override any combination that is in use already. Handily, I also found icons for my Shortcuts in Launchpad as well, which means that they also could be added to the Dock, something that I also briefly did.
Using the Shortcut
After expending the effort needed to set it up, using the new email summariser is straightforward. In Apple Mail, select one or more messages that you want to summarise; there is no need to select and copy the contained textual content because the Shortcut does that for you. Using the previously assigned keyboard combination, menu or Launchpad icon then triggers the summarisation processing. Thus, a window appears moments later displaying the generated summary while the same text is copied to your clipboard, ready to paste anywhere you need it to go. When you dismiss the pop-up window, the Mail app then automatically comes back into focus again.
Opening up Kindle for PC in a maximised window on Windows 11
One irritation with the Windows app for Amazon Kindle is that it does not open in a maximised window, and it scarcely remembers your size settings from session to session. Finding a solution to this sizing issue is no easy task, so I happened on one of my own that I previously used with File Explorer folder shortcuts.
The first step is to find the actual location of the Start Menu shortcut. Trying C:\Users\[User Name]\AppData\Roaming\Microsoft\Windows\Start Menu\Programs\Amazon\Amazon Kindle should do that.
Next, right-click on the Kindle icon and choose Properties from the context menu that appears. In the dialogue box that causes to appear on the screen, look for the "Run:" setting. By default, this appears as "Normal Window" but you can change this to "Maximised", which is what I did before clicking on Apply before doing the same for the OK button to dismiss the dialogue box.
If you have pinned the shortcut to the taskbar or elsewhere, you may need to unpin it and pin it again to carry over the change. After that, I found that the Kindle app opened up in a maximised window as I wanted.
Quickly changing between virtual desktops in Windows 10
One of the benefits of running Linux is the availability of virtual desktops, and installing VirtuaWin was the only way to get the same functionality on Windows before the launch of Windows 10. For reasons known to Microsoft, they decided against the same sort of implementation as seen in Linux or UNIX. Instead, they put the virtual desktop functionality a click away and rather hides it from most users unless they know what clicking on the Task View button allows. The approach also made switching between desktops slower with a mouse. However, there are keyboard shortcuts that address this once multiple virtual desktops exist.
Using WIN + CTRL + LEFT or WIN + CTRL + RIGHT does this easily once you have mastered the action. Depending on your keyboard setup, WIN is the Windows, Super or Command key while CTRL is the Control key. Then, LEFT is the left arrow key and RIGHT is the right arrow key. For machines with smaller screens where multitasking causes clutter, virtual desktops are a godsend for organising how you work, and having quick key combinations for switching between them adds to their utility.
Getting rid of Windows 10 notifications about disabling start-up applications
On several Windows 10 machines, I have been seeing messages appearing in its Action Centre pane with the heading Disable apps to help improve performance. It appeared again recently, so I decided to look further into the matter.
What I found was that the solution first involves opening up the Control Panel, which takes a little finding in Windows 10. You could use Cortana to get to it or right-clicking on the Start Menu and left-clicking on the Control Panel menu. Using the Windows key + X will produce the same menu, and choosing the same entry will have the same effect.
Once the Control Panel is open, it makes life a little easier if you change to the Large icons view using the drop-down menu under the Search Control Panel box on the right-hand side. Then, what you need to do is click on the Security and Maintenance icon.
Once in that Security and Maintenance section, you are presented with two subheadings, one for Security and one for Maintenance. So long as you have not dismissed the message in the action centre, you will see a corresponding entry under the Maintenance section. At the bottom of that entry, there will be a link that turns off these messages permanently, and clicking on this will have the desired effect.
Initial impressions of Windows 10
Being ever curious on the technology front, the release of the first build of a Technical Preview of Windows 10 was enough to get me having a look at what was on offer. The furore regarding Windows 8.x added to the interest, so I went to the download page to get a 64-bit installation ISO image.
That got installed into a fresh VirtualBox virtual machine and the process worked smoothly to give something not so far removed from Windows 8.1. However, it took until release 4.3.18 of VirtualBox before the Guest additions had caught up with the Windows prototype, so I signed up for the Windows Insider program and got a 64-bit ISO image to install the Enterprise preview of Windows 10 into a VMware virtual machine since and that supported full screen display of the preview while VirtualBox caught up with it.
Of course, the most obvious development was the return of the Start Menu, and it works exactly as expected too. Initially, the apparent lack of an easy way to disable App panels had me going to Classic Shell for an acceptable Start Menu. It was only later that it dawned on me that unpinning these panels would deliver to me the undistracting result that I wanted.
Another feature that attracted my interest is the new virtual desktop functionality. Here I was expecting something like what I have used on Linux and UNIX. There, each workspace is a distinct desktop, with only the applications open in a given workspace showing on a panel in there. Windows does not work that way with all applications visible on the taskbar regardless of what workspace they occupy, which causes clutter. Another deficiency is not having a desktop indicator on the taskbar instead of the Task View button. On Windows 7 and 8.x, I have been a user of VirtuaWin and this still works largely in the way that I expect of it too, except for any application windows that have some persistence associated with them; the Task Manager is an example and I include some security software in the same category too.
Even so, here are some keyboard shortcuts for anyone who wants to take advantage of the Windows 10 virtual desktop feature:
- Create a new desktop: Windows key + Ctrl + D
- Switch to previous desktop: Windows key + Ctrl + Left arrow
- Switch to next desktop: Windows key + Ctrl + Right arrow
Otherwise, stability is excellent for a preview of a version of Windows that is early on its road to final release. An upgrade to a whole new build went smoothly when initiated following a prompt from the operating system itself. All installed applications were retained, and a new taskbar button for notifications made its appearance alongside the existing Action Centre icon. So far, I am unsure what this does and whether the Action Centre button will be replaced in the fullness of time, yet I am happy to await where things go with this.
All is polished up to now, and there is nothing to suggest that Windows 10 will not be to 8.x what 7 was to Vista. The Start Screen has been dispatched after what has proved to be a misadventure for Microsoft. Regardless of what was hyped a few years ago, the PC still is with us; touchscreen devices like tablets are augmenting it instead of replacing it for any tasks involving some sort of creation. If anything, we have seen the PC evolve with laptops perhaps becoming more like the Surface Pro, at least when it comes to hybrid devices. However, we are not as happy to smudge our PC screens quite like those on phones and tablets, so a return to a more keyboard and mouse centred approach for some devices is welcome.
What I have here are just a few observations; there are more elsewhere, including a useful article by Ed Bott on ZDNet. All in all, we are early in the process for Windows 10 and, though it looks favourable so far, I will continue to keep an eye on how it progresses. The need to be less experimental than Windows 8.x is being fulfilled: so far, it certainly is less schizophrenic and should not be a major jump for users of Windows 7.
A look at Windows 8.1
Last week, Microsoft released a preview of Windows 8.1 and some hailed the return of the Start button, yet the reality is not as simple as that. Being a Linux user, I am left wondering if ideas have been borrowed from GNOME Shell instead of putting back the Start Menu like it was in Windows 7. What we have got is a smoothing of the interface that is there for those who like to tweak settings and not available by default. GNOME Shell has been controversial too, so borrowing from it is not an uncontentious move, even if there are people like me who are at home with that kind of interface.
What you get now is more configuration options to go with the new Start button. While right-clicking on the latter does get you a menu, this is no Start Menu like we had before. Instead, we get a settings menu with a "Shut down" entry. That's better than before, which might be saying something about what was done in Windows 8, and it produces a sub-menu with options of shutting down or restarting your PC as well as putting it to sleep. Otherwise, it is a place for accessing system configuration items and not your more usual software, not a bad thing, but it's best to be clear about these things. Holding down the Windows key and pressing X will pop up the same menu if you prefer keyboard shortcuts, and I have a soft spot for them too.

The real power is to be discovered when you right-click on the task bar and select Properties from the pop-up menu. Within the dialogue box that appears, there is the Navigation tab that contains a whole plethora of interesting options. Corner navigation can be scaled back to remove the options of switching between applications in the upper-left corner or getting what is called the Charms menu from the upper-right corner. Things get interesting in the Start Screen section. This where you tell Windows to boot to the desktop instead of the Start Screen and adjust what the Start button gives you. For instance, you can make it use your desktop background and display the Start Screen Apps View. Both of these make the new Start interface less intrusive and make the Apps View feel not unlike the way GNOME Shell overlays your screen when you hit the Activities button or hover over the upper-left corner of the desktop.
It all seems rather more like a series of little concessions, and not the restoration that some (many?) would prefer. Classic Shell still works for all those seeking an actual Start Menu and even replaces the restored Microsoft Start button too. So, if the new improvements aren't enough for you, you still can take matters into your own hands until you start to take advantage of what's new in 8.1.
Apart from the refusal to give us back a Windows 7 style desktop experience, we now have a touchscreen keyboard button added to the taskbar. So far, it always appears there even when I try turning it off. For me, that's a bug, so it's something that I'd like to see fixed before the final release.
All in all, Windows 8.1 feels more polished than Windows 8 was and will be a free update when the production version is released. My explorations have taken place within a separate VMware virtual machine because updating a Windows 8 installation to the 8.1 preview is forcing a complete re-installation on yourself later on. Though there are talks about Windows 9 now, I am left wondering if going for point releases like 8.2, 8.3, etc. might be a better strategy for Microsoft. It still looks as if Windows 8 could do with continual polishing before it gets more acceptable to users. 8.1 is a step forward, and more like it may be needed yet.
Upgrading from Windows 7 to Windows 8 within a VMWare Virtual Machine
Though my main home PC runs Linux Mint, I do like to have the facility to use Windows software occasionally, and virtualisation has allowed me to continue doing that. For a good while, it was a Windows 7 guest within a VirtualBox virtual machine and, before that, one running Windows XP fulfilled the same role. However, it did feel as if things were running slower in VirtualBox than once might have been the case, so I jumped ship to VMware Player. While it may be proprietary and closed source, it is free of charge and has been doing what was needed. A subsequent recent upgrade of a video driver on the host operating system allowed the enabling of a better graphical environment in the Windows 7 guest.
Instability
However, there were issues with stability and I lost the ability to flit from the VM window to the Linux desktop at will, with the system freezing on me and needing a reboot. Working in Windows 7 using full-screen mode avoided this, yet it did feel as I was constrained to working on a Windows-only machine whenever I did so. The graphics performance was imperfect too, with screening refreshing being very blocky with some momentary scrambling whenever I opened the Start menu. Others would not have been as patient with that as I was, though there was the matter of an expensive Photoshop licence to be guarded too.
In hindsight, a bit of pruning could have helped. An example would have been driver housekeeping in the form of removing VirtualBox Guest Additions because they could have been conflicting with their VMware counterparts. For some reason, those thoughts entered my mind to make me consider another, more expensive option instead.
Considering NAS & Windows/Linux Networking
That would have taken the form of setting aside a PC for running Windows 7 and having a NAS for sharing files between it and my Linux system. In fact, I did get to exploring what a four bay QNAP TS-412 would offer me and realised that you cannot put normal desktop hard drives into devices like that. For a while, it looked as if it would be a matter of getting drives bundled with the device or acquiring enterprise grade disks to main the required continuity of operation. The final edition of PC Plus highlighted another one, though: the Western Digital Red Pro range. These are part way been desktop and enterprise classifications and have been developed in association with NAS makers too.
While looking at the NAS option certainly became an education, it has exited any sort of wish list that I have. After all, it is the cost of such a setup that gets me asking if I really need such a thing. While the purchase of a Netgear FS 605 Ethernet switch would have helped incorporate it, there has been no trouble sorting alternative uses for that device since it bumps up the number of networked devices that I can have, never a bad capability to have. As I was to find, there was a less expensive alternative that would become sufficient for my needs.
In-situ Windows 8 Upgrade
Microsoft has been making available evaluation copies of Windows 8 Enterprise that last for 90 days before expiring. One is in my hands has been running faultlessly in a VMware virtual machine for the past few weeks. That made me wonder if upgrading from Windows 7 to Windows 8 help with my main Windows VM problems. Being a curious risk-taking type I decided to answer the question for myself using the £24.99 Windows Pro upgrade offer that Microsoft have been running for those not needing a disk up front; they need to pay £49.99 while you can get one afterwards for an extra £12.99 and £3.49 postage if you wish, a slightly cheaper option. Though there also was a time cost in that it occupied a lot of a weekend for me, it seems to have done what was needed, so it was worth the outlay.
Given the element of risk, Photoshop was deactivated to be on the safe side. That wasn't the only pre-upgrade action that was needed because the Windows 8 Pro 32-bit upgrade needs at least 16 GB before it will proceed. Of course, there was the matter of downloading the installer from the Microsoft website too. This took care of system evaluation and paying for the software, as well as the actual upgrade itself.
The installation took a few hours, with virtual machine reboots along the way. Naturally, the licence key was needed too, as well as the selection of a few options, though there weren't many of these. Being able to carry over settings from the pre-existing Windows 7 instance certainly helped with this and with making the process smoother too. No software needed reinstatement, and it doesn't feel as if the system has forgotten very much at all, a successful outcome.
Post-upgrade Actions
Just because I had a working Windows 8 instance didn't mean that there wasn't more to be done. In fact, it was the post-upgrade sorting that took up more time than the actual installation. For one thing, my digital mapping software wouldn't work without .Net Framework 3.5 and turning on the operating system feature from the Control Panel fell over at the point where it was being downloaded from the Microsoft Update website. Even removing Avira Internet Security after updating it to the latest version had no effect, and that was a finding during the Windows 8 system evaluation process. The solution was to mount the Windows 8 Enterprise ISO installation image that I had and issue the following command from a command prompt running with administrative privileges:
dism.exe /online /enable-feature /featurename:NetFX3 /Source:d:\sources\sxs /LimitAccess
For sake of assurance regarding compatibility, Avira has been replaced with Trend Micro Titanium Internet Security. The Avira licence won't go to waste, since I have another home in mind for it. Removing Avira without crashing Windows 8 proved impossible, though, and necessitating booting Windows 8 into Safe Mode. Because of much faster startup times, that cannot be achieved with a key press at the appropriate moment because the time window is too short now. One solution is to set the Safe Boot tick box in the Boot tab of MSCONFIG (or System Configuration, as it otherwise calls itself) before the machine is restarted. While there may be others, this was the one that I used. With Avira removed, clearing the same setting and rebooting restored normal service.
Dealing with a Dual Personality
One observer has stated that Windows 8 gives you two operating systems for the price of one: the one on the Start screen and the one on the desktop. Having got to wanting to work with one at a time, I decided to make some adjustments. Adding Classic Shell got me back a Start menu, and I omitted the Windows Explorer (or File Explorer as it is known in Windows 8) and Internet Explorer components. Though Classic Shell will present a desktop like what we have been getting from Windows 7 by sweeping the Start screen out of the way for you, I found that this wasn't quick enough for my liking, so I added Skip Metro Suite to speed up things. Though the tool does more than sweeping the Start screen out of the way, I have switched off these functions. Classic Shell has been configured too, so the Start screen can be accessed with a press of the Windows key. It has updated too so that boot into the desktop should be faster now. As for me, I'll leave things as they are for now. Even the possibility of using Windows' own functionality to go directly to the traditional desktop will be left untested while things are left to settle. Tinkering can need a break.
Outcome
After all that effort, I now have a seemingly more stable Windows virtual machine running Windows 8. Flitting between it and other Linux desktop applications has not caused a system freeze so far, and that was the result that I wanted. There now is no need to consider having separate Windows and Linux PC's with a NAS for sharing files between them, so that option is well off my wish-list. There are better uses for my money.
Not everyone has had my experience, though, because I saw a report that one user failed to update a physical machine to Windows 8 and installed Ubuntu instead; they were a Linux user anyway, even if they used Fedora more than Ubuntu. It is possible to roll back from Windows 8 to the previous version of Windows because there is a windows.old directory left primarily for that purpose. However, that may not help you if you have a partially operating system that doesn't allow you to do just that. In time, I'll remove it using the Disk Clean-up utility by asking it to remove previous Windows installations or running File Explorer with administrator privileges. Somehow, the former approach sounds the safer.
What About Installing Afresh?
While there was a time when I went solely for upgrades when moving from one version of Windows to the next, the annoyance of the process got to me. If I had known that installing the upgrade twice onto a computer with a clean disk would suffice, it would have saved me a lot. Staring from Windows 95 (from the days when you got a full installation disk with a PC and not the rescue media that we get now) and moving through a sequence of successors not only was time-consuming, but it also revealed the limitations of the first in the series when it came to supporting more recent hardware. It was enough to have me buying the full retailed editions of Windows XP and Windows 7 when they were released; the latter got downloaded directly from Microsoft. While these were retail versions that you could move from one computer to another, Windows 8 will not be like that. In fact, you will need to get its System Builder edition from a reseller and that can only be used on one machine. It is the merging of the former retail and OEM product offerings.
What I have been reading is that the market for full retail versions of Windows was not a big one anyway. However, it was how I used to work as you have read above, and it does give you a fresh system. Most probably get Windows with a new PC and don't go building them from scratch like I have done for more than a decade. Maybe the System Builder version would apply to me anyway, and it appears to be intended for virtual machine use as well as on physical ones. More care will be needed with those licences by the looks of things, and I wonder what needs not to be changed so as not to invalidate a licence. After all, making a mistake might cost between £75 and £120 depending on the edition.
Final Thoughts
So far, Windows 8 is treating me well, and I have managed to bend it to my will too, always a good thing to be able to say. In time, it might be that a System Builder copy could need buying yet, but I'll leave well alone for now. Though I needed new security software, the upgrade still saved me money over a hardware solution to my home computing needs and I have a backup disk on order from Microsoft too. That I have had to spend some time settling things was a means of learning new things for me but others may not be so patient and, with Windows 7 working well enough for most, you have to ask if it's only curious folk like me who are taking the plunge. Still, the dramatic change has re-energised the PC world in an era when smartphones and tablets have made so much of the running recently. That too is no bad thing because an unchanging technology is one that dies and there are times when significant changes are needed, as much as they upset some folk. For Microsoft, this looks like one of them, and it'll be interesting to see where things go from here for PC technology.