TOPIC: WINDOWS 10
Managing Microsoft Outlook on Windows: Fonts, Zoom, Data Files and Deployment Controls
Outlook continues to evolve across Windows, with a mixture of everyday personalisation options for users and deployment controls for administrators. Recent guidance from Microsoft brings together practical steps for composing messages in a preferred typeface, approaches for reading messages more comfortably, and a set of administrative measures to manage when and how the new Outlook appears in an organisation. Alongside this are reminders about where Outlook stores data on different account types and how that affects moving between computers, as well as pointers for finding POP, IMAP and SMTP settings for Outlook.com when manual configuration is needed. What follows draws these threads together so that individual users and IT teams can navigate the changes with clarity.
Changing the Default Font for New Messages and Replies
For those composing email, Outlook starts with a familiar default: new messages use Calibri in black. This is only a starting point because the application allows the font, its colour, size and style to be changed, and it treats new messages separately from replies and forwards so that different choices can be set for each if desired.
In new Outlook for Windows, the path goes like this: View > View Settings > Email > Compose and Reply. Under Message Format, the preferred font, size and style can be chosen before saving, and these settings then apply whenever a message is written or a reply is sent. Note that in new Outlook the font setting applies to both new messages and replies and forwards from a single control, so a separate choice for each is not available in this version.
In classic Outlook for Windows, the approach is different and more granular. Navigating to File > Options > Mail reveals a Stationery and Fonts button. On the Personal Stationery tab, there are separate Font buttons for new mail messages and for replying or forwarding messages, which allows a distinct typeface, size and colour to be set for each scenario independently. This separation can be useful for distinguishing composed messages from replied ones at a glance. If similar changes are needed for the message list rather than the compose window, there is a separate set of options for changing the font or font size in the message list.
Adjusting the Zoom Level in the Reading Pane
Comfort when reading is equally important, particularly with longer emails. Both new and classic Outlook offer ways to adjust zoom in the Reading Pane without touching system-wide display settings, though the controls differ between the two versions. In new Outlook, selecting a message in the inbox opens it in the Reading Pane, after which the View tab's Zoom control can be used. Zooming in and out is done with plus and minus buttons, and there is a Reset option that returns the view to its default level. In classic Outlook, the same result can be achieved either by dragging the zoom bar at the bottom right of the window or by going to View and then Zoom, where a specific percentage between 50% and 200% can be chosen. Classic Outlook also offers a "Remember my preference" checkbox in the Zoom dialogue, which locks the chosen level so it persists across sessions without needing to be reset each time. In both versions, these adjustments affect only how messages appear on the screen and have no bearing on how they are composed or how recipients will see them.
Confirming Which Version of Outlook Is in Use
Not every copy of Outlook presents the same options at the same time. If steps that are described as applying to new Outlook do not appear, the device may still be running classic Outlook for Windows. That is not uncommon in environments where administrators are controlling the transition or where devices have not yet received the relevant updates, so checking the version in use is a sensible first step before assuming that something has gone wrong.
Hiding the New Outlook Toggle in Classic Outlook
For administrators, a recurring question is how to prevent users from switching to new Outlook until the organisation is ready. Microsoft provides a cloud policy in the Microsoft 365 Apps admin centre that hides the Try the new Outlook toggle in classic Outlook for Windows. After signing in to the admin centre, the policy can be created by going to Customisation, selecting Policy Management and enabling the policy named Hide the "Try the new Outlook" toggle in Outlook. There is also a registry-based method for controlling the same setting: the key is under HKEY_CURRENT_USERSoftwareMicrosoftOffice16.0OutlookOptionsGeneral and is named HideNewOutlookToggle, with a value of dword:00000000 to hide the toggle. To later enable the policy, the same value is set to 1. As with any registry change, this approach is best handled with care and in line with internal change management practices.
Removing the New Outlook App After Preinstallation on Windows 11
Preinstallation of the new Outlook on Windows 11 is another area where planning matters. On Windows 11 builds later than version 23H2, the app is preinstalled for all users, and there is currently no way to block that preinstallation. If devices should not surface the new Outlook, it can be removed after installation using the following Windows PowerShell command:
Remove-AppxProvisionedPackage -AllUsers -Online -PackageName (Get-AppxPackage Microsoft.OutlookForWindows).PackageFullNameAfter deprovisioning, Windows updates will not reinstall the app. Administrators can also remove an additional Windows orchestrator registry value at HKEY_LOCAL_MACHINESOFTWAREMicrosoftWindowsUpdateOrchestratorUScheduler_OobeOutlookUpdate where applicable. Devices that have installed the March 2024 Non-Security Preview release, or a later cumulative update for Windows 11 version 23H2, respect the deprovisioning command and do not require removal of that registry value.
Handling User-Installed Instances and Start Menu Placeholders
Users may also install the app themselves, for example by selecting a toggle. In that case, the management approach shifts from provisioned packages to installed packages, and the following PowerShell command removes the app for all users:
Remove-AppxPackage -AllUsers -Package (Get-AppxPackage Microsoft.OutlookForWindows).PackageFullNameIt is worth verifying whether the app is actually installed or whether only a Start menu placeholder is visible because a pinned icon may appear even when the underlying app is not yet present. A quick check of the folder at %localappdata%MicrosoftOlklogs can confirm whether the app has produced logs, and Start layout policies can be used to manage pins, so users are not inadvertently prompted to install by selecting a placeholder. On consumer devices, a Recommended section in the Windows 11 Start menu can also surface the app, which may need consideration in user communications.
Migrating Users Away from Windows Mail and Calendar
The end of support for Windows Mail and Calendar on the 31st of December 2024 introduced another migration pathway. Active users of those apps are being switched automatically to the new Outlook app, so organisations that wish to block that route can remove the Mail and Calendar apps from devices using the following command:
Get-AppxProvisionedPackage -Online | Where {$_.DisplayName -match "microsoft.windowscommunicationsapps"} | Remove-AppxProvisionedPackage -Online -PackageName {$_.PackageName}For current users, the installed package can be removed with Remove-AppxPackage -AllUsers -Package (Get-AppxPackage microsoft.windowscommunicationsapps).PackageFullName. Alternatives exist through Microsoft Intune or Configuration Manager, which may be preferable in environments that already use those tools for application lifecycle management.
Blocking Acquisition via the Microsoft Store
Preventing acquisition from the Microsoft Store is more straightforward. Because the new Outlook for Windows is available there as well, blocking access to the Microsoft Store app prevents users from downloading it through that channel. Microsoft provides configuration options for controlling Microsoft Store access, and administrators can align those with broader device management policies that may already limit consumer app installs on corporate devices.
Opting Out of Automatic Migration
Some organisations will want to opt out of new Outlook migration entirely for a period. Starting in January 2025, users with Microsoft 365 Business Standard and Premium licences are automatically migrated from classic Outlook to new Outlook, with in-app notifications sent before the switch and the option to toggle back afterwards. Microsoft exposes a policy named Manage user setting for new Outlook automatic migration that controls whether users are switched automatically. If the policy is not set, the user setting remains uncontrolled and users can manage it themselves, with the default being enabled. Enabling the policy enforces automatic migration and prevents users from changing the setting, while disabling it turns off automatic migration and also prevents user changes. The equivalent registry setting sits under HKEY_CURRENT_USERSoftwarePoliciesMicrosoftoffice16.0outlookpreferences with a DWORD named NewOutlookMigrationUserSetting set to 0 to disable or 1 to enable. The same controls can be managed via Group Policy Administrative Templates and through the Cloud Policy service from the Microsoft 365 Apps admin centre, and because the setting is defined in ADMX templates it can also be surfaced in Intune using Administrative Templates.
Applying Conditional Access and Mailbox Policies
Beyond installation state and migration timing, access policies are a decisive layer of control. Conditional Access policies can require multifactor authentication, restrict access by location, block risky sign-in behaviours or insist on organisation-managed devices. For additional nuance, Outlook on the web (OWA) mailbox policies used together with the ConditionalAccessPolicy parameter can limit capabilities for users on non-compliant devices, for instance by restricting attachments. This approach allows a more graduated user experience that reduces risk without completely blocking access, and it can be combined with broader Conditional Access baseline requirements.
There are cases where a firmer control is required. To prevent mailbox access from the new Outlook regardless of how users acquired the app, administrators can use an Exchange mailbox policy that blocks organisation mailboxes from being added. This acts as a final block so that work or school accounts cannot be used in the app, even if an individual user has installed it or found it preinstalled. Because mailbox policies are applied to the account rather than to a device or a specific app, it is prudent to consider them alongside the earlier measures that block acquisition or control installation, so that personal accounts are not used in ways that bypass organisational safeguards.
Understanding How Outlook Stores Data and What Moves to a New Computer
While deployment and access are important, day-to-day continuity often depends on understanding how Outlook stores data and how that affects moving to a new computer. Outlook saves backup information in a variety of different locations depending on the account type involved. For users of Microsoft 365, Exchange, Outlook.com, Hotmail.com or Live.com accounts not accessed by POP or IMAP, email is backed up on the server and there is no Personal Folders file with a .pst extension. An Offline Folders file with an .ost extension may be present, but Outlook automatically recreates this when a new email account is added, and it cannot be moved between computers. Other elements such as navigation pane settings, print styles, signatures and stationery can be transferred, and their locations vary with version and configuration.
Users of POP accounts encounter a different arrangement. All email, calendar, contact and task information is stored in a .pst file, and moving this file to a new computer preserves that information. It does not carry over the account settings themselves, so Outlook needs to be set up on the new computer before opening the .pst file that was copied from the old one. On Windows 11, navigation pane settings are found at drive:Users<username>AppDataRoamingMicrosoftOutlook and signatures at drive:Users<username>AppDataRoamingMicrosoftSignatures. Knowing these paths saves time during a migration and reduces the risk of overlooking important data.
Avoiding OneDrive Synchronisation Problems with PST Files
Large .pst files can slow down OneDrive synchronisation if they are stored in folders that OneDrive is backing up. Symptoms include messages such as "Processing changes" or "A file is in use" that persist for longer than expected. Microsoft provides guidance on removing an Outlook PST data file from OneDrive if that becomes necessary, and doing so can restore normal synchronisation behaviour while keeping Outlook functional on the local machine.
Showing Hidden Files and Extensions on Windows
Locating Outlook data sometimes means revealing folders and file name extensions that Windows hides by default. This is especially true when navigating to AppData or similar directories, or when differentiating between PST and OST files. On Windows 11 File Explorer, going to View > Show, where both "File name extensions" and "Hidden items" settings can be toggled to their on positions. Doing so makes the AppData folder and the distinction between these file types visible without needing to navigate through the Control Panel.
Configuring POP, IMAP and SMTP Settings for Outlook.com
Configuration of Outlook.com accounts brings its own questions when used in the Outlook desktop app or other mail applications. Outlook and Outlook.com can often detect the correct mailbox settings automatically, which simplifies setup for many users. When that is not the case, or when using a third-party app, the POP, IMAP and SMTP settings can be viewed within Outlook.com settings and used for manual configuration. For Outlook.com accounts, both the IMAP and POP server name is outlook.office365.com, with IMAP using port 993 and POP using port 995, both with SSL/TLS encryption and OAuth2 authentication. It is worth noting that POP and IMAP access is disabled by default in Outlook.com and must be enabled in account settings before either protocol can be used. For other non-Microsoft accounts, the safest course is to obtain settings directly from the relevant email provider rather than guessing values, since incorrect entries can lead to connection issues that are not always obvious at first glance.
Getting Support for Outlook.com
Support remains close at hand for Outlook.com users who need it. The Help option on the menu bar in Outlook.com opens self-help resources where queries can be entered and common issues surfaced. If those do not resolve the problem, there is a path to contact support, which requires signing in to the account so that assistance can be tailored. If signing in is not possible, Microsoft directs users to a separate route to begin recovery or get help, and the Outlook.com Community provides an additional place to search for answers or ask questions from other users.
Keeping Users and IT Teams Informed During Outlook's Transition
Together, these user-facing features and administrative controls reflect a period of transition for Outlook on Windows. Individuals can shape the way they write and read messages, adjusting fonts to suit their preferences and using zoom where needed, without altering system-wide settings. Administrators can pace the adoption of the new Outlook with policies that hide toggles, prevent or reverse preinstallation, opt out of automatic migration and apply Conditional Access or mailbox policies that enforce organisational requirements. Underneath these changes, the fundamentals of data storage and account setup remain steady, with server-backed accounts recreating their local caches on-demand and POP accounts relying on .pst files that can be moved with care. By keeping these points in mind, users and IT teams alike can make informed decisions that avoid surprises and maintain a smooth email experience.
Getting Adobe Lightroom Classic to remember the search filters that you have set
With Windows 10 support to end in October 2025 and VirtualBox now offering full support for Windows 11, I have moved onto Windows 11 for personal use while retaining Windows 10 for professional work, at least for now. Of course, a lot could happen before 2025 with rumours of a new Windows version, the moniker Windows 12 has been mooted, but all that is speculation for now.
As part of the changeover, I moved the Adobe apps that I have in an ongoing subscription, Lightroom Classic and Photoshop are the main ones for me, to the new virtual machine. That meant that some settings from the previous one were lost and needed reinstating.
One of those was the persistence of Library Filters, so I had to find out how to get that sorted. If my memory is not fooling me, this seemed to be a default action in the past, and that meant that I was surprised by the change in behaviour.
Nevertheless, I had to go to the File menu, select Library Filters (it is near the bottom of the menu in the current version at the time of writing) and switch on Lock Filters by clicking on it to get a tick mark preceding the text. There is another setting called Remember Each Source's Filters Separately in the same place that can be set in the same manner if so desired, and I am experimenting with that at the moment, even though I have not bothered with this in the past.
Fixing Windows 11 freezing issues in VirtualBox with KVM paravirtualisation
Recently, I have been trying to get Windows 11 to run smoothly within a VirtualBox virtual machine, and there has been a lot of experimentation along the way. This was to eradicate intermittent freezes that escalated CPU usage and necessitated hard restarts. If I were to use Windows 11 as a long-term replacement for Windows 10, these needed to go.
An internet search showed that others faced the same predicament, yet a range of proposed solutions did nothing for me. The suggestion of enabling 3D graphics capability did nothing but produce a black screen at startup time, so that was not a runner. It might have been the combination of underlying graphics hardware and the drivers on my Linux Mint machine that hindered me when it helped others.
In the end, a look at the bug tracker for Windows guest operating systems running on VirtualBox sent me in another direction. The Paravirtualisation interface also may have caused issues with Windows 10 virtual machines, since these were all set to KVM. Doing the same for Windows 11 seems to have stopped the freezing behaviour so far. It meant going to the virtual machine settings, navigating to System > Acceleration and changing the dropdown menu value from Default to KVM before clicking on the OK button.
Before that, I have been blaming the newness of VirtualBox 7 (it is best not to expect too much of a fresh release bringing such major changes) and even the way that I installed Windows 11 using the streamlined installation or licensing issues. Now that things are going better, it may have been a lesson from Windows 10 that I had forgotten. The EFI, Secure Boot and TPM 2.0 requirements of Windows 11 also blind sided me, especially given the long wait for VirtualBox to add such compatibility, but that is behind me at this stage.
Given that Windows 11 is not perfect, Start11 makes it usable and the October 2025 expiry for Windows 10 also focuses my mind. It is time to move over for the sake of future-proofing if nothing else. In time, we may get a better operating system as Windows 11 matures and some minds surely are thinking of a "Windows 12". Depending on how things go, we may get to a point where something vintage in the nature of Windows XP, Windows 7 or Windows 10 appears. Those older versions of Windows became like old gold during their lives.
One way to fix slow CyberGhost VPN connections on Windows 10
Due to a need to access websites with country blocking, I have decided to give CyberGhost a go, and it also will come in handy when connecting devices to other Wi-Fi connections. What I have got is the three-year subscription package and all went well on the first day of use. However, things became unusable on the second and a reboot did not sort it.
Since the problem seemed to affect a phone running Android too, I even got to suspect my router and broadband provider. Even terminating the subscription came to mind, but it did not come to that. Instead, I did a bit more research and tried changing the maximum transition unit (MTU) for the connection to 1300 as suggested in a CyberGhost help article. Because using the Control Panel meant that it was resetting to 1500 on my Windows 10 machine, I then turned to a command line-based solution.
To accomplish that, I started PowerShell in administrator mode from the context menu produced by right-clicking on the Start Menu icon on the taskbar. Then, I entered the following command to see what connections I had and what the MTU settings were:
netsh interface ipv4 show subinterfaces
From looking through the Settings and Control Panel applications, I already had worked out what network interface belonged to the CyberGhost connection. Seeing that the MTU setting was 1500, I then issued a command like the following to change that to 1300.
netsh interface ipv4 set subinterface "<name of ethernet interface>" mtu=1300 store=persistent
Here, <name of ethernet interface> gets replaced by the name of your connection and the string is quoted to avoid spaces in the name causing problems with executing the command. Once that second command had been run, the first one was issued again and the output checked to ensure that the MTU setting was as expected.
While this was done when the VPN connection was inactive, it may work also with an active connection. After making the change, I again reconnected to the VPN and all has been as expected since then, and I found a better connection for my Android phone too.
Lessons learned on managing Windows Taskbar and Start Menu colouring in VirtualBox virtual machines
In the last few weeks, I have had a few occasions when the colouration of the Windows 10 taskbar and its Star Menu has departed from my expectations. At times, this happened in VirtualBox virtual machine installations and both the legacy 5.2.x versions and the current 6.x ones have thrown up issues.
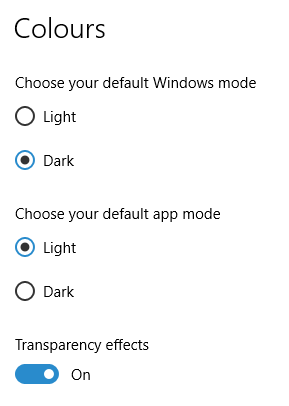

The first one actually happened with a Windows 10 installation in VirtualBox 5.2.x when the taskbar changed colour to light grey and there was no way to get it to pick up the colour of the desktop image to become blue instead. The solution was to change the Windows from Light to Dark in order for the desired colouration to be applied, and the settings above are taken from the screen that appears on going to Settings > Personalisation > Colours.
The second issue appeared in Windows 10 Professional installation in VirtualBox 6.0.x when the taskbar and Start Menu turned transparent after an updated. This virtual machine is used to see what is coming in the slow ring of Windows Insider, so some rough edges could be expected. The solution here was to turn off 3D acceleration in the Display pane of the VM settings after shutting it down. Starting it again showed that all was back as expected.
Both resolutions took a share of time to find and there was a deal of experimentation needed too. Once identified, they addressed the issues as desired. Hence, I am recording them here for use by others as much as future reference for myself.
Quickly changing between virtual desktops in Windows 10
One of the benefits of running Linux is the availability of virtual desktops, and installing VirtuaWin was the only way to get the same functionality on Windows before the launch of Windows 10. For reasons known to Microsoft, they decided against the same sort of implementation as seen in Linux or UNIX. Instead, they put the virtual desktop functionality a click away and rather hides it from most users unless they know what clicking on the Task View button allows. The approach also made switching between desktops slower with a mouse. However, there are keyboard shortcuts that address this once multiple virtual desktops exist.
Using WIN + CTRL + LEFT or WIN + CTRL + RIGHT does this easily once you have mastered the action. Depending on your keyboard setup, WIN is the Windows, Super or Command key while CTRL is the Control key. Then, LEFT is the left arrow key and RIGHT is the right arrow key. For machines with smaller screens where multitasking causes clutter, virtual desktops are a godsend for organising how you work, and having quick key combinations for switching between them adds to their utility.
Using PowerShell to reinstall Windows Apps
Recently, I managed to use 10AppsManager to remove most of the in-built apps from a Windows 10 virtual machine that I have for testing development versions in case anything ugly were to appear in a production update. Curiosity is my excuse for letting the tool do what it did and some could do with restoration. Out of the lot, Windows Store is the main one that I have sorted so far.
The first step of the process was to start up PowerShell in administrator mode. On my system, this is as simple as clicking on the relevant item in the menu popped up by right-clicking on the Start Menu button and clicking on the Yes button in the dialogue box that appears afterwards. In your case, it might be a case of right-clicking on the appropriate Start Menu programs entry, selecting the administrator option and going from there.
With this PowerShell session open, the first command to issue is the following:
Get-Appxpackage -Allusers > c:\temp\appxpackage.txt
This creates a listing of Windows app information and pops it into a text file in your choice of directory. Opening the text file in Notepad allows you to search it more easily, and there is an entry for Windows Store:
Name                   : Microsoft.WindowsStore
Publisher              : CN=Microsoft Corporation, O=Microsoft Corporation, L=Redmond, S=Washington, C=US
Architecture           : X64
ResourceId             :
Version                : 11607.1001.32.0
PackageFullName        : Microsoft.WindowsStore_11607.1001.32.0_x64__8wekyb3d8bbwe
InstallLocation        : C:\Program Files\WindowsApps\Microsoft.WindowsStore_11607.1001.32.0_x64__8wekyb3d8bbwe
IsFramework            : False
PackageFamilyName      : Microsoft.WindowsStore_8wekyb3d8bbwe
PublisherId            : 8wekyb3d8bbwe
PackageUserInformation : {S-1-5-21-3224249330-198124288-2558179248-1001
IsResourcePackage      : False
IsBundle               : False
IsDevelopmentMode      : False
Dependencies           : {Microsoft.VCLibs.140.00_14.0.24123.0_x64__8wekyb3d8bbwe,
Microsoft.NET.Native.Framework.1.3_1.3.24201.0_x64__8wekyb3d8bbwe,
Microsoft.NET.Native.Runtime.1.3_1.3.23901.0_x64__8wekyb3d8bbwe,
Microsoft.WindowsStore_11607.1001.32.0_neutral_split.scale-100_8wekyb3d8bbwe}
Using the information from the InstallLocation field, the following command can be built and executed (here, it has gone over several lines, so you need to get your version onto a single one):
Add-AppxPackage -register "C:\Program Files\WindowsApps\Microsoft.WindowsStore_11607.1001.32.0_x64__8wekyb3d8bbwe\AppxManifest.xml" -DisableDevelopmentMode
Once the above has completed, the app was installed and ready to use again. As the mood took me, I installed other apps from the Windows Store as I saw fit.
Forcing an upgrade to Windows 10 Anniversary Update
There remain people who advise those on Windows 7 or 8.x to hold fire on upgrading to Windows 10. Now that the free upgrade no longer is available, that advice may hold more weight than it did. Even so, there are those among us who jumped ship who are open to having the latest versions of things at no monetary cost to see what is available, and I must admit to being one of those.
After all, I do have a virtual machine with a pre-release version of the next update to Windows 10 installed on there to see what might be coming our way and to get a sense of what changes that may bring so that I am ready for those. Otherwise, I am usually happy to wait, but I noticed that the Windows 10 Anniversary Update only came to my HP Pavilion dm4 laptop and not other machines with Windows 10 installed, so I started to wonder why there was a lag when it came to automatic upgrades.
So that these things do not arrive when it is least convenient, I took advantage of a manual method to choose my timing. This did not involve installation from a disk image, but was in-situ. The first part of the process is standard enough in that the Settings app was started and the Update & security item chosen. That dropped me onto the Windows Update, and I first clicked on the Check for updates button to see what would happen. When nothing came of that, the Learn more link was clicked to bring me onto part of the Microsoft support website where I found that the Windows 10 Anniversary Update installer could be downloaded, so I duly did just that.
Running it produced a screen asking whether I wanted to proceed. Since I wanted to go ahead, the appropriate button was clicked and the machine left alone until the process completed. Because the installer purely is a facilitator, the first stage is to download the rest of the files needed, and that will take a while on any connection. Once downloading was completed, the actual process of installation commenced with several restarts before a log-in screen was again on offer. On logging in to the machine, the last part of the process started.
Though the process took quite a while, it seemingly worked without a hitch. If there was anything that I needed to do, it was the re-installation of VirtualBox Guest Additions to restore access to shared folders, as well as dealing with a self-inflicted irritation. Otherwise, I have found that previously installed software worked as expected and no file has been missed. Waiting a while may have had its advantages too because initial issues with the Anniversary Update will have been addressed, though it is best not to leave it too long, or you could have the feeling of being forgotten. A happy balance needs striking.
Dealing with an "Your insider preview build settings need attention" message in Windows 10 Settings
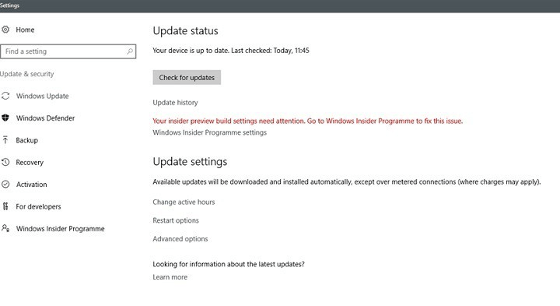
Having now upgraded all my Windows 10 machines to the Anniversary Update edition without much in the way of upheaval, I came across the following message on one of them:
Your insider preview build settings need attention. Go to Windows Insider Programme to fix this.
It appeared on the Update screen of the Settings application, and I believe that I may have triggered it by letting foolish curiosity take me to the Windows Insider Programme screen. Returning there offered no way of resolving the issue, so I had to try the registry editing tip that I discovered elsewhere on the web. Naturally, the creation of a System Restore Point before proceeding with changes to the Windows Registry is advised.
Typing REGEDIT into Cortana brings up a clickable link to the Registry Editor. Having clicked on this, I then clicked on the Yes button on the ensuing dialogue box that Windows 10 throws up every time you make a system change, such as installing new software. With the Registry Editor opened, I made my way to the following location:
HKEY_LOCAL_MACHINE\SOFTWARE\Microsoft\WindowsSelfHost\UI\Strings
Once there, I deleted every entry that mentioned "Insider" or "Windows Insider" to leave only two afterwards: "(Default)", "UnknownErrorDialogValues". That resolved the issue, and I now intend to stay away from the Windows Insider Programme screen in Settings so that the message never appears again.
Getting rid of Windows 10 notifications about disabling start-up applications
On several Windows 10 machines, I have been seeing messages appearing in its Action Centre pane with the heading Disable apps to help improve performance. It appeared again recently, so I decided to look further into the matter.
What I found was that the solution first involves opening up the Control Panel, which takes a little finding in Windows 10. You could use Cortana to get to it or right-clicking on the Start Menu and left-clicking on the Control Panel menu. Using the Windows key + X will produce the same menu, and choosing the same entry will have the same effect.
Once the Control Panel is open, it makes life a little easier if you change to the Large icons view using the drop-down menu under the Search Control Panel box on the right-hand side. Then, what you need to do is click on the Security and Maintenance icon.
Once in that Security and Maintenance section, you are presented with two subheadings, one for Security and one for Maintenance. So long as you have not dismissed the message in the action centre, you will see a corresponding entry under the Maintenance section. At the bottom of that entry, there will be a link that turns off these messages permanently, and clicking on this will have the desired effect.