TOPIC: START MENU
Opening up Kindle for PC in a maximised window on Windows 11
One irritation with the Windows app for Amazon Kindle is that it does not open in a maximised window, and it scarcely remembers your size settings from session to session. Finding a solution to this sizing issue is no easy task, so I happened on one of my own that I previously used with File Explorer folder shortcuts.
The first step is to find the actual location of the Start Menu shortcut. Trying C:\Users\[User Name]\AppData\Roaming\Microsoft\Windows\Start Menu\Programs\Amazon\Amazon Kindle should do that.
Next, right-click on the Kindle icon and choose Properties from the context menu that appears. In the dialogue box that causes to appear on the screen, look for the "Run:" setting. By default, this appears as "Normal Window" but you can change this to "Maximised", which is what I did before clicking on Apply before doing the same for the OK button to dismiss the dialogue box.
If you have pinned the shortcut to the taskbar or elsewhere, you may need to unpin it and pin it again to carry over the change. After that, I found that the Kindle app opened up in a maximised window as I wanted.
Lessons learned on managing Windows Taskbar and Start Menu colouring in VirtualBox virtual machines
In the last few weeks, I have had a few occasions when the colouration of the Windows 10 taskbar and its Star Menu has departed from my expectations. At times, this happened in VirtualBox virtual machine installations and both the legacy 5.2.x versions and the current 6.x ones have thrown up issues.
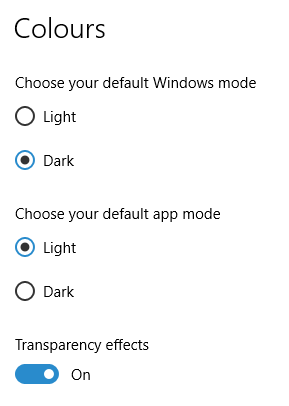

The first one actually happened with a Windows 10 installation in VirtualBox 5.2.x when the taskbar changed colour to light grey and there was no way to get it to pick up the colour of the desktop image to become blue instead. The solution was to change the Windows from Light to Dark in order for the desired colouration to be applied, and the settings above are taken from the screen that appears on going to Settings > Personalisation > Colours.
The second issue appeared in Windows 10 Professional installation in VirtualBox 6.0.x when the taskbar and Start Menu turned transparent after an updated. This virtual machine is used to see what is coming in the slow ring of Windows Insider, so some rough edges could be expected. The solution here was to turn off 3D acceleration in the Display pane of the VM settings after shutting it down. Starting it again showed that all was back as expected.
Both resolutions took a share of time to find and there was a deal of experimentation needed too. Once identified, they addressed the issues as desired. Hence, I am recording them here for use by others as much as future reference for myself.
Using PowerShell to reinstall Windows Apps
Recently, I managed to use 10AppsManager to remove most of the in-built apps from a Windows 10 virtual machine that I have for testing development versions in case anything ugly were to appear in a production update. Curiosity is my excuse for letting the tool do what it did and some could do with restoration. Out of the lot, Windows Store is the main one that I have sorted so far.
The first step of the process was to start up PowerShell in administrator mode. On my system, this is as simple as clicking on the relevant item in the menu popped up by right-clicking on the Start Menu button and clicking on the Yes button in the dialogue box that appears afterwards. In your case, it might be a case of right-clicking on the appropriate Start Menu programs entry, selecting the administrator option and going from there.
With this PowerShell session open, the first command to issue is the following:
Get-Appxpackage -Allusers > c:\temp\appxpackage.txt
This creates a listing of Windows app information and pops it into a text file in your choice of directory. Opening the text file in Notepad allows you to search it more easily, and there is an entry for Windows Store:
Name                   : Microsoft.WindowsStore
Publisher              : CN=Microsoft Corporation, O=Microsoft Corporation, L=Redmond, S=Washington, C=US
Architecture           : X64
ResourceId             :
Version                : 11607.1001.32.0
PackageFullName        : Microsoft.WindowsStore_11607.1001.32.0_x64__8wekyb3d8bbwe
InstallLocation        : C:\Program Files\WindowsApps\Microsoft.WindowsStore_11607.1001.32.0_x64__8wekyb3d8bbwe
IsFramework            : False
PackageFamilyName      : Microsoft.WindowsStore_8wekyb3d8bbwe
PublisherId            : 8wekyb3d8bbwe
PackageUserInformation : {S-1-5-21-3224249330-198124288-2558179248-1001
IsResourcePackage      : False
IsBundle               : False
IsDevelopmentMode      : False
Dependencies           : {Microsoft.VCLibs.140.00_14.0.24123.0_x64__8wekyb3d8bbwe,
Microsoft.NET.Native.Framework.1.3_1.3.24201.0_x64__8wekyb3d8bbwe,
Microsoft.NET.Native.Runtime.1.3_1.3.23901.0_x64__8wekyb3d8bbwe,
Microsoft.WindowsStore_11607.1001.32.0_neutral_split.scale-100_8wekyb3d8bbwe}
Using the information from the InstallLocation field, the following command can be built and executed (here, it has gone over several lines, so you need to get your version onto a single one):
Add-AppxPackage -register "C:\Program Files\WindowsApps\Microsoft.WindowsStore_11607.1001.32.0_x64__8wekyb3d8bbwe\AppxManifest.xml" -DisableDevelopmentMode
Once the above has completed, the app was installed and ready to use again. As the mood took me, I installed other apps from the Windows Store as I saw fit.
Getting rid of Windows 10 notifications about disabling start-up applications
On several Windows 10 machines, I have been seeing messages appearing in its Action Centre pane with the heading Disable apps to help improve performance. It appeared again recently, so I decided to look further into the matter.
What I found was that the solution first involves opening up the Control Panel, which takes a little finding in Windows 10. You could use Cortana to get to it or right-clicking on the Start Menu and left-clicking on the Control Panel menu. Using the Windows key + X will produce the same menu, and choosing the same entry will have the same effect.
Once the Control Panel is open, it makes life a little easier if you change to the Large icons view using the drop-down menu under the Search Control Panel box on the right-hand side. Then, what you need to do is click on the Security and Maintenance icon.
Once in that Security and Maintenance section, you are presented with two subheadings, one for Security and one for Maintenance. So long as you have not dismissed the message in the action centre, you will see a corresponding entry under the Maintenance section. At the bottom of that entry, there will be a link that turns off these messages permanently, and clicking on this will have the desired effect.
More thoughts on Windows 10
Now that I have left Windows 8.x behind me and there are a number of my machines running Windows 10, I have decided to revisit my impressions of the operating system. The first Technical Preview was something that I installed in a virtual machine, and I have been keeping an eye on how things have developed since then and intend to retain a Windows Insider installation to see what might be heading our way as Windows 10 evolves as now expected.
After elaborating on the all important upgrade process earlier, I am now moving onto other topics. While the Start Menu is a big item, there are others, as you will see below.
Start Menu
Let's start with an admission: the prototype Start Menu that we got in the initial Windows 10 Technical Preview was more to my liking. Unpinning all the tiles allowed the menu to collapse back to the sort of width that anyone familiar with Windows 7 would have liked. If there was a setting to expunge all tiles at once and produce this state, I would have been well happy.
It was later that we got to learn that Microsoft was not about to consign the Windows 8 Modern interface entirely to history, as many would have wanted. Some elements remain with us, such as a Start Menu with a mandatory area for tiles and the ability to have it display full screen. Some are live, only for this can be turned off on a tile by tile basis and unneeded ones can be removed altogether. It is even possible to uninstall most apps by right-clicking on a tile or other Start Menu entry and selecting the required option from the resulting context menu. For others, there is a command line alternative that uses PowerShell to do removals. After this pruning, things were left in such a state that I have not been moved to restore Classic Shell so far.
While the Start Menu settings used to be in the same place as those for the taskbar, they are found now in the new Settings tool. Some are in the Personalisation section, and it has its own Start subsection for setting full screen mode or highlighting of new apps, among other things. The equivalent Colours subsection is where you find other settings like assigning background colours based on those in a desktop background image, which itself is assigned in it own subsection in the Personalisation area.
Virtual Desktops
Initially, I failed to see the point in how Microsoft implemented these and favoured VirtuaWin instead. My main complaint was the taskbar showed buttons for all open apps regardless of the screen in which they are opened. However, that was changed, so your taskbar shows different buttons for each virtual desktop, just like the way that Linux and UNIX do things. Switching between desktops may not be as smooth as those yet, but the default setting is a move in the right direction, and you can change it if you like.
Cortana
Though this was presented to the world as a voice operated personal assistant like Apple's Siri, I cannot say that I am keen on such things, so I decided to work as I usually do instead. Keyboard interaction works fine, and I have neutered things to leave off web searches on Bing to use the thing much in the same way as the search box on the Windows 7 Start Menu. While it may be able to do more than that, I am more than happy to keep my workflow unchanged for now. Cortana's settings are available via its pop-up menu. Collapsing the search box to an icon to save space for your pinned and open applications is available from the Search section of the taskbar context menu (right-clicking the taskbar produces this).
Settings
In Windows 8.x, the Control Panel was not the only area for settings but remained feature complete. However, the same is not the case for Windows 10 where the new Settings panel is starting to take over from it. Though the two co-exist for now, it seems clear that Settings is where everything is headed.
Though the Personalisation section of the tool has been mentioned in relation to the Start Menu, there are plenty of others. For instance, the Privacy one is one that definitely needs reviewing, and I found myself changing a lot of the default settings in there. Naturally, there are some other sections in Settings that hardly need any attention from most of us and these include Ease of Access (accessibility), Time & language, Devices and Network & Internet. The System section has a few settings like tablet mode that may need review, while the Update & security one has backup and recovery subsections that may be of interest. The latter of these is where you find the tools for refreshing the state of the system following instability or returning to a previous Windows version (7 or 8.x) within thirty days of the upgrade.
Successfully migrating to Windows 10 on physical devices and virtual machines
While I have had preview builds of Windows 10 in various virtual machines for the most of twelve months, actually upgrading physical and virtual devices that you use for more critical work is a very different matter. Also, Windows 10 is set to be a rolling release with enhancements coming on an occasional basis, so I would like to see what comes before it hits the actual machines that I need to use. That means that a VirtualBox instance of the preview build is being retained to see what happens to that over time.
While some might call it incautious, I have taken the plunge and completely moved from Windows 8.1 to Windows 10. The first machine that I upgraded was more expendable, and success with that encouraged me to move onto others before even including a Windows 7 machine to see how that went. The 30-day restoration period allows an added degree of comfort when doing all this. The list of machines that I upgraded were a VMware VM with 32-bit Windows 8.1 Pro (itself part of a 32-bit upgrade cascade involving Windows 7 Home and Windows 8 Pro), a VirtualBox VM with 64-bit Windows 8.1, a physical PC that dual booted Linux Mint 17.2 and 64-bit Windows 8.1 and an HP Pavilion dm4 laptop (Intel Core i3 with 8 GB RAM and a 1 TB SSHD) with Windows 7.
The main issue that I uncovered with the virtual machines is that the Windows 10 update tool that is downloaded onto Windows 7 and 8.x does not accept the graphics capability on there. This is a bug because the functionality works fine on the Windows Insider builds. The solution was to download the appropriate Windows 10 ISO image for use in the ensuing upgrade. There are 32-bit and 64-bit disk images with Windows 10 and Windows 10 Pro installation files on each. My own actions used both disk images.
During the virtual machine upgrades, most of the applications that considered important were carried over from Windows 8.1 to Windows without a bother. Anyone would expect Microsoft's own software like Word, Excel and others to make the transition, but others like Adobe's Photoshop and Lightroom made it too, as did Mozilla's Firefox, albeit requiring a trip to Settings to set it as the default option for opening web pages. Less well-known desktop applications like Zinio (digital magazines) or Mapyx Quo (maps for cycling, walking and the like) were the same. Classic Shell was an exception but the Windows 10 Start Menu suffices for now anyway. Also, there was a need to reinstate Bitdefender Antivirus Plus using its new Windows 10 compatible installation file. Still, the experience was a big change from the way things used to be in the days when you used to have to reinstall nearly all your software following a Windows upgrade.
The Windows 10 update tool worked well for the Windows 8.1 PC, so no installation disks were needed. Neither was the bootloader overwritten so the Windows option needed selecting from GRUB every time there was a system reboot as part of the installation process, a temporary nuisance that was tolerated since booting into Linux Mint was preserved. Again, no critical software was lost in the process apart from Kaspersky Internet Security, which needed the Windows 10 compatible version installed, much like Bitdefender, or Epson scanning software that I found was easy to reinstall anyway. Usefully, Anquet's Outdoor Map Navigator (again used for working with walking and cycling maps) continued to function properly after the changeover.
For the Windows 7 laptop, it was much the same story, albeit with the upgrade being delivered using Windows Update. Then, the main Windows account could be connected to my Outlook account to get everything tied up with the other machines for the first time. Before the obligatory change of background picture, the browns in the one that I was using were causing interface items to appear in red, not exactly my favourite colour for application menus and the like. Now they are in blue, and all the upheaval surrounding the operating system upgrade had no effect on the Dropbox or Kaspersky installations that I had in place before it all started. If there is any irritation, it is that unpinning of application tiles from the Start Menu or turning off live tiles is not always as instantaneous as I would have liked, and that is all done now anyway.
While writing the above, I could not help thinking that more observations on Windows 10 may follow, but these will do for now. Microsoft had to get this upgrade process right, and it does appear that they have, so credit is due to them for that. So far, I have Windows 10 to be stable and will be seeing how things develop from here, especially when those new features arrive occasionally as is the promise that has been made to us users. Hopefully, that will be as painless as it needs to be to ensure trust is retained.
Initial impressions of Windows 10
Being ever curious on the technology front, the release of the first build of a Technical Preview of Windows 10 was enough to get me having a look at what was on offer. The furore regarding Windows 8.x added to the interest, so I went to the download page to get a 64-bit installation ISO image.
That got installed into a fresh VirtualBox virtual machine and the process worked smoothly to give something not so far removed from Windows 8.1. However, it took until release 4.3.18 of VirtualBox before the Guest additions had caught up with the Windows prototype, so I signed up for the Windows Insider program and got a 64-bit ISO image to install the Enterprise preview of Windows 10 into a VMware virtual machine since and that supported full screen display of the preview while VirtualBox caught up with it.
Of course, the most obvious development was the return of the Start Menu, and it works exactly as expected too. Initially, the apparent lack of an easy way to disable App panels had me going to Classic Shell for an acceptable Start Menu. It was only later that it dawned on me that unpinning these panels would deliver to me the undistracting result that I wanted.
Another feature that attracted my interest is the new virtual desktop functionality. Here I was expecting something like what I have used on Linux and UNIX. There, each workspace is a distinct desktop, with only the applications open in a given workspace showing on a panel in there. Windows does not work that way with all applications visible on the taskbar regardless of what workspace they occupy, which causes clutter. Another deficiency is not having a desktop indicator on the taskbar instead of the Task View button. On Windows 7 and 8.x, I have been a user of VirtuaWin and this still works largely in the way that I expect of it too, except for any application windows that have some persistence associated with them; the Task Manager is an example and I include some security software in the same category too.
Even so, here are some keyboard shortcuts for anyone who wants to take advantage of the Windows 10 virtual desktop feature:
- Create a new desktop: Windows key + Ctrl + D
- Switch to previous desktop: Windows key + Ctrl + Left arrow
- Switch to next desktop: Windows key + Ctrl + Right arrow
Otherwise, stability is excellent for a preview of a version of Windows that is early on its road to final release. An upgrade to a whole new build went smoothly when initiated following a prompt from the operating system itself. All installed applications were retained, and a new taskbar button for notifications made its appearance alongside the existing Action Centre icon. So far, I am unsure what this does and whether the Action Centre button will be replaced in the fullness of time, yet I am happy to await where things go with this.
All is polished up to now, and there is nothing to suggest that Windows 10 will not be to 8.x what 7 was to Vista. The Start Screen has been dispatched after what has proved to be a misadventure for Microsoft. Regardless of what was hyped a few years ago, the PC still is with us; touchscreen devices like tablets are augmenting it instead of replacing it for any tasks involving some sort of creation. If anything, we have seen the PC evolve with laptops perhaps becoming more like the Surface Pro, at least when it comes to hybrid devices. However, we are not as happy to smudge our PC screens quite like those on phones and tablets, so a return to a more keyboard and mouse centred approach for some devices is welcome.
What I have here are just a few observations; there are more elsewhere, including a useful article by Ed Bott on ZDNet. All in all, we are early in the process for Windows 10 and, though it looks favourable so far, I will continue to keep an eye on how it progresses. The need to be less experimental than Windows 8.x is being fulfilled: so far, it certainly is less schizophrenic and should not be a major jump for users of Windows 7.
A look at Windows 8.1
Last week, Microsoft released a preview of Windows 8.1 and some hailed the return of the Start button, yet the reality is not as simple as that. Being a Linux user, I am left wondering if ideas have been borrowed from GNOME Shell instead of putting back the Start Menu like it was in Windows 7. What we have got is a smoothing of the interface that is there for those who like to tweak settings and not available by default. GNOME Shell has been controversial too, so borrowing from it is not an uncontentious move, even if there are people like me who are at home with that kind of interface.
What you get now is more configuration options to go with the new Start button. While right-clicking on the latter does get you a menu, this is no Start Menu like we had before. Instead, we get a settings menu with a "Shut down" entry. That's better than before, which might be saying something about what was done in Windows 8, and it produces a sub-menu with options of shutting down or restarting your PC as well as putting it to sleep. Otherwise, it is a place for accessing system configuration items and not your more usual software, not a bad thing, but it's best to be clear about these things. Holding down the Windows key and pressing X will pop up the same menu if you prefer keyboard shortcuts, and I have a soft spot for them too.

The real power is to be discovered when you right-click on the task bar and select Properties from the pop-up menu. Within the dialogue box that appears, there is the Navigation tab that contains a whole plethora of interesting options. Corner navigation can be scaled back to remove the options of switching between applications in the upper-left corner or getting what is called the Charms menu from the upper-right corner. Things get interesting in the Start Screen section. This where you tell Windows to boot to the desktop instead of the Start Screen and adjust what the Start button gives you. For instance, you can make it use your desktop background and display the Start Screen Apps View. Both of these make the new Start interface less intrusive and make the Apps View feel not unlike the way GNOME Shell overlays your screen when you hit the Activities button or hover over the upper-left corner of the desktop.
It all seems rather more like a series of little concessions, and not the restoration that some (many?) would prefer. Classic Shell still works for all those seeking an actual Start Menu and even replaces the restored Microsoft Start button too. So, if the new improvements aren't enough for you, you still can take matters into your own hands until you start to take advantage of what's new in 8.1.
Apart from the refusal to give us back a Windows 7 style desktop experience, we now have a touchscreen keyboard button added to the taskbar. So far, it always appears there even when I try turning it off. For me, that's a bug, so it's something that I'd like to see fixed before the final release.
All in all, Windows 8.1 feels more polished than Windows 8 was and will be a free update when the production version is released. My explorations have taken place within a separate VMware virtual machine because updating a Windows 8 installation to the 8.1 preview is forcing a complete re-installation on yourself later on. Though there are talks about Windows 9 now, I am left wondering if going for point releases like 8.2, 8.3, etc. might be a better strategy for Microsoft. It still looks as if Windows 8 could do with continual polishing before it gets more acceptable to users. 8.1 is a step forward, and more like it may be needed yet.
Adding a Start Menu to Windows 8
For all the world, it looks like Microsoft has mined a concept from a not often recalled series of Windows: 3.x. Then, we had a Program Manager for starting all our applications, with no sign of a Start Menu. That came with Windows 95 and I cannot see anyone mourning the burying of the Program Manager interface either. It was there in Windows 95 if you knew where to look, and I do remember starting an instance, possibly out of curiosity.
Every Windows user seems to have taken to the Start Menu, regardless of how big it can grow when you install a lot of software on your machine. It didn't matter that Windows NT got it later than Windows 9x ones either; NT 3.51 has the Program Manager too, and it was NT 4 that got the then new interface that has been developed and progressed in no less than four subsequent versions of Windows (2000, XP, Vista & 7). Maybe it was because computing was the preserve of fewer folk that the interchange brought little if any sign of a backlash. The zeitgeist of the age reflected the newness of desktop computing, and its freshness probably brought an extra level of openness too.
Things are different now, though. You only have to hear of the complaints about changes to Linux desktop environments to realise how attached folk become to certain computer interfaces. Ironically, personal computing has just got exciting again after a fairly stale decade of stasis. Mobile computing devices are aplenty nowadays, and it no longer is a matter of using a stationary desktop PC or laptop, even if those brought their own excitement in the 1990's. In fact, reading a title like Computer Shopper reminds me of how things once were with it's still sticking with PC reviews while others are not concentrating on them as much. Of course, the other gadgets get reviewed too, so it is not stuck in any rut. Still, it is good to see the desktop PC getting a look in an age when there is so much competition, especially from phones and tablets.
In this maelstrom, Microsoft has decided to do something dramatic with Windows 8. It has resurrected the Program Manager paradigm in the form of the Start screen and excised the Start Menu from the desktop altogether. For touch screen computing interfaces such as tablets, you can see the sense of this, but it's going to come as a major surprise to many. Removing what lies behind how many people interact with a PC is risky, so you have to wonder how it will work out for all concerned.
What reminded me of this was a piece on CNET by Mary Jo Foley. Interestingly, software is turning up that returns the Start Menu to Windows 8. One of these is Classic Shell, and I decided to give it a go on a Windows 8 Enterprise evaluation instance that I have. Installation is like any Windows program, and I limited the options to the menu and updater. At the end of the operation, a button with a shell icon appeared on the desktop's taskbar. You can make the resultant menu appear like that of Windows XP or Windows 7 if you like. There are other settings like what the Windows key does and what happens when you click on the button with a mouse. By default, both open the new Start Menu, and holding down the Shift key when doing either brings up the Start screen. This is customisable, so you can have things the other way around if you so desire. Another setting is to switch from the Start screen to the desktop after you log into Windows 8 (you may also have it log in for you automatically, but it's something that I do not think anyone should be doing). While the Start screen does flash up, things move along quickly; maybe having not appear at all would be better for many.
Classic Shell is free of charge and worked well for me, apart from that small rough edge noted above. It is also open source and looks well maintained too. For that reason, it appeals to me more than Stardock's Start8 (currently in beta release at the time of writing) or Pokki for Windows 8, which really is an App Store that adds a Start Menu. If you encounter Windows 8 on a new computer, then they might be worth trying should you want a Start Menu back. Being an open-minded type, I could get along with the standard Windows 8 interface, yet it's always good to have choices too. Most of us want to own our computing experience, it seems, so these tools could have their uses for Windows 8 users.
A first look at Windows 8 reveals Metro interface challenges
Even if it has been a little while, I have managed to set up a VirtualBox virtual machine to have a look at the Developer Preview of the next version of Windows, something that I and others continue to call Windows 8 though Microsoft has yet to confirm the name. When I tried the installation before, it failed on me, though that may have been due to having an earlier release of VirtualBox on my machine at that time. 4.1.14 has a preset for Windows 8 and I also happened to notice that it can create virtual hard disks that can be used with competitors like VMWare, Parallels and Virtual PC too. It's an interesting development, even if I am left wondering why you'd need to do that when VirtualBox runs on most platforms anyway.
To get back to Windows 8, the installation ran near enough without any intervention apart from stating the language you wanted to use, U.K. English in my case. On startup, the operating system presents you with a lock screen that you need to get out of the way so you can log in. It can be dragged out of your way, or you can double-click on it or use the carriage return key to get rid of it. Quite why someone thinks it's a good extra is a little beyond me, when a log in screen would suffice. Logging in gets you the new start menu or, as I prefer to think of it, screen. By default, there are a good few Metro apps installed, though I decided to rid myself of most of them.
Regarding those apps, one irritation could be that there isn't that obvious a way to switch away from them to something else. Thankfully, ALT+TAB does seem to work and it has the most instantaneous effect. Otherwise, using the Windows key or hovering over the bottom-left corner of the screen to get the menu that brings up the start screen. From the PC user's point of view, I could see this needing a little more thought because it took a little while for me to figure out what to do. Closing Metro apps isn't an option either unless you resort to the Task Manager to do so. Microsoft appears to want to leave them open from the point at which you start them until the PC is shut down. It's a design decision that leaves me unconvinced, though; thoughts of rogue apps running riot on a system come to mind. Then, a stop button could be handy.
There is no start menu as we have come to know it any more with the start screen replacing it. However, it is possible to limit what's on there to the software that you use most often and rearrange panels as you'd like them to be. Apart from hosting shortcuts for starting applications, it also acts as a task switcher like the task bar in Windows 7 and there is one of those in Windows 8 too when you jump to the desktop; handily, there's a panel for that too. Installing Firefox added a panel to the start screen, so a little thought has gone into such a common situation, and that's just as well. Still, there's more work to be done because, currently, there's no way of changing the background colour of the start screen without resorting to a hex editor or third-party tools. Still, since you can pick your own picture for the lock screen, things are not all locked down on you.
A preview of IE 10 is included and, apart from the occasional artifact when displaying one of my websites, it seems to work well enough, as does Windows Explorer. However, aside from these and a smattering of Metro apps, the Developer Preview does feel barer than previous versions of Windows. However, it does appear that applications like Notepad, PowerShell and the Command Prompt are on there, yet you need to search for these. That also means that you need to know about them too, so I'd suggest a better way of browsing the applications that are available too. This is one of the weaknesses of Ubuntu's Unity interface, and you have to search in the Dash to find them. Just starting to type in the Metro start screen (and other screens too, it seems) in Windows does trigger the completion of a search box, much like what happens in the GNOME Shell Activities screen on systems with GNOME 3. While it's good to see good ideas being reused from elsewhere, Microsoft might do well to note that you still can browse lists of applications in GNOME 3 too.
Shutting down Windows 8 also is seemingly more convoluted than is the case with Windows 7. Logging off and then powering off from the log in screen is one approach, and that was my early impression of GNOME 3 too. With the latter, I later discovered a status menu plugin that added in the option where it was accessible or that using the ALT key when clicking the status menu when the plugin wouldn't work would do what I needed. Without logging off from Windows 8, you can do a shutdown using the sidebar that appears on selecting Settings from the menu that pops up on hovering near the bottom-left corner of the start screen or the Start button of the task bar of the desktop. Then, look for the power icon and select what you need from the menu that clicking on this icon produces. Of course, you may find that the ALT+F4 key combination when issued while on a clean desktop is the cleanest of all.
All in all, the Developer Preview of the next release of Windows looks fairly usable. That is not to imply that there aren't things that need changing. Aside from this being an early sight of what may be coming to us Windows users, it isn't unknown for Microsoft to roll back on a radical move to make it more palatable to the user community. After all, it has to watch how it treats the corporate market too. The strong possibility of there being alterations is one thought that needs to be shared with those who are inclined to lose their tempers at the moment and I have seen comments with unpleasant language out there on the web (none of that here, please, by the way). As for me, I like to look ahead to be forewarned about what's coming my way in the world of computing. What I have seen so far of the next Windows release is reassuring, though there are rough edges such as PC shutdown and Metro app switching, yet Microsoft cannot commit commercial suicide either, so these have to be fixed. It appears that the world of Microsoft operating systems is in flux, with the company's keeping a firm eye on the world of mobile computing, with tablets being a major concern. While others may disagree, I can see Windows 8 working well on conventional PC's and that's no bad thing.