TOPIC: SCRIPTING LANGUAGES
Executing PowerShell scripts in Windows 11
Recently, I have added the capability to update a Hugo-driven website from a laptop running Windows 11. Compared to what you get with Linux, I do feel a little like a fish out of water when it comes to using Windows for tasks that I accomplish more often on the former. That includes running PowerShell scripts instead of their BASH counterparts. While Linux Subsystem for Windows could be an option, my machine runs Windows 11 Home, where it is unavailable. Learning the ways of the Windows Terminal cannot do any harm in any case.
The default action of not executing PowerShell scripts is not a bad approach when it comes to keeping machines secure for less technical users. For the rest, you need to learn how to use the Set-ExecutionPolicy commandlet. Doing this in a safe means doing it in a restrictive manner. Thus, I chose the following command and executed it in a terminal running with admin privileges:
Set-ExecutionPolicy -ExecutionPolicy Unrestricted -Scope CurrentUser
The scope here is for the currently logged-in user, instead of allowing every user the same capability. Some undoubtedly might suggest an execution policy of AllSigned and that adds effort that I was unwilling to expend, hence the choice that I made. This is not that critical a machine, so that is why I made the choice that I did. There was nothing too complicated about the script logic anyway.
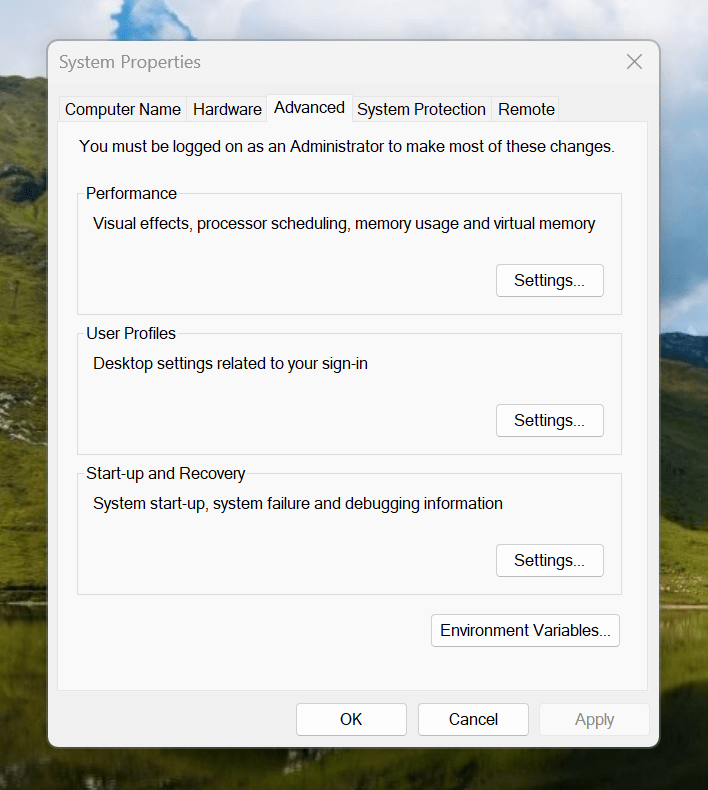
Making the script available without needing to specify the path to it was my next step. In my case, I added a new location to the Path environment variable. To accomplish that, you need to find the Control Panel, open it and go to System and Security. Then, move to System (Control Panel\System and Security\System) and click on Advanced System Settings. In the new dialogue box that appears, click on the Environment Variables... button. Next, select the Path entry and click on the Edit button. That spawns another dialogue box where I added the new path. Clicking the OK button in each dialogue box closes them all, one at a time, to get back to the Control Panel window again. That too can be closed, and any open terminals shut down and a new one opened. The process is clunky, yet it works once you know what to do.
At the end of all this, I had a scripted process for updating a Hugo-driven website. It was not as sleek as what I have on my Linux system, yet it works well enough to allow more flexibility. In time, I may refine things further.
AttributeError: module 'PIL' has no attribute 'Image'
One of my websites has an online photo gallery. This has been a long-term activity that has taken several forms over the years. Once HTML and JavaScript based, it then was powered by Perl before PHP and MySQL came along to take things from there.
While that remains how it works, the publishing side of things has used its own selection of mechanisms over the same time span. Perl and XML were the backbone until Python and Markdown took over. There was a time when ImageMagick and GraphicsMagick handled image processing, but Python now does that as well.
That was when the error message gracing the title of this post came to my notice. Everything was working well when executed in Spyder, but the message appears when I tried running things using Python on the command line. PIL is the abbreviated name for the Python 3 pillow package; there was one called PIL in the Python 2 days.
For me, pillow loads, resizes and creates new images, which is handy for adding borders and copyright/source information to each image as well as creating thumbnails. All this happens in memory and that makes everything go quickly, much faster than disk-based tools like ImageMagick and GraphicsMagick.
Of course, nothing is going to happen if the package cannot be loaded, and that is what the error message is about. Linux is what I mainly use, so that is the context for this scenario. What I was doing was something like the following in the Python script:
import PIL
Then, I referred to PIL.Image when I needed it, and this could not be found when the script was run from the command line (BASH). The solution was to add something like the following:
from PIL import Image
That sorted it, and I must have run into trouble with PIL.ImageFilter too, since I now load it in the same manner. In both cases, I could just refer to Image or ImageFilter as I required and without the dot syntax. However, you need to make sure that there is no clash with anything in another loaded Python package when doing this.
Upgrading Julia packages
Whenever a new version of Julia is released, I have certain actions to perform. With Julia 1.10, installing and updating it has become more automated thanks to shell scripting or the use of WINGET, depending on your operating system. Because my environment predates this, I found that the manual route still works best for me, and I will continue to do that.
Returning to what needs doing after an update, this includes updating Julia packages. In the REPL, this involves dropping to the PKG subshell using the ] key if you want to avoid using longer commands or filling your history with what is less important for everyday usage.
Previously, I often ran code to find a package was missing after updating Julia, so the add command was needed to reinstate it. That may raise its head again, but there also is the up command for upgrading all packages that were installed. This could be a time saver when only a single command is needed for all packages and not one command for each package as otherwise might be the case.
String replacement in BASH scripting
During creation of new posts for a Hugo deployed website, I found myself using the same directories again and again. Since I invariably ended up making typing mistakes when I did so, I fancied the idea of using shortcodes instead.
Because I wanted to turn the shortcode into the actual directory name, I chose the use of text replacement in BASH scripting. Thankfully, this is simple and avoids the use of regular expressions, which can bring their own problems. The essential syntax is as follows:
variable="${variable/search text/replacement}"
For the variable, the search text is substituted with the replacement straightforwardly. It is even possible to include the search and replacement text in variables. In the example below, this is achieved using variables called original and replacement.
variable="${variable/$original/$replacement}"
Doing this got me my translatable shortcodes and converted them into actual directory names for the hugo command to process. There may be other uses yet.
Another way to supply the terminal output of one BASH command to another
My usual way for sending the output of one command to another is to be place one command after another, separated by the pipe (|) operator, adjusting the second command as needed. However, I recently found that this approach does not work well for docker pull commands until I uncovered another option.
The solution is to enclose the input command in $( ) within the output command. Within the parentheses, any kind of command can be declared and includes anything with piping as part of it. As long as text is being printed to the terminal, it can be fed to the second command and used as required. Thus, you can have something like the following:
docker pull $([command outputting name of image to download])
This approach has helped with other kinds of automation of docker image and container use and deployment because it is so general. There may be other uses found for the approach yet.
Removing duplicate characters from strings using BASH scripting
Recently, I wanted to extract some text from the Linux command by word number only for multiple spaces to make things less predictable. The solution was to remove the duplicate spaces. This can be done using sed, but you add the complexity of regular expressions if you opt for that solution. Instead, the tr command offers a neater approach. For removing duplicate spaces, the command takes the following form:
echo "test test" | tr -s " "
Since I was piping some text to the command, that is what I have above. The tr command is intended to replace or delete characters, and the -s switch is a shorthand for --squeeze-repeats. The actual character to be deduplicated is passed in quotes at the end; here, it is a space, but it could be anything that is duplicated. The resulting text in this example becomes:
test test
After the processing, there is now only one space separating the two words, which is the solution that I sought. It certainly cut out any variability that I was encountering in my usage.
Rendering Markdown into HTML using PHP
One of the good things about using virtual private servers for hosting websites instead of shared hosting or using a web application service like WordPress.com or Tumblr is that you get added control and flexibility. There was a time when HTML, CSS and client-side scripting were all that was available from the shared hosting providers that I was using back then. Then, static websites were my lot until it became possible to use Perl server side scripting. PHP predominates now, but Python or Ruby cannot be discounted either.
Being able to install whatever you want is a bonus as well, though it means that you also are responsible for the security of the containers that you use. There will be infrastructure security, but that of your own machine will be your own concern. Added power always means added responsibility, as many might say.
The reason that these thought emerge here is that getting PHP to render Markdown as HTML needs the installation of Composer. Without that, you cannot use the CommonMark package to do the required back-work. All the command that you see here will work on Ubuntu 22.04. First, you need to download Composer and executing the following command will accomplish this:
curl https://getcomposer.org/installer -o /tmp/composer-setup.php
Before the installation, it does no harm to ensure that all is well with the script before proceeding. That means that capturing the signature for the script using the following command is wise:
HASH=`curl https://composer.github.io/installer.sig`
Once you have the script signature, then you can check its integrity using this command:
php -r "if (hash_file('SHA384', '/tmp/composer-setup.php') === '$HASH') { echo 'Installer verified'; } else { echo 'Installer corrupt'; unlink('composer-setup.php'); } echo PHP_EOL;"
The result that you want is "Installer verified". If not, you have some investigating to do. Otherwise, just execute the installation command:
sudo php /tmp/composer-setup.php --install-dir=/usr/local/bin --filename=composer
With Composer installed, the next step is to run the following command in the area where your web server expects files to be stored. That is important when calling the package in a PHP script.
composer require league/commonmark
Then, you can use it in a PHP script like so:
define("ROOT_LOC",$_SERVER['DOCUMENT_ROOT']);

include ROOT_LOC . '/vendor/autoload.php';

use League\CommonMark\CommonMarkConverter;

$converter = new CommonMarkConverter();

echo $converter->convertToHtml(file_get_contents(ROOT_LOC . '<location of markdown file>));
The first line finds the absolute location of your web server file directory before using it when defining the locations of the autoload script and the required markdown file. The third line then calls in the CommonMark package, while the fourth sets up a new object for the desired transformation. The last line converts the input to HTML and outputs the result.
If you need to render the output of more than one Markdown file, then repeating the last line from the preceding block with a different file location is all you need to do. The CommonMark object persists and can be used like a variable without needing the reinitialisation to be repeated every time.
The idea of building a website using PHP to render Markdown has come to mind, but I will leave it at custom web pages for now. If an opportunity comes, then I can examine the idea again. Before, I had to edit HTML, but Markdown is friendlier to edit, so that is a small advance for now.
Resolving a clash between Homebrew and Python
For reasons that I cannot recall now, I installed the Hugo static website generator on my Linux system and web servers using Homebrew. The only reason that I suggest is that it might have been a way to get the latest version at the time because Linux Mint only does major changes like that every two years, keeping it in line with long-term support editions of Ubuntu.
When Homebrew was installed, it changed the lookup path for command line executables by adding the following line to my .bashrc file:
eval "$(/home/linuxbrew/.linuxbrew/bin/brew shellenv)"
This executed the following lines:
export HOMEBREW_PREFIX="/home/linuxbrew/.linuxbrew";

export HOMEBREW_CELLAR="/home/linuxbrew/.linuxbrew/Cellar";

export HOMEBREW_REPOSITORY="/home/linuxbrew/.linuxbrew/Homebrew";

export PATH="/home/linuxbrew/.linuxbrew/bin:/home/linuxbrew/.linuxbrew/sbin${PATH+:$PATH}";

export MANPATH="/home/linuxbrew/.linuxbrew/share/man${MANPATH+:$MANPATH}:";

export INFOPATH="/home/linuxbrew/.linuxbrew/share/info:${INFOPATH:-}";
While the result suits Homebrew, it changed the setup of Python and its packages on my system. Eventually, this had undesirable consequences, like messing up how Spyder started, so I wanted to change this. There are other things that I have automated using Python and these were not working either.
One way that I have seen suggested is to execute the following command, but I cannot vouch for this:
brew unlink python
What I did was to comment out the offending line in .bashrc and replace it with the following:
export PATH="$PATH:/home/linuxbrew/.linuxbrew/bin:/home/linuxbrew/.linuxbrew/sbin"
export HOMEBREW_PREFIX="/home/linuxbrew/.linuxbrew";

export HOMEBREW_CELLAR="/home/linuxbrew/.linuxbrew/Cellar";

export HOMEBREW_REPOSITORY="/home/linuxbrew/.linuxbrew/Homebrew";
export MANPATH="/home/linuxbrew/.linuxbrew/share/man${MANPATH+:$MANPATH}:";

export INFOPATH="${INFOPATH:-}/home/linuxbrew/.linuxbrew/share/info";
The first command adds Homebrew paths to the end of the PATH variable rather than the beginning, which was the previous arrangement. This ensures system folders are searched for executable files before Homebrew folders. It also means Python packages load from my user area instead of the Homebrew location, which happened under Homebrew's default configuration. When working with Python packages, remember not to install one version at the system level and another in your user area, as this creates conflicts.
So far, the result of the Homebrew changes is not unsatisfactory, and I will watch for any rough edges that need addressing. If something comes up, then I will set things up in another way.
A look at the Julia programming language
Several open-source computing languages get mentioned when talking about working with data. Among these are R and Python, but there are others; Julia is another one of these. It took a while before I got to check out Julia because I felt the need to get acquainted with R and Python beforehand. There are others like Lua to investigate too, but that can wait for now.
With the way that R is making an incursion into clinical data reporting analysis following the passage of decades when SAS was predominant, my explorations of Julia are inspired by a certain contrariness on my part. Alongside some small personal projects, there has been some reading in (digital) book form and online. Concerning the latter of these, there are useful tutorials like Introduction to Data Science: Learn Julia Programming, Maths & Data Science from Scratch or Julia Programming: a Hands-on Tutorial. Like what happens with R, there are online versions of published books available free of charge, and they include Interactive Visualization and Plotting with Julia. Video learning can help too and Jane Herriman has recorded and shared useful beginner's guides on YouTube that start with the basics before heading onto more advanced subjects like multiple dispatch, broadcasting and metaprogramming.
This piece of learning has been made of simple self-inspired puzzles before moving on to anything more complex. That differs from my dalliance with R and Python, where I ventured into complexity first, not least because of testing them out with public COVID data. Eventually, I got around to doing that with Julia too, though my interest was beginning to wane by then, and Julia's abilities for creating multipage PDF files were such that the PDF Toolkit was needed to help with this. Along the way, I have made use of such packages as CSV.jl, DataFrames.jl, DataFramesMeta, Plots, Gadfly.jl, XLSX.jl and JSON3.jl, among others. After that, there is PrettyTables.jl to try out, and anyone can look at the Beautiful Makie website to see what Makie can do. There are plenty of other packages creating graphs, such as SpatialGraphs.jl, PGFPlotsX and GRUtils.jl. For formatting numbers, options include Format.jl and Humanize.jl.
So far, my primary usage has been with personal financial data together with automated processing and backup of photo files. The photo file processing has taken advantage of the ability to compile Julia scripts for added speed because just-in-time compilation always means there is a lag before the real work begins.
VS Code is my chosen editor for working with Julia scripts, since it has a plugin for the language. That adds the REPL, syntax highlighting, execution and data frame viewing capabilities that once were added to the now defunct Atom editor by its own plugin. While it would be nice to have a keyboard shortcut for script execution, the whole thing works well and is regularly updated.
Naturally, there have been a load of queries as I have gone along and the Julia Documentation has been consulted as well as Julia Discourse and Stack Overflow. The latter pair have become regular landing spots on many a Google search. One example followed a glitch that I encountered after a Julia upgrade when I asked a question about this and was directed to the XLSX.jl Migration Guides where I got the information that I needed to fix my code for it to run properly.
There is more learning to do as I continue to use Julia for various things. Once compiled, it does run fast like it has been promised. The syntax paradigm is akin to R and Python, but there are Julia-specific features too. If you have used the others, the learning curve is lessened but not eliminated completely. This is not an object-oriented language as such, but its functional nature makes it familiar enough for getting going with it. In short, the project has come a long way since it started more than ten years ago. There is much for the scientific programmer, but only time will tell if it usurped its older competitors. For now, I will remain interested in it.
Removing a Julia package using REPL or script commands
While I have been programming with SAS for a few decades, and it remains a linchpin in the world of clinical development in the pharmaceutical industry, other technologies like R and Python are gaining a foothold. Two years ago, I started to look at those languages with personal projects being a great way of facilitating this. In addition, I got to hear of Julia and got to try that too. That journey continues since I have put it into use for importing and backing up photos, and there are other possible uses too.
Recently, I updated Julia to version 1.8.2 but ran into a problem with the DataArrays package that I had installed, so I decided to remove it since it was added during experimentation. Though the Pkg package that is used for package management is documented, I had not got to that, which meant that some web searching ensued. It turns out that there are two ways of doing this. One uses the REPL: after pressing the ] key, the following command gets issued:
rm DataArrays
When all is done, pressing the delete or backspace keys returns things to normal. This also can be done in a script as well as the REPL, and the following line works in both instances:
using Pkg; Pkg.rm("DataArrays")
While the semicolon is used to separate two commands issued on the same line, they can be on different lines or issued separately just as well. Naturally, DataArrays is just an example here; you just replace that with the name of whatever other package you need to remove. Since we can get carried away when downloading packages, there are times when a clean-up is needed to remove redundant packages, so knowing how to remove any clutter is invaluable.