TOPIC: MYSQL
Understanding and Managing MySQL Binary Log Files
When a MySQL server begins filling a disk with files named along the lines of server-bin.n or mysql-bin.00000n, where n is an incrementing number, the immediate concern is usually storage pressure. These files typically live in /var/lib/mysql and can accumulate steadily or very quickly depending on workload. While they may look obscure at first glance, they are neither random nor a sign of corruption. They are MySQL binary log files, commonly shortened to binlogs, and they exist for specific operational reasons.
What Binary Logs Are and What They Do
Understanding what these files do is the first step towards deciding whether they should remain enabled. The binary log contains all statements that update data or that potentially could have updated it, including operations such as DELETE or UPDATE where no rows were matched. Rather than being a plain text history, the log stores events describing those modifications and also includes information about how long each data-changing statement took to execute. In practical terms, the binary log forms a continuous stream of change activity on the server.
That design serves two important purposes. The first is data recovery: after a backup file has been restored, the events recorded in the binary log after that backup was made are re-executed, bringing the databases up to date from the point of the backup. The second is high availability and replication: the binary log is used on primary replication servers as a record of the statements to be sent to secondary servers. It is worth noting that it is actually the replica that pulls log data from the primary, rather than the primary pushing it outward. Without binlogs, that style of replication cannot function at all.
Before Making Any Changes
Because of those uses, any change to binary logging should be made with care. Changes to MySQL server settings and to binlog files should be made only when verified backups already exist, as mistakes can lead to data corruption or loss. If a server is important, caution matters more than convenience.
It is also worth noting that from MySQL 8.0 onwards, binary logging is enabled by default, with the log_bin system variable set to ON whether or not the --log-bin option is specified explicitly. This is a significant change from earlier versions, where binary logging had to be switched on manually. Commenting out log_bin may not switch it off in newer versions, which is consistent with this change in default behaviour and is one reason why simply commenting out that directive may not always produce the expected result.
Disabling Binary Logging
On systems where replication is not in use and point-in-time recovery is not needed, disabling binary logging may be a reasonable choice. The conventional approach is to open /etc/my.cnf or /etc/mysql/my.cnf and find the line that reads log_bin, then remove or comment it out:
#log_bin = /var/log/mysql/mysql-bin.logThe following related settings for automatic expiry and maximum log file size can also be commented out if binary logging is being disabled entirely:
#expire_logs_days = 10
#max_binlog_size  = 100M
Once the file is saved, the server needs to be restarted. On many Linux systems, that means running one of the following:
service mysql restartor:
systemctl restart mysqlFollowing a restart, it is worth confirming the service came back cleanly:
systemctl status mysqlIf disabling binary logging does not produce the expected result, the safest course is to check the active MySQL version and review the matching vendor documentation for that release, as configuration behaviour is not always identical across versions and distributions. In MySQL 8.0 and later, the preferred startup options for disabling binary logging are --skip-log-bin or --disable-log-bin rather than commenting out log_bin alone.
Replication and the Case for Keeping Binlogs
For servers that are using replication, disabling binary logs is not a realistic option. If the primary does not log, there is nothing for the replica to download and apply, and replication cannot proceed. In those cases, the question is not whether to keep the files but how to manage their growth sensibly, and that is where retention settings and manual purging come in.
MySQL provides built-in ways to expire old binlogs automatically. With expire_logs_days = 10 in the configuration file, logs older than ten days are purged automatically by the MySQL server, removing the need for manual intervention under normal circumstances. Automatic expiry is often the simplest route on systems where a fixed retention window is acceptable and where replication lag, or backup policies do not require logs to be kept for longer.
Purging Binary Logs Manually
Manual purging remains useful in several situations: storage may already be tight, log growth may have exceeded expectations, or a one-off clean-up may be needed after a burst of activity. For those cases, the MySQL client can issue purge commands directly. The first example removes everything before a named log file, and the second removes everything before a given date and time:
mysql -u root -p 'MyPassword' -e "PURGE BINARY LOGS TO 'mysql-bin.03';"mysql -u root -p 'MyPassword' -e "PURGE BINARY LOGS BEFORE '2008-12-15 10:06:06';"It is also possible to remove logs older than a specified interval using a relative expression:
mysql -u root -p -e "PURGE BINARY LOGS BEFORE DATE_SUB(NOW(), INTERVAL 7 DAY);"Any purge action on a replicated environment should be timed so that replicas have already consumed the relevant logs. Purging logs that a replica still needs will break replication. A more drastic option, RESET MASTER (or RESET BINARY LOGS AND GTIDS in MySQL 8.4 and later), deletes all binary log files and resets the binary log index entirely, and should be approached with corresponding caution rather than used as a routine housekeeping measure.
Securing Database Credentials
One practical concern in the purge examples above is authentication. Placing a password directly on the command line is a security risk because command-line passwords can be exposed to other users through shell history or process inspection. A more secure alternative is to store connection details using the mysql_config_editor utility, which writes credentials to an obfuscated file named .mylogin.cnf.
On non-Windows systems, that file lives in the current user's home directory, and each group of settings within it is called a login path. A login path can store host, user, password, port and socket values. A default client login path is created with the following command, after which the password is entered at a prompt and is not echoed to the screen:
mysql_config_editor set --login-path=client --host=localhost --user=localuser --passwordAdditional login paths can be added for other servers. MySQL clients can then use those stored credentials like so:
mysql --login-path=clientA purge command written with a stored login path then becomes:
mysql --login-path=client -e "PURGE BINARY LOGS BEFORE DATE_SUB(NOW(), INTERVAL 7 DAY);"That form is easier to automate cleanly and keeps credentials out of shell history. Client programmes still read .mylogin.cnf even when --no-defaults is used, unless --no-login-paths is specified, which gives administrators a safer way to avoid command-line passwords without giving up flexible client behaviour.
The Relationship Between mysqlcheck and Binary Logging
It is also worth understanding how table maintenance tools interact with binary logging because they can contribute to log growth in ways that are not immediately obvious. The mysqlcheck utility performs table maintenance operations, including checking, repairing, analysing and optimising tables, while the server is running. The --write-binlog option is enabled by default for ANALYZE TABLE, OPTIMIZE TABLE and REPAIR TABLE statements generated by mysqlcheck, meaning those statements are written to the binary log unless instructed otherwise.
Using --skip-write-binlog adds NO_WRITE_TO_BINLOG to those statements, preventing them from being recorded in the binary log. That can matter if maintenance operations should not be sent to replicas or replayed during recovery from backup. It is also important to note that InnoDB tables can be checked with CHECK TABLE but cannot be repaired with REPAIR TABLE, and that taking a backup before attempting any repair operation is advisable because some circumstances can result in data loss. Binary logging records change events at the server level rather than belonging to any single storage engine, so the presence of InnoDB does not in itself remove binlogs from the picture.
Managing MySQL Binary Log Files: A Practical Summary
For administrators trying to decide what to do when binlogs are consuming disk space, context is everything. A development server with no replication and no need for point-in-time recovery may be a sensible candidate for disabling binary logging. A production server participating in replication or relying on binlogs for recovery should retain them and focus instead on retention settings, controlled purging and an understanding of what workloads are causing rapid log rotation.
The practical path is to begin with the role and requirements of the server rather than with deletion. If the server does not need binary logs, use --skip-log-bin or --disable-log-bin at startup (or comment out log_bin on older versions) and then verify whether the change actually took effect for the installed version. If the server does need them, review retention settings such as expire_logs_days, use purge commands carefully when necessary and avoid exposing passwords on the command line by using mysql_config_editor and stored login paths. Where maintenance commands are involved, remember that mysqlcheck writes certain statements to the binary log by default unless --skip-write-binlog is specified. Binlog files are part of the server's change history and can be central to recovery and replication; when they begin to dominate a file system, the right response depends on what the server is expected to do and how carefully housekeeping is carried out.
How complexity can blind you
Visitors may not have noticed it, but I was having a lot of trouble with this website. Intermittent slowdowns beset any attempt to add new content or perform any other administration. This was not happening on any other web portal that I had, even one sharing the same publishing software.
Even so, WordPress did get the blame at first, at least when deactivating plugins had no effect. Then, it was the turn of the web server, resulting in a move to something more powerful and my leaving Apache for Nginx at the same time. Redis caching was another suspect, especially when things got in a twist on the new instance. As if that were not enough, MySQL came in for some scrutiny too.
Finally, another suspect emerged: Cloudflare. Either some settings got mangled or something else was happening, but cutting out that intermediary was enough to make things fly again. Now, I use bunny.net for DNS duties instead, and the simplification has helped enormously; the previous layering was no help with debugging. With a bit of care, I might add some other tools behind the scenes while taking things slowly to avoid confusion in the future.
Dealing with Error 1064 in MySQL queries
Recently, I was querying a MySQL database table and got a response like the following:
ERROR 1064 (42000): You have an error in your SQL syntax; check the manual that corresponds to your MySQL server version for the right syntax to use
The cause was that one of the data column columns was named using the MySQL reserved word key. While best practice is not to use reserved words like this at all, this was not something that I could alter. Therefore, I enclosed the offending keyword in backticks (`) to make the query work.
There is more information in the MySQL documentation on Schema Object Names and on Keywords and Reserved Words for dealing with or avoiding this kind of situation. While I realise that things change over time and that every implementation of SQL is a little different, it does look as if not using established keywords should be a minimum expectation when any database tables get created.
Disabling the SSL connection requirement in MySQL Workbench
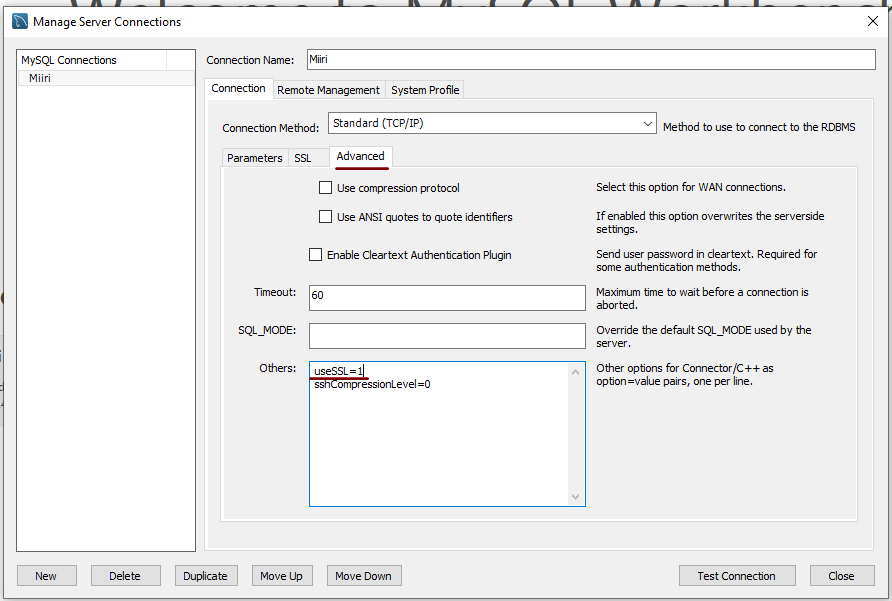
A while ago, I found that MySQL Workbench would only use SSL connections and that was stopping it from connecting to local databases. Thus, I looked for a way to override this: the cure was to go to Database > Manage Connections... in the menus for the application's home tab. In the dialogue box that appeared, I chose the connection of interest and went to the Advanced panel under Connection and removed the line useSSL=1 from the Others field. The screenshot below shows you what things looked like before the change was made. Naturally, the best practice would be to secure a remote database connection using SSL, so this approach is best reserved for remote non-production databases. While it may be that this does not happen now, I thought I would share this in case the problem persists for anyone.
Controlling display of users on the logon screen in Linux Mint 20.3
Recently, I tried using Commento with a static website that I was developing and this needed PostgreSQL rather than MySQL or MariaDB, which many content management tools use. That meant a learning curve that made me buy a book, as well as the creation of a system account for administering PostgreSQL. These are not the kind of things that you want to be too visible, so I wanted to hide them.
Since Linux Mint uses AccountsService, you cannot use lightdm to do this (the comments in /etc/lightdm/users.conf suggest as much). Instead, you need to go to /var/lib/AccountsService/users and look for a file called after the username. If one exists, all that is needed is for you to add the following line under the [User] section:
SystemAccount=true
If there is no file present for the user in question, then you need to create one with the following lines in there:
[User]
SystemAccount=true
Once the configuration files are set up as needed, AccountsService needs to be restarted and the following command does that deed:
sudo systemctl restart accounts-daemon.service
Logging out should reveal that the user in question is not listed on the logon screen as required.
Moving a website from shared hosting to a virtual private server
This year has seen some optimisation being applied to my web presences, guided by the results of GTMetrix scans. It was then that I realised how slow things were, so server loads were reduced. Anything that slowed response times, such as WordPress plugins, got removed. Usage of Matomo also was curtailed in favour of Google Analytics, while HTML, CSS and JS minification followed. Something that had yet to happen was a search for a faster server. Now, another website has been moved onto a virtual private server (VPS) to see how that would go.
Speed was not the only consideration, since security was a factor too. After all, a VPS is more locked away from other users than a folder on a shared server. There also is the added sense of control, so Let's Encrypt SSL certificates can be added using the Electronic Frontier Foundation's Certbot. That avoids the expense of using an SSL certificate provided through my shared hosting provider, and a successful transition for my travel website may mean that this one undergoes the same move.
For the VPS, I chose Ubuntu 18.04 as its operating system, and it came with the LAMP stack already in place. Have offload development websites, the mix of Apache, MySQL and PHP is more familiar to me than anything using Nginx or Python. It also means that .htaccess files become more useful than they were on my previous Nginx-based platform. Having full access to the operating system using SSH helps too and should mean that I have fewer calls on technical support since I can do more for myself. Any extra tinkering should not affect others either, since this type of setup is well known to me and having an offline counterpart means that anything riskier is tried there beforehand.
Naturally, there were niggles to overcome with the move. The first to fix was to make the MySQL instance accept calls from outside the server so that I could migrate data there from elsewhere, and I even got my shared hosting setup to start using the new database to see what performance boost it might give. To make all this happen, I first found the location of the relevant my.cnf configuration file using the following command:
find / -name my.cnf
Once I had the right file, I commented out the following line that it contained and restarted the database service afterwards, using another command to stop the appearance of any error 111 messages:
bind-address 127.0.0.1
service mysql restart
After that, things worked as required and I moved onto another matter: uploading the requisite files. That meant installing an FTP server, so I chose proftpd since I knew that well from previous tinkering. Once that was in place, file transfer commenced.
When that was done, I could do some testing to see if I had an active web server that loaded the website. Along the way, I also instated some Apache modules like mod-rewrite using the a2enmod command, restarting Apache each time I enabled another module.
Then, I discovered that Textpattern needed php-7.2-xml installed, so the following command was executed to do this:
apt install php7.2-xml
Then, the following line was uncommented in the correct php.ini configuration file that I found using the same method as that described already for the my.cnf configuration and that was followed by yet another Apache restart:
extension=php_xmlrpc.dll
Addressing the above issues yielded enough success for me to change the IP address in my Cloudflare dashboard so it pointed at the VPS and not the shared server. The changeover happened seamlessly without having to await DNS updates as once would have been the case. It had the added advantage of making both WordPress and Textpattern work fully.
With everything working to my satisfaction, I then followed the instructions on Certbot to set up my new Let's Encrypt SSL certificate. Aside from a tweak to a configuration file and another Apache restart, the process was more automated than I had expected, so I was ready to embark on some fine-tuning to embed the new security arrangements. That meant updating .htaccess files and Textpattern has its own, so the following addition was needed there:
RewriteCond %{HTTPS} !=on

RewriteRule ^ https://%{HTTP_HOST}%{REQUEST_URI} [R=301,L]
This complemented what was already in the main .htaccess file, and WordPress allows you to include http(s) in the address it uses, so that was another task completed. The general .htaccess only needed the following lines to be added:
RewriteCond %{SERVER_PORT} 80

RewriteRule ^(.*)$ https://www.assortedexplorations.com/$1 [R,L]
What all these achieve is to redirect insecure connections to secure ones for every visitor to the website. After that, internal hyperlinks without https needed updating along with any forms so that a padlock sign could be shown for all pages.
With the main work completed, it was time to sort out a lingering niggle regarding the appearance of an FTP login page every time a WordPress installation or update was requested. The main solution was to make the web server account the owner of the files and directories, but the following line was added to wp-config.php as part of the fix even if it probably is not necessary:
define('FS_METHOD', 'direct');
There also was the non-operation of WP Cron and that was addressed using WP-CLI and a script from Bjorn Johansen. To make double sure of its effectiveness, the following was added to wp-config.php to turn off the usual WP-Cron behaviour:
define('DISABLE_WP_CRON', true);
Intriguingly, WP-CLI offers a long list of possible commands that are worth investigating. A few have been examined, but more await attention.
Before those, I still need to get my new VPS to send emails. So far, sendmail has been installed, the hostname changed from localhost and the server restarted. More investigations are needed, but what I have not is faster than what was there before, so the effort has been rewarded already.
Setting up MySQL on Sabayon Linux
For quite a while now, I have offline web servers for doing a spot of tweaking and tinkering away from the gaze of web users that visit what I have on there. Therefore, one of the tests that I apply to any prospective main Linux distro is the ability to set up a web server on there. This is more straightforward for some than for others. For Ubuntu and Linux Mint, it is a matter of installing the required software and doing a small bit of configuration. My experience with Sabayon is that it needs a little more effort than this, so I am sharing it here for the installation of MySQL.
The first step is to install the software using the commands that you find below. The first pops the software onto the system while the second completes the set-up. The --basedir option is need with the latter because it won't find things without it. It specifies the base location on the system, and it's /usr in my case.
sudo equo install dev-db/mysql

sudo /usr/bin/mysql_install_db --basedir=/usr
With the above complete, it's time to start the database server and set the password for the root user. That's what the two following commands achieve. Once your root password is set, you can go about creating databases and adding other users using the MySQL command line
sudo /etc/init.d/mysql start

mysqladmin -u root password 'password'
The last step is to set the database server to start every time you start your Sabayon system. The first command adds an entry for MySQL to the default run level so that this happens. The purpose of the second command is to check that this happened before restarting your computer to discover if it really happens. This procedure also is necessary for having an Apache web server behave in the same way, so the commands are worth having and even may have a use for other services on your system. ProFTP is another that comes to mind, for instance.
sudo rc-update add mysql default

sudo rc-update show | grep mysql
Sorting out MySQL on Arch Linux
Seeing Arch Linux running so solidly in a VirtualBox virtual box has me contemplating whether I should have it installed on a real PC. Saying that, recent announcements regarding the implementation of GNOME 3 in Linux Mint have caught my interest, even if the idea of using a rolling distribution as my main home operating system still has a lot of appeal for me. Having an upheaval come my way every six months when a new version of Linux Mint is released is the main cause of that.
While remaining undecided, I continue to evaluate the idea of Arch Linux acting as my main OS for day-to-day home computing. Towards that end, I have set up a working web server instance on there using the usual combination of Apache, Perl, PHP and MySQL. Of these, it was MySQL that went the least smoothly of all because the daemon wouldn't start for me.
It was then that I started to turn to Google for inspiration, and a range of actions resulted that combined to give the result that I wanted. One problem was a lack of disk space caused by months of software upgrades. Since tools like it in other Linux distros allow you to clear some disk space of obsolete installation files, I decided to see if it was possible to do the same with pacman, the Arch Linux command line package manager. The following command, executed as root, cleared about 2 GB of cruft for me:
pacman -Sc
The S in the switch tells pacman to perform package database synchronization, while the c instructs it to clear its cache of obsolete packages. In fact, using the following command as root every time an update is performed both updates software and removes redundant or outmoded packages:
pacman -Syuc
So I don't forget the needful housekeeping, this will be what I use from this point forward, with y being the switch for a refresh and u triggering a system upgrade. It's nice to have everything happen together without too much effort.
To do the required debugging that led me to the above along with other things, I issued the following command:
mysqld_safe --datadir=/var/lib/mysql/ &
This starts up the MySQL daemon in safe mode if all is working properly, and it wasn't in my case. Nevertheless, it creates a useful log file called myhost.err in /var/lib/mysql/. This gave me the messages that allowed the debugging of what was happening. It led me to installing net-tools and inettools using pacman; it was the latter of these that put hostname on my system and got the MySQL server startup a little further along. Other actions included unlocking the ibdata1 data file and removing the ib_logfile0 and ib_logfile1 files to gain something of a clean sheet. The kill command was used to shut down any lingering mysqld sessions too. To ensure that the ibdata1 file was unlocked, I executed the following commands:
mv ibdata1 ibdata1.bad

cp -a ibdata1.bad ibdata1
These renamed the original and then crafted a new duplicate of it, with the -a switch on the cp command forcing copying with greater integrity than normal. Along with the various file operations, I also created a link to my.cnf, the MySQL configuration file on Linux systems, in /etc using the following command executed by root:
ln -s /etc/mysql/ my.cnf /etc/my.cnf
While I am unsure if this made a real difference, uncommenting the lines in the same file that pertained to InnoDB tables. What directed me to these were complaints from mysqld_safe in the myhost.err log file. All I did was to uncomment the lines beginning with innodb and these were 116-118, 121-122 and 124-127 in my configuration file, but it may be different in yours.
After all the above, the MySQL daemon ran happily and, more importantly, started when I rebooted the virtual machine. Thinking about it now, I believe that it was a lack of disk space, the locking of a data file and the lack of InnoDB support that was stopping the MySQL service from running. Running commands like mysqld start weren't yielding useful messages, so a lot of digging was needed to get the result that I needed. In fact, that's one of the reasons why I am sharing my experiences here.
In the end, creating databases and loading them with data were all that was needed for me to start to see functioning websites on my (virtual) Arch Linux system. It turned out to be another step on the way to making it workable as a potential replacement for the Linux distributions that I use most often (Linux Mint, Fedora and Ubuntu).
A waiting game
Having been away every weekend in July, I was looking forward to a quiet one at home to start August. However, there was a problem with one of my websites hosted by Fasthosts that was set to occupy me for the weekend and a few weekday evenings afterwards.
Since the issue appeared to be slow site response, I followed advice given to me by second line support when this website displayed the same type of behaviour: upgrade from Apache 1.3 to 2.2 using the control panel. Unfortunately for me, that didn't work smoothly at all and there seemed to be serious file loss as a result. Raising a ticket with the support desk only got me the answer that I had to wait for completion, and I now have come to the conclusion that the migration process may have got stuck somewhere along the way. Maybe another ticket is in order.
Several factors contributed to the waiting period referenced in the post title. First, support response times for budget hosting packages are notably slow, which makes me question whether higher-profile websites receive better service. Second, restoring websites via FTP consumes significant time, as does rebuilding and repopulating databases. Third, DNS configuration changes also introduce delays.
In retrospect, these time demands might be reduced through various approaches. Phone support could prove faster than email tickets, unless during major incidents, like the security changeover that left numerous Fasthosts users waiting for hours one night. However, phone support isn't a universal solution, as we've known since those cautionary tales began circulating in the mid-1990's.
Regular backups would streamline restoration processes. While my existing backups were adequate, they weren't comprehensive, necessitating additional work later. As for DNS changes, more frequent PC restarts would help detect propagation sooner, a lesson I will remember despite having no immediate plans to relocate websites. Ultimately, accelerating DNS propagation makes a substantial difference in minimizing downtime.
While awaiting a response from Fasthosts, I began to ponder the idea of using an alternative provider. Perusal of the latest digital edition of .Net (I now subscribe to the non-paper edition to cut down on the clutter caused by having paper copies about the place) ensued before I decided to investigate the option of using Webfusion. Having decided to stick with shared hosting, I gave their Unlimited Linux option a go. For someone accustomed to monthly billing, it was unusual to see annual biannual and triannual payment schemes too. Because the first of these appears to be the default option, a little care and attention is needed if you want something else. Also, Webfusion offers a sliding scale pricing model: the longer your commitment period, the lower your monthly hosting cost becomes; it is a pricing structure designed to encourage longer-term subscriptions.
Once the account was set up, I added a database and set to the long process of uploading files from my local development site using FileZilla. Having got a MySQL backup from the Fasthosts site, I used the provided PhpMyAdmin interface to upload the data in a piecemeal manner without exceeding the 8 MB file size limitation. It isn't possible to connect remotely to the MySQL server using the likes of MySQL Administrator, while SSH is another connection option that isn't available. There were some questions for the support people along the way; the first of these got a timely answer, though later ones took longer before I got an answer. Still, getting advice on the address of the test website was a big help while I was sorting out the DNS changeover.
Regarding domain setup, it required considerable effort and searching through Webfusion's FAQ's before I succeeded. Initially, I attempted to use name servers mentioned in an article, but this approach failed to achieve my goal. The effects might have been noticed sooner had I rebooted my PC earlier, though this didn't occur to me at the time. Ultimately, I reverted to using my domain provider's name servers and configured them with the necessary information. This solution successfully brought my website back online, allowing me to address any remaining issues.
With the site essentially operating again, it was time to iron out the rough edges. The biggest of these was that MOD_REWRITE doesn't seem to work the same on the Webfusion server like it does on the Fasthosts ones. This meant that I needed to use the SCRIPT_URI CGI variable instead of PATH_INFO to keep using clean URL's for a PHP-powered photo gallery that I have. It took me a while to figure that out, and only to feel much better when I managed to get the results that I needed. However, I also took the chance to tidy up site addresses with redirections in my .htaccess file in an attempt to ensure that I lost no regular readers, something that I seem to have achieved with some success because one such visitor later commented on a new entry in the outdoors blog.
Once any remaining missing images were instated or references to them removed, it was then time to do a full backup for the sake of safety. The first of these activities was yet another time consumer, while the second didn't take so long, which is just as well given how important it is to have frequent backups. Hopefully, though, the relocated site's performance continues to be as solid as it is now.
The question as to what to do with the Fasthosts webspace remains outstanding. Currently, they are offering free upgrades to existing hosting packages for an annual commitment. After my recent experience, I cannot say that I'm so sure about going down that route. In fact, the observation leaves me wondering if instating that very extension was the cause of breaking my site. All in all, what happened to that Fasthosts website wasn't the greatest of experiences, while the service offered by Webfusion is rock solid thus far. Although I question whether Fasthosts' service quality has declined from its previous standards, I remain open to reassessing my opinion as I observe their performance over time.
Moving from Ubuntu 10.10 to Linux Mint 10
With a long Easter weekend available to me and with thoughts of forthcoming changes in the world of Ubuntu, I got to wonder about the merits of moving my main home PC to Linux Mint instead. Though there is a rolling variant based on Debian, I went for the more usual one based on Ubuntu that uses GNOME. For the record, Linux Mint isn't just about the GNOME desktop, but you also can have it with Xfce, LXDE and KDE desktops as well. While I have been known to use Lubuntu and like its LXDE implementation, I stuck with the option with which I have most experience.
Once I selected the right disk for the bootloader, the main installation of Mint went smoothly. By default, Ubuntu seems to take care of this, while Mint leaves it to you. When you have your operating system files on sdc, installation on the default of sda isn't going to produce a booting system. Instead, I ended up with GRUB errors and, while I suppose that I could have resolved these, the lazier option of repeating the installation with the right bootloader location was the one that I chose. It produced the result that I wanted: a working and loading operating system.
However, there was not something not right about the way that the windows were displayed on the desktop, with title bars and window management not working as they should. Creating a new account showed that it was the settings that were carried over from Ubuntu in my home area that were the cause. Again, I opted for a less strenuous option and moved things from the old account to the new one. One outcome of that decision was that there was a lot of use of the chown command to get file and folder permissions set for the new account. To make this all happen, the new account needed to be made into an Administrator just like its predecessor; by default, more restrictive desktop accounts are created using the Users and Groups application from the Administration submenu. Once I was happy that the migration was complete, I backed up any remaining files from the old user folder and removed it from the system. Some of the old configuration files were to find a new life with Linux Mint.
In the middle of the above, I also got to customise my desktop to get the feel that is amenable. For example, I do like a panel at the top and another at the bottom. By default, Linux Mint only comes with the latter. The main menu was moved to the top because I have become used to having there, and switchers for windows and desktops were added at the bottom. They were only a few from what has turned out not to be a short list of things that I fancied having: clock, bin, clearance of desktop, application launchers, clock, broken application killer, user switcher, off button for PC, run command and notification area. It all was gentle tinkering, but still is the sort of thing that you wouldn't want to have to do over and over again. Let's hope that is the case for Linux Mint upgrades in the future. That the configuration files for all of these are stored in the home area hopefully should make life easier, especially when an in-situ upgrade like that for Ubuntu isn't recommended by the Mint team.
With the desktop arranged to my liking, the longer job of adding to the collection of software on there, while pruning a few unwanted items too, was next. Having had Apache, PHP and MySQL on the system before I popped in that Linux Format magazine cover disk for the installation, I wanted to restore them. To get the off-line websites back, I had made copies of the old Apache settings that simply were copied over the defaults in /etc/apache (in fact, I simply overwrote the apache directory in /etc, but the effect was the same). Using MySQL Administrator enabled the taking of a backup of the old database too. In the interests of spring-cleaning, I only migrated a few of the old databases from the old system to the new one. In fact, there was an element of such tidying in my mind when I decided to change Linux distribution in the first place; Ubuntu hadn't been installed from afresh onto the system for a while anyway and some undesirable messages were appearing at update time though they were far from being critical errors.
The web server reinstatement was only part of the software configuration that I was doing, and there was a lot of use of apt-get while this was in progress. A rather diverse selection was added: Emacs, NEdit, ClamAV, Shotwell (just make sure that your permissions are sorted first before getting this to use older settings because anything inaccessible just gets cleared out; F-Spot was never there at first in my case, but it may differ for you), UFRaw, Chrome, Evolution (never have been a user of Mozilla Thunderbird, the default email client on Mint), Dropbox, FileZilla, MySQL Administrator, MySQL Query Browser, NetBeans, POEdit, Banshee (while Rhythmbox is what comes with Mint, I replaced it with this), VirtualBox and GParted. This is quite a list and while I maybe should have engaged the services of dpkg to help automate things, I didn't do that on this occasion, though Mint seems to have a front end for it that does the same sort of thing. Given that the community favours clean installations, it's little that something like this is on offer in the suite of tools in the standard installation. This is the type of rigmarole that one would not draw on themselves too often.
With desktop tinkering and software installations complete, it was time to do a little more configuration. To get my HP laser printer going, I ran hp-setup to download the (proprietary, RMS will not be happy...) driver for it because it otherwise wouldn't work for me. Fortune was removed from the terminal sessions because I like them to be without such things. To accomplish this, I edited /etc/bash.bashrc and commented out the /usr/games/fortune line before using apt-get to clear the software from my system. Being able to migrate my old Firefox and Evolution profiles, albeit manually, has become another boon. Undoubtedly, there are more adjustments that I could be making, but I am happy to do these as and when I get to them. So far, I have a more than usable system, even if I engaged in more customisation than many users would go doing.
Let's finish this with some of my impressions of Linux Mint. What goes without saying is that some things are done differently, which is to be expected. Distribution upgrades are just one example, while there are tools available to make clean installations that little bit easier. To my eyes, the desktop looks very clean and fond display is carried over from Ubuntu, not at all a bad thing. While it may sound like a small matter, it does appear to me that Fedora and openSUSE could learn a thing or too about how to display fonts onscreen on their systems. It is the sort of thing that adds the spot of polish that leaves a much better impression. So far, it hasn't been any hardship to find my way around; it helps that I can make the system fit my wants and needs. That it looks set to stay that way is another bonus. We have a lot of change coming in the Linux world, with GNOME 3 on the way and Ubuntu's decision to use Unity as their main desktop environment. While watching both of these developments mature, it looks as if I'll be happily using Mint. Change can refresh, while a bit of stability is good too.