Limiting Google Drive upload & synchronisation speeds using Trickle
9th October 2021Having had a mishap that lost me some photos in the early days of my dalliance with digital photography, I have been far more careful since then and that now applies to other files as well. Doing regular backups is a must that you find reiterated by many different authors and the current computing climate makes doing that more vital than it ever was.
So, as well as having various local backups, I also have remote ones in the form of OneDrive, Dropbox and Google Drive. These more correctly are file synchronisation services but disciplined use can make them useful as additional storage facilities in the interests of maintaining added resilience. There also are dedicated backup services that I have seen reviewed in the likes of PC Pro magazine but I have to make use of those.
Insync
Part of my process for dealing with new digital photo files is to back them up to Google Drive and I did that with a Windows client in the early days but then moved to Insync running on Linux Mint. One drawback to the approach is that this hogs the upload bandwidth of an internet connection that has yet to move to fibre from copper cabling. Having fibre connections to a local cabinet helps but a 100 KiB/s upload speed is easily overwhelmed and digital photo file sizes keep increasing. It does not help that I insist on using more flexible raw formats like DNG, CR2 or CR3 either.
Making fewer images could help to cut the load but I still come away from an excursion with many files because I get so besotted with my surroundings. This means that upload sessions take numerous hours and can extend across calendar days. Ultimately, this makes my internet connection far less usable so I want to throttle upload speed much like what is possible in the Transmission BitTorrent client or in the Dropbox client. Unfortunately, this is not available in Insync so I have tried using the trickle command instead and an example is below:
trickle -d 2000 -u 50 insync
Here, the upload speed is limited to 50 KiB/s while the download speed is limited to 2000 KiB/s. In my case, the latter of these hardly matters while the former leaves me with acceptable internet usability. Insync does not work smoothly with this, however, so occasional restarts are needed to keep file uploads progressing and CPU load also is higher. As rough as the user experience feels, uploads can continue in parallel with other work.
gdrive
One other option that I am exploring is the use of the command-line tool gdrive and this appears to work well with trickle. After downloading and installing the tool, getting going is a matter of issuing the following command and following the instructions:
gdrive about
On web servers, I even have the tool backing up things to Google Drive on a scheduled basis. Because of a Google Drive limitation that I have encountered not only with gdrive but also with Insync and Google’s own Windows Google Drive client, synchronisation only can happen with two new folders, one local and the other remote. Handily, gdrive supports the usual bash style commands for working with remote directories so something like the following will create a directory on Google Drive:
gdrive mkdir ttdc [ID for parent folder]
Here, the ID for the parent folder may be omitted but it can be obtained by going to Google Drive online and getting a link location by right-clicking on a folder and choosing the appropriate context menu item. This gets you something like the following and the required identifier is found between the last slash and the first question mark in the address string (so as not to share any real links, I made the address more general below):
https://drive.google.com/drive/folders/[remote folder ID]?usp=sharing
Then, synchronisation uses a command like the following:
gdrive sync upload [local folder or file path] [remote folder ID]
There also is the option to do a one-way upload and this is the form of the command used:
gdrive upload [local folder or file path] -p [remote folder ID]
Because every file or folder object has its own ID on Google Drive, it is possible to create two objects on there that appear to have the same name though that is sure to cause confusion even if you know what is happening. It is possible in each of the above to throttle them using trickle as well:
trickle -d 2000 -u 50 gdrive sync upload [local folder or file path] [remote folder ID]
 trickle -d 2000 -u 50 gdrive upload [local folder or file path] -p [remote folder ID]
Handily, this works without the added drama seen with Insync and lends itself to scripting as well so it could be something that I will incorporate into my current workflow. One thing that needs to be watched is file upload failures but there may be ways to catch those and retry them so that would another thing that needs doing. This is built into Insync and it would be a learning opportunity if I was to stick with gdrive instead.
Pondering travel device consolidation using an Apple iPad Pro 12.9″
18th September 2016It was a change of job in 2010 that got me interested in using devices with internet connectivity on the go. Until then, the attraction of smartphones had not been strong, but I got myself a Blackberry on a pay as you go contract, but the entry device was painfully slow, and the connectivity was 2G. It was a very sluggish start.
It was supplemented by an Asus Eee PC that I connected to the internet using broadband dongles and a Wi-Fi hub. This cumbersome arrangement did not work well on short journeys and the variability of mobile network reception even meant that longer journeys were not all that successful either. Usage in hotels and guest houses though went better and that has meant that the miniature laptop came with me on many a journey.
In time, I moved away from broadband dongles to using smartphones as Wi-Fi hubs and that largely is how I work with laptops and tablets away from home unless there is hotel Wi-Fi available. Even trips overseas have seen me operate in much the same manner.
One feature is that we seem to carry quite a number of different gadgets with us at a time and that can cause inconvenience when going through airport security since they want to screen each device separately. When you are carrying a laptop, a tablet, a phone and a camera, it does take time to organise yourself and you can meet impatient staff, as I found recently when returning from Oslo. Checking in whatever you can as hold luggage helps to get around at least some of the nuisance and it might be time for the use of better machinery to cut down on having to screen everything separately.
When you come away after an embarrassing episode as I once did, the attractions of consolidating devices start to become plain. In fact, most probably could get with having just their phone. It is when you take activities like photography more seriously that the gadget count increases. After all, the main reason a laptop comes on trips beyond Britain and Ireland at all is to back up photos from my camera in case an SD card fails.
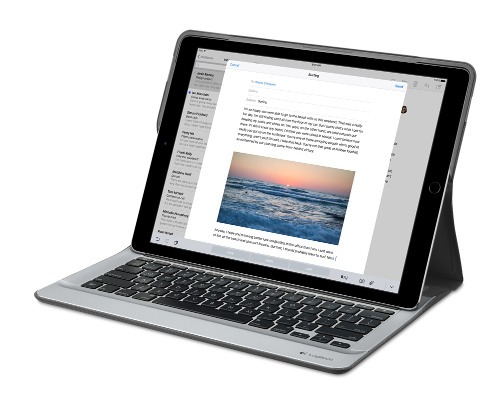
Parking that thought for a while, let’s go back to March this year when temptation overcame what should have been a period of personal restraint. The result was that a 32 GB 12.9″ Apple iPad Pro came into my possession along with an Apple Pencil and a Logitech CREATE Backlit Keyboard Case. It should have done so, but the size of the screen did not strike me until I got it home from the Apple Store. That was one of the main attractions because maps can be shown with a greater field of view in a variety of apps, a big selling point for a hiker with a liking for maps, who wants more than what is on offer from Apple, Google or even Bing. The precision of the Pencil is another boon that makes surfing the website so much easier and the solid connection between the case and the iPad means that keyboard usage is less fiddly than it would if it used Bluetooth. Having tried them with the BBC iPlayer app, I can confirm that the sound from the speakers is better than any other mobile device that I have used.
Already, it has come with me on trips around England and Scotland. These weekend trips saw me leave the Asus Eee PC stay at home when it normally might have come with me and taking just a single device along with a camera or two had its uses too. The screen is large for reading on a train but I find that it works just as well so long as you have enough space. Otherwise, combining use of a suite of apps with recourse to the web does much of the information seeking needed while on a trip away and I was not found wanting. Battery life is good too, which helps.
Those trips allowed for a little light hotel room blog post editing too and the iPad Pro did what was needed, though the ergonomics of reaching for the screen with the Pencil meant that my arm was held aloft more than was ideal. Another thing that raised questions in my mind is the appearance of word suggestions at the bottom of the screen as if this were a mobile phone since I wondered if these were more of a hindrance than a help given that I just fancied typing and not pointing at the screen to complete words. Copying and pasting works too but I have found the screen-based version a little clunky so I must see if the keyboard one works just as well, though the keyboard set up is typical of a Mac so that affects word selection. You need to use the OPTION key in the keyboard shortcut that you use for this and not COMMAND or CONTROL as you might do on a PC.
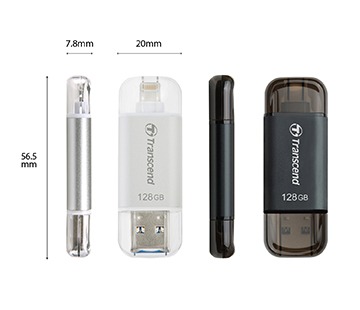
Even with these eccentricities, I was left wondering if it had any utility when it came to backing up photos from digital cameras and there is an SD card adapter that makes this possible. A failure of foresight on my part meant that the 32 GB capacity now is an obvious limitation but I think I might have hit on a possible solution that does not need to upload to an iCloud account. It involves clearing off the photos onto a 128 GB Transcend JetDrive Go 300 so they do not clog up the iPad Pro’s storage. That the device has both Lightning and USB connectivity means that you can plug it into a laptop or desktop PC afterwards too. If that were to work as I would hope, then the laptop/tablet combination that I have been using for all overseas trips could be replaced to allow a weight reduction as well as cutting the hassle at airport security.
Trips to Ireland still may see my sticking with a tried and tested combination though because I often have needed to do some printing while over there. While I have been able to print a test document from an iPad Mini on my home network-connected printer, not every model supports this and that for NFC or Air Print is not universal either. If this were not an obstacle, apps like Pages, Numbers and Keynote could have their uses for business-related work and there are web-based offerings from Google, Microsoft and others too.
In conclusion, I have found that my iPad Pro does so much of what I need on a trip away that retiring the laptop/tablet combination for most of these is not as outrageous as it once would have seemed. In some ways, iOS has a way to go yet before it could take over from macOS but it remains in development so it will be interesting to see what happens next. All the while, hybrid devices running Windows 10 are becoming more pervasive and that might provide Apple with the encouragement that it needs.
More thoughts on Windows 10
11th August 2015Now that I have left Windows 8.x behind me and there are a number of my machines running Windows 10, I have decided to revisit my impressions of the operating system. The first Technical Preview was something that I installed in a virtual machine and I have been keeping an eye on things have developed since then and intend to retain a Windows Insider installation to see what might be heading our way as Windows 10 evolves as now expected.
After elaborating on the all important upgrade process earlier, I am now moving onto other topics. The Start Menu is a big item but there are others as you will see below.
Start Menu
Let’s start with an admission: the prototype Start Menu that we got in the initial Windows 10 Technical Preview was more to my liking. Unpinning all the tiles allowed the menu to collapse back to the sort of width that anyone familiar with Windows 7 would have liked. If there was a setting to expunge all tiles at once and produce this state, I would have been well happy.
It was latter that we got to learn that Microsoft was not about consign the Windows 8 Modern interface entirely to history as many would have wanted. Some elements remain with us such as a Start Menu with a mandatory area for tiles and the ability to have it display full screen. Some are live but this can be turned off on a tile by tile basis and unneeded ones can be removed altogether. It is even possible to uninstall most apps by right clicking on a tile or other Start Menu entry and select the required option from the resulting context menu. For others, there is a command line alternative that uses Powershell to do removals. After this pruning, things were left in such a state that I have not been moved to restore Classic Shell so far.
The Start Menu settings used be in the same place as those for the taskbar but they are found in the new Settings tool. Some are in the Personalisation section and it has its own Start subsection for setting full screen mode or highlighting of new apps among other things. The equivalent Colours subsection is where you find other settings like assigning background colours based on those in a desktop background image, which itself is assigned in it own subsection in the Personalisation area.
Virtual Desktops
Initially, I failed to see the point in how Microsoft implemented these and favoured Virtuawin instead. My main complaint was the taskbar showed buttons for all open apps regardless of the screen in which they are opened. However, that was changed so your taskbar shows different buttons for each virtual desktop, just like the way that Linux and UNIX do things. Switching between desktops may not be as smooth of those yet but the default setting is a move in the right direction and you can change it if you want.
Cortana
This was presented to the world as a voice operated personal assistant like Apple’s Siri but I cannot say that I am keen on such things so I decided to work as I usually do instead. Keyboard interaction works fine and I have neutered things to leave off web searches on Bing to use the thing much in the same way as the search box on the Windows 7 Start Menu. It may be able to do more than that but I am more than happy to keep my workflow unchanged for now. Cortana’s settings are available via its pop-up menu. Collapsing the search box to an icon to save space for your pinned and open applications is available from the Search section of the taskbar context menu (right clicking the taskbar produces this).
Settings
In Windows 8.x, the Control Panel was not the only area for settings but remained feature complete but the same is not the case for Windows 10 where the new Settings panel is starting to take over from it. The two co-exist for now but it seems clear that Settings is where everything is headed.
The Personalisation section of the tool has been mentioned in relation to the Start Menu but there are plenty of others. For instance, the Privacy one is one that definitely needs reviewing and I found myself changing a lot of the default settings in there. Naturally, there are some other sections in Settings that need hardly any attention from most of us and these include Ease of access (accessibility), Time & language, Devices and Network & Internet. The System section has a few settings like tablet mode that may need review and the Update & security one has backup and recovery subsections that may be of interest. The latter of these is where you find the tools for refreshing the state of the system following instability or returning to a previous Windows version (7 or 8.x) within thirty days of the upgrade.
Piggybacking an Android Wi-Fi device off your Windows PC’s internet connection
16th March 2013One of the disadvantages of my Google/Asus Nexus 7 is that it needs a Wi-Fi connection to use. Most of the time this is not a problem since I also have a Huawei mobile WiFi hub from T-Mobile and this seems to work just about anywhere in the U.K. Away from the U.K. though, it won’t work because roaming is not switched on for it and that may be no bad thing with the fees that could introduce. My HTC Desire S could deputise but I need to watch costs with that too.
There’s also the factor of download caps and those apply both to the Huawei and to the HTC. Recently, I added Anquet‘s Outdoor Map Navigator (OMN) to my Nexus 7 through the Google Play store for a fee of £7 and that allows access to any walking maps that I have bought from Anquet. However, those are large downloads so the caps start to come into play. Frugality would help but I began to look at other possibilities that make use of a laptop’s Wi-Fi functionality.
Looking on the web, I found two options for this that work on Windows 7 (8 should be OK too): Connectify Hotspot and Virtual Router Manager. The first of these is commercial software but there is a Lite edition for those wanting to try it out; that it is not a time limited demo is not something that I can confirm though that did not seem to be the case since it looked as if only features were missing from it that you’d get if you paid for the Pro variant. The second option is an open source one and is free of charge apart from an invitation to donate to the project.
Though online tutorials show the usage of either of these to be straightforward, my experiences were not all that positive at the outset. In fact, there was something that I needed to do and that is why this post has come to exist at all. That happened even after the restart that Conectify Hotspot needed as part of its installation; it runs as a system service so that’s why the restart was needed. In fact, it was Virtual Router Manager that told me what the issue was and it needed no reboot. Neither did it cause network disconnection of a laptop like the Connectify offering did on me and that was the cause of its ejection from that system; limitations in favour of its paid addition aside, it may have the snazzier interface but I’ll take effective simplicity any day.
Using Virtual Router Manager turns out to be simple enough. It needs a network name (also known as an SSID), a password to restrict who accesses the network and the internet connection to be shared. In my case, the was Local Area Connection on the drop down list. With all the required information entered, I was ready to start the router using the Start Network Router button. The text on this changes to Stop Network Router when the hub is operational or at least it should have done for me on the first time that I ran it. What I got instead was the following message:
The group or resource is not in the correct state to perform the requested operation.
The above may not say all that much but it becomes more than ample information if you enter it into the likes of Google. Behind the scenes, Virtual Router Manager is using native Windows functionality is create a WiFi hub from a PC and it appears to be the Microsoft Virtual Wi-Fi Miniport Adapter from what I have seen. When I tried setting up an adhoc Wi-Fi network from a laptop to the Nexus 7 using Windows’ own network set up capability via its Control Panel, it didn’t do what I needed so there might be something that third party software can do. So, the interesting thing about the solution to my Virtual Router Manager problem was that it needed me to delve into the innards of Windows a little.
Firstly, there’s running Command Prompt (All Programs > Accessories) from the Start Menu with Administrator privileges. It helps here if the account with which you log into Windows is in the Administrators group since all you have to do then is right click on the Start Menu entry and choose Run as administrator entry in the pop-up context menu. With a command line window now open, you then need to issue the following command:
netsh wlan set hostednetwork mode=allow ssid=[network name] key=[password] keyUsage=persistent
When that had done its thing, Virtual Router Manager worked without a hitch though it did turn itself after a while and that may be no bad thing from the security standpoint. On the Android side, it was a matter of going in Settings > Wi-Fi and choose the new network that have been creating on the laptop. This sort of thing may apply to other types of tablet (Dare I mention iPads?) so you could connect anything to the hub without needing to do any more on the Windows side.
For those wanting to know what’s going on behind the scenes on Windows, there’s a useful tutorial on Instructables that shows what third party software is saving you from having to do. Even if I never go down the more DIY route, I probably have saved myself having to buy a mobile Wi-Fi hub for any trips to Éire. For now, the Irish 3G dongle that I already have should be enough.