TOPIC: HARDWARE VIRTUALIZATION
Converting QEMU disk images to VirtualBox images on Linux Mint 21
Recently, VirtualBox gained fuller support for Windows 11 and I successively set up a new Windows 11 virtual machine that, I hope, will supplant a Windows 10 counterpart in time. While the setup itself was streamlined, I ran into such stability issues that I set the new VM aside until a new version of VirtualBox got released. That has happened with the appearance of version 7.0.2, but Windows 11 remains prone to freezing on my Linux Mint machine. Thankfully, that now is much less frequent, yet the need for added stability remains outstanding.
While I was thinking about trying out VirtualBox 7.0.0, I remembered a QEMU machine that I had running Windows 11. Though QEMU proved more limited than VirtualBox when it came to having easy availability of functionality like moving data in and out of the virtual machine or support for sound, there was no problem with TPM support or system stability. Since it did contain some useful data, I wondered about converting its virtual hard disk to VirtualBox format, and it is easy to do. First, you need to install qemu-img and other utilities as follows:
sudo apt-get install qemu-utils
With that in place, executing a command like the following performs the required conversion. Here, the -O switch specifies the required file type of vdi in this case.
qemu-img convert -O vdi [virtual hard disk].qcow2 [virtual hard disk].vdi
While I have yet to mount it on the new VirtualBox Windows 11 virtual machine, it is good to have the old virtual hard disk available for doing so. The thought of using it as a boot drive in VirtualBox did enter my mind, but the required change of drivers and other incompatibilities dissuaded me from doing so.
How to access host files in VMware Virtual Machines using Shared Folders
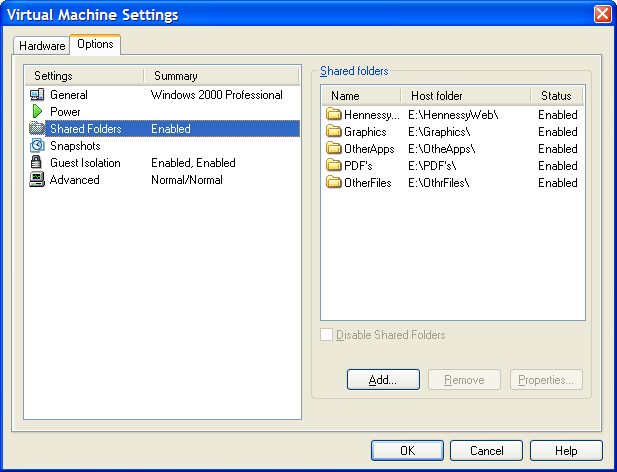
I am very surprised at myself for not realising until recently that there is a way to make host data visible to a guest operating system installed in a VMware virtual machine other than resorting to using flash drives, CD's, DVD's and the like. Though you can copy and paste from the host into the VM, I have found that to be hit-and-miss at times. It was a revelation to find VMware's Shared Folders function. My suspicion is that you need VMware Tools installed in the guest operating system to make it work, which may not be trivial for some Linux distributions or UNIX. However, I was using it with a Windows 2000 guest and a Windows XP host, and it worked like a dream.
What you see below are the shared folder settings in the host's VMware interface for that virtual machine. Just clicking on the Add... button brings up a wizard that will set up the shared folder for you; it's all very user-friendly. Look for the Edit virtual machine settings link on the VM configuration page, click that and pop over to the Options tab and this what you can get.
The result of the above spot of configuration appears in Windows Explorer like it does below. Not only are the shared folders accessible in this way, but you can also map drive letters as if they were network resources, a very nice feature. It is definitely more accessible than working out Windows networking and getting things to happen that way.
