TOPIC: FEATURES NEW TO WINDOWS 7
Executing PowerShell scripts in Windows 11
Recently, I have added the capability to update a Hugo-driven website from a laptop running Windows 11. Compared to what you get with Linux, I do feel a little like a fish out of water when it comes to using Windows for tasks that I accomplish more often on the former. That includes running PowerShell scripts instead of their BASH counterparts. While Linux Subsystem for Windows could be an option, my machine runs Windows 11 Home, where it is unavailable. Learning the ways of the Windows Terminal cannot do any harm in any case.
The default action of not executing PowerShell scripts is not a bad approach when it comes to keeping machines secure for less technical users. For the rest, you need to learn how to use the Set-ExecutionPolicy commandlet. Doing this in a safe means doing it in a restrictive manner. Thus, I chose the following command and executed it in a terminal running with admin privileges:
Set-ExecutionPolicy -ExecutionPolicy Unrestricted -Scope CurrentUser
The scope here is for the currently logged-in user, instead of allowing every user the same capability. Some undoubtedly might suggest an execution policy of AllSigned and that adds effort that I was unwilling to expend, hence the choice that I made. This is not that critical a machine, so that is why I made the choice that I did. There was nothing too complicated about the script logic anyway.
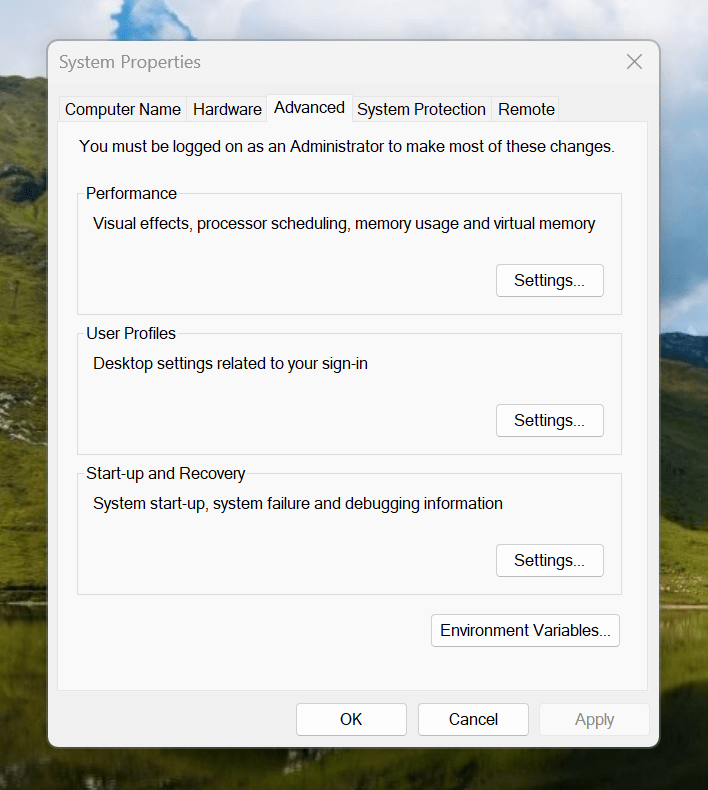
Making the script available without needing to specify the path to it was my next step. In my case, I added a new location to the Path environment variable. To accomplish that, you need to find the Control Panel, open it and go to System and Security. Then, move to System (Control Panel\System and Security\System) and click on Advanced System Settings. In the new dialogue box that appears, click on the Environment Variables... button. Next, select the Path entry and click on the Edit button. That spawns another dialogue box where I added the new path. Clicking the OK button in each dialogue box closes them all, one at a time, to get back to the Control Panel window again. That too can be closed, and any open terminals shut down and a new one opened. The process is clunky, yet it works once you know what to do.
At the end of all this, I had a scripted process for updating a Hugo-driven website. It was not as sleek as what I have on my Linux system, yet it works well enough to allow more flexibility. In time, I may refine things further.
Forcing an upgrade to Windows 10 Anniversary Update
There remain people who advise those on Windows 7 or 8.x to hold fire on upgrading to Windows 10. Now that the free upgrade no longer is available, that advice may hold more weight than it did. Even so, there are those among us who jumped ship who are open to having the latest versions of things at no monetary cost to see what is available, and I must admit to being one of those.
After all, I do have a virtual machine with a pre-release version of the next update to Windows 10 installed on there to see what might be coming our way and to get a sense of what changes that may bring so that I am ready for those. Otherwise, I am usually happy to wait, but I noticed that the Windows 10 Anniversary Update only came to my HP Pavilion dm4 laptop and not other machines with Windows 10 installed, so I started to wonder why there was a lag when it came to automatic upgrades.
So that these things do not arrive when it is least convenient, I took advantage of a manual method to choose my timing. This did not involve installation from a disk image, but was in-situ. The first part of the process is standard enough in that the Settings app was started and the Update & security item chosen. That dropped me onto the Windows Update, and I first clicked on the Check for updates button to see what would happen. When nothing came of that, the Learn more link was clicked to bring me onto part of the Microsoft support website where I found that the Windows 10 Anniversary Update installer could be downloaded, so I duly did just that.
Running it produced a screen asking whether I wanted to proceed. Since I wanted to go ahead, the appropriate button was clicked and the machine left alone until the process completed. Because the installer purely is a facilitator, the first stage is to download the rest of the files needed, and that will take a while on any connection. Once downloading was completed, the actual process of installation commenced with several restarts before a log-in screen was again on offer. On logging in to the machine, the last part of the process started.
Though the process took quite a while, it seemingly worked without a hitch. If there was anything that I needed to do, it was the re-installation of VirtualBox Guest Additions to restore access to shared folders, as well as dealing with a self-inflicted irritation. Otherwise, I have found that previously installed software worked as expected and no file has been missed. Waiting a while may have had its advantages too because initial issues with the Anniversary Update will have been addressed, though it is best not to leave it too long, or you could have the feeling of being forgotten. A happy balance needs striking.
Resolving Windows Update Error 0x80244019 on Windows 10
In Windows 10, the preferred place to look if you fancy prompting an update of the system is in the Update & Security section of the Settings application. At the top is the Windows Update, and the process usually is as simple as pressing the Check for updates button. For most of the time, that has been my experience, but it stopped working on my main Windows 10 virtual machine, so I needed to resolve the problem.
Initially, going into the Advanced Options section and deselecting the tick box for Give me updates for other Microsoft products when I update Windows helped. However, it seemed a non-ideal solution, so I looked further. When it was then that I found that manually resetting a system's Windows Updates components helped others, I tried that and restarted the system.
The first part of the process was to right-click on the Start Menu button and select the Windows PowerShell (Admin) entry from the menu that appeared. This may be replaced by Command Prompt (Admin) on your system on your machine, but the next steps in the process are the same. In fact, you could include any commands you see below in a script file and execute that if you prefer. Here, I will run through each group in succession.
From either PowerShell or the Command Prompt, you need to stop the Windows Update, Cryptographic, BITS (or Background Intelligent Transfer Service) and MSI Installer services. To accomplish this, execute the following commands at a command prompt:
net stop wuauserv

net stop cryptSvc

net stop bits

net stop msiserver
With the services stopped, it is then possible to rename the SoftwareDistribution and Catroot2 folders so you can refresh everything to remove them. To accomplish this, execute the following pair of commands using either PowerShell or the Command Prompt:
ren C:\Windows\SoftwareDistribution SoftwareDistribution.old

ren C:\Windows\System32\catroot2 Catroot2.old
Once you have the folders renamed, then you can start the Windows Update, Cryptographic, BITS and MSI Installer services by executing the following commands in either PowerShell or the Command Prompt:
net start wuauserv

net start cryptSvc

net start bits

net start msiserver
Once these have completed, you may close the PowerShell or Command Prompt window that you were using and restart the machine. Going into the Update & Security section of the Settings tool afterwards and pressing the Check for updates button now builds new versions of the folders that you renamed, and this takes a little while longer than the usual update process. Otherwise, you could let your system rebuild things in its own time. As it happens, I opted for manual intervention and all has worked well since then.