One way to fix slow CyberGhost VPN connections on Windows 10
Due to a need to access websites with country blocking, I have decided to give CyberGhost a go, and it also will come in handy when connecting devices to other Wi-Fi connections. What I have got is the three-year subscription package and all went well on the first day of use. However, things became unusable on the second and a reboot did not sort it.
Since the problem seemed to affect a phone running Android too, I even got to suspect my router and broadband provider. Even terminating the subscription came to mind, but it did not come to that. Instead, I did a bit more research and tried changing the maximum transition unit (MTU) for the connection to 1300 as suggested in a CyberGhost help article. Because using the Control Panel meant that it was resetting to 1500 on my Windows 10 machine, I then turned to a command line-based solution.
To accomplish that, I started PowerShell in administrator mode from the context menu produced by right-clicking on the Start Menu icon on the taskbar. Then, I entered the following command to see what connections I had and what the MTU settings were:
netsh interface ipv4 show subinterfaces
From looking through the Settings and Control Panel applications, I already had worked out what network interface belonged to the CyberGhost connection. Seeing that the MTU setting was 1500, I then issued a command like the following to change that to 1300.
netsh interface ipv4 set subinterface "<name of ethernet interface>" mtu=1300 store=persistent
Here, <name of ethernet interface> gets replaced by the name of your connection and the string is quoted to avoid spaces in the name causing problems with executing the command. Once that second command had been run, the first one was issued again and the output checked to ensure that the MTU setting was as expected.
While this was done when the VPN connection was inactive, it may work also with an active connection. After making the change, I again reconnected to the VPN and all has been as expected since then, and I found a better connection for my Android phone too.
Using multi-line commenting in Perl to inactivate blocks of code during testing
Recently, I needed to inactivate blocks of code in a Perl script while doing some testing. Since this is something that I often do in other computing languages, I sought the same in Perl. To accomplish that, I need to use the POD methodology. This meant enclosing the code as follows.
=start
<< Code to be inactivated by inclusion in a comment >>
=cut
While the =start line could use any word after the equality sign, it seems that =cut is required to close the multi-line comment. If this was actual programming documentation, then the comment block should include some meaningful text for use with perldoc. However, that was not a concern here because the commenting statements would be removed afterwards anyway. It also is good practice not to leave commented code in a production script or program to avoid any later confusion.
In my case, this facility allowed me to isolate the code that I had to alter and test before putting everything back as needed. It also saved time since I did not need to individually comment out every executable line because multiple lines could be inactivated at a time.
EVF or OVF?
In photography, some developments are temporary fads, while others create enduring changes. Special effects filters and high dynamic range techniques generated excitement before their usage became more restrained. The same applies to most image processing techniques, as good taste eventually prevails. Some developments, however, signal more substantial shifts.
The biggest example of the latter is the move away from film photography to digital image capture. There still are film photographers who largely depend on older cameras, since very few are made any more. While my own transition came later than others, I hardly use film any more, and a lack of replacement parts for cameras that are more than fifteen years old only helps to keep things that way. Another truth is that digital photography makes me look at my images more critically, which helps me improve.
Also, mobile phone cameras have become so capable that the compact camera market has shrunk dramatically. In fact, I gave away my Canon PowerShot G11 earlier this year because there was little justification in hanging onto it. After all, it dated back to 2010 and a phone would do now what it once did, though the G11 did more for me than I might have expected. Until 2017, my only photos of Swedish locations were made with that camera. If I ever was emotional at its departure, and I doubt that I was, that is not felt now.
If you read photography magazines, you get the sense that mirrorless cameras have captured a lot of the limelight, and that especially is the case with the introduction of full frame models. Some writers even are writing off the chances of SLR's remaining in production, though available model ranges remain extensive despite the new interlopers. Whatever about the departure of film, the possible loss of SLR's with their bright optical viewfinders (OVF's) does make me a little emotional since they were the cameras that, so many like me aspired to owning during my younger years and the type has served me well over the decades.

Even so, I too have used mirrorless cameras and an Olympus PEN E-PL5 came into my possession in 2013. However, I found that using the screen on the back of a camera was not to my liking and the quality of mobile phone cameras is such that I no longer need any added portability. However, it needs to be remembered that using a Tamron 14 to 150 mm zoom lens with the body cannot have helped either. Wishing to sample a counterpart with an electronic view finder, I replaced it with an Olympus OM-D E-M10 Mark III earlier this year and have been getting on fine with that.
The camera body is compact, yet handles like an SLR. I turned off the automatic switching between viewfinder and screen because I found it distracting. I prefer to switch between them manually. Getting used to the electronic viewfinder (EVF) took some time, but adding a spirit level overlay proved both useful and educational. The camera produces images with strong greens and blues, which suits me since I like both colours. The 16.1 megapixel sensor creates smaller files that upload quickly to back-up services. My Tamron lens works flawlessly, and keeping this lens was a key reason I stayed with Olympus despite a shutter failure on my previous camera. The repair was done efficiently and at a reasonable price.
Despite the quality of the new Olympus, it has not replaced my Canon EOS 5D Mark II and Pentax K5 II SLRs. The Olympus has a much smaller frame. In January, I bought a new Sigma 24 to 105 mm zoom lens for the Canon after my older lens developed a fault that could not be fixed. The new lens performs well and produces impressively sharp images. However, the full frame Canon setup is heavy, even when used handheld. This is why the Pentax remains my choice for travelling abroad. Both the Canon and Pentax offer brighter viewfinders, which I value. Therefore, the OM-D complements rather than replaces my other cameras.
Although I can work with electronic viewfinders (EVF's) if single-lens reflex cameras (SLRs) become obsolete, I plan to use mainly SLRs for now. Canon recently launched a new enthusiast model, indicating ongoing interest in SLRs. Canon appears to envision a hybrid approach where using the screen on the back of the camera might provide faster autofocus or other functions, while the optical viewfinder (OVF) allows traditional operation. This makes me wonder if future cameras might include viewfinders that switch between EVF and OVF modes. This idea might be both far-fetched and fascinating, but other unforeseen possibilities might exist. One thing is certain: we live in a time of rapid change.
Generating PNG files in SAS using ODS Graphics
Recently, I had someone ask me how to create PNG files in SAS using ODS Graphics, so I sought out the answer for them. Normally, the suggestion would have been to create RTF or PDF files instead, but there was a specific need that needed a different approach. Adding something like the following lines before an SGPLOT, SGPANEL or SGRENDER procedure should do the needful:
ods listing gpath='E:\';

ods graphics / imagename="test" imagefmt=png;
Here, the ODS LISTING statement declares the destination for the desired graphics file, while the ODS GRAPHICS statement defines the file name and type. In the above example, the file test.png would be created in the root of the E drive of a Windows machine. However, this also works with Linux or UNIX directory paths.
Lessons learned on managing Windows Taskbar and Start Menu colouring in VirtualBox virtual machines
In the last few weeks, I have had a few occasions when the colouration of the Windows 10 taskbar and its Star Menu has departed from my expectations. At times, this happened in VirtualBox virtual machine installations and both the legacy 5.2.x versions and the current 6.x ones have thrown up issues.
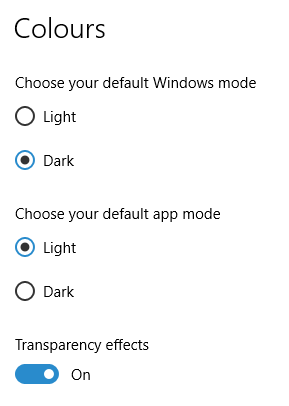

The first one actually happened with a Windows 10 installation in VirtualBox 5.2.x when the taskbar changed colour to light grey and there was no way to get it to pick up the colour of the desktop image to become blue instead. The solution was to change the Windows from Light to Dark in order for the desired colouration to be applied, and the settings above are taken from the screen that appears on going to Settings > Personalisation > Colours.
The second issue appeared in Windows 10 Professional installation in VirtualBox 6.0.x when the taskbar and Start Menu turned transparent after an updated. This virtual machine is used to see what is coming in the slow ring of Windows Insider, so some rough edges could be expected. The solution here was to turn off 3D acceleration in the Display pane of the VM settings after shutting it down. Starting it again showed that all was back as expected.
Both resolutions took a share of time to find and there was a deal of experimentation needed too. Once identified, they addressed the issues as desired. Hence, I am recording them here for use by others as much as future reference for myself.
Shrinking title bar search box in Microsoft Office 365 applications

It might be a new development, but I only recently spotted the presence of a search box in the titles of both Microsoft Word and Microsoft Excel that I have as part of an Office 365 subscription. Though handy for searching file contents and checking on spelling and grammar, I also realised that the boxes take up quite a bit of space and decided to see if hiding them was possible.
![]()
In the event, I found that they could be shrunk from a box to an icon that expanded to pop up a box when you clicked on them. Since I did not need the box to be on view all the time, that outcome was sufficient for my designs, though it may not satisfy others who want to hide this functionality completely.
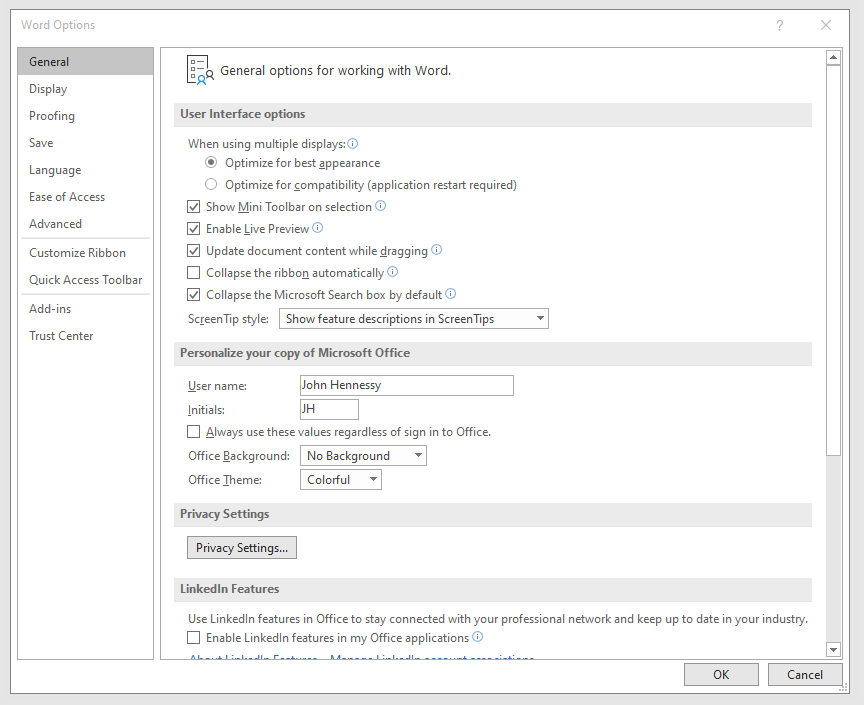
To get it, it was a matter of going to File > Options and putting a tick in the box next to the Collapse the Microsoft Search box by default entry in the General tab before clicking on the OK button. Doing that freed up some title bar space as desired, and searching is only a button press away.
Ensuring that Flatpak remains up to date on Linux Mint 19.2
The Flatpak concept offers a useful way of getting the latest version of software like LibreOffice or GIMP on Linux machines because repositories are managed conservatively when it comes to the versions of included software. Ubuntu has Snaps, which are similar in concept. Both options bundle dependencies with the packaged software so that its operation can use later versions of system libraries than what may be available with a particular distribution.
However, even Flatpak depends on what is available through the repositories for a distribution, as I found when a software update needed a version of the tool. The solution was to add PPA using the following command and agreeing to the prompts that arise (answering Y, in other words):
sudo add-apt-repository ppa:alexlarsson/flatpak
With the new PPA instated, the usual apt commands were used to update the Flatpak package and continue with the required updates. Since then, all has gone smoothly as expected.
Shared folders not automounting on an Ubuntu 18.04 guest in a VirtualBox virtual machine
Over the weekend, I finally got to resolve a problem that has affected Ubuntu 18.04 virtual machine for quite a while. The usual checks on Guest Additions installation and vboxsf group access assignment were performed but were not causing the issue. Also, no other VM (Windows (7 & 10) and Linux Mint Debian Edition) on the same Linux Mint 19.2 machine was experiencing the same issue. The latter observation made the problem intrinsic to the Ubuntu VM itself.
Because I install the Guest Additions software from the included virtual CD, I executed the following command to open the relevant file for editing:
sudo systemctl edit --full vboxadd-service
If I had installed virtualbox-guest-dkms and virtualbox-guest-utils from the Ubuntu repositories instead, then this would have been the command that I needed to execute instead of the above.
sudo systemctl edit --full virtualbox-guest-utils
Whichever configuration gets opened, the line that needs attention is the one beginning with "Conflicts" (line 6 in the file on my system). The required edit removes systemd-timesync.service from the list following the equals sign. It is worth checking that file paths include the correct version number for the Guest Additions software that is installed, in case this is not how things are. The only change that was needed on my Ubuntu VM was to the Conflicts line, and rebooting it got the Shared Folder automatically mounted under the /media directory as expected.
Performing parallel processing in Perl scripting with the Parallel::ForkManager module
In a previous post, I described how to add Perl modules in Linux Mint, while mentioning that I hoped to add another that discusses the use of the Parallel::ForkManager module. This is that second post, and I am going to keep things as simple and generic as they can be. There are other articles like one on the Perl Maven website that go into more detail.
The first thing to do is ensure that the Parallel::ForkManager module is called by your script; having the line of code presented below near the top of the file will do just that. Without this step, the script will not be able to find the required module by itself and errors will be generated.
use Parallel::ForkManager;
Then, the maximum number of threads needs to be specified. While that can be achieved using a simple variable declaration, the following line reads this from the command used to invoke the script. It even tells a forgetful user what they need to do in its own terse manner. Here $0 is the name of the script and N is the number of threads. Not all these threads will get used and processing capacity will limit how many actually are in use, which means that there is less chance of overwhelming a CPU.
my $forks = shift or die "Usage: $0 N\n";
Once the maximum number of available threads is known, the next step is to instantiate the Parallel::ForkManager object as follows to use these child processes:
my $pm = Parallel::ForkManager->new($forks);
With the Parallel::ForkManager object available, it is now possible to use it as part of a loop. A foreach loop works well, though only a single array can be used, with hashes being needed when other collections need interrogation. Two extra statements are needed, with one to start a child process and another to end it.
foreach $t (@array) {

my $pid = $pm->start and next;

<< Other code to be processed >>

$pm->finish;

}
Since there is often other processing performed by script, and it is possible to have multiple threaded loops in one, there needs to be a way of getting the parent process to wait until all the child processes have completed before moving from one step to another in the main script and that is what the following statement does. In short, it adds more control.
$pm->wait_all_children;
To close, there needs to be a comment on the advantages of parallel processing. Modern multicore processors often get used in single threaded operations, which leaves most of the capacity unused. Utilising this extra power then shortens processing times markedly. To give you an idea of what can be achieved, I had a single script taking around 2.5 minutes to complete in single threaded mode, while setting the maximum number of threads to 24 reduced this to just over half a minute while taking up 80% of the processing capacity. This was with an AMD Ryzen 7 2700X CPU with eight cores and a maximum of 16 processor threads. Surprisingly, using 16 as the maximum thread number only used half the processor capacity, so it seems to be a matter of performing one's own measurements when making these decisions.
Installing Perl modules using CPAN on Linux Mint 19.2
My online travel photo gallery is a self-coded set of PHP scripts that read data from tables in a MySQL database. These tables are built from input XML files using a Perl script that itself creates and executes an SQL script. The Perl script also does some image processing using GraphicsMagick commands to resize images and to add copyright information and image framing. Because this processed one image at a time sequentially, it was taking several minutes to complete and only partly used the capacity of the PC that I used.
This led me to look at adding parallel processing, which is what brought me to looking at the Parallel::ForkManager Perl module. An alternative approach might have been to add new images in such a way as not to need the full run involving hundreds of image files, but that will take more work and I fancied having a look at parallelising things anyway.
If it was not there already, the first act would have been to install build-essential to get access to the cpan command. The following command accomplishes this:
sudo apt-get install build-essential
Once that is there, the cpan command needs to be run and some questions answered to get things going. The first question to answer is whether you want setup to be as automated as possible, and the default answer of yes worked for me. The next question to answer regards the approach that cpan takes when installing modules: I chose sudo here (local::lib is the default value and manual is another option). After this, cpan drops into its own command shell. Here, I issued two more commands to continue the basic setup by updating CPAN.pm to the latest version and adding Bundle::CPAN to optimise the module further:
make install

install Bundle::CPAN
Continuing the last of these may need extra intervention to confirmation the suggested default of exit at one point in its operation, which takes a little time to complete. It is after this that Parallel::ForkManager can be installed using the following command:
install Parallel::ForkManager
That completed quickly and the cpan shell was exited using its exit command. Then, the new module was available in scripting after that. The actual use of this module is something that hope to describe in another post, so I am ending this one here, and the same process is just as applicable to setting up cpan and adding any other Perl CPAN module.