Executing PowerShell scripts in Windows 11
Recently, I have added the capability to update a Hugo-driven website from a laptop running Windows 11. Compared to what you get with Linux, I do feel a little like a fish out of water when it comes to using Windows for tasks that I accomplish more often on the former. That includes running PowerShell scripts instead of their BASH counterparts. While Linux Subsystem for Windows could be an option, my machine runs Windows 11 Home, where it is unavailable. Learning the ways of the Windows Terminal cannot do any harm in any case.
The default action of not executing PowerShell scripts is not a bad approach when it comes to keeping machines secure for less technical users. For the rest, you need to learn how to use the Set-ExecutionPolicy commandlet. Doing this in a safe means doing it in a restrictive manner. Thus, I chose the following command and executed it in a terminal running with admin privileges:
Set-ExecutionPolicy -ExecutionPolicy Unrestricted -Scope CurrentUser
The scope here is for the currently logged-in user, instead of allowing every user the same capability. Some undoubtedly might suggest an execution policy of AllSigned and that adds effort that I was unwilling to expend, hence the choice that I made. This is not that critical a machine, so that is why I made the choice that I did. There was nothing too complicated about the script logic anyway.
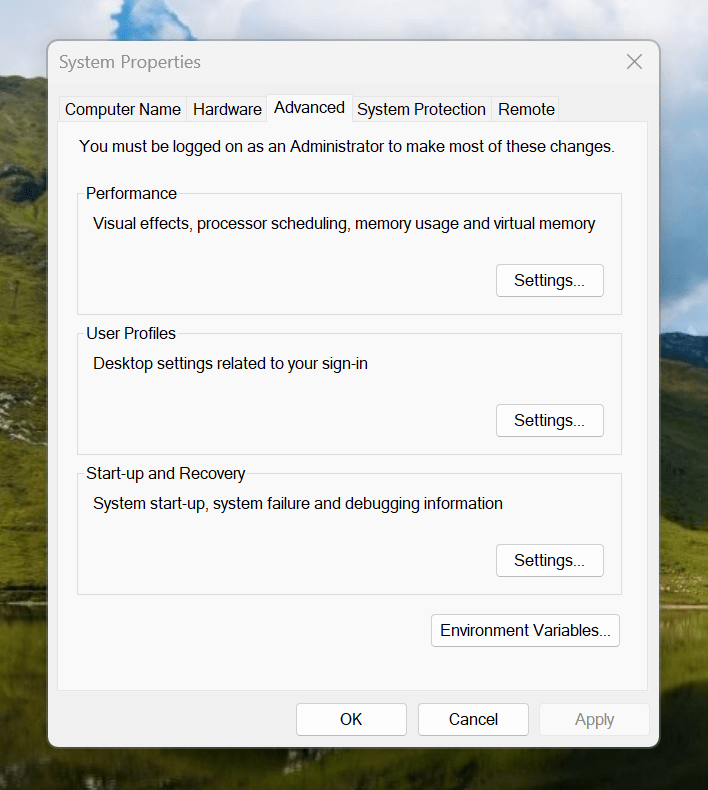
Making the script available without needing to specify the path to it was my next step. In my case, I added a new location to the Path environment variable. To accomplish that, you need to find the Control Panel, open it and go to System and Security. Then, move to System (Control Panel\System and Security\System) and click on Advanced System Settings. In the new dialogue box that appears, click on the Environment Variables... button. Next, select the Path entry and click on the Edit button. That spawns another dialogue box where I added the new path. Clicking the OK button in each dialogue box closes them all, one at a time, to get back to the Control Panel window again. That too can be closed, and any open terminals shut down and a new one opened. The process is clunky, yet it works once you know what to do.
At the end of all this, I had a scripted process for updating a Hugo-driven website. It was not as sleek as what I have on my Linux system, yet it works well enough to allow more flexibility. In time, I may refine things further.
Get web links from Outlook emails and Teams chats to open in your web browser of choice
By default, web links from either Outlook (here, I am referring to the Classic version and not the newer web appliance version that Microsoft would like us all to use, though many think it to be feature-incomplete) or Teams open in Edge, which may not be everyone's choice of web browser. Many choose Google Chrome, while I mainly use Mozilla Firefox, with Brave being another option that I have.
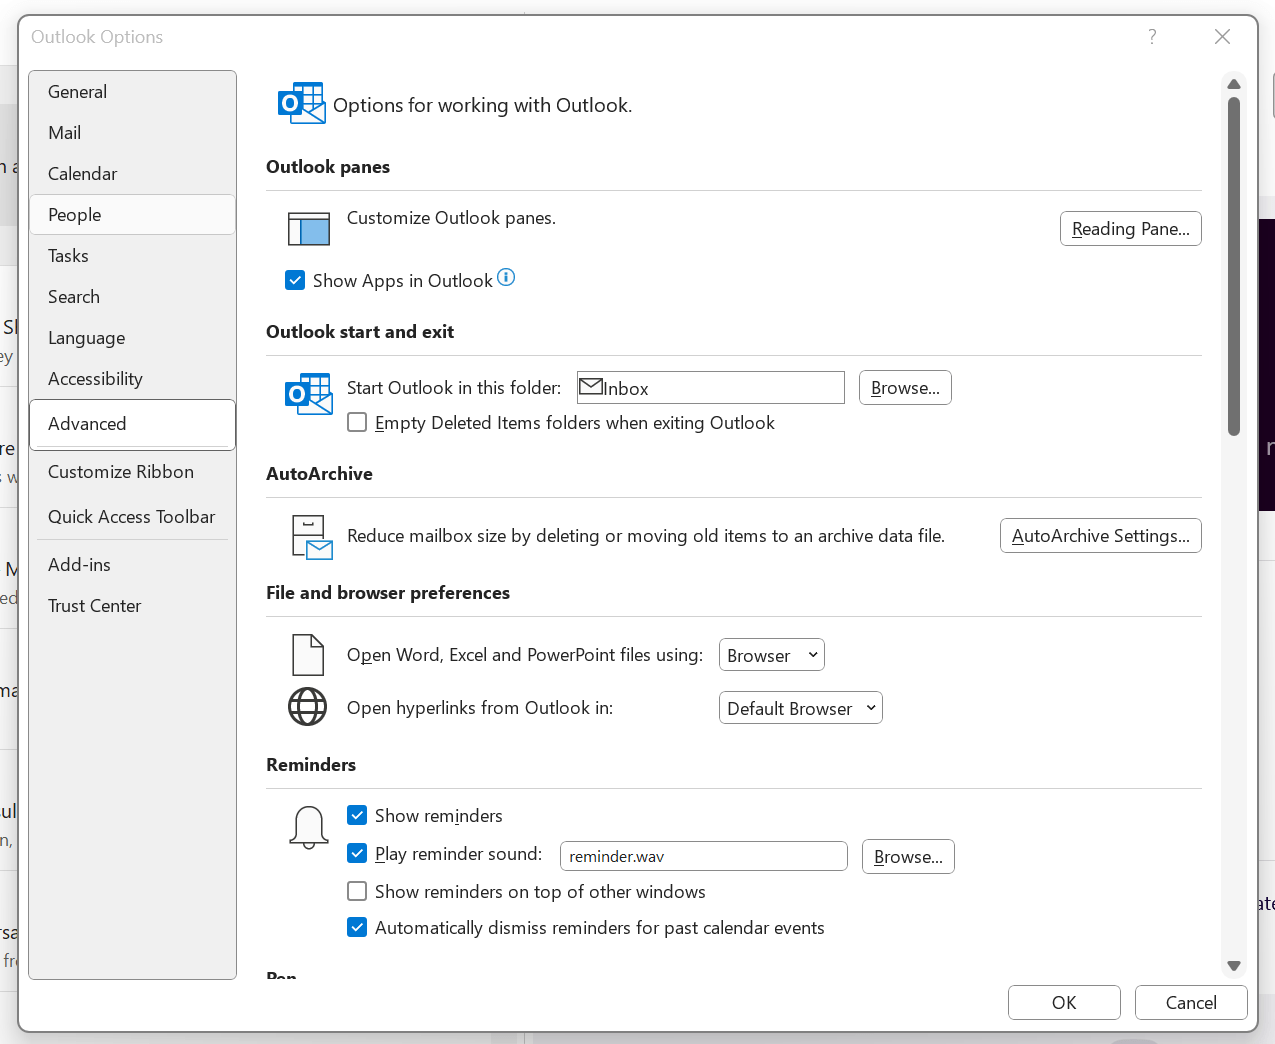
To get both Outlook and Teams to use your default system web browser, go to Outlook and navigate to File > Options > Advanced > File and browser preferences. Once there, look for the line with Open hyperlinks from Outlook in. The dropdown box will show Microsoft Edge by default, but there is another option: Default Browser. Choosing that will change things away from Edge to your chosen browser, assuming that you have set it by default using the Settings application.

If you have not gone there, navigate to Apps > Default apps. Once there, find the entry for the browser that you want to use and click on the Set default button. You also will see a list of file types, where you may need to change the setting for those as well. Once the system default is sorted, that will be honoured by Outlook and Teams as well.
Making the LanguageTool embedded HTTP Server work on Windows 11
My choice of Markdown editor is VS Code or VSCodium, the latter being a fork of the former with Microsoft telemetry removed. In either case, I use the LanguageTool Linter extension for the required grammar and spelling checks. Pointing that to the remote web service offered by LanguageTool could get punitive, even if I am a subscriber. Thus, I use a locally installed equivalent instead.
In my usual Linux system, that is how I work. However, I have replicated the set-up on a Windows laptop for added flexibility. The needed the JRE, so that was downloaded from the Oracle website and then installed. The next step is to download the LanguageTool embedded HTTP Server zip file and decompress it to a chosen location. To run the server, the command like the following is issued from the Windows Terminal (the single line may break over two here):
java -cp "[Chosen Location]\LanguageTool-stable\LanguageTool-6.4\languagetool-server.jar" org.languagetool.server.HTTPServer --port 8081 --allow-origin
That is enough to get things going because it fulfils the default settings of the LanguageTool Linter extension in VS Code or VSCodium. The fastText application is unavailable for Windows, so I did without it. So far, things are operating acceptably, even if there is a way to address more memory should that be required.
Observations from selected sessions of SAS Innovate 2024
SAS Innovate 2024 provided insight into evolving approaches to analytics modernisation, platform development and applied data science across multiple industries. This document captures observations from sessions addressing strategic platform migrations, unified analytics environments, enterprise integration patterns and practical applications in regulated sectors. The content reflects a discipline transitioning from experimental implementations to production-grade, business-critical infrastructure.

Strategic Platform Modernisation
A presentation from DNB Bank detailed the organisation's migration from SAS 9.4 to SAS Viya on Microsoft Azure. The strategic approach proved counter-intuitive: whilst SAS Viya supports both SAS and Python code seamlessly, DNB deliberately chose to rewrite their legacy SAS code library into Python. The rationale combined two business objectives. First, expanding the addressable talent market by tapping into the global Python developer pool. Second, creating a viable exit strategy from their primary analytics vendor, ensuring compliance with financial regulatory requirements to demonstrate realistic vendor transition options within 30 to 90 days.
This decision represents a fundamental shift in enterprise software value propositions. Competitive advantage no longer derives from creating vendor lock-in, but from providing powerful, stable and governed environments that fully embrace open-source tools. The winning strategy involves convincing customers to remain because the platform delivers undeniable value, not because departure presents insurmountable difficulty. This is something that signals the maturing of a market, where value flows through partnership rather than proprietary constraints.
Unified Analytics Environments
A healthcare analytics presentation addressed the persistent debate between low-code/no-code interfaces for business users and professional coding environments for data scientists. Two analysts tackled identical problems (predicting diabetes risk factors using a public CDC dataset) using different approaches within the same platform.
The low-code user employed SAS Viya's Model Studio, a visual interface. This analyst assessed the model for statistical bias against variables such as age and gender by selecting a configuration option, whereupon the platform automatically generated fairness statistics and visualisations.
The professional coder used SAS Viya Workbench, a code-first environment similar to Visual Studio Code. This analyst manually wrote code to perform identical bias assessments. However, direct code access enabled fine-tuning of variable interactions (such as age and cholesterol), ultimately producing a logistic regression model with marginally superior performance compared to the low-code approach.
The demonstration illustrated that the debate presents a false dichotomy. The actual value resides in unified platforms, enabling both personas to achieve exceptional productivity. Citizen data scientists can rapidly build and validate baseline models, whilst expert coders can refine those same models with advanced techniques and deploy them, all within a single ecosystem. This unified approach characterises disciplinary development, where focus shifts from tribal tool debates to collective problem-solving.
Analytics as Enterprise Infrastructure
Multiple architectural demonstrations illustrated analytics platforms evolving beyond sophisticated workbenches for specialists into the central nervous system of enterprise operations. Three distinct patterns emerged:
The AI Assistant Architecture: A demonstration featured a customer-facing AI assistant built with Azure OpenAI. When users interacted with the chatbot regarding credit risk, requests routed through Azure Logic App not to the large language model for decisions but to a SAS Intelligent Decisioning engine. The SAS engine functioned as the trusted decision core, executing business rules and models to generate real-time risk assessments, which returned to the chatbot for customer delivery. SAS provided not the interface but the automated decision engine.
The Digital Twin Pattern: A pharmaceutical use case described using historical data from penicillin manufacturing batches to train machine learning models. These models became digital twins of physical bioreactors. Rather than conducting costly and time-consuming physical experiments, researchers executed thousands of in silico simulated experiments, adjusting parameters in the model to discover the optimal recipe for maximising yield (the "Golden Batch").
The Microsoft 365 Automation Hub: A workflow demonstration showed SAS programmes functioning as critical nodes in Microsoft 365 ecosystems. The automated process involved SAS code accessing SharePoint folders, retrieving Excel files, executing analyses, generating new reports as Excel files and delivering those reports directly into Microsoft Teams channels for business users.
These patterns mark profound evolution. Analytics platforms are moving beyond sophisticated calculators for experts, becoming foundational infrastructure: the connective tissue enabling intelligent automation and integrating disparate systems such as cloud office suites, AI interfaces and industrial hardware into cohesive business processes. This evolution from specialised tool to core infrastructure clearly indicates analytics' growing maturity within enterprise contexts.
Applied Data Science in High-Stakes Environments
Whilst much data science narrative focuses on e-commerce recommendations or marketing optimisation, compelling applications tackle intensely human, high-stakes operational challenges. Heather Hallett, a former ICU nurse and healthcare industry consultant at SAS, presented on improving hospital efficiency.
She described the challenge of staffing intensive care units, where having appropriate nurse numbers with correct skills proves critical. Staffing decisions constitute "life and death decisions". Her team uses forecasting models (such as ARIMA) to predict patient demand and optimisation algorithms (including mixed-integer programming) to create optimal nurse schedules. The optimisation addresses more than headcount; it matches nurses' specific skills, such as certifications for complex assistive devices like intra-aortic balloon pumps, to forecasted needs of the sickest patients.
A second use case applied identical operational rigour to community care. Using the classic "travelling salesman solver" from optimisation theory, the team planned efficient daily routes for mobile care vans serving maximum numbers of patients in their homes, delivering essential services to those unable to reach hospitals easily.
These applications ground abstract concepts of forecasting and optimisation in deeply tangible human contexts. They demonstrate that beyond driving revenue or reducing costs, the ultimate purpose of data science and operational analytics can be directly improving and even saving human lives. This application of sophisticated mathematics to life preservation marks data science evolution from commercial tool to critical component of human-centred operations.
Transparency as Competitive Advantage
In highly regulated industries such as pharmaceuticals, generating trustworthy research proves paramount. A presentation from Japanese pharmaceutical company Shionogi detailed how they transform the transparency challenge in Real-World Evidence (RWE) into competitive advantage.
The core problem with RWE studies, which analyse data from sources such as electronic health records and insurance claims, involves their historical lack of standardisation and transparency compared to randomised clinical trials, leading regulators and peers to question validity. Shionogi's solution is an internal system called "AI SAS for RWE", addressing the challenge through two approaches:
Standardisation: The system transforms disparate Real-World Data from various vendors into a Shionogi-defined common data model based on OMOP principles, ensuring consistency where direct conversion of Japanese RWD proves challenging.
Semi-Automation: It semi-automates the entire analysis workflow, from defining research concepts to generating final tables, figures and reports.
The most innovative aspect involves its foundation in radical transparency. The system automatically records every research process step: from the initial concept suite where analysis is defined, through specification documents, final analysis programmes and resulting reports, directly into Git. This creates a complete, immutable and auditable history of exactly how evidence was generated.
This represents more than a clever technical solution; it constitutes profound strategic positioning. By building transparent, reproducible and efficient systems for generating RWE, Shionogi directly addresses core industry challenges. They work to increase research quality and trustworthiness, effectively transforming regulatory burden into competitive edge built on integrity. This move toward provable, auditable results hallmarks a discipline transitioning from experimental art to industrial-grade science.
User Experience as Productivity Multiplier
In complex data tool contexts, user experience (UX) has evolved beyond "nice-to-have" aesthetic features into a central product strategy pillar, directly tied to user productivity and talent acquisition. A detailed examination of the upcoming complete rewrite of SAS Studio illustrated this point.
The motivation for the massive undertaking proved straightforward: the old architecture was slow and becoming a drag on user productivity. The primary goal for the new version involved making a web-based application "feel like a desktop application" regarding speed and responsiveness. To achieve this, the team focused on improvements directly boosting productivity for coders and analysts:
A Modern Editor: Integrating the Monaco editor used in the widely popular Visual Studio Code, providing familiar and powerful coding experiences.
Smarter Assistance: Improving code completion and syntax help to reduce errors and time spent consulting documentation.
Better Navigation: Adding features such as code "mini-maps" enabling programmers to navigate thousands of lines of code instantly.
For modern technical software, UX has become a fundamental competitive differentiator. Faster, more intuitive and less frustrating tools do not merely improve existing user satisfaction; they enhance productivity. In competitive markets for top data science and engineering talent, providing a best-in-class user experience represents a key strategy for attracting and retaining exceptional people. The next leap in team productivity might derive not from new algorithms but from superior interfaces.
Conclusion
These observations from SAS Innovate 2024 illustrate a discipline maturing. Data science is moving beyond isolated experiments and "science projects", becoming pragmatic, integrated, transparent and deeply human business functionality. Focus shifts from algorithmic novelty to real-world application value (whether enabling better user experiences, building regulatory trust or making life-or-death decisions on ICU floors).
As analytics becomes more integrated and accessible, the challenge involves identifying where it might unexpectedly transform core processes within organisations, moving from specialist concern to foundational infrastructure enabling intelligent, automated and human-centred operations.
Stop Excel 365 saving files to OneDrive by default
Recently, I was doing some work in Excel (while I use the 365 version, this may work with others too) when I found it offering to save a file to OneDrive by default. My preference is to keep everything local, especially given the limitations of online storage. Thus, I sought a way to do just this.

That meant going to File > Options and then to the Save tab. In there, I found the option called Save to Computer by default and activated that. The default local location can be changed too, but I left this as it was because I tend to use multiple file locations anyway. Clicking on the OK button after making the change that I wanted was enough to set the behaviour as I required, and I no longer see the prompt for online storage since then.
Resolving "repository doesn't support architecture i386" error when checking for updates to Brave Browser on Linux
Recently, I started to observe the following message when doing my usual update routine on Linux Mint (Debian, Ubuntu and their variants are likely affected as well):
N: Skipping acquire of configured file 'main/binary-i386/Packages' as repository 'https://brave-browser-apt-release.s3.brave.com stable InRelease' doesn't support architecture 'i386'
As the message suggests, there was something amiss with the repository set up for Brave, a browser that I added for extra privacy. Since Firefox remains the main one that I use, Brave is something that I have in hand for when I need it. Handily, its installation routine adds in repository information for keeping it up to date. However, there is an issue with what you find in /etc/apt/sources.list.d/brave-browser-release.list. By default, the line appears like thus:
deb [signed-by=/usr/share/keyrings/brave-browser-archive-keyring.gpg] https://brave-browser-apt-release.s3.brave.com/ stable main
To avoid the i386 error, it needs to look like this instead:
deb [signed-by=/usr/share/keyrings/brave-browser-archive-keyring.gpg arch=amd64] https://brave-browser-apt-release.s3.brave.com/ stable main
The difference between the tow is the presence of arch=amd64 in the second version. This stops the search for non-existent i386 files, the 32 bit version in other words. With Y2K2038 in the offing, the days of 32 bit computing architectures are numbered because there is a real limit to the magnitude of the dates that can be represented in any case. Thus, sticking with 64 bit ones is both the present for many and the future for all.
Upgrading from OpenMediaVault 6.x to OpenMediaVault 7.x
Having an older PC to upgrade, I decided to install OpenMediaVault on there a few years ago after adding in 6 TB and 4 TB hard drives for storage, a Gigabit network card to speed up backups and a new BeQuiet! power supply to make it quieter. It has been working smoothly since then, and the release of OpenMediaVault 7.x had me wondering how to move to it.
Usefully, I enabled an SSH service for remote logins and set up an account for anything that I needed to do. This includes upgrades, taking backups of what is on my NAS drives, and even shutting down the machine when I am done with what I need to do with it.
Using an SSH session, the first step was to switch to the administrator account and issue the following command to ensure that my OpenMediaVault 6.x installation was as up-to-date as it could be:
omv-update
Once that had completed what it needed to do, the next step was to do the upgrade itself with the following command:
omv-release-upgrade
With that complete, it was time to reboot the system, and I fired up the web administration interface and spotted a kernel update that I applied. Again, the system was restarted, and further updates were noticed and these were applied, again through the web interface. The whole thing is based on Debian 12.x, but I am not complaining as long as it quietly does exactly what I need of it. There was one slight glitch when doing an update after the changeover, and that was quickly sorted.
Later on, I ran into trouble because I had changed my broadband. Because the router address had changed, the system lost its access to the rest of the internet. The web interface also got disable and was issuing 502: Bad Gateway errors. The solution was to execute the following command with superuser privileges:
omv-salt stage run deploy
That took quite a while to run, though. After it completed, I needed to work out what the administrator credentials were. With that done, I could log in and update the network details as needed to restore external internet access. Since then, all has been well.
Updating fail2ban filters for WordPress
Not so long ago, WordPress warned me that some of its Fail2ban filters were obsolete because I have the corresponding WP-fail2ban plugin installed, and the software is present on the underlying Ubuntu Server system. The solution was to connect to the server by SSH and execute the following commands.
wget https://plugins.svn.wordpress.org/wp-fail2ban/trunk/filters.d/wordpress-hard.conf

wget https://plugins.svn.wordpress.org/wp-fail2ban/trunk/filters.d/wordpress-soft.conf

wget https://plugins.svn.wordpress.org/wp-fail2ban/trunk/filters.d/wordpress-extra.conf

sudo mv wordpress-*.conf /etc/fail2ban/filter.d/
The first three commands download the updated configuration files before the last moves them to their final location. It is tempting to download the files directly to that final location, only for wget to create new files instead of overwriting the old ones as required.
Catching keyboard interruptions in a Python script for a more orderly exit
A while back, I was using a Python script to watch a folder and process photos in there, whenever a new one was added. Eventually, I ended up with a few of these because I was unable to work out a way to get multiple folders watched in the same script.
In each of them, though, I needed a tidy way to exit a running script in place of the stream of consciousness that often emerges when you do such things to it. Because I knew what was happening anyway, I needed a script to terminate quietly and set to uncover a way to achieve this.
What came up was something like the code that you see below. While I naturally did some customisations, I kept the essential construct to capture keyboard interruption shortcuts, like the use of CTRL + C in a Linux command line interface.
if __name__ == '__main__':
    try:
        main()
    except KeyboardInterrupt:
        print('Interrupted')
        try:
            sys.exit(130)
        except SystemExit:
            os._exit(130)
What is happening above is that the interruption operation is captured in a nested TRY/EXCEPT block. The outer block catches the interruption, while the inner one runs through different ways of performing the script termination. For the first termination function call, you need to call the SYS package and the second needs the OS one, so you need to declare these at the start of your script.
Of the two, SYS.EXIT is preferable because it invokes clean-up activities while OS._EXIT does not, which might explain the "_" prefix in the second of these. In fact, calling SYS.EXIT is not that different to issuing RAISE SYSTEMEXIT instead because that lies underneath it. Here OS._EXIT is the fallback for when SYS.EXIT fails, and it is not all that desirable given the abrupt action that it invokes.
The exit code of 130 is fed to both, since that is what is issued when you terminate a running instance of an application on Linux anyway. Using 0 could negate any means of picking up what has happened if you have downstream processing. In my use case, everything was standalone, so that did not matter so much.
Automating writing using R and Claude
Automation of writing using AI has become prominent recently, especially since GPT came to everyone's notice. It is more than automation of proofreading but of producing the content itself, as Mark Hinkle and Luke Matthews can testify. Figuring out how to use Generative AI needs more than one line prompts, so knowing what multi-line ones will work is what is earning six digit annual salaries for some.
Recently, I gave this a go when writing a post that used content from a Reddit post thread. The first step was to extract the content from the thread, and I found that I could use R to do this. That meant installing the RedditExtractoR package using the following command:
install.packages("RedditExtractoR")
Then, I created a short script containing the following lines of code with placeholders added in place of the actual locations:
library("RedditExtractoR")
write.csv(get_thread_content("<URL for Reddit post thread>"), "<location of text file>")
The first line above calls the RedditExtractoR package for use so that its get_thread_content function could be used to scape the thread's textual content. This was then fed to write.csv for writing out a text file with content.
Once I had the text file, I could upload it to Anthropic's Claude for the next steps. Firstly, I got it to give me a summary of the thread discussion before I asked it to give me the suggested solutions to the issue. Impressively, it capably provided me with the latter.
Now armed with these answers, I set to crafting the post from them. Claude did not do all the work for me, but it certainly helped with the writing. This is something that I fancy exploring further, especially given how business computing is likely to proceed in the next few years.