TOPIC: VIRTUALBOX
Windows 11 virtualisation on Linux using KVM and QEMU
Windows 11 arrived in October 2021 with a requirement that posed a challenge to many virtualisation users: TPM 2.0 was mandatory, not optional. For anyone running Windows in a virtual machine, that meant their hypervisor needed to emulate a Trusted Platform Module convincingly enough to satisfy the installer.
VirtualBox, which had been my go-to choice for desktop virtualisation for years, could not do this in its 6.1.x series. Support arrived only with VirtualBox 7.0 in October 2022, meaning anyone who needed Windows 11 in a VM faced roughly a year with no straightforward path through their existing tool.
That gap prompted a look at KVM (Kernel-based Virtual Machine), which could handle the TPM requirement through software emulation. This article documents what that investigation found, what the rough edges were at the time, and how the situation has developed in the years since.
What KVM Actually Is
KVM is not a standalone application. It is a virtualisation infrastructure built directly into the Linux kernel, and has been since the module was merged between 2006 and 2007. Rather than sitting on top of the operating system as a separate layer, it turns the Linux kernel itself into a hypervisor. This makes KVM a type-1 hypervisor in practice, even when running on a desktop machine, which is part of why its performance characteristics compare favourably with hosted solutions.
In use, KVM operates alongside QEMU for hardware emulation, libvirt for virtual machine management and virt-manager as a graphical front end. The distinction matters because problems and improvements tend to originate in different parts of that stack. KVM itself is rarely the issue; QEMU and libvirt are where the day-to-day configuration lives.
To confirm that the host CPU supports hardware virtualisation before beginning, the following command checks for the relevant flags:
egrep -c '(vmx|svm)' /proc/cpuinfoAny result above zero means the hardware is capable. Intel processors expose the vmx flag and AMD processors expose svm.
Installing the Required Packages
The installation is straightforward on any major distribution.
On Debian and Ubuntu:
sudo apt install qemu-kvm libvirt-daemon-system libvirt-clients bridge-utils virt-managerOn Fedora:
sudo dnf install @virtualizationOn Arch Linux:
sudo pacman -S qemu libvirt virt-manager bridge-utilsAfter installation, the current user needs to be added to the libvirt and kvm groups before the tools will work without root privileges:
sudo usermod -aG libvirt,kvm $(whoami)Logging out and back in instates the group membership.
Configuring Network Bridging
The default network configuration in libvirt uses NAT, which is sufficient for most purposes and requires no additional setup. The VM can reach the internet and the host, but the host cannot initiate connections to the VM. For a Windows 11 guest used primarily for application compatibility, NAT works without complaint.
A bridged network, which places the VM on the same network segment as the host, requires a wired Ethernet connection. Wireless interfaces do not support bridging in the standard Linux networking stack due to how 802.11 handles MAC addresses. For those on a wired connection, a bridge can be defined with a file named bridge.xml:
<network>
  <name>br0</name>
  <forward mode="bridge"/>
  <bridge name="br0"/>
</network>
The bridge is then activated with:
sudo virsh net-define bridge.xml
sudo virsh net-start br0
sudo virsh net-autostart br0
Installing Windows 11
Windows 11 requires TPM 2.0 and Secure Boot. Neither is present in a default KVM configuration, and both need to be added explicitly.
The swtpm package provides software TPM emulation:
sudo apt install swtpm swtpm-tools   # Debian/Ubuntu
sudo dnf install swtpm swtpm-tools   # Fedora
UEFI firmware is provided by the ovmf package, which supplies the file that virt-manager needs for Secure Boot:
sudo apt install ovmf   # Debian/Ubuntu
sudo dnf install edk2-ovmf   # Fedora
In virt-manager, when creating the VM, the firmware should be set to UEFI x86_64: /usr/share/OVMF/OVMF_CODE.fd rather than the default BIOS option. A TPM 2.0 device should be added in the hardware configuration before the VM is started. With those two elements in place, the Windows 11 installer proceeds without complaint about the hardware requirements.
The VirtIO drivers ISO should be attached as a second virtual CD-ROM drive during installation. The installer will not find the storage device otherwise because the VirtIO disk controller is not a standard device that Windows recognises without a driver. When prompted to select an installation location and no disks appear, clicking "Load driver" and browsing to the VirtIO ISO resolves it.
During the out-of-box experience, Windows 11 requires a Microsoft account and an internet connection by default. To bypass this and create a local account instead, opening a command prompt with Shift+F10 and running the following works on the Home edition:
oobebypassNROThe machine restarts and presents an option to proceed without internet access.
Performance Considerations
KVM performance for a Windows 11 guest is generally good, but one factor specific to Windows 11 is worth understanding. Memory Integrity, also referred to as Hypervisor-Protected Code Integrity (HVCI), is a Windows security feature that uses virtualisation to protect the kernel. Running it inside a virtual machine creates nested virtualisation overhead because the guest is attempting to run its own virtualisation layer inside the host's. The performance impact is more pronounced on processors predating Intel Kaby Lake or AMD Zen 2, where the hardware support for nested virtualisation is less capable.
The CPU type selection in virt-manager also matters more than it might appear. Setting the CPU model to host-passthrough exposes the actual host CPU flags to the guest, which improves performance compared to emulated CPU models, at the cost of reduced portability if the VM image is ever moved to a different machine.
Host File System Access and Clipboard Sharing
This was where the experience diverged most noticeably from VirtualBox. VirtualBox Guest Additions handle shared folders and clipboard integration as a single installation, and the result works reliably with minimal configuration. KVM requires separate solutions for each, and in 2022 neither was as seamless as it has since become.
Clipboard Sharing via SPICE
Clipboard sharing uses the SPICE display protocol rather than VNC. The VM needs a SPICE display and a virtio-serial controller, which virt-manager adds automatically when SPICE is selected. Within the Windows guest, the installer for SPICE guest tools provides the clipboard agent. Once installed, clipboard text passes between host and guest in both directions.
The critical dependency that caused problems in 2022 was the virtio-serial channel. Without a com.redhat.spice.0 character device present in the VM configuration, the clipboard agent installs successfully but does nothing. Virt-manager now adds this automatically when SPICE is selected, which removes one of the more common failure points.
Host Directory Sharing via Virtiofs
At the time of this investigation, the practical option for sharing files between the Linux host and a Windows guest was WebDAV, which worked but felt like a workaround. The proper solution, virtiofs, existed but was not yet well-supported on Windows guests. The situation has since improved to the point where virtiofs is now the standard recommended approach.
It requires three components: the virtiofsd daemon on the host (included in recent QEMU packages), the virtiofs driver from the VirtIO Windows drivers package and WinFsp, which is the Windows equivalent of FUSE. Once configured through virt-manager's file system hardware settings, the shared directory appears as a mapped drive in Windows Explorer. The virtiofsd daemon was also rewritten in Rust in the intervening period, improving both its reliability and performance.
To configure a shared directory, shared memory must first be enabled in the VM's memory settings, then a file system device added with the driver set to virtiofs, a source path on the host and an arbitrary mount tag. The corresponding libvirt XML looks like this:
<memoryBacking>
  <source type='memfd'/>
  <access mode='shared'/>
</memoryBacking>

<filesystem type='mount' accessmode='passthrough'>
  <driver type='virtiofs' queue='1024'/>
  <source dir='/home/user/shared'/>
  <target dir='host_share'/>
</filesystem>
This was the area where VirtualBox held a clear practical advantage in 2022. The gap has since narrowed considerably.
Migrating from VirtualBox
Moving existing VirtualBox VMs to KVM is possible using qemu-img, which converts between disk image formats. The straightforward conversion from VDI to QCOW2 is:
qemu-img convert -f vdi -O qcow2 windows11.vdi windows11.qcow2For large images or where reliability is a concern, converting via an intermediate RAW format reduces the risk of issues:
qemu-img convert -f vdi -O raw windows11.vdi windows11.raw
qemu-img convert -f raw -O qcow2 windows11.raw windows11.qcow2
The resulting QCOW2 file can then be used when creating a new VM in virt-manager, selecting "Import existing disk image" rather than creating a new one.
How the Landscape Has Shifted Since
The investigation described here took place during a specific window: VirtualBox 6.1.x was the current release, Windows 11 had just launched, and KVM was the most practical route to TPM emulation on Linux. That context has changed in several ways worth noting for anyone reading this in 2026.
VirtualBox 7.0 arrived in October 2022 with TPM 1.2 and 2.0 support, Secure Boot and a number of additional improvements. The original reason for investigating KVM was resolved, and for those who had moved across during the gap period, returning to VirtualBox for Windows guests made sense given its more straightforward Guest Additions integration.
QEMU reached version 10.0 in April 2025, a significant milestone reflecting years of accumulated improvements to hardware emulation, storage performance and x86 guest support. Libvirt has kept pace, adding reliable internal snapshots for UEFI-based VMs, evdev input device hot plug and improved unprivileged user support. The virtiofs situation for Windows guests has moved from "technically possible but awkward" to "the recommended approach with good documentation and a rewritten daemon", which addresses the most significant practical shortcoming from 2022 directly.
The broader desktop virtualisation landscape shifted when VMware Workstation Pro became free for all users, including commercial ones, in November 2024. VMware Workstation Player was discontinued as a separate product at the same time, having become redundant once Workstation Pro was available at no cost. This gave desktop users a third credible option alongside VirtualBox and KVM, with VMware's historically strong Windows guest integration now accessible without a licence fee, though users of the free version are not entitled to support through the global support team.
The miniature PC market also expanded considerably from 2023 onwards, with Intel N100-based and AMD Ryzen Embedded systems offering enough performance to run Windows natively at modest cost. For many people, that proves a cleaner solution than any hypervisor, eliminating the integration limitations entirely by giving Windows its own dedicated hardware.
Final Assessment
KVM handled Windows 11 competently during a period when the alternatives could not, and the platform has continued to improve in the years since. The two areas that fell short in 2022, host file sharing and clipboard integration, have been addressed by developments in virtiofs and the SPICE tooling, and a new user starting today may find the experience noticeably smoother.
Whether KVM is the right choice in 2026 depends on the use case. For Linux-native workloads and server-style VM management, it remains the strongest option on Linux. For a Windows desktop guest where ease of integration matters most, VirtualBox 7.x and VMware Workstation Pro are both strong alternatives, with the latter now free to use for both commercial and personal purposes. The question that drove this investigation was answered by VirtualBox itself in October 2022. KVM provided a workable solution in the meantime, and the platform has only become more capable since then.
Additional Reading
How To Convert VirtualBox Disk Image (VDI) to Qcow2 format
How to enable TPM and secure boot on KVM?
Windows 11 on KVM – How to Install Step by Step?
Enable Virtualization-based Protection of Code Integrity in Microsoft Windows
VirtualBox memory allocation error: Solving Linux Mint host issues after LLM usage
It happened to me today when I tried starting up Windows virtual machines in VirtualBox on my main Linux Mint workstation as a host after a long layover for these. They failed to start, only for these messages to appear:
Out of memory condition when allocating memory with low physical backing. (VERR_NO_LOW_MEMORY).
Result Code:

NS_ERROR_FAILURE (0x80004005)

Component:

ConsoleWrap

Interface:

IConsole {6ac83d89-6ee7-4e33-8ae6-b257b2e81be8}
Since the messages are cryptic in the circumstances, I had to seek out their meaning. The system has plenty of memory, so it could be that. Various suggestions came my way like installing the VirtualBox Extension Pack or reinstalling VirtualBox Extensions in the affected VM. The first had no effect, while the second was impossible.
However, there was one more suggestion: fragmentation of memory, much like file fragmentation on a disk drive. Thus, I opted for a reboot, which sorted out things, making it look as if that were the problem. If it comes up again, I might try compacting the memory with the following command, leaving for a while to complete due to any temporary system slowdown:
echo 1 > /proc/sys/vm/compact_memory
Because there had been some on-machine usage of an LLM, I now reckon that caused the malaise. These can be as heavy on memory as they are on processors, so fragmentation can result. That is yet another likely lesson learned from experimenting with this much-hyped technology.
Getting Adobe Lightroom Classic to remember the search filters that you have set
With Windows 10 support to end in October 2025 and VirtualBox now offering full support for Windows 11, I have moved onto Windows 11 for personal use while retaining Windows 10 for professional work, at least for now. Of course, a lot could happen before 2025 with rumours of a new Windows version, the moniker Windows 12 has been mooted, but all that is speculation for now.
As part of the changeover, I moved the Adobe apps that I have in an ongoing subscription, Lightroom Classic and Photoshop are the main ones for me, to the new virtual machine. That meant that some settings from the previous one were lost and needed reinstating.
One of those was the persistence of Library Filters, so I had to find out how to get that sorted. If my memory is not fooling me, this seemed to be a default action in the past, and that meant that I was surprised by the change in behaviour.
Nevertheless, I had to go to the File menu, select Library Filters (it is near the bottom of the menu in the current version at the time of writing) and switch on Lock Filters by clicking on it to get a tick mark preceding the text. There is another setting called Remember Each Source's Filters Separately in the same place that can be set in the same manner if so desired, and I am experimenting with that at the moment, even though I have not bothered with this in the past.
How to adjust Adobe Lightroom Classic font sizes beyond the default options
Earlier in the year, I upgraded my monitor to a 34-inch widescreen Iiyama XUB3493WQSU. At the time, I was in wonderment at what I was doing, even if I have grown used to it now. For one thing, it made the onscreen text too small, so I ended up having to scale things up in both Linux and Windows. The former turned out to be more malleable than the latter, and that impression also applies to the main subject of this piece.
What I also found is that I needed to scale the user interface font sizes within Adobe Lightroom Classic running within a Windows virtual machine on VirtualBox. That can be done by going to Edit > Preferences through the menus and then going to the Interface tab in the dialogue box that appears where you can change the Font Size setting using the dropdown menu and confirm changes using the OK button.
However, the range of options is limited. Medium appears to be the default setting, while the others include Small, Large, Larger and Largest. Large scales by 150%, Larger by 200% and Largest by 250%. Of these, Large was the setting that I chose, though it always felt too big to me.
Out of curiosity, I decided to probe further, only to find extra possibilities that could be selected by direct editing of a configuration file. This file is called Lightroom Classic CC 7 Preferences.agprefs and can be found in C:\Users\[user account]\AppData\Roaming\Adobe\Lightroom\Preferences. In there, you need to find the line containing AgPanel_baseFontSize and change the value enclosed within quotes and save the file. Taking a backup beforehand is wise, even if the modification is not a major one.
The available choices are scale125, scale140, scale150, scale175, scale180, scale200 and scale250. Some of these may be recognisable as those available through the Lightroom Classic user interface. In my case, I chose the first on the list, so the line in the configuration file became:
AgPanel_baseFontSize="scale125"
While there may be good reasons for the additional options not being available through the user interface, things are working out OK for me for now. It is another tweak that helps me to get used to the larger screen size and its higher resolution.
Fixing Windows 11 freezing issues in VirtualBox with KVM paravirtualisation
Recently, I have been trying to get Windows 11 to run smoothly within a VirtualBox virtual machine, and there has been a lot of experimentation along the way. This was to eradicate intermittent freezes that escalated CPU usage and necessitated hard restarts. If I were to use Windows 11 as a long-term replacement for Windows 10, these needed to go.
An internet search showed that others faced the same predicament, yet a range of proposed solutions did nothing for me. The suggestion of enabling 3D graphics capability did nothing but produce a black screen at startup time, so that was not a runner. It might have been the combination of underlying graphics hardware and the drivers on my Linux Mint machine that hindered me when it helped others.
In the end, a look at the bug tracker for Windows guest operating systems running on VirtualBox sent me in another direction. The Paravirtualisation interface also may have caused issues with Windows 10 virtual machines, since these were all set to KVM. Doing the same for Windows 11 seems to have stopped the freezing behaviour so far. It meant going to the virtual machine settings, navigating to System > Acceleration and changing the dropdown menu value from Default to KVM before clicking on the OK button.
Before that, I have been blaming the newness of VirtualBox 7 (it is best not to expect too much of a fresh release bringing such major changes) and even the way that I installed Windows 11 using the streamlined installation or licensing issues. Now that things are going better, it may have been a lesson from Windows 10 that I had forgotten. The EFI, Secure Boot and TPM 2.0 requirements of Windows 11 also blind sided me, especially given the long wait for VirtualBox to add such compatibility, but that is behind me at this stage.
Given that Windows 11 is not perfect, Start11 makes it usable and the October 2025 expiry for Windows 10 also focuses my mind. It is time to move over for the sake of future-proofing if nothing else. In time, we may get a better operating system as Windows 11 matures and some minds surely are thinking of a "Windows 12". Depending on how things go, we may get to a point where something vintage in the nature of Windows XP, Windows 7 or Windows 10 appears. Those older versions of Windows became like old gold during their lives.
Converting QEMU disk images to VirtualBox images on Linux Mint 21
Recently, VirtualBox gained fuller support for Windows 11 and I successively set up a new Windows 11 virtual machine that, I hope, will supplant a Windows 10 counterpart in time. While the setup itself was streamlined, I ran into such stability issues that I set the new VM aside until a new version of VirtualBox got released. That has happened with the appearance of version 7.0.2, but Windows 11 remains prone to freezing on my Linux Mint machine. Thankfully, that now is much less frequent, yet the need for added stability remains outstanding.
While I was thinking about trying out VirtualBox 7.0.0, I remembered a QEMU machine that I had running Windows 11. Though QEMU proved more limited than VirtualBox when it came to having easy availability of functionality like moving data in and out of the virtual machine or support for sound, there was no problem with TPM support or system stability. Since it did contain some useful data, I wondered about converting its virtual hard disk to VirtualBox format, and it is easy to do. First, you need to install qemu-img and other utilities as follows:
sudo apt-get install qemu-utils
With that in place, executing a command like the following performs the required conversion. Here, the -O switch specifies the required file type of vdi in this case.
qemu-img convert -O vdi [virtual hard disk].qcow2 [virtual hard disk].vdi
While I have yet to mount it on the new VirtualBox Windows 11 virtual machine, it is good to have the old virtual hard disk available for doing so. The thought of using it as a boot drive in VirtualBox did enter my mind, but the required change of drivers and other incompatibilities dissuaded me from doing so.
Changing the UUID of a VirtualBox Virtual Disk Image in Linux
Recent experimentation centring around getting my hands on a test version of Windows 11 had me duplicating virtual machines and virtual disk images, though VirtualBox still is not ready for the next Windows version; it has no TPM capability at the moment. Nevertheless, I was able to get something after a fresh installation that removed whatever files were on the disk image. That meant that I needed to mount the old version to get at those files again.
While renaming partially helped with this, what I really needed to do was change the UUID, so VirtualBox would not report a collision between two disk images with the same UUID. To avoid this, the UUID of one of the disk images had to be changed and a command like the following was used to accomplish this:
VBoxManage internalcommands sethduuid [Virtual Disk Image Name].vdi
Because I was doing this on Linux Mint, I could call VBoxManage without need to tell the system where it was, as would be the case on Windows. Otherwise, it is the sethduuid portion that changes the UUID as required. Another way around this is to clone the VDI file using the following command, but I had not realised that at the time:
VBoxManage clonevdi [old virtual disk image].vdi [new virtual disk image].vdi
It appears that there can be more than one way to do things in VirtualBox at times, so the second way will remain on reference for the future.
Getting rid of the Windows Resizing message from a Manjaro VirtualBox guest
Like Fedora, Manjaro also installs a package for VirtualBox Guest Additions when you install the Linux distro in a VirtualBox virtual machine. However, it does have certain expectations when doing this. On many systems, and my own is one of these, Linux guests are forced to use the VMSVGA virtual graphics controller while Windows guests are allowed to use the VBoxSVGA one. It is the latter that Manjaro expects, so you get a message like the following appearing when the desktop environment has loaded:
Windows Resizing

Set your VirtualBox Graphics Controller to enable windows resizing
After ensuring that gcc, make, perl and kernel headers are installed, I usually install VirtualBox Guest Additions myself from the included ISO image, and so I did the same with Manjaro. Doing that and restarting the virtual machine got me extra functionality like screen resizing and being able to copy and paste between the VM and elsewhere after choosing the Bidirectional setting in the menus under Devices > Shared Clipboard.
That still left an unwanted message popping up on startup. To get rid of that, I just needed to remove /etc/xdg/autostart/mhwd-vmsvga-alert.desktop. While it can be deleted, I just moved it somewhere else and a restart proved that the message was gone as needed. Now everything is working as I wanted.
Resolving VirtualBox Shared Folders problems in Fedora 32 through a correct Guest Additions installation
While some Linux distros like Fedora install VirtualBox drivers during installation time, I prefer to install the VirtualBox Guest Additions themselves. Before doing this, it is best to remove the virtualbox-guest-additions package from Fedora to avoid conflicts. After that, execute the following command to ensure that all prerequisites for the VirtualBox Guest Additions are in place before mounting the VirtualBox Guest Additions ISO image and installing from there:
sudo dnf -y install gcc automake make kernel-headers dkms bzip2 libxcrypt-compat kernel-devel perl
During the installation, you may encounter a message like the following:
ValueError: File context for /opt/VBoxGuestAdditions-<VERSION>/other/mount.vboxsf already defined
This is generated by SELinux, so the following commands need to be executed before repeating the installation of VirtualBox Guest Additions:
sudo semanage fcontext -d /opt/VBoxGuestAdditions-<VERSION>/other/mount.vboxsf

sudo restorecon /opt/VBoxGuestAdditions-<VERSION>/other/mount.vboxsf
Without doing the above step and fixing the preceding error message, I had an issue with mounting of Shared Folders whereby the mount point was set up, but no folder contents were displayed. This happened even when my user account was added to the vboxsf group, and it proved to be the SELinux context issue that was the cause.
Lessons learned on managing Windows Taskbar and Start Menu colouring in VirtualBox virtual machines
In the last few weeks, I have had a few occasions when the colouration of the Windows 10 taskbar and its Star Menu has departed from my expectations. At times, this happened in VirtualBox virtual machine installations and both the legacy 5.2.x versions and the current 6.x ones have thrown up issues.
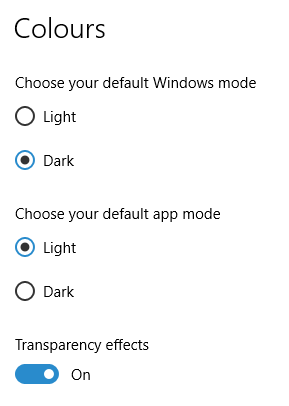

The first one actually happened with a Windows 10 installation in VirtualBox 5.2.x when the taskbar changed colour to light grey and there was no way to get it to pick up the colour of the desktop image to become blue instead. The solution was to change the Windows from Light to Dark in order for the desired colouration to be applied, and the settings above are taken from the screen that appears on going to Settings > Personalisation > Colours.
The second issue appeared in Windows 10 Professional installation in VirtualBox 6.0.x when the taskbar and Start Menu turned transparent after an updated. This virtual machine is used to see what is coming in the slow ring of Windows Insider, so some rough edges could be expected. The solution here was to turn off 3D acceleration in the Display pane of the VM settings after shutting it down. Starting it again showed that all was back as expected.
Both resolutions took a share of time to find and there was a deal of experimentation needed too. Once identified, they addressed the issues as desired. Hence, I am recording them here for use by others as much as future reference for myself.