TOPIC: SYSTEM ADMINISTRATION
Building and installing Microsoft Core Fonts on Fedora 19 with RPM
While I have a previous posting from 2009 that discusses adding Microsoft's Core Fonts to the then current version of Fedora, it did strike me that I hadn't laid out the series of commands that were used. Instead, I referred to an external and unofficial Fedora FAQ. That's still there, yet I also felt that I was leaving things a little to chance, given how websites can disappear quite suddenly.
Even after next to four years, it still amazes me that you cannot install Microsoft's Core Fonts in Fedora as you would on Ubuntu, Linux Mint or even Debian. Therefore, the following series of steps is as necessary now as it was then.
The first step is to add in a number of precursor applications such as wget for command line file downloading from websites, cabextract for extracting the contents of Windows CAB files, rpmbuild for creating RPM installers and utilities for the XFS file system that chkfontpath needs:
sudo yum -y install rpm-build cabextract ttmkfdir wget xfs
Here, I have gone with terminal commands that use sudo, but you could become the superuser (root) for all of this and there are those who believe you should. The -y switch tells yum to go ahead with prompting you for permission before it does any installations. The next step is to download the Microsoft fonts package with wget:
sudo wget http://corefonts.sourceforge.net/msttcorefonts-2.0-1.spec
Once that is done, you need to install the chkfontpath package because the RPM for the fonts cannot be built without it:
sudo rpm -ivh http://dl.atrpms.net/all/chkfontpath
Once that is in place, you are ready to create the RPM file using this command:
sudo rpmbuild -ba msttcorefonts-2.0-1.spec
After the RPM has been created, it is time to install it:
sudo yum install --nogpgcheck ~/rpmbuild/RPMS/noarch/msttcorefonts-2.0-1.noarch.rpm
When installation has completed, the process is done. Because I used sudo, all of this happened in my own home area, so there was a need for some housekeeping afterwards. If you did it by becoming the root user, then the files would be there instead, and that's the scenario in the online FAQ.
Getting an Epson Pefection 4490 Photo scanner going with Ubuntu GNOME Remix 12.10
My Epson Perfection 4490 Photo scanner has been in my possession for a while now, and it is impossible to justify any replacement given that it both works well and digital photography has taken over from its film predecessor for me. Every time I go installing an operating system afresh, I need to reinstate it again; last year's installation of Ubuntu GNOME Remix 12.04 only saw me do the deed recently. When I did so, it was brought back to me that I'd never gone and documented on here how this was done. Given that I sometimes use this place as a repository of stuff to which I need to refer again in the future, it seemed remiss of me, so here it is for you all.
Though I had XSane and SimpleScan already installed on the system, Sane wasn't on there. Hence, I went and added it and a few other extras using the following command:
sudo apt-get install sane sane-utils libsane-extras
Then, it was onto the Epson website for their Perfection 4490 Photo Linux drivers, since Sane's support for this scanner seemingly remains incomplete even though it pre-dates my move to Linux in 2007. Three files were needed, and the following commands install them (depending on when you do this, the file names may be different, so just change them to whatever they are for you):
sudo dpkg -i iscan-data_1.22.0-1_all.deb

sudo dpkg -i iscan_2.29.1-5~usb0.1.ltdl7_i386.deb

sudo dpkg -i iscan-plugin-gt-x750_2.1.2-1_i386.deb
With those in place, there was one other task that needed doing so that scanning could be done without resorting to running scanning software using sudo privileges. To free up the access to a normal user account, I needed a HAL device information file. These normally are in, but /usr/share/hal/fdi/ they change every time an installation, so any modifications that you may make will be lost. Therefore, there is no point modifying either /usr/share/hal/fdi/preprobe/10osvendor/20-libsane.fdi or /usr/share/hal/fdi/preprobe/10osvendor/20-libsane-extras.fdi where scanner information usually is to be found.
The first task in creating an FDI file was to issue the lsusb command and look for a line corresponding to my scanner. This is the one that I got:
Bus 001 Device 004: ID 04b8:0119 Seiko Epson Corp. Perfection 4490 Photo
From this, I gleaned the manufacturer ID and model ID as 04b8 and 0119, respectively. These are needed later on. Next I needed to create the hal/fdi/preprobe/ folder structure under /etc since it was there. Then, I created epson4490photo.fdi in the bottom folder of the tree (/etc/hal/fdi/preprobe/epson4490photo.fdi) as follows:
cd /etc/hal/fdi/preprobe/ && sudo touch epson4490photo.fdi
Then, I edited the new file using the following command:
gksu gedit epson4490photo.fdi &
With the file open, I added in the following text:
<?xml version="1.0" encoding="UTF-8"?>

<deviceinfo version="0.2">

<device>

<match key="info.subsystem" string="usb">

<!-- Epson Perfection 4490 Photo -->

<match key="usb.vendor_id" int="0x04b8">

<match key="usb.product_id" int="0x0119">

<append key="info.capabilities" type="strlist">scanner</append>

<merge key="scanner.access_method" type="string">proprietary</merge>

</match>

</match>

</match>

</device>

</deviceinfo>
Since it's all in XML, the place to look is immediately beneath the scanner name comment. The int attributes of the two match elements immediately following the comment line are populated using the information from the lsusb command output, with 0x prefixing both the manufacturer and model identifiers. The element with a key attribute of usb.vendor_id is the former, and that with a key attribute of usb.product_id is the latter. With epson4490photo.fdi saved, I rebooted the machine to restart HAL and all was as I wanted it to be, apart maybe from XSane making complaints that seemed not to be of any actual consequence. With Epson's Image Scan! and Simple Scan on the PC, there's no need to be bothered with those messages. Choice is good when you have it, especially when you have expended some effort to get that far.
Setting up MySQL on Sabayon Linux
For quite a while now, I have offline web servers for doing a spot of tweaking and tinkering away from the gaze of web users that visit what I have on there. Therefore, one of the tests that I apply to any prospective main Linux distro is the ability to set up a web server on there. This is more straightforward for some than for others. For Ubuntu and Linux Mint, it is a matter of installing the required software and doing a small bit of configuration. My experience with Sabayon is that it needs a little more effort than this, so I am sharing it here for the installation of MySQL.
The first step is to install the software using the commands that you find below. The first pops the software onto the system while the second completes the set-up. The --basedir option is need with the latter because it won't find things without it. It specifies the base location on the system, and it's /usr in my case.
sudo equo install dev-db/mysql

sudo /usr/bin/mysql_install_db --basedir=/usr
With the above complete, it's time to start the database server and set the password for the root user. That's what the two following commands achieve. Once your root password is set, you can go about creating databases and adding other users using the MySQL command line
sudo /etc/init.d/mysql start

mysqladmin -u root password 'password'
The last step is to set the database server to start every time you start your Sabayon system. The first command adds an entry for MySQL to the default run level so that this happens. The purpose of the second command is to check that this happened before restarting your computer to discover if it really happens. This procedure also is necessary for having an Apache web server behave in the same way, so the commands are worth having and even may have a use for other services on your system. ProFTP is another that comes to mind, for instance.
sudo rc-update add mysql default

sudo rc-update show | grep mysql
Listing hardware information for Linux systems
Curiosity about the graphics card on my backup PC caused me to look for ways of getting this information without opening up the machine or searching for a manual. In the end, a solitary command did the job:
sudo lshw
If you are running it as root, the sudo piece can be dropped, but the result is the same. As it happened, it provided me with the information that I needed.
Changing from to Nvidia Graphics Drivers on Linux Mint Debian Edition 64-bit
One way of doing this is to go to the Nvidia website and download the latest file from the relevant page on there. Then, the next stage is to restart your PC and choose rescue mode instead of the more usual graphical option. This drops you onto a command shell that is requesting your root password. Once this is done, you can move onto the next stage of the exercise. Migrate to the directory where the *.run file is located and issue a command similar to the following:
bash NVIDIA-Linux-x86_64-295.40.run
The above was the latest file available at the time of writing, which may have changed by the time that you read this. If the executable asks to modify your X configuration file, I believe that the best course is to let it do that. Editing it yourself or running nvidia-xconfig are alternative approaches if you so prefer.
Since proprietary Nvidia drivers are included in the repositories for Linux Mint Debian Edition, that may be a better course of action since you will get updates through normal system update channels. Then, the course of action is to start by issuing the following installation commands:
sudo apt-get install module-assistant

sudo apt-get install nvidia-kernel-common

sudo apt-get install nvidia-glx

sudo apt-get install kernel-source-NVIDIA

sudo apt-get install nvidia-xconfig
Once those have completed, issuing the following in turn will complete the job ahead of a reboot:
sudo m-a a-i nvidia

sudo modprobe nvidia

sudo nvidia-xconfig
If you reboot before running the above like I did, you will get a black screen with a flashing cursor instead of a full desktop because X failed to load. Then, the remedy is to reboot the machine and choose the rescue mode option, provide the root password and issue the three commands (at this point, the sudo prefix can be dropped because it's unneeded) then. Another reboot will see order restored and the new driver in place. Running the following at that point will do a check on things, as will be the general appearance of everything:
glxinfo | grep render
Taking the sudo command beyond Ubuntu
Though some may call it introducing a security risk, being able to execute administrator commands on Ubuntu using sudo and gksu by default is handy. It's not the only Linux distribution with the facility, though, since the /etc/sudoers file is found in Debian and I plan to have a look into Fedora. The thing that needs to be done is to add the following line to the aforementioned file (you will need to do this as root):
[your user name] ALL=(ALL) ALL
One that is done, you are all set. Just make sure that you're using a secure password, though, and removing the sudo/gksu permissions is as simple as reversing the change.
Update on 2011-12-03: The very same can be done for both Arch Linux and Fedora, The same file locations apply too.
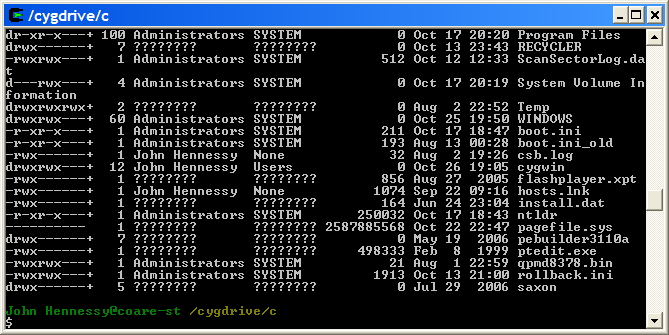
A UNIX shell running on Windows
Here's an idea that I got for a post before I spent that torrid weekend with Windows that caused me to jump ship to Linux. The idea of having a UNIX command line while still remaining on Windows did appeal to me at the time, and Cygwin seems to provide an intriguing way to do this. At its most basic, it is a set of DLL's that allow you to run standard UNIX commands in a shell like what you see below. However, it is extensible with a good number of packages that you can choose to install. NEdit is just one that gets included, and I think that I spied Apache too. The standard installation is a web-based affair, with your downloading only the components that you need; it's worth trawling through the possibilities while you're at it.
Now that I am firmly ensconced in the world of Linux, this may be one possibility that I will park, for a while anyway. After all, I now do have the full power of the UNIX command line...