TOPIC: MYSQL WORKBENCH
Understanding and Managing MySQL Binary Log Files
When a MySQL server begins filling a disk with files named along the lines of server-bin.n or mysql-bin.00000n, where n is an incrementing number, the immediate concern is usually storage pressure. These files typically live in /var/lib/mysql and can accumulate steadily or very quickly depending on workload. While they may look obscure at first glance, they are neither random nor a sign of corruption. They are MySQL binary log files, commonly shortened to binlogs, and they exist for specific operational reasons.
What Binary Logs Are and What They Do
Understanding what these files do is the first step towards deciding whether they should remain enabled. The binary log contains all statements that update data or that potentially could have updated it, including operations such as DELETE or UPDATE where no rows were matched. Rather than being a plain text history, the log stores events describing those modifications and also includes information about how long each data-changing statement took to execute. In practical terms, the binary log forms a continuous stream of change activity on the server.
That design serves two important purposes. The first is data recovery: after a backup file has been restored, the events recorded in the binary log after that backup was made are re-executed, bringing the databases up to date from the point of the backup. The second is high availability and replication: the binary log is used on primary replication servers as a record of the statements to be sent to secondary servers. It is worth noting that it is actually the replica that pulls log data from the primary, rather than the primary pushing it outward. Without binlogs, that style of replication cannot function at all.
Before Making Any Changes
Because of those uses, any change to binary logging should be made with care. Changes to MySQL server settings and to binlog files should be made only when verified backups already exist, as mistakes can lead to data corruption or loss. If a server is important, caution matters more than convenience.
It is also worth noting that from MySQL 8.0 onwards, binary logging is enabled by default, with the log_bin system variable set to ON whether or not the --log-bin option is specified explicitly. This is a significant change from earlier versions, where binary logging had to be switched on manually. Commenting out log_bin may not switch it off in newer versions, which is consistent with this change in default behaviour and is one reason why simply commenting out that directive may not always produce the expected result.
Disabling Binary Logging
On systems where replication is not in use and point-in-time recovery is not needed, disabling binary logging may be a reasonable choice. The conventional approach is to open /etc/my.cnf or /etc/mysql/my.cnf and find the line that reads log_bin, then remove or comment it out:
#log_bin = /var/log/mysql/mysql-bin.logThe following related settings for automatic expiry and maximum log file size can also be commented out if binary logging is being disabled entirely:
#expire_logs_days = 10
#max_binlog_size  = 100M
Once the file is saved, the server needs to be restarted. On many Linux systems, that means running one of the following:
service mysql restartor:
systemctl restart mysqlFollowing a restart, it is worth confirming the service came back cleanly:
systemctl status mysqlIf disabling binary logging does not produce the expected result, the safest course is to check the active MySQL version and review the matching vendor documentation for that release, as configuration behaviour is not always identical across versions and distributions. In MySQL 8.0 and later, the preferred startup options for disabling binary logging are --skip-log-bin or --disable-log-bin rather than commenting out log_bin alone.
Replication and the Case for Keeping Binlogs
For servers that are using replication, disabling binary logs is not a realistic option. If the primary does not log, there is nothing for the replica to download and apply, and replication cannot proceed. In those cases, the question is not whether to keep the files but how to manage their growth sensibly, and that is where retention settings and manual purging come in.
MySQL provides built-in ways to expire old binlogs automatically. With expire_logs_days = 10 in the configuration file, logs older than ten days are purged automatically by the MySQL server, removing the need for manual intervention under normal circumstances. Automatic expiry is often the simplest route on systems where a fixed retention window is acceptable and where replication lag, or backup policies do not require logs to be kept for longer.
Purging Binary Logs Manually
Manual purging remains useful in several situations: storage may already be tight, log growth may have exceeded expectations, or a one-off clean-up may be needed after a burst of activity. For those cases, the MySQL client can issue purge commands directly. The first example removes everything before a named log file, and the second removes everything before a given date and time:
mysql -u root -p 'MyPassword' -e "PURGE BINARY LOGS TO 'mysql-bin.03';"mysql -u root -p 'MyPassword' -e "PURGE BINARY LOGS BEFORE '2008-12-15 10:06:06';"It is also possible to remove logs older than a specified interval using a relative expression:
mysql -u root -p -e "PURGE BINARY LOGS BEFORE DATE_SUB(NOW(), INTERVAL 7 DAY);"Any purge action on a replicated environment should be timed so that replicas have already consumed the relevant logs. Purging logs that a replica still needs will break replication. A more drastic option, RESET MASTER (or RESET BINARY LOGS AND GTIDS in MySQL 8.4 and later), deletes all binary log files and resets the binary log index entirely, and should be approached with corresponding caution rather than used as a routine housekeeping measure.
Securing Database Credentials
One practical concern in the purge examples above is authentication. Placing a password directly on the command line is a security risk because command-line passwords can be exposed to other users through shell history or process inspection. A more secure alternative is to store connection details using the mysql_config_editor utility, which writes credentials to an obfuscated file named .mylogin.cnf.
On non-Windows systems, that file lives in the current user's home directory, and each group of settings within it is called a login path. A login path can store host, user, password, port and socket values. A default client login path is created with the following command, after which the password is entered at a prompt and is not echoed to the screen:
mysql_config_editor set --login-path=client --host=localhost --user=localuser --passwordAdditional login paths can be added for other servers. MySQL clients can then use those stored credentials like so:
mysql --login-path=clientA purge command written with a stored login path then becomes:
mysql --login-path=client -e "PURGE BINARY LOGS BEFORE DATE_SUB(NOW(), INTERVAL 7 DAY);"That form is easier to automate cleanly and keeps credentials out of shell history. Client programmes still read .mylogin.cnf even when --no-defaults is used, unless --no-login-paths is specified, which gives administrators a safer way to avoid command-line passwords without giving up flexible client behaviour.
The Relationship Between mysqlcheck and Binary Logging
It is also worth understanding how table maintenance tools interact with binary logging because they can contribute to log growth in ways that are not immediately obvious. The mysqlcheck utility performs table maintenance operations, including checking, repairing, analysing and optimising tables, while the server is running. The --write-binlog option is enabled by default for ANALYZE TABLE, OPTIMIZE TABLE and REPAIR TABLE statements generated by mysqlcheck, meaning those statements are written to the binary log unless instructed otherwise.
Using --skip-write-binlog adds NO_WRITE_TO_BINLOG to those statements, preventing them from being recorded in the binary log. That can matter if maintenance operations should not be sent to replicas or replayed during recovery from backup. It is also important to note that InnoDB tables can be checked with CHECK TABLE but cannot be repaired with REPAIR TABLE, and that taking a backup before attempting any repair operation is advisable because some circumstances can result in data loss. Binary logging records change events at the server level rather than belonging to any single storage engine, so the presence of InnoDB does not in itself remove binlogs from the picture.
Managing MySQL Binary Log Files: A Practical Summary
For administrators trying to decide what to do when binlogs are consuming disk space, context is everything. A development server with no replication and no need for point-in-time recovery may be a sensible candidate for disabling binary logging. A production server participating in replication or relying on binlogs for recovery should retain them and focus instead on retention settings, controlled purging and an understanding of what workloads are causing rapid log rotation.
The practical path is to begin with the role and requirements of the server rather than with deletion. If the server does not need binary logs, use --skip-log-bin or --disable-log-bin at startup (or comment out log_bin on older versions) and then verify whether the change actually took effect for the installed version. If the server does need them, review retention settings such as expire_logs_days, use purge commands carefully when necessary and avoid exposing passwords on the command line by using mysql_config_editor and stored login paths. Where maintenance commands are involved, remember that mysqlcheck writes certain statements to the binary log by default unless --skip-write-binlog is specified. Binlog files are part of the server's change history and can be central to recovery and replication; when they begin to dominate a file system, the right response depends on what the server is expected to do and how carefully housekeeping is carried out.
Dealing with Error 1064 in MySQL queries
Recently, I was querying a MySQL database table and got a response like the following:
ERROR 1064 (42000): You have an error in your SQL syntax; check the manual that corresponds to your MySQL server version for the right syntax to use
The cause was that one of the data column columns was named using the MySQL reserved word key. While best practice is not to use reserved words like this at all, this was not something that I could alter. Therefore, I enclosed the offending keyword in backticks (`) to make the query work.
There is more information in the MySQL documentation on Schema Object Names and on Keywords and Reserved Words for dealing with or avoiding this kind of situation. While I realise that things change over time and that every implementation of SQL is a little different, it does look as if not using established keywords should be a minimum expectation when any database tables get created.
Disabling the SSL connection requirement in MySQL Workbench
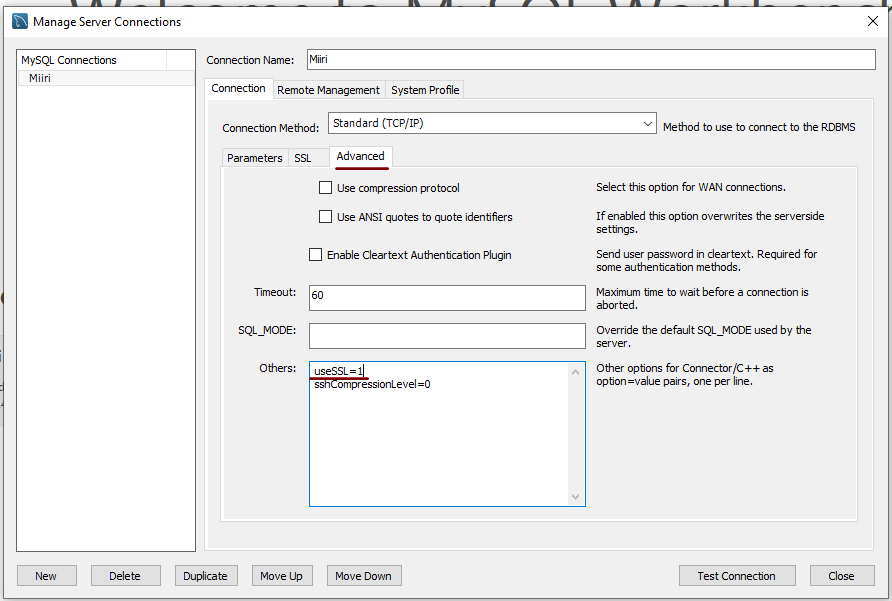
A while ago, I found that MySQL Workbench would only use SSL connections and that was stopping it from connecting to local databases. Thus, I looked for a way to override this: the cure was to go to Database > Manage Connections... in the menus for the application's home tab. In the dialogue box that appeared, I chose the connection of interest and went to the Advanced panel under Connection and removed the line useSSL=1 from the Others field. The screenshot below shows you what things looked like before the change was made. Naturally, the best practice would be to secure a remote database connection using SSL, so this approach is best reserved for remote non-production databases. While it may be that this does not happen now, I thought I would share this in case the problem persists for anyone.
Setting up MySQL on Sabayon Linux
For quite a while now, I have offline web servers for doing a spot of tweaking and tinkering away from the gaze of web users that visit what I have on there. Therefore, one of the tests that I apply to any prospective main Linux distro is the ability to set up a web server on there. This is more straightforward for some than for others. For Ubuntu and Linux Mint, it is a matter of installing the required software and doing a small bit of configuration. My experience with Sabayon is that it needs a little more effort than this, so I am sharing it here for the installation of MySQL.
The first step is to install the software using the commands that you find below. The first pops the software onto the system while the second completes the set-up. The --basedir option is need with the latter because it won't find things without it. It specifies the base location on the system, and it's /usr in my case.
sudo equo install dev-db/mysql

sudo /usr/bin/mysql_install_db --basedir=/usr
With the above complete, it's time to start the database server and set the password for the root user. That's what the two following commands achieve. Once your root password is set, you can go about creating databases and adding other users using the MySQL command line
sudo /etc/init.d/mysql start

mysqladmin -u root password 'password'
The last step is to set the database server to start every time you start your Sabayon system. The first command adds an entry for MySQL to the default run level so that this happens. The purpose of the second command is to check that this happened before restarting your computer to discover if it really happens. This procedure also is necessary for having an Apache web server behave in the same way, so the commands are worth having and even may have a use for other services on your system. ProFTP is another that comes to mind, for instance.
sudo rc-update add mysql default

sudo rc-update show | grep mysql
Further securing MySQL in Fedora
Ubuntu users must be spoilt because any MySQL installation asks you for a root password, an excellent thing in my opinion. With Fedora, it just pops the thing on there with you needing to set up a service and setting the root password yourself; if I recall correctly, I think that openSUSE does the same thing. For the service management, I needed to grab system-config-services from the repositories because my Live CD installation left off a lot of stuff, OpenOffice and GIMP even. The following command line recipe addressed the service manager omission:
su - # Change to root, entering password when asked

yum -y install system-config-services # Installs the thing without a yes/no prompt

exit # Return to normal user shell
Thereafter, the Services item from the menus at System > Administration was pressed into service and the MySQL service enabled and started. The next step was to lock down the root user, so the following sequence was used:
mysql # Enter MySQL prompt; no need for user or password because it still is unsecured!

UPDATE mysql.user SET Password=PASSWORD('MyNewPass') WHERE User='root';

FLUSH PRIVILEGES;

quit # Exit the mysql prompt, leaving the bare mysql command unusable
For those occasions when password problems keep you out of the MySQL shell, you'll find password resetting advice on the MySQL website, though I didn't need to go the whole hog here. MySQL Administrator might be another option for this type of thing. That thought never struck me while I was using it to set up less privileged users and allowing them access to the system. For a while, I was well stymied in my attempts to access the MySQL using any of those extra accounts until I got the idea of associating them with a host, another thing that is not needed on Ubuntu if my experience is any guide. All in all, Fedora may make you work a little extra to get things like thing done, yet I am not complaining if it makes you understand a little more about what is going on in the background, something that is never a disadvantage.
Running SQL scripts with MySQL
Here's another of those little things that you forget if you aren't using them every day: running MySQL scripts using the Windows command line. Yes, you can also run SQL commands interactively, but there's a certain convenience about scripts. I am putting an example here so that it can be found again easily:
mysql -u username -p databasename < script.sql
Though I wouldn't be at all surprised if the same line worked under Linux and UNIX, I haven't needed to give it a try.