TOPIC: MENU
Building context-sensitive navigation in Grav CMS with Twig
If you are migrating a web portal because a new CMS release broke a site navigation menu plugin, then you are going to make sure that something similar is there in the new version. The initial upset was caused by Textpattern 4.9.0, the move to which resulted in a hasty rollback. A subsequent AI interaction brought Grav CMS into the fray, where menus can be built using the Twig templating language.
Along the way, there was one noticeable difference: a composite menu with hierarchy that drilled down to the pages in a selected section was not quite as possible in Grav. Nevertheless, displaying one menu for pages in a given section along with another showing the other sections is hardly a dealbreaker as far as I am concerned, especially when things are context-sensitive anyway.
This may because Grav derives its navigation directly from the content directory tree using folder naming conventions and front matter flags, all unlike database-driven systems that rely on a dedicated menu editor. After all, you are working with files that expose page state, and not queries of database tables.
The Pages Folder
At the heart of the system is the pages folder. Grav looks at the top level of this directory to determine the primary navigation, and any subfolder that begins with a numeric prefix is treated as a visible page whose position in the menu is set by that number. A structure such as pages/01.home, pages/02.about, pages/03.blog and pages/04.contact immediately yields a working menu in the order you expect. Because this approach is driven by the file system, reordering pages is as simple as renaming the folders, with no additional configuration required.
Visibility can also be controlled without renaming if you prefer to keep folders unnumbered. Each page has a Markdown file containing YAML front matter (commonly named default.md), and adding visible: true to that front matter ensures the page appears in navigation. Setting visible: false hides it. Both approaches work across a site, though the numeric prefix convention remains the most straightforward way to manage ordering and visibility together.
Customising Menu Labels
Menu text defaults to the page title, which suits most cases well. There are times when you want a shorter label in the navigation while keeping a fuller title for the page itself, and the front matter field menu: makes that possible. Writing menu: Blog on the blog page means the menu displays "Blog" even if the page title reads "Company Blog and News". This keeps navigation crisp without sacrificing descriptive titles for search engines and content clarity.
The Main Menu Loop
The primary navigation iterates over pages.children.visible and prints a link for each top-level page. The active and activeChild flags on each page object let you mark the current location: active matches the page the visitor is on, while activeChild is true on any parent whose descendant is currently being viewed. Testing both together means a top-level item is highlighted, whether the visitor is on that page directly or anywhere beneath it:
<ul id="mainmenu" class="section_list">
  {% for p in pages.children.visible %}
    <li class="{{ (p.active or p.activeChild) ? 'active_class' : '' }}">
      <a href="{{ p.url }}">{{ p.menu }}</a>
    </li>
  {% endfor %}
</ul>
This loop picks up any changes to the page tree automatically, with no further configuration required.
Context-Sensitive Sidebar Headings
Before the navigation blocks, the sidebar can show a contextual heading depending on where the visitor is. On the home page, a page.home check provides one heading, and a route comparison handles a specific page such as /search:
{% if page.home %}
  <h4 class="mt-4 mb-4">Fancy Some Exploration?</h4>
{% endif %}

{% if page.route == '/search' %}
  <h4 class="mt-4 mb-4">Fancy Some More Exploration?</h4>
{% endif %}
These headings appear independently of the secondary navigation block, so they display even when there is no active section with children to list below them.
The Secondary Menu
When a visitor is inside a section that has visible child pages, a secondary menu listing those children is more useful than a dropdown. The approach is to find the active top-level page, referred to here as the owner, by looping through pages.children.visible and checking the same active and activeChild flags:
{% set owner = null %}
{% for top in pages.children.visible %}
  {% if top.active or top.activeChild %}
    {% set owner = top %}
  {% endif %}
{% endfor %}
Once owner is found, its menu label can be used as a section heading and its visible children rendered as a list. Importantly, each child item should test child.active or child.activeChild rather than child.active alone. Without activeChild, a visitor to a grandchild page would see no item highlighted in the secondary nav at all:
{% if owner and owner.children.visible.count > 0 %}
  <h4 class="mt-4 mb-4">{{ owner.menu }}</h4>
  <ul id="secondary-nav" class="section_list">
    {% for child in owner.children.visible %}
      <li class="{{ (child.active or child.activeChild) ? 'active_class' : '' }}">
        <a href="{{ child.url }}">{{ child.menu }}</a>
      </li>
    {% endfor %}
  </ul>
  <h4 class="mt-4 mb-4">Looking Elsewhere?</h4>
{% endif %}
The entire block is conditional on owner existing and having visible children, so it does not render at all on the home page, the search page or any other top-level page without subsections.
Common Troubleshooting Points
There are a few subtleties worth bearing in mind. The most frequent cause of trouble is looping over the wrong collection: using page.children.visible instead of pages.children.visible in the owner-detection loop places you inside the current page's subtree, so nothing will flag as active or activeChild correctly. A second issue affects secondary nav items specifically: using only child.active means a visitor to a grandchild page sees no item highlighted because none of the listed children is the current page. Adding or child.activeChild to the condition resolves this. Clearing the Grav cache is also a worthwhile step during development because stale output can make correct template changes appear to have no effect.
Closing Remarks
In summary, you have learned how Grav assembles navigation from its page tree, how to detect the active section using active and activeChild flags, how to display a secondary menu only when a section has visible children, and how to show context-sensitive headings for specific pages. The result is a sidebar that maintains itself automatically as pages are added or reorganised, with no manual menu configuration required.
How to adjust Adobe Lightroom Classic font sizes beyond the default options
Earlier in the year, I upgraded my monitor to a 34-inch widescreen Iiyama XUB3493WQSU. At the time, I was in wonderment at what I was doing, even if I have grown used to it now. For one thing, it made the onscreen text too small, so I ended up having to scale things up in both Linux and Windows. The former turned out to be more malleable than the latter, and that impression also applies to the main subject of this piece.
What I also found is that I needed to scale the user interface font sizes within Adobe Lightroom Classic running within a Windows virtual machine on VirtualBox. That can be done by going to Edit > Preferences through the menus and then going to the Interface tab in the dialogue box that appears where you can change the Font Size setting using the dropdown menu and confirm changes using the OK button.
However, the range of options is limited. Medium appears to be the default setting, while the others include Small, Large, Larger and Largest. Large scales by 150%, Larger by 200% and Largest by 250%. Of these, Large was the setting that I chose, though it always felt too big to me.
Out of curiosity, I decided to probe further, only to find extra possibilities that could be selected by direct editing of a configuration file. This file is called Lightroom Classic CC 7 Preferences.agprefs and can be found in C:\Users\[user account]\AppData\Roaming\Adobe\Lightroom\Preferences. In there, you need to find the line containing AgPanel_baseFontSize and change the value enclosed within quotes and save the file. Taking a backup beforehand is wise, even if the modification is not a major one.
The available choices are scale125, scale140, scale150, scale175, scale180, scale200 and scale250. Some of these may be recognisable as those available through the Lightroom Classic user interface. In my case, I chose the first on the list, so the line in the configuration file became:
AgPanel_baseFontSize="scale125"
While there may be good reasons for the additional options not being available through the user interface, things are working out OK for me for now. It is another tweak that helps me to get used to the larger screen size and its higher resolution.
Restoring the menu bar on GNOME Terminal in a GNOME Shell session
By default, a GNOME Terminal instance does not display a menu bar and that applies not only in GNOME Shell but also on the Cinnamon Desktop environment. In the latter, it is easy enough to display the menu bar using the context menu produced by right-clicking in the window before going to Edit > Preferences and ticking the box for Show menubar by default in new terminals in the General section. After closing the Preferences dialogue, every new GNOME Terminal session will show the menu bar.
Unfortunately, it is not so easy in GNOME Shell, though the context menu route does allow you to unhide the menu bar on a temporary basis. That is because the requisite tick box is missing from the Preferences dialogue box displayed after navigating to Edit > Preferences in the menus. To address, you need to execute the following command in a terminal session:
gsettings set org.gnome.Terminal.Legacy.Settings headerbar false
This change permanently adds the menu bar and includes the previously missing tick box, which is selected when necessary. Although GNOME Shell has a minimalist design in some aspects, making this function difficult to access seems excessive.
On upgrading from Fedora 13 to Fedora 14
My Fedora box recently got upgraded to the latest version of the distribution (14) and I stuck to a method that I have used successfully before and one that isn't that common with variants of Linux either. What I did was to go to the Fedora website and download a full DVD image, burn it to a disk and boot from that. Then, I chose the upgrade option from the menus and all went smoothly with only commonplace options needing selection from the menus and no data got lost either. Apparently, this way of going about things is only offered by the DVD option because the equivalent Live CD versions only do full installations.
However, there was another option that I fancied trying, but was stymied by messages about a troublesome Dropbox repository. As I later discovered, that would have been easily sorted, only for my opting for a tried and tested method instead. This was a pity because only two commands would have needed to be issued when logged in as root, and it would have been good to have had a go with them:
yum update yum

yum --releasever=14 update --skip-broken
These may have done what I habitually do with Ubuntu upgrades but trying them out either will have to await the release of the next version or my getting around to setting up a Fedora virtual machine to see what happens. The latter course of action might be sensible anyway to see if all works without any problems before doing it for a real PC installation.
Testing a Firefox performance fix
Recently, I have been having problems with Firefox being sluggish, so I resorted to a Lifehacker tip to see if that helped. It was a matter of opening up the Error Console from the Tools menu and entering the following long line into the command bar and hitting the evaluate button:
Components.classes["@mozilla.org/browser/nav-history-service;1"].getService(Components.interfaces.nsPIPlacesDatabase).DBConnection.executeSimpleSQL("VACUUM");
It did the track once or twice, but its database hoovering claims are on trial as far as I am concerned. Keeping an eye on what's eating system resources will be on the menu too, especially after seeing what my brief foray with Ubuntu One was doing. A move to Google Chrome cannot be ruled out of the question, either.
Selecting SAS code in the Program Editor on UNIX
Here's a possible bugbear with programming using the SAS Display Manager in UNIX, selecting sections of code and running them. In the installations that I have encountered, the mouse selection is not retained, so the code selection cannot be run. There is a fix for this that is not the most obvious. Going to the Preferences dialogue box (Tools > Options > Preferences... from the menu bar) and selecting the Editing tab brings up the screen below:
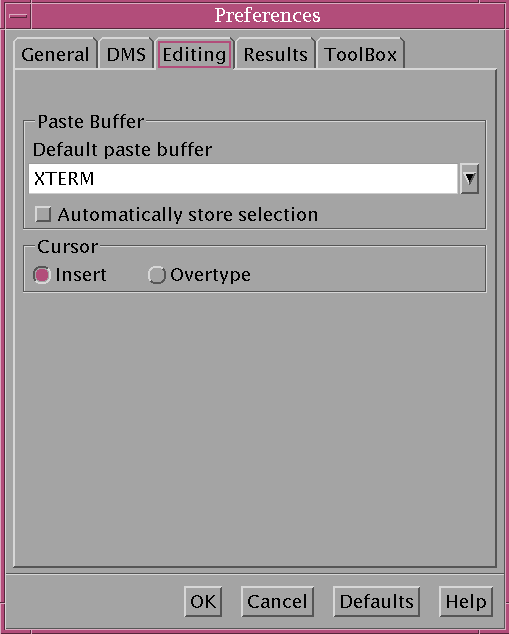
Ensuring that "Automatically store selection" is switched off, as shown above, will allow one to select and submit sections of code from a SAS program like what is normal practice with Windows SAS. Though it isn't an obvious solution, it does the trick for me.