TOPIC: LINUX
Resolving a Linux Mint and Windows keyboard shortcut conflict encountered when using SAS Enterprise Guide in a remote Citrix session
Here is a gotcha, slight though it is, that caught me when working in SAS Enterprise Guide on a Windows system to which I was connecting from Linux via Citrix. What I wanted to do was use the keyboard shortcut CTRL + SHIFT + U to convert text to upper case in the program editor, only for it to produce a black square and nothing else.
What I was encountering was a clash in keyboard shortcut assignments. On Linux Mint, CTRL + SHIFT + U activates Unicode character input mode. The black square was there for me to enter a hexadecimal code to add a character that my keyboard would not facilitate in normal circumstances. While the facility clearly has its uses, it was getting in my way and a solution had to be found.
Taking the simple route, I changed the keyboard shortcut to avoid the clash. Though others may want to go further than this, that was enough for me. At the command line, I issued the following command so that I could accomplish this:
ibus-setup
In the application screen that appeared, I navigated to the Emoji tab. To the right of the Unicode code point box, I clicked on the button with four dots. That led me to another dialogue box where I could change the modifier keys. Thus, I unchecked the box for SHIFT and ticked the one for SUPER (the Windows key on many keyboards these days) instead, before clicking on the OK button to confirm the setting. With that completed, I closed the IBus Preferences screen.
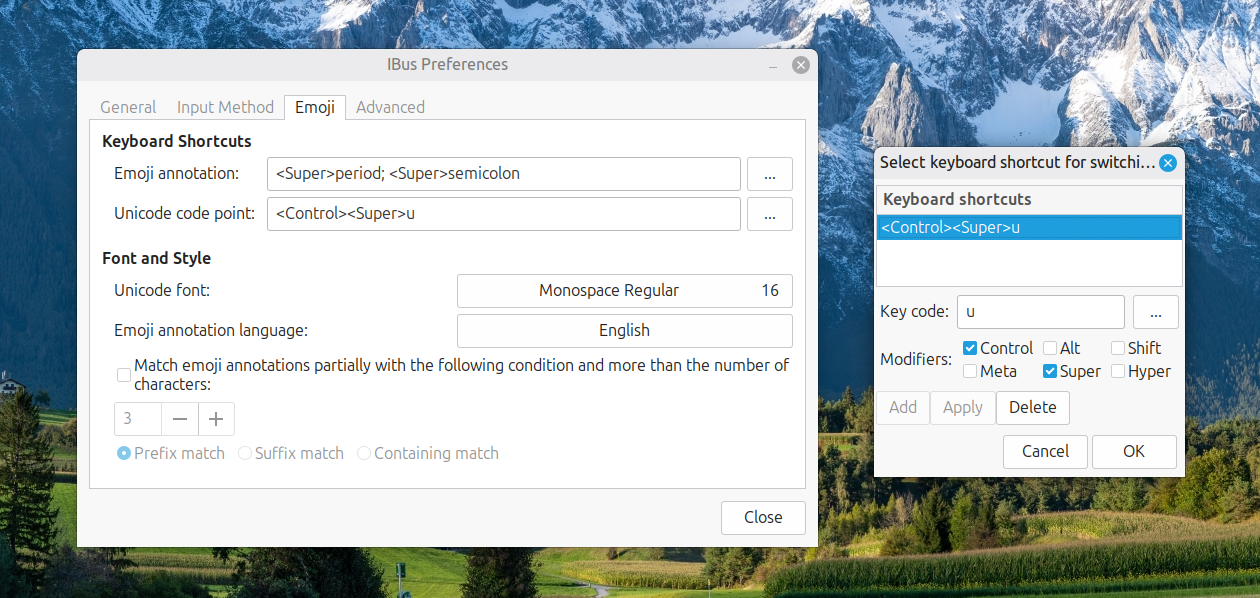
Now, I had CTRL + SUPER + U instead of CTRL + SHIFT + U. This meant that the CTRL + SHIFT + U in Enterprise Guide worked exactly as I expected it to do. A baffling situation had been resolved to leave me working without intrusion.
Grouping directories first in output from ls commands executed in terminal sessions on macOS and Linux
This enquiry began with my seeing directories and files being sorted by alphabetical order without regard for type in macOS Finder. In Windows and Linux file managers, I am accustomed to directories and files being listed in distinct blocks, albeit within the same listings, with the former preceding the latter. What I had missed was that the ls command and its aliases did what I was seeing in macOS Finder, which perhaps is why the operating system and its default apps work like that.
Over to Linux
On the zsh implementation that macOS uses, there is no way to order the output so that directories are listed before files. However, the situation is different on Linux because of the use of GNU tooling. Here, the --group-directories-first switch is available, and I have started to use this on my own Linux systems, web servers as well as workstations. This can be set up in .bashrc or .bash_aliases like the following:
alias ls='ls  --color=auto --group-directories-first'

alias ll='ls -lh  --color=auto --group-directories-first'
Above, the --color=auto switch adds colour to the output too. Issuing the following command makes the updates available in a terminal session (~ is the shorthand for the home directory below):
source ~/.bashrc
Back to macOS
While that works well on Linux, additional tweaks are needed to implement the same on macOS. Firstly, you have to install Homebrew using this command (you may be asked for your system password to let the process proceed):
/bin/bash -c "$(curl -fsSL https://raw.githubusercontent.com/Homebrew/install/HEAD/install.sh)"
To make it work, this should be added to the .zshrc file in your home folder:
export PATH="/opt/homebrew/opt/coreutils/libexec/gnubin:$PATH"
Then, you need to install coreutils for GNU commands like gls (a different name is used to distinguish it from what comes with macOS) and adding dircolors gives you coloured text output as well:
brew install coreutils

brew install dircolors
Once those were in place, I found that adding these lines to the .zshrc file was all that was needed (note those extra g's):
alias ls='gls  --color=auto --group-directories-first'

alias ll='gls -lh  --color=auto --group-directories-first'
If your experience differs, they may need to be preceded with this line in the same configuration file:
eval "$(dircolors -b)"
The final additions then look like this:
export PATH="/opt/homebrew/opt/coreutils/libexec/gnubin:$PATH"

eval "$(dircolors -b)"

alias ls='gls  --color=auto --group-directories-first'

alias ll='gls -lh  --color=auto --group-directories-first'
Following those, issuing this command will make the settings available in your terminal session:
source ~/.zshrc
Closing Remarks
In summary, you have learned how to list directories before files, and not intermingled as is the default situation. For me, this discovery was educational and adds some extra user-friendliness that was not there before the tweaks. While we may be considering two operating systems and two different shells (bash and zsh), there is enough crossover to make terminal directory and file listing operations function consistently regardless of where you are working.
A Practical Linux Administration Toolkit: Kernels, Storage, Filesystems, Transfers and Shell Completion
Linux command-line administration has a way of beginning with a deceptively simple question that opens into several possible answers. Whether the task is checking which kernels are installed before an upgrade, mounting an NFS share for backup access, diagnosing low disk space, throttling a long-running sync job or wiring up tab completion, the right answer depends on context: the distribution, the file system type, the transport protocol and whether the need is a one-off action or a persistent configuration. This guide draws those everyday administrative themes into a single continuous reference.
Identifying Your System and Installed Kernels
Reading Distribution Information
A sensible place to begin any administration session is knowing exactly what you are working with. One quick approach is to read the release files directly:
cat /etc/*-releaseOn systems where bat is available (sometimes installed as batcat), the same files can be read with syntax highlighting using batcat /etc/*-release. Typical output on Ubuntu includes /etc/lsb-release and /etc/os-release, with values such as DISTRIB_ID=Ubuntu, VERSION_ID="20.04" and PRETTY_NAME="Ubuntu 20.04.6 LTS". Three additional commands, cat /etc/os-release, lsb_release -a and hostnamectl, each present the same underlying facts in slightly different formats, while uname -r reports the currently running kernel release in isolation. Adding more flags with uname -mrs extends the output to include the kernel name and machine hardware class, which on an older RHEL system might return something like Linux 2.6.18-8.1.14.el5 x86_64.
Querying Installed Kernels by Package Manager
On Red Hat Enterprise Linux, CentOS, Rocky Linux, AlmaLinux, Oracle Linux and Fedora, installed kernels are managed by the RPM package database and are queried with:
rpm -qa kernelThis may return entries such as kernel-5.14.0-70.30.1.el9_0.x86_64. The same information is also accessible through yum list installed kernel or dnf list installed kernel. On Debian, Ubuntu, Linux Mint and Pop!_OS the package manager differs, so the command changes accordingly:
dpkg --list | grep linux-imageOutput may include versioned packages, such as linux-image-2.6.20-15-generic, alongside the metapackage linux-image-generic. Arch Linux users can query with pacman -Q | grep linux, while SUSE Enterprise Linux and openSUSE users can turn to rpm -qa | grep -i kernel or use zypper search -i kernel, which presents results in a structured table. Alpine Linux takes yet another approach with apk info -vvv | grep -E 'Linux' | grep -iE 'lts|virt', which may return entries such as linux-virt-5.15.98-r0 - Linux lts kernel.
Finding Kernels Outside the Package Manager
Package databases do not always tell the whole story, particularly where custom-compiled kernels are involved. A kernel built and installed manually will not appear in any package manager query at all. In that case, /lib/modules/ is a useful place to look, since each installed kernel generally has a corresponding module directory. Running ls -l /lib/modules/ may show entries such as 4.15.0-55-generic, 4.18.0-25-generic and 5.0.0-23-generic. A further check is:
sudo find /boot/ -iname "vmlinuz*"This may return files such as /boot/vmlinuz-5.4.0-65-generic and /boot/vmlinuz-5.4.0-66-generic, confirming precisely which versions exist on disk.
A Brief History of vmlinuz
That naming convention is worth understanding because it appears on virtually every Linux system. vmlinuz is the compressed, bootable Linux kernel image stored in /boot/. The name traces back through computing history: early Unix kernels were simply called /unix, but when the University of California, Berkeley ported Unix to the VAX architecture in 1979 and added paged virtual memory, the resulting system, 3BSD, was known as VMUNIX (Virtual Memory Unix) and its kernel images were named /vmunix. Linux inherited vmlinuz as a mutation of vmunix, with the trailing z denoting gzip compression (though other algorithms such as xz and lzma are also supported). The counterpart vmlinux refers to the uncompressed, non-bootable kernel file, which is used for debugging and symbol table generation but is not loaded directly at boot. Running ls -l /boot/ will show the full set of boot files present on any given system.
Examining and Investigating Disk Usage
Why ls Is Not the Right Tool for Directory Sizes
Storage management is an area where a familiar command can mislead. Running ls -l on a directory typically shows it occupying 4,096 bytes, which reflects the directory entry metadata rather than the combined size of its contents. For real space consumption, du is the appropriate tool.
sudo du -sh /varThe above command produces a summarised, human-readable total such as 85G /var. The -s flag limits output to a single grand total and -h formats values in K, M or G units. For an individual file, du -sh /var/log/syslog might report 12M /var/log/syslog, while ls -lh /var/log/syslog adds ownership and timestamps to the same figure.
Drilling Down to Find Where Space Has Gone
When a file system is full and the need is to locate exactly where the space has accumulated, du can be made progressively more revealing. The command sudo du -h --max-depth=1 /var lists first-level subdirectories with sizes, potentially showing 77G /var/lib, 5.0G /var/cache and 3.3G /var/log. To surface the biggest consumers quickly, piping to sort and head works well:
sudo du -h /var/ | sort -rh | head -10Adding the -a flag includes individual files alongside directories in the same output:
sudo du -ah /var/ | sort -rh | head -10Apparent Size Versus Allocated Disk Space
There is a subtle distinction that sometimes causes confusion. By default, du reports allocated disk usage, which is governed by the file system block size. A single-byte file on a file system with 4 KB blocks still consumes 4 KB of disk. To see the amount of data actually stored rather than allocated, sudo du -sh --apparent-size /var reports the apparent size instead. The df command answers a different question altogether: it shows free and used space per mounted file system, such as /dev/sda1 at 73 per cent usage or /dev/sdb1 mounted on /data with 70 GB free. In practice, du is for locating what consumes space and df is for checking how much remains on each volume.
gdu: A Faster Interactive Alternative
Some administrators prefer a more modern tool for storage investigations, and gdu is a notable option. It is a fast disk usage analyser written in Go with an interactive console interface, designed primarily for SSDs where it can exploit parallel processing to full effect, though it functions on hard drives too with less dramatic speed gains. The binary release can be installed by extracting its .tgz archive:
curl -L https://github.com/dundee/gdu/releases/latest/download/gdu_linux_amd64.tgz | tar xz
chmod +x gdu_linux_amd64
mv gdu_linux_amd64 /usr/bin/gdu
It can also be run directly via Docker without installation:
docker run --rm --init --interactive --tty --privileged
  --volume /:/mnt/root ghcr.io/dundee/gdu /mnt/root
In use, gdu scans a directory interactively when run without flags, summarises a target with gdu -ps /some/dir, shows top results with gdu -t 10 / and runs without interaction using gdu -n /. It supports apparent size display, hidden file inclusion, item counts, modification times, exclusions, age filtering and database-backed analysis through SQLite or BadgerDB. The project documentation notes that hard links are counted only once and that analysis data can be exported as JSON for later review.
Unpacking TGZ Archives
A brief note on the tar command is useful here, since it appears throughout Linux administration, including in the gdu installation step above. A .tgz file is simply a GZIP-compressed tar archive, and the standard way to extract one is:
tar zxvf archive.tgzModern GNU tar can detect the compression type automatically, so the -z flag is often optional:
tar xvf archive.tgzTo extract into a specific directory rather than the current working directory, the -C option takes a destination path:
tar zxvf archive.tgz -C /path/to/destination/To inspect the contents of a .tgz file without extracting it, the t (list) flag replaces x (extract):
tar ztvf archive.tgzThe tar command was first introduced in the seventh edition of Unix in January 1979 and its name comes from its original purpose as a Tape ARchiver. Despite that origin, modern tar reads from and writes to files, pipes and remote devices with equal facility.
Mounting NFS Shares and Optical Media
Installing NFS Client Tools
NFS remains common on Linux and Unix-like systems, allowing remote directories to be mounted locally and treated as though they were native file systems. Before a client can mount an NFS export, the client packages must be installed. On Ubuntu and Debian, that means:
sudo apt update
sudo apt install nfs-common
On Fedora and RHEL-based distributions, the equivalent is:
sudo dnf install nfs-utilsOnce installed, showmount -e 10.10.0.10 can list available exports from a server, returning output such as /backups 10.10.0.0/24 and /data *.
Mounting an NFS Share Manually
Mounting an NFS share follows the same broad pattern as mounting any other file system. First, create a local mount point:
sudo mkdir -p /var/backupsThen mount the remote export, specifying the file system type explicitly:
sudo mount -t nfs 10.10.0.10:/backups /var/backupsA successful command produces no output. Verification is done with mount | grep nfs or df -h, after which the local directory acts as the root of the remote file system for all practical purposes.
Persisting NFS Mounts Across Reboots
Since a manual mount does not survive a reboot, persistent setups use /etc/fstab. An appropriate entry looks like:
10.10.0.10:/backups /var/backups nfs defaults,nofail,_netdev 0 0The nofail option prevents a boot failure if the NFS server is unavailable when the machine starts. The _netdev flag marks the mount as network-dependent, ensuring the system defers the operation until the network stack is available. Running sudo mount -a tests the entry without rebooting.
Troubleshooting Common NFS Errors
NFS problems are often predictable. A "Permission denied" error usually means the server export in /etc/exports does not include the client, and reloading exports with sudo exportfs -ar is frequently the remedy. "RPC: Program not registered" indicates the NFS service is not running on the server, in which case sudo systemctl restart nfs-server applies. A "Stale file handle" error generally follows a server reboot or a deleted file and is cleared by unmounting and remounting. Timeouts and "Server not responding" messages call for checking network connectivity, confirming that firewall rules permit access to port 111 (rpcbind, required for NFSv3) and port 2049 (NFS itself), and verifying NFS version compatibility using the vers=3 or vers=4 mount option. NFSv4 requires only port 2049, while NFSv2 and NFSv3 also require port 111. To detach a share, sudo umount /var/backups is the standard route, with fuser -m /var/backups helping identify processes that are blocking the unmounting process.
Mounting Optical Media
CDs and DVDs are less central than they once were, but some systems still need to read them. After inserting a disc, blkid can identify the block device path, which is typically /dev/sr0, and will report the file system type as iso9660. With a mount point created using sudo mkdir /mnt/cdrom, the disc is mounted with:
sudo mount /dev/sr0 /mnt/cdromThe warning device write-protected, mounted read-only is expected for optical media and can be disregarded. CDs and DVDs use the ISO 9660 file system, a data-exchange standard designed to be readable across operating systems. Once mounted, the disc contents are accessible under /mnt/cdrom, and sudo umount /mnt/cdrom detaches it cleanly when work is complete.
Transferring Files Securely and Efficiently
Copying Files with scp
scp (Secure Copy) transfers files and directories between hosts over SSH, encrypting both data and authentication credentials in transit. Its basic syntax is:
scp [OPTIONS] [[user@]host:]source [[user@]host:]destinationThe colon is how scp distinguishes between local and remote paths: a path without a colon is local. A typical upload from a local machine to a remote host looks like:
scp file.txt remote_username@10.10.0.2:/remote/directoryA download from a remote host to the local machine reverses the argument order:
scp remote_username@10.10.0.2:/remote/file.txt /local/directoryCommonly used options include -r for recursive directory copies, -p to preserve metadata such as modification times and permissions, -C for compression, -i for a specific private key, -l to cap bandwidth in Kbit/s and the uppercase -P to specify a non-standard SSH port. It is also possible to copy between two remote hosts directly, routing the transfer through the local machine with the -3 flag.
The Protocol Change in OpenSSH 9.0
There is an important change in modern OpenSSH that administrators should be aware of. From OpenSSH 9.0 onward, the scp command uses the SFTP protocol internally by default rather than the older SCP/RCP protocol, which is now considered outdated. The command behaves identically from the user's perspective, but if an older server requires the legacy protocol, the -O flag forces it. For advanced requirements such as resumable transfers or incremental directory synchronisation, rsync is generally the better fit, particularly for large directory trees.
Throttling rsync to Protect Bandwidth
Even with rsync, raw speed is not always desirable. A backup script consuming all available bandwidth can disrupt other services on the same network link, so --bwlimit is often essential. The basic syntax is:
rsync --bwlimit=KBPS source destinationThe value is in units of 1,024 bytes unless an explicit suffix is added. A fractional value is also valid: --bwlimit=1.5m sets a cap of 1.5 MB/s. A local transfer capped at 1,000 KB/s looks like:
rsync --bwlimit=1000 /path/to/source /path/to/dest/And a remote backup:
rsync --bwlimit=1000 /var/www/html/ backups@server1.example.com:~/mysite.backups/The man page for rsync explains that --bwlimit works by limiting the size of the blocks rsync writes and then sleeping between writes to achieve the target average. Some volume undulation is therefore normal in practice.
Managing I/O Priority with ionice
Bandwidth is only one dimension of the load a transfer places on a system. Disk I/O scheduling may also need attention, particularly on busy servers running other workloads. The ionice utility adjusts the I/O scheduling class and priority of a process without altering its CPU priority. For instance:
/usr/bin/ionice -c2 -n7 rsync --bwlimit=1000 /path/to/source /path/to/dest/This runs the rsync process in best-effort I/O class (-c2) at the lowest priority level (-n7), combining transfer rate limiting with reduced I/O priority. The scheduling classes are: 0 (none), 1 (real-time), 2 (best-effort) and 3 (idle), with priority levels 0 to 7 available for the real-time and best-effort classes.
Together, --bwlimitand ionice provide complementary controls over exactly how much resource a routine transfer is permitted to consume at any given time.
Setting Up Bash Tab Completion
On Ubuntu and related distributions, Bash programmable completion is provided by the bash-completion package. If tab completion does not function as expected in a new installation or container environment, the following commands will install the necessary support:
sudo apt update
sudo apt upgrade
sudo apt install bash-completion
The package places a shell script at /etc/profile.d/bash_completion.sh. To ensure it is loaded in shell startup, the following appends the source line to .bashrc:
echo "source /etc/profile.d/bash_completion.sh" >> ~/.bashrcA conditional form avoids duplicating the line on repeated runs:
grep -wq '^source /etc/profile.d/bash_completion.sh' ~/.bashrc
  || echo 'source /etc/profile.d/bash_completion.sh' >> ~/.bashrc
The script is typically loaded automatically in a fresh login shell, but source /etc/profile.d/bash_completion.sh activates it immediately in the current session. Once active, pressing Tab after partial input such as sudo apt i or cat /etc/re completes commands and paths against what is actually installed. Bash also supports simple custom completions: complete -W 'google.com cyberciti.biz nixcraft.com' host teaches the shell to offer those three domains after typing host and pressing Tab, which illustrates how the feature can be extended to match the patterns of repeated daily work.
Installing Snap on Debian
Snap is a packaging format developed by Canonical that bundles an application together with all of its dependencies into a single self-contained package. Snaps update automatically, roll back gracefully on failure and are distributed through the Snap Store, which carries software from both Canonical and independent publishers. The background service that manages them, snapd, is pre-installed on Ubuntu but requires a manual setup step on Debian.
On Debian 9 (Stretch) and newer, snap can be installed directly from the command line:
sudo apt update
sudo apt install snapd
After installation, logging out and back in again, or restarting the system, is necessary to ensure that snap's paths are updated correctly in the environment. Once that is done, install the snapd snap itself to obtain the latest version of the daemon:
sudo snap install snapdTo verify that the setup is working, the hello-world snap provides a straightforward test:
sudo snap install hello-world
hello-world
A successful run prints Hello World! to the terminal. Note that snap is not available on Debian versions before 9. If a snap installation produces an error such as snap "lxd" assumes unsupported features, the resolution is to ensure the core snap is present and current:
sudo snap install core
sudo snap refresh core
On desktop systems, the Snap Store graphical application can then be installed with sudo snap install snap-store, providing a point-and-click interface for browsing and managing snaps alongside the command-line tools.
Increasing the Root Partition Size on Fedora with LVM
Fedora's default installer has used LVM (Logical Volume Manager) for many years, dividing the available disk into a volume group containing separate logical volumes for root (/), home (/home) and swap. This arrangement makes it straightforward to redistribute space between volumes without repartitioning the physical disk, which is a significant advantage over a fixed partition layout. Note that Fedora 33 and later default to Btrfs without LVM for new installations, so the steps below apply to systems that were installed with LVM, including pre-Fedora 33 installs and any system where LVM was selected manually.
Because the root file system is in active use while the system is running, resizing it safely requires booting from a Fedora Live USB stick rather than the installed system. Once booted from the live environment, open a terminal and begin by checking the volume group:
sudo vgsOutput such as the following shows the volume group name, total size and, crucially, how much free space (VFree) is unallocated:
  VG     #PV #LV #SN Attr   VSize    VFree
  fedora   1   3   0 wz--n- <237.28g    0
Before proceeding, confirm the exact device mapper paths for the root and home logical volumes by running fdisk -l, since the volume group name varies between installations. Common names include /dev/mapper/fedora-root and /dev/mapper/fedora-home, though some systems use fedora00 or another prefix.
When Free Space Is Already Available
If VFree shows unallocated space in the volume group, the root logical volume can be extended directly and the file system resized in a single command:
lvresize -L +5G --resizefs /dev/mapper/fedora-rootThe --resizefs flag instructs lvresize to resize the file system at the same time as the logical volume, removing the need to run resize2fs separately.
When There Is No Free Space
If VFree is zero, space must first be reclaimed from another logical volume before it can be given to root. The most common approach is to shrink the home logical volume, which typically holds the most available headroom. Shrinking a file system involves data moving on disk, so the operation requires the volume to be unmounted, which is why the live environment is essential. To take 10 GB from home:
lvresize -L -10G --resizefs /dev/mapper/fedora-homeOnce that completes, the freed space appears as VFree in vgs and can be added to the root volume:
lvresize -L +10G --resizefs /dev/mapper/fedora-rootBoth steps use --resizefs so that the file system boundaries are updated alongside the logical volume boundaries. After rebooting back into the installed system, df -h will confirm the new sizes are in effect.
Keeping a Linux System Well Maintained
The commands and configurations covered above form a coherent body of everyday Linux administration practice. Knowing where installed kernels are recorded, how to measure real disk usage rather than directory metadata, how to attach local and network file systems correctly, how to extract archives and move data securely without disrupting shared resources, how to make the shell itself more productive, how to extend a Debian system with snap packages and how to redistribute disk space between LVM volumes on Fedora converts a scattered collection of one-liners into a reliable working toolkit. Each topic interconnects naturally with the others: a kernel query clarifies what system you are managing, disk investigation reveals whether a file system has room for what you plan to transfer, NFS mounting determines where that transfer will land and bandwidth control determines what impact it will have while it runs.
Adding a dropdown calendar to the macOS desktop with Itsycal
In Linux Mint, there is a dropdown calendar that can be used for some advance planning. On Windows, there is a pop-up one on the taskbar that is as useful. Neither of these possibilities is there on a default macOS desktop, and I missed the functionality. Thus, a search began.
That ended with my finding Itsycal, which does exactly what I need. Handily, it also integrates with the macOS Calendar app, though I use other places for my appointments. In some ways, that is more than I need. The dropdown pane with the ability to go back and forth through time suffices for me.
While it would be ideal if I could go year by year as well as month by month, which is the case on Linux Mint, I can manage with just the latter. Anything is better than having nothing at all. Sometimes, using more than one operating system broadens a mind.
Finding a better way to uninstall Mac applications
If you were to consult an AI about uninstalling software under macOS, you would be given a list of commands to run in the Terminal. That feels far less slick than either Linux or Windows. Thus, I set to looking for a cleaner solution. It came in the form of AppCleaner from FreeMacSoft.
This finds the files to remove once you have supplied the name of the app that you wish to uninstall. Once you have reviewed those, you can set it to remove them to the recycling bin, after which they can be expunged from there. Handily, this automates the manual graft that otherwise would be needed.
It amazes me that such an operation is not handled within macOS itself, instead of leaving it to the software providers themselves, or third-party tools like this one. Otherwise, a Mac could get very messy, though Homebrew offers ways of managing software installations for certain cases. Surprisingly, the situation is more free-form than on iOS, too.
Installing PowerShell on Linux Mint for some cross-platform testing
Given how well shell scripting works on Linux and my familiarity with it, the need to install PowerShell on a Linux system may seem surprising. However, this was part of some testing that I wanted to do on a machine that I controlled before moving the code to a client's system. The first step was to ensure that any prerequisites were in place:
sudo apt update

sudo apt install -y wget apt-transport-https software-properties-common
After that, the next moves were to download and install the required package for instating Microsoft repository details:
wget -q https://packages.microsoft.com/config/ubuntu/24.04/packages-microsoft-prod.deb

sudo dpkg -i packages-microsoft-prod.deb
Then, I could install PowerShell itself:
sudo apt update

sudo apt install -y powershell
When it was in place, issuing the following command started up the extra shell for what I needed to do:
pwsh
During my investigations, I found that my local version of PowerShell was not the same as on the client's system, meaning that any code was not as portable as I might have expected, Nevertheless, it is good to have this for future reference and proves how interoperable Microsoft has needed to become.
Remote access between Mac and Linux: Choosing the right approach
Connecting from a Mac to a Linux desktop on the same network can be done in several ways, and the right choice depends on whether terminal access suffices or a full graphical session is needed. Terminal access is the simplest to arrange and often the most robust, while graphical access can be provided either by creating a fresh desktop session or by sharing the one already open on the Linux machine. Each approach trades ease of setup, performance and fidelity in different ways, so it helps to understand the options before settling on a configuration.
Understanding Your Requirements
The choice between methods rests primarily on three questions. First, is command-line access sufficient, or is a graphical desktop required? Second, if a desktop is needed, should it be a new session, or must it mirror the existing physical display? Third, how important is responsiveness compared to visual fidelity and feature completeness?
For administrative tasks that involve editing configuration files, managing services, or running scripts, SSH provides everything necessary. When a desktop environment is required, the decision becomes whether to view the exact state of the Linux machine's monitor or to work in a separate session.
The Three Main Options
SSH for Terminal Access
SSH requires no graphical overhead and works reliably over any connection. For many administrative tasks, this is all that is needed. Setting up SSH access is straightforward and forms the foundation for other secure operations, including file transfer and tunnelling.
RDP for New Desktop Sessions
Remote Desktop Protocol excels at creating new sessions with clean input handling and good performance over imperfect connections. RDP with a lightweight desktop such as Xfce delivers the most responsive experience for new sessions, though it does not support compositing desktops like Cinnamon well. The protocol translates keyboard and mouse input in a way that many clients have optimised for years, making it the most forgiving route when precise input behaviour matters.
VNC for Virtual or Shared Desktops
VNC can either create new virtual desktops or share the physical display. TigerVNC is suitable when a new Cinnamon session is acceptable and continuity with the local environment is valued. It can launch a full Cinnamon desktop in a virtual session, though it may feel less responsive than RDP, particularly when network conditions are suboptimal.
x11vnc mirrors the physical display exactly, making it ideal for monitoring ongoing work or providing remote guidance. This is the only option when the requirement is to see precisely what appears on the Linux machine's screen. However, it shares the same performance characteristics as other VNC solutions and is limited to showing what is already displayed locally.
Making the Choice
The decision ultimately comes down to the specific use case. If the goal is to work efficiently in a fresh desktop session with optimal responsiveness, RDP to an Xfce desktop environment is the clear choice. If maintaining the full Cinnamon experience in a new session is important, TigerVNC provides that continuity. When the task requires seeing or controlling the exact desktop session that is already running on the Linux machine, x11vnc is the only viable option.
In the articles that follow, we will examine the practical setup and configuration of x11vnc for sharing physical desktops, followed by detailed guidance on SSH, RDP and TigerVNC for those preferring terminal access or fresh desktop sessions.
What's Next
Part 2 explores x11vnc in detail, covering everything from basic setup to advanced performance tuning, input handling with KVM switches, clipboard troubleshooting and running x11vnc as a system service.
Part 3 examines SSH for terminal access, RDP with Xfce for responsive remote sessions, and TigerVNC for virtual Cinnamon desktops, along with file transfer options and operational considerations.
Command line installation and upgrading of VSCode and VSCodium on Windows, macOS and Linux
Downloading and installing software packages from a website is all very well until you need to update them. Then, a single command streamlines the process significantly. Given that VSCode and VSCodium are updated regularly, this becomes all the more pertinent and explains why I chose them for this piece.
Windows
Now that Windows 10 is more or less behind us, we can focus on Windows 11. That comes with the winget command by default, which is handy because it allows command line installation of anything that is in the Windows store, which includes VSCode and VSCodium. The commands can be as simple as these:
winget install VisualStudioCode

winget install VSCodium.VSCodium
The above is shorthand for this, though:
winget install --id VisualStudioCode

winget install --id VSCodium.VSCodium
If you want exact matches, the above then becomes:
winget install -e --id VisualStudioCode

winget install -e --id VSCodium.VSCodium
For upgrades, this is what is needed:
winget upgrade Microsoft.VisualStudioCode

winget upgrade VSCodium.VSCodium
Even better, you can do an upgrade everything at once operation:
winget upgrade --all
The last part certainly is better than the round trip to a website and back to going through an installation GUI. There is a lot less mouse clicking for one thing.
macOS
On macOS, you need to have Homebrew installed to make things more streamlined. To complete that, you need to run the following command (which may need you to enter your system password to get things to happen):
/bin/bash -c "$(curl -fsSL https://raw.githubusercontent.com/Homebrew/install/HEAD/install.sh)"
Then, you can execute one or both of these in the Terminal app, perhaps having to authorise everything with your password when requested to do so:
brew install --cask visual-studio-code

brew install --cask vscodium
The reason for the -cask switch is that these are apps that you want to go into the correct locations on macOS as well as having their icons appear in Launchpad. Omitting it is fine for command line utilities, but not for these.
To update and upgrade everything that you have installed via Homebrew, just issue the following in a terminal session:
brew update && brew upgrade
Debian, Ubuntu & Linux Mint
Like any other Debian or Ubuntu derivative, Linux Mint has its own in-built package management system via apt. Other Linux distributions have their own way of doing things (Fedora and Arch come to mind here), yet the essential idea is similar in many cases. Because there are a number of steps, I have split out VSCode from VSCodium for added clarity. Because of the way that things are set up, one or both apps can be updated using the usual apt commands without individual attention.
VSCode
The first step is to download the repository key using the following command:
wget -qO- https://packages.microsoft.com/keys/microsoft.asc \

| gpg --dearmor > packages.microsoft.gpg

sudo install -D -o root -g root -m 644 packages.microsoft.gpg /etc/apt/keyrings/packages.microsoft.gpg
Then, you can add the repository like this:
echo "deb [arch=amd64 signed-by=/etc/apt/keyrings/packages.microsoft.gpg] \

https://packages.microsoft.com/repos/code stable main" \

| sudo tee /etc/apt/sources.list.d/vscode.list
With that in place, the last thing that you need to do is issue the command for doing the installation from the repository:
sudo apt update; sudo apt install code
Above, I have put two commands together: one to update the repository and another to do the installation.
VSCodium
Since the VSCodium process is similar, here are the three commands together: one for downloading the repository key, another that adds the new repository and one more to perform the repository updates and subsequent installation:
curl -fSsL https://gitlab.com/paulcarroty/vscodium-deb-rpm-repo/raw/master/pub.gpg \

| sudo gpg --dearmor | sudo tee /usr/share/keyrings/vscodium-archive-keyring.gpg >/dev/null
echo "deb [arch=amd64 signed-by=/usr/share/keyrings/vscodium-archive-keyring.gpg] \

https://download.vscodium.com/debs vscodium main" \

| sudo tee /etc/apt/sources.list.d/vscodium.sources
sudo apt update; sudo apt install codium
After the three steps have completed successfully, VSCodium is installed and available to use on your system, and is accessible through the menus too.
Controlling the version of Python used in the Positron console with virtual environments
Because I have Homebrew installed on my Linux system for getting Hugo and LanguageTool on there, I also have a later version of Python than is available from the Linux Mint repositories. Both 3.12 and 3.13 are on my machine as a consequence. Here is the line in my .bashrc file that makes that happen:
eval "$(/home/linuxbrew/.linuxbrew/bin/brew shellenv)"
The result is when I issue the command which python3, this is what I get:
/home/linuxbrew/.linuxbrew/bin/python3
However, Positron looks to /usr/bin/python3 by default. Since this can get confusing, setting a virtual environment has its uses as long as you create it with the intended Python version. This is how you can do it, even if I needed to use sudo mode for some reason:
python3 -m venv .venv
When working solely on the command line, activating it becomes a necessity, adding another manual step to a mind that had resisted all this until recently:
source .venv/bin/activate
Thankfully, just issuing the deactivate command will do the eponymous action. Even better, just opening a folder with a venv in Positron saves you from issuing the extra commands and grants you the desired Python version in the console that it opens. Having run into some clashes between package versions, I am beginning to appreciate having a dedicated environment for a set of Python scripts, especially when an IDE makes it easy to work with such an arrangement.
And then there was one...
Even with the rise of the internet, magazine publishing was in rude health at the end of the last century. That persisted through the first decade of this century before any decline began to be noticed. Now, things are a poor shadow of what once used to be.
Though a niche area with some added interest, Linux magazine publishing has not been able to escape this trend. At the height of the flourish, we had the launch of Linux Voice by former writers of Linux Format. That only continues as a section in Linux Magazine these days, one of the first casualties from a general decline in readership.
Next, it was the turn of Linux User & Developer. This came into the hands of Future when they acquired Imagine Publishing and remained in print for a time after that due to the conditions of the deal set by the competition regulator. Once beyond that, Future closed it to stick with its own more lightweight title, Linux Format, transferring some of the writers across to the latter. This echoed what they did with Web Designer; they closed that in favour of .Net.
In both cases, dispatching the in-house publications might have been a better idea; without content, you cannot have readers. In time, .Net met its demise and the same fate awaited Linux Format a few months ago after it celebrated its silver jubilee. There was no goodbye edition this time: it went out with a bang, reminding us of glory days that have passed. The content was becoming more diverse with hardware features getting included, perhaps reflecting that something else was happening behind the scenes.
After all that, Linux Magazine soldiers on to outlive the others. It perhaps helps that it is published by an operation centred around the title, Linux New Media, which also publishes Admin Magazine. Even so, it too has needed to trim things a bit. For a time, there was a dedicated Raspberry Pi title that lives on as a section in Linux Magazine.
It was while sprucing up some of the content on here that I was reminded of the changes. Where do you find surveys of what is available? The options could include desktop environments and Linux distributions as much as code editors, web browsers and other kinds of software. While it is true that operations like Future have portals for exactly this kind of thing, they too have a nemesis in the form of GenAI. Asking ChatGPT may be their undoing as much as web publishing triggered a decline in magazine publishing.
Technology upheaval means destruction as much as creation, and there are occasions when spending quiet time reading a paper periodical is just what you need. We all need time away from screen reading, whatever the device happens to be.