TOPIC: CROSS-PLATFORM SOFTWARE
A look at the Julia programming language
Several open-source computing languages get mentioned when talking about working with data. Among these are R and Python, but there are others; Julia is another one of these. It took a while before I got to check out Julia because I felt the need to get acquainted with R and Python beforehand. There are others like Lua to investigate too, but that can wait for now.
With the way that R is making an incursion into clinical data reporting analysis following the passage of decades when SAS was predominant, my explorations of Julia are inspired by a certain contrariness on my part. Alongside some small personal projects, there has been some reading in (digital) book form and online. Concerning the latter of these, there are useful tutorials like Introduction to Data Science: Learn Julia Programming, Maths & Data Science from Scratch or Julia Programming: a Hands-on Tutorial. Like what happens with R, there are online versions of published books available free of charge, and they include Interactive Visualization and Plotting with Julia. Video learning can help too and Jane Herriman has recorded and shared useful beginner's guides on YouTube that start with the basics before heading onto more advanced subjects like multiple dispatch, broadcasting and metaprogramming.
This piece of learning has been made of simple self-inspired puzzles before moving on to anything more complex. That differs from my dalliance with R and Python, where I ventured into complexity first, not least because of testing them out with public COVID data. Eventually, I got around to doing that with Julia too, though my interest was beginning to wane by then, and Julia's abilities for creating multipage PDF files were such that the PDF Toolkit was needed to help with this. Along the way, I have made use of such packages as CSV.jl, DataFrames.jl, DataFramesMeta, Plots, Gadfly.jl, XLSX.jl and JSON3.jl, among others. After that, there is PrettyTables.jl to try out, and anyone can look at the Beautiful Makie website to see what Makie can do. There are plenty of other packages creating graphs, such as SpatialGraphs.jl, PGFPlotsX and GRUtils.jl. For formatting numbers, options include Format.jl and Humanize.jl.
So far, my primary usage has been with personal financial data together with automated processing and backup of photo files. The photo file processing has taken advantage of the ability to compile Julia scripts for added speed because just-in-time compilation always means there is a lag before the real work begins.
VS Code is my chosen editor for working with Julia scripts, since it has a plugin for the language. That adds the REPL, syntax highlighting, execution and data frame viewing capabilities that once were added to the now defunct Atom editor by its own plugin. While it would be nice to have a keyboard shortcut for script execution, the whole thing works well and is regularly updated.
Naturally, there have been a load of queries as I have gone along and the Julia Documentation has been consulted as well as Julia Discourse and Stack Overflow. The latter pair have become regular landing spots on many a Google search. One example followed a glitch that I encountered after a Julia upgrade when I asked a question about this and was directed to the XLSX.jl Migration Guides where I got the information that I needed to fix my code for it to run properly.
There is more learning to do as I continue to use Julia for various things. Once compiled, it does run fast like it has been promised. The syntax paradigm is akin to R and Python, but there are Julia-specific features too. If you have used the others, the learning curve is lessened but not eliminated completely. This is not an object-oriented language as such, but its functional nature makes it familiar enough for getting going with it. In short, the project has come a long way since it started more than ten years ago. There is much for the scientific programmer, but only time will tell if it usurped its older competitors. For now, I will remain interested in it.
Disabling the SSL connection requirement in MySQL Workbench
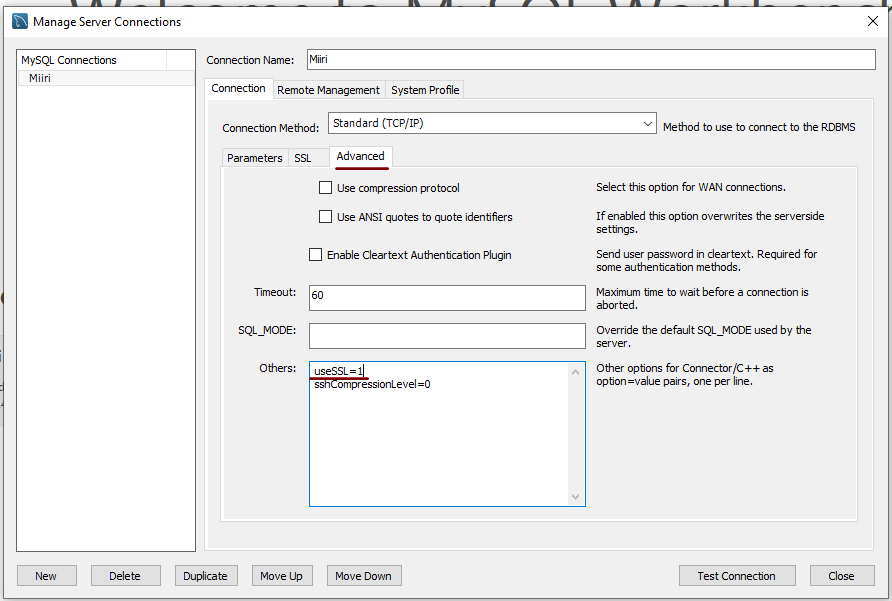
A while ago, I found that MySQL Workbench would only use SSL connections and that was stopping it from connecting to local databases. Thus, I looked for a way to override this: the cure was to go to Database > Manage Connections... in the menus for the application's home tab. In the dialogue box that appeared, I chose the connection of interest and went to the Advanced panel under Connection and removed the line useSSL=1 from the Others field. The screenshot below shows you what things looked like before the change was made. Naturally, the best practice would be to secure a remote database connection using SSL, so this approach is best reserved for remote non-production databases. While it may be that this does not happen now, I thought I would share this in case the problem persists for anyone.
Removing a Julia package using REPL or script commands
While I have been programming with SAS for a few decades, and it remains a linchpin in the world of clinical development in the pharmaceutical industry, other technologies like R and Python are gaining a foothold. Two years ago, I started to look at those languages with personal projects being a great way of facilitating this. In addition, I got to hear of Julia and got to try that too. That journey continues since I have put it into use for importing and backing up photos, and there are other possible uses too.
Recently, I updated Julia to version 1.8.2 but ran into a problem with the DataArrays package that I had installed, so I decided to remove it since it was added during experimentation. Though the Pkg package that is used for package management is documented, I had not got to that, which meant that some web searching ensued. It turns out that there are two ways of doing this. One uses the REPL: after pressing the ] key, the following command gets issued:
rm DataArrays
When all is done, pressing the delete or backspace keys returns things to normal. This also can be done in a script as well as the REPL, and the following line works in both instances:
using Pkg; Pkg.rm("DataArrays")
While the semicolon is used to separate two commands issued on the same line, they can be on different lines or issued separately just as well. Naturally, DataArrays is just an example here; you just replace that with the name of whatever other package you need to remove. Since we can get carried away when downloading packages, there are times when a clean-up is needed to remove redundant packages, so knowing how to remove any clutter is invaluable.
Accessing Julia REPL command history
In the BASH shell used on Linux and UNIX, the history command calls up a list of recent commands used and has many uses. There is a .bash_history file in the root of the user folder that logs and provides all this information, so there are times when you need to exclude some commands from there, but that is another story.
The Julia REPL environment works similarly to many operating system command line interfaces, so I wondered if there was a way to recall or refer to the history of commands issued. So far, I have not come across an equivalent to the BASH history command for the REPL itself, but there the command history is retained in a file like .bash_history. The location varies on different operating systems, though. On Linux, it is ~/.julia/logs/repl_history.jl while it is %USERPROFILE%\.julia\logs\repl_history.jl on Windows. While I tend to use scripts that I have written in VSCode rather than entering pieces of code in the REPL, the history retains its uses. Thus, I am sharing it here for others. In the past, the location changed, but these are the ones with Julia 1.8.2, the version that I have at the time of writing.
Controlling display of users on the logon screen in Linux Mint 20.3
Recently, I tried using Commento with a static website that I was developing and this needed PostgreSQL rather than MySQL or MariaDB, which many content management tools use. That meant a learning curve that made me buy a book, as well as the creation of a system account for administering PostgreSQL. These are not the kind of things that you want to be too visible, so I wanted to hide them.
Since Linux Mint uses AccountsService, you cannot use lightdm to do this (the comments in /etc/lightdm/users.conf suggest as much). Instead, you need to go to /var/lib/AccountsService/users and look for a file called after the username. If one exists, all that is needed is for you to add the following line under the [User] section:
SystemAccount=true
If there is no file present for the user in question, then you need to create one with the following lines in there:
[User]
SystemAccount=true
Once the configuration files are set up as needed, AccountsService needs to be restarted and the following command does that deed:
sudo systemctl restart accounts-daemon.service
Logging out should reveal that the user in question is not listed on the logon screen as required.
Something to watch with the SYSODSESCAPECHAR automatic SAS macro variable
Recently, a client of mine updated one of their systems from SAS 9.4 M5 to SAS 9.4 M7. Despite performing due diligence regarding changes between the maintenance release, a change in behaviour of the SYSODSESCAPECHAR automatic macro variable surprised them. The macro variable captures the assignment of the ODS escape character used to prefix RTF codes for page numbering and other things. That setting is made using an ODS ESCAPECHAR statement like the following:
ods escapechar="~";
In the M5 release, the tilde character in this example was output by the automatic macro variable, but that changed in the M7 release to 7E, the hexadecimal code for the same and this tripped up one of their validated macro programs used in output production. The adopted solution was to use the escape sequence (ESC) that gave the same outcome that was there before the change. That was less verbose than alternative code changing the hexadecimal code into the expected ASCII character that follows.
data _null_;
    call symput("new",byte(input("&sysodsescapechar.",hex.)));
run;
The above supplies a hexadecimal code to the BYTE function for correct rendering, with the SYMPUT routine assigning the resulting value to a macro variable named new. Just using the escape sequence is far more succinct, though there is now an added validation need once user pilot testing has completed. In my line of business, the updating of code is the quickest part of many such changes; documentation and testing always take longer.
Using multi-line commenting in Perl to inactivate blocks of code during testing
Recently, I needed to inactivate blocks of code in a Perl script while doing some testing. Since this is something that I often do in other computing languages, I sought the same in Perl. To accomplish that, I need to use the POD methodology. This meant enclosing the code as follows.
=start
<< Code to be inactivated by inclusion in a comment >>
=cut
While the =start line could use any word after the equality sign, it seems that =cut is required to close the multi-line comment. If this was actual programming documentation, then the comment block should include some meaningful text for use with perldoc. However, that was not a concern here because the commenting statements would be removed afterwards anyway. It also is good practice not to leave commented code in a production script or program to avoid any later confusion.
In my case, this facility allowed me to isolate the code that I had to alter and test before putting everything back as needed. It also saved time since I did not need to individually comment out every executable line because multiple lines could be inactivated at a time.
Getting Eclipse to start without incompatibility errors on Linux Mint 19.1
Recent curiosity about Java programming and Groovy scripting got me trying to start up the Eclipse IDE that I had installed on my main machine. What I got instead of a successful application startup was a message that included the following:
!MESSAGE Exception launching the Eclipse Platform:

!STACK

java.lang.ClassNotFoundException: org.eclipse.core.runtime.adaptor.EclipseStarter

at java.base/java.net.URLClassLoader.findClass(URLClassLoader.java:466)

at java.base/java.lang.ClassLoader.loadClass(ClassLoader.java:566)

at java.base/java.lang.ClassLoader.loadClass(ClassLoader.java:499)

at org.eclipse.equinox.launcher.Main.invokeFramework(Main.java:626)

at org.eclipse.equinox.launcher.Main.basicRun(Main.java:584)

at org.eclipse.equinox.launcher.Main.run(Main.java:1438)

at org.eclipse.equinox.launcher.Main.main(Main.java:1414)
The cause was a mismatch between Eclipse and the installed version of Java that it needed to run. After all, the software itself is written in the Java language and the installed version from the usual software repositories was too old for Java 11. The solution turned out to be installing a newer version as a Snap (Ubuntu's answer to Flatpak). The following command did the needful since snapd already was running on my machine:
sudo snap install eclipse --classic
The only part of the command that warrants extra comment is the --classic switch, since that is needed for a tool like Eclipse that needs to access a host file system. On executing, the software was downloaded from Snapcraft and then installed within its own bundle of dependencies. The latter adds a certain detachment from the underlying Linux installation and ensures that no messages appear because of incompatibilities like the one near the start of this post.
Moving a website from shared hosting to a virtual private server
This year has seen some optimisation being applied to my web presences, guided by the results of GTMetrix scans. It was then that I realised how slow things were, so server loads were reduced. Anything that slowed response times, such as WordPress plugins, got removed. Usage of Matomo also was curtailed in favour of Google Analytics, while HTML, CSS and JS minification followed. Something that had yet to happen was a search for a faster server. Now, another website has been moved onto a virtual private server (VPS) to see how that would go.
Speed was not the only consideration, since security was a factor too. After all, a VPS is more locked away from other users than a folder on a shared server. There also is the added sense of control, so Let's Encrypt SSL certificates can be added using the Electronic Frontier Foundation's Certbot. That avoids the expense of using an SSL certificate provided through my shared hosting provider, and a successful transition for my travel website may mean that this one undergoes the same move.
For the VPS, I chose Ubuntu 18.04 as its operating system, and it came with the LAMP stack already in place. Have offload development websites, the mix of Apache, MySQL and PHP is more familiar to me than anything using Nginx or Python. It also means that .htaccess files become more useful than they were on my previous Nginx-based platform. Having full access to the operating system using SSH helps too and should mean that I have fewer calls on technical support since I can do more for myself. Any extra tinkering should not affect others either, since this type of setup is well known to me and having an offline counterpart means that anything riskier is tried there beforehand.
Naturally, there were niggles to overcome with the move. The first to fix was to make the MySQL instance accept calls from outside the server so that I could migrate data there from elsewhere, and I even got my shared hosting setup to start using the new database to see what performance boost it might give. To make all this happen, I first found the location of the relevant my.cnf configuration file using the following command:
find / -name my.cnf
Once I had the right file, I commented out the following line that it contained and restarted the database service afterwards, using another command to stop the appearance of any error 111 messages:
bind-address 127.0.0.1
service mysql restart
After that, things worked as required and I moved onto another matter: uploading the requisite files. That meant installing an FTP server, so I chose proftpd since I knew that well from previous tinkering. Once that was in place, file transfer commenced.
When that was done, I could do some testing to see if I had an active web server that loaded the website. Along the way, I also instated some Apache modules like mod-rewrite using the a2enmod command, restarting Apache each time I enabled another module.
Then, I discovered that Textpattern needed php-7.2-xml installed, so the following command was executed to do this:
apt install php7.2-xml
Then, the following line was uncommented in the correct php.ini configuration file that I found using the same method as that described already for the my.cnf configuration and that was followed by yet another Apache restart:
extension=php_xmlrpc.dll
Addressing the above issues yielded enough success for me to change the IP address in my Cloudflare dashboard so it pointed at the VPS and not the shared server. The changeover happened seamlessly without having to await DNS updates as once would have been the case. It had the added advantage of making both WordPress and Textpattern work fully.
With everything working to my satisfaction, I then followed the instructions on Certbot to set up my new Let's Encrypt SSL certificate. Aside from a tweak to a configuration file and another Apache restart, the process was more automated than I had expected, so I was ready to embark on some fine-tuning to embed the new security arrangements. That meant updating .htaccess files and Textpattern has its own, so the following addition was needed there:
RewriteCond %{HTTPS} !=on

RewriteRule ^ https://%{HTTP_HOST}%{REQUEST_URI} [R=301,L]
This complemented what was already in the main .htaccess file, and WordPress allows you to include http(s) in the address it uses, so that was another task completed. The general .htaccess only needed the following lines to be added:
RewriteCond %{SERVER_PORT} 80

RewriteRule ^(.*)$ https://www.assortedexplorations.com/$1 [R,L]
What all these achieve is to redirect insecure connections to secure ones for every visitor to the website. After that, internal hyperlinks without https needed updating along with any forms so that a padlock sign could be shown for all pages.
With the main work completed, it was time to sort out a lingering niggle regarding the appearance of an FTP login page every time a WordPress installation or update was requested. The main solution was to make the web server account the owner of the files and directories, but the following line was added to wp-config.php as part of the fix even if it probably is not necessary:
define('FS_METHOD', 'direct');
There also was the non-operation of WP Cron and that was addressed using WP-CLI and a script from Bjorn Johansen. To make double sure of its effectiveness, the following was added to wp-config.php to turn off the usual WP-Cron behaviour:
define('DISABLE_WP_CRON', true);
Intriguingly, WP-CLI offers a long list of possible commands that are worth investigating. A few have been examined, but more await attention.
Before those, I still need to get my new VPS to send emails. So far, sendmail has been installed, the hostname changed from localhost and the server restarted. More investigations are needed, but what I have not is faster than what was there before, so the effort has been rewarded already.
Updating Piwik using the Linux Command Line
Because updating Piwik using its web interface has proved tempestuous, I have decided to update the self-hosted analytics application on an SSH session. The production web servers that I use are hosted on Linux systems, so that is why any commands apply to the Linux or UNIX command line only. What is needed for Windows servers may differ.
The first step is to down the required ZIP file with this command:
wget https://builds.piwik.org/piwik.zip
Once the download is complete, the contents of the ZIP archive are extracted into a new subfolder. This is a process that I carry out in a separate folder to that where the website files are kept before copying everything from the extraction folder in there. Here is the unzip command, and the -o switch turns on overwriting of any previously existing files:
unzip -o piwik.zip
Without the required folder in the web server area to be updated, the next step is to do the actual system update that includes any updates to the Piwik database that you are using. There are two commands that you can use once you have specified the location of your Piwik installation. The second is needed when the first option cannot find where the PHP executable is stored. My systems had something more specific than these because both PHP 5.6 and PHP 7.0 are installed. Looking in /usr/bin was enough to find what I needed to execute in place of PHP below. Otherwise, the command was the same.
./[path to piwik]/console core:update
php [path to piwik]/console core:update
While the upgrade is ongoing, it prompts you to permit it to continue before it goes and modifies the database. This did not take long on my systems, but that depends on how much data there is. Once, the process has completed, you can delete any extraneous files using the rm command.