Using PowerShell to reinstall Windows Apps
Recently, I managed to use 10AppsManager to remove most of the in-built apps from a Windows 10 virtual machine that I have for testing development versions in case anything ugly were to appear in a production update. Curiosity is my excuse for letting the tool do what it did and some could do with restoration. Out of the lot, Windows Store is the main one that I have sorted so far.
The first step of the process was to start up PowerShell in administrator mode. On my system, this is as simple as clicking on the relevant item in the menu popped up by right-clicking on the Start Menu button and clicking on the Yes button in the dialogue box that appears afterwards. In your case, it might be a case of right-clicking on the appropriate Start Menu programs entry, selecting the administrator option and going from there.
With this PowerShell session open, the first command to issue is the following:
Get-Appxpackage -Allusers > c:\temp\appxpackage.txt
This creates a listing of Windows app information and pops it into a text file in your choice of directory. Opening the text file in Notepad allows you to search it more easily, and there is an entry for Windows Store:
Name                   : Microsoft.WindowsStore
Publisher              : CN=Microsoft Corporation, O=Microsoft Corporation, L=Redmond, S=Washington, C=US
Architecture           : X64
ResourceId             :
Version                : 11607.1001.32.0
PackageFullName        : Microsoft.WindowsStore_11607.1001.32.0_x64__8wekyb3d8bbwe
InstallLocation        : C:\Program Files\WindowsApps\Microsoft.WindowsStore_11607.1001.32.0_x64__8wekyb3d8bbwe
IsFramework            : False
PackageFamilyName      : Microsoft.WindowsStore_8wekyb3d8bbwe
PublisherId            : 8wekyb3d8bbwe
PackageUserInformation : {S-1-5-21-3224249330-198124288-2558179248-1001
IsResourcePackage      : False
IsBundle               : False
IsDevelopmentMode      : False
Dependencies           : {Microsoft.VCLibs.140.00_14.0.24123.0_x64__8wekyb3d8bbwe,
Microsoft.NET.Native.Framework.1.3_1.3.24201.0_x64__8wekyb3d8bbwe,
Microsoft.NET.Native.Runtime.1.3_1.3.23901.0_x64__8wekyb3d8bbwe,
Microsoft.WindowsStore_11607.1001.32.0_neutral_split.scale-100_8wekyb3d8bbwe}
Using the information from the InstallLocation field, the following command can be built and executed (here, it has gone over several lines, so you need to get your version onto a single one):
Add-AppxPackage -register "C:\Program Files\WindowsApps\Microsoft.WindowsStore_11607.1001.32.0_x64__8wekyb3d8bbwe\AppxManifest.xml" -DisableDevelopmentMode
Once the above has completed, the app was installed and ready to use again. As the mood took me, I installed other apps from the Windows Store as I saw fit.
Forcing an upgrade to Windows 10 Anniversary Update
There remain people who advise those on Windows 7 or 8.x to hold fire on upgrading to Windows 10. Now that the free upgrade no longer is available, that advice may hold more weight than it did. Even so, there are those among us who jumped ship who are open to having the latest versions of things at no monetary cost to see what is available, and I must admit to being one of those.
After all, I do have a virtual machine with a pre-release version of the next update to Windows 10 installed on there to see what might be coming our way and to get a sense of what changes that may bring so that I am ready for those. Otherwise, I am usually happy to wait, but I noticed that the Windows 10 Anniversary Update only came to my HP Pavilion dm4 laptop and not other machines with Windows 10 installed, so I started to wonder why there was a lag when it came to automatic upgrades.
So that these things do not arrive when it is least convenient, I took advantage of a manual method to choose my timing. This did not involve installation from a disk image, but was in-situ. The first part of the process is standard enough in that the Settings app was started and the Update & security item chosen. That dropped me onto the Windows Update, and I first clicked on the Check for updates button to see what would happen. When nothing came of that, the Learn more link was clicked to bring me onto part of the Microsoft support website where I found that the Windows 10 Anniversary Update installer could be downloaded, so I duly did just that.
Running it produced a screen asking whether I wanted to proceed. Since I wanted to go ahead, the appropriate button was clicked and the machine left alone until the process completed. Because the installer purely is a facilitator, the first stage is to download the rest of the files needed, and that will take a while on any connection. Once downloading was completed, the actual process of installation commenced with several restarts before a log-in screen was again on offer. On logging in to the machine, the last part of the process started.
Though the process took quite a while, it seemingly worked without a hitch. If there was anything that I needed to do, it was the re-installation of VirtualBox Guest Additions to restore access to shared folders, as well as dealing with a self-inflicted irritation. Otherwise, I have found that previously installed software worked as expected and no file has been missed. Waiting a while may have had its advantages too because initial issues with the Anniversary Update will have been addressed, though it is best not to leave it too long, or you could have the feeling of being forgotten. A happy balance needs striking.
Dealing with an "Your insider preview build settings need attention" message in Windows 10 Settings
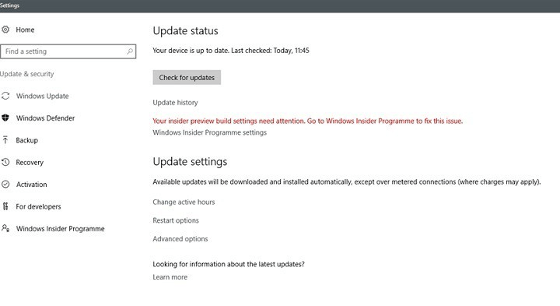
Having now upgraded all my Windows 10 machines to the Anniversary Update edition without much in the way of upheaval, I came across the following message on one of them:
Your insider preview build settings need attention. Go to Windows Insider Programme to fix this.
It appeared on the Update screen of the Settings application, and I believe that I may have triggered it by letting foolish curiosity take me to the Windows Insider Programme screen. Returning there offered no way of resolving the issue, so I had to try the registry editing tip that I discovered elsewhere on the web. Naturally, the creation of a System Restore Point before proceeding with changes to the Windows Registry is advised.
Typing REGEDIT into Cortana brings up a clickable link to the Registry Editor. Having clicked on this, I then clicked on the Yes button on the ensuing dialogue box that Windows 10 throws up every time you make a system change, such as installing new software. With the Registry Editor opened, I made my way to the following location:
HKEY_LOCAL_MACHINE\SOFTWARE\Microsoft\WindowsSelfHost\UI\Strings
Once there, I deleted every entry that mentioned "Insider" or "Windows Insider" to leave only two afterwards: "(Default)", "UnknownErrorDialogValues". That resolved the issue, and I now intend to stay away from the Windows Insider Programme screen in Settings so that the message never appears again.
Thoughts on eBooks
Recently, I have been doing a clear out of paper books in case the recent European Union referendum result in the U.K. affects my ability to stay there, since I am an Irish citizen. In my two decades here, I have not felt as much uncertainty and lack of belonging as I do now. It is as if life wants to become difficult for a while.
What made the clearance easier was that there was of making sure that the books were re-used and eBooks replaced anything that I would want to keep. However, what I had not realised is that demand for eBooks has flat lined, something that only became apparent in a recent article in PC Pro article penned by Stuart Turton. He had all sorts of suggestions about how to liven up the medium, but I have some of my own.
Niall Benvie also broached the subject from the point of view of photographic display in an article featured in Outdoor Photography because most are looking at photos on their smartphones and that often reduces the quality of what they see. Having a partiality to photo books, it remains the one class of books that I am more likely to have in paper form, even I have an Apple iPad Pro (the original 12.9 inch version) and I am using it to write these very words. There also is the six-year-old 24-inch Iiyama screen that I use with my home PC.
The two apps with which I have had experience are Google Play Books and Amazon Kindle, both of which I have used on both iOS and Android, while I use the Windows app for the latter too. Both apps are simple and work effectively until you end up with something of a collection. Then, shortcomings become apparent.
Search functionality is something that can be hidden away in menus, and that is why I missed it for so long. For example, Amazon's Kindle supports puts the search box in a prominent place on iOS but hides the same function in menus on its Android or Windows incarnations. Google Play Books consistently does the latter from what I have seen, and it would do no harm to have a search box on the library screen since menus and touchscreen devices do not mix as well. The ability to search within a book is similarly afflicted, so this also needs moving to a more prominent place and is really handy for guidebooks or other more technical textbooks.
The ability to organise a collection appears to be another missed opportunity. The closest that I have seen so far are the Cloud and Device screens on Amazon's Kindle app, but even this is not ideal. Having the ability to select some books as favourites would help, as would hiding others from the library screen would be an improvement. Having the ability to re-sell unwanted eBooks would be another worthwhile addition because you do just that with paper books.
When I started on this piece, I reached the conclusion the eBooks too closely mimicked libraries of paper books. Now, I am not so sure. It appears to me that the format is failing to take full advantage of its digital form, and that might have been what Turton was trying to evoke, but the examples that he used did not appeal to me. Also, we could do with more organisation functionality in apps, and the ability to resell could be another opportunity. Instead, we appear to be getting digital libraries and there are times when a personal collection is best.
All the while, paper books are being packaged in ever more attractive ways and there always will be some that look better in paper form than in digital formats, and that still applies to those with glossy appealing photos. Paper books almost feel like gift items these days, and you cannot fault the ability to browse them by flicking through the pages with your hands.
Reloading .bashrc within a BASH terminal session
BASH is a command-line interpreter that is commonly used by Linux and UNIX operating systems. Chances are that you will find yourself in a BASH session if you start up a terminal emulator in many of these, though there are others like KSH and SSH too.
BASH comes with its own configuration files and one of these is located in your own home directory, .bashrc. Among other things, it can become a place to store command shortcuts or aliases. Here is an example:
alias us='sudo apt-get update && sudo apt-get upgrade'
Such a definition needs there to be no spaces around the equals sign, and the actual command to be declared in single quotes. Doing anything other than this will not work, as I have found. Also, there are times when you want to update or add one of these and use it without shutting down a terminal emulator and restarting it.
To reload the .bashrc file to use the updates contained in there, one of the following commands can be issued:
source ~/.bashrc
. ~/.bashrc
Both will read the file and execute its contents so you get those updates made available so you can continue what you are doing. There appears to be a tendency for this kind of thing in the world of Linux and UNIX because it also applies to remounting drives after a change to /etc/fstab and restarting system services like Apache, MySQL or Nginx. The command for the former is below:
sudo mount -a
Often, the means for applying the sorts of in-situ changes that you make are simple ones too, and anything that avoids system reboots has to be good since you have less work interruptions.
Batch conversion of DNG files to other file types with the Linux command line
At the time of writing, Google Drive is unable to accept DNG files, the Adobe file type for RAW images from digital cameras. While the uploads themselves work fine, the additional processing at the end that, I believe, is needed for Google Photos appears to be failing. Because of this, I thought of other possibilities like uploading them to Dropbox or enclosing them in ZIP archives instead; of these, it is the first that I have been doing and with nothing but success so far. Another idea is to convert the files into an image format that Google Drive can handle, and TIFF came to mind because it keeps all the detail from the original image. In contrast, JPEG files lose some information because of the nature of the compression.
Handily, a one line command does the conversion for all files in a directory once you have all the required software installed:
find -type f | grep -i "DNG" | parallel mogrify -format tiff {}
The find and grep commands are standard, with the first getting you a list of all the files in the current directory and sending (piping) these to the grep command, so the list only retains the names of all DNG files. The last part uses two commands for which I found installation was needed on my Linux Mint machine. The parallel package is the first of these and distributes the heavy workload across all the cores in your processor, and this command will add it to your system:
sudo apt-get install parallel
The mogrify command is part of the ImageMagick suite along with others like convert and this is how you add that to your system:
sudo apt-get install imagemagick
In the command at the top, the parallel command works through all the files in the list provided to it and feeds them to mogrify for conversion. Without the use of parallel, the basic command is like this:
mogrify -format tiff *.DNG
In both cases, the -format switch specifies the output file type, with the tiff portion triggering the creation of TIFF files. The *.DNG portion itself captures all DNG files in a directory, but {} does this in the main command at the top of this post. If you wanted JPEG ones, you would replace tiff with jpg. Should you ever need them, a full list of what file types are supported is produced using the identify command (also part of ImageMagick) as follows:
identify -list format
Overriding replacement of double or triple hyphenation in WordPress
On here, I have posts with example commands that include double hyphens, and they have been displayed merged together, something that has resulted in a comment posted by a visitor to this part of the web. All the while, I have been blaming the fonts that I have been using, only for it to be the fault of WordPress itself.
Changing multiple dashes to something else has been a feature of Word autocorrect, but I never expected to see WordPress aping that behaviour, and it has been doing so for a few years now. The culprit is wptexturize and that cannot be disabled, for it does many other useful things.
What happens is that the wptexturize filter changes '--' (double hyphens) to '–' (– in web entity encoding) and '---' (triple hyphens) to '—' (— in web entity encoding). The solution is to add another filter to the content that changes these back to the way they were, and the following code does this:
add_filter( 'the_content' , 'mh_un_en_dash' , 50 );

function mh_un_en_dash( $content ) {

$content = str_replace( '–' , '--' , $content );

$content = str_replace( '—' , '---' , $content );

return $content;

}
The first line of the segment adds in the new filter that uses the function defined below it. The third and fourth lines above do the required substitution before the function returns the post content for display in the web page. The whole code block can be used to create a plugin or placed in the theme's functions.php file. Either way, things appear without the substitution, confusing your readers. It makes me wonder if a bug report has been created for this because the behaviour looks odd to me.
Compressing a VirtualBox VDI file for a Linux guest
In a previous posting, I talked about compressing a virtual hard disk for a Windows guest system running in VirtualBox on a Linux system. Since then, I have needed to do the same for a Linux guest following some housekeeping. Because the Linux distribution used is Debian, the instructions are relevant to that and maybe its derivatives such as Ubuntu, Linux Mint and their like.
While there are other alternatives like dd, I am going to stick with a utility named zerofree to overwrite the newly freed up disk space with zeroes to aid compression later on in the process for this and the first step is to install it using the following command:
apt-get install zerofree
Once that has been completed, the next step is to unmount the relevant disk partition. Luckily for me, what I needed to compress was an area that I reserved for synchronisation with Dropbox. If it was the root area where the operating system files are kept, a live distro would be needed instead. In any event, the required command takes the following form, with the mount point being whatever it is on your system (/home, for instance):
sudo umount [mount point]
With the disk partition unmounted, zerofree can be run by issuing a command that looks like this:
zerofree -v /dev/sdxN
Above, the -v switch tells zerofree to display its progress and a continually updating percentage count tells you how it is going. The /dev/sdxN piece is generic with the x corresponding to the letter assigned to the disk on which the partition resides (a, b, c or whatever) and the N is the partition number (1, 2, 3 or whatever; before GPT, the maximum was 4). Putting all this together, we get an example like /dev/sdb2.
Once, that had completed, the next step is to shut down the VM and execute a command like the following on the host Linux system ([file location/file name] needs to be replaced with whatever applies on your system):
VBoxManage modifyhd [file location/file name].vdi --compact
With the zero filling in place, there was a lot of space released when I tried this. While it would be nice for dynamic virtual disks to reduce in size automatically, I accept that there may be data integrity risks with those, so the manual process will suffice for now. It has not been needed that often anyway.
Getting rid of Windows 10 notifications about disabling start-up applications
On several Windows 10 machines, I have been seeing messages appearing in its Action Centre pane with the heading Disable apps to help improve performance. It appeared again recently, so I decided to look further into the matter.
What I found was that the solution first involves opening up the Control Panel, which takes a little finding in Windows 10. You could use Cortana to get to it or right-clicking on the Start Menu and left-clicking on the Control Panel menu. Using the Windows key + X will produce the same menu, and choosing the same entry will have the same effect.
Once the Control Panel is open, it makes life a little easier if you change to the Large icons view using the drop-down menu under the Search Control Panel box on the right-hand side. Then, what you need to do is click on the Security and Maintenance icon.
Once in that Security and Maintenance section, you are presented with two subheadings, one for Security and one for Maintenance. So long as you have not dismissed the message in the action centre, you will see a corresponding entry under the Maintenance section. At the bottom of that entry, there will be a link that turns off these messages permanently, and clicking on this will have the desired effect.
Turning off push notifications in Firefox 46
Firefox 44 introduced a feature I only recently noticed when Yahoo Mail offered browser notifications for new emails; I did not need this and could not switch it off permanently for that site. This meant I was bothered each time I checked that email address, an unnecessary irritation. Other websites offered similar push notifications but allowed permanent deactivation, making this a site-specific function unless you take an alternative approach.
Open a new browser tab and enter about:config in the address bar, then press return. If this is your first time, a warning message will appear, which you can dismiss permanently. This reveals a searchable list of options. Find dom.webnotifications.enabled and dom.webnotifications.serviceworker.enabled. By default, these values are set to 'true'. Double-click each one to change them to 'false'. This will prevent push notification offers from web services like Yahoo Mail, reducing intrusions during your browsing.