Synthetic Data: The key to unlocking AI's potential in healthcare

The integration of artificial intelligence into healthcare is being hindered by challenges such as data scarcity, privacy concerns and regulatory constraints. Healthcare organisations face difficulties in obtaining sufficient volumes of high-quality, real-world data to train AI models, which can accurately predict outcomes or assist in decision-making.
Synthetic data, defined as algorithmically generated data that mimics real-world data, is emerging as a solution to these challenges. This artificially generated data mirrors the statistical properties of real-world data without containing any sensitive or identifiable information, allowing organisations to sidestep privacy issues and adhere to regulatory requirements.
By generating datasets that preserve statistical relationships and distributions found in real data, synthetic data enables healthcare organisations to train AI models with rich datasets while ensuring sensitive information remains secure. The use of synthetic data can also help address bias and ensure fairness in AI systems by enabling the creation of balanced training sets and allowing for the evaluation of model outputs across different demographic groups.
Furthermore, synthetic data can be generated programmatically, reducing the time spent on data collection and processing and enabling organisations to scale their AI initiatives more efficiently. Ultimately, synthetic data are becoming a critical asset in the development of AI in healthcare, enabling faster development cycles, improving outcomes and driving innovation while maintaining trust and security.
What SAS Innovate 2025 revealed about the future of enterprise analytics
SAS Innovate 2025 comprised a global event in Orlando (6th-9th May) followed by regional editions on tour. This document provides observations from both the global event and the London stop (3rd-4th June), covering technical content, platform developments and thematic emphasis across the two occasions. The global event featured extensive recorded content covering platform capabilities, migration approaches and practical applications, whilst the London event incorporated these themes with additional local perspectives and a particular focus on governance and life sciences applications.

Global Event
Platform Expansion and New Capabilities
The global SAS Innovate 2025 event included content on SAS Clinical Acceleration, positioned as a SAS Viya equivalent to SAS LSAF. Whilst much appeared familiar from the predecessor platform, performance improvements and additional capabilities represented meaningful enhancements.
Two presentations, likely restricted to in-person attendees based on their absence from certain schedules, covered AI-powered SAS code generation. Shionogi presented on using AI for clinical studies and real-world evidence generation, with the significant detail that the AI capability existed within SAS Viya rather than depending on external large language models. Another session addressed interrogating and generating study protocols using SAS Viya, including functionality intended to support study planning in ways that could improve success probability.
These sessions collectively indicated a directional shift. The scope extends beyond conventional expectations of "SAS in clinical" contexts, moving into upstream and adjacent activities, including protocol development and more integrated automation.
Architectural Approaches and Data Movement
A significant theme across multiple sessions addressed fundamental shifts in data architecture. The traditional approach of moving massive datasets from various sources into a single centralised analytics engine is being challenged by a new paradigm: bringing analytics to the data. The integration of SAS Viya with SingleStore exemplifies this approach, where analytics processing occurs directly within the source database rather than requiring data extraction and loading. This architectural change can reduce infrastructure requirements for specific workloads by as much as 50 per cent, whilst eliminating the complexity and cost associated with constant data movement and duplication.
Trustworthy AI and Organisational Reflection
Keynote presentations addressed the relationship between AI systems and organisational practices. SAS Vice President of Data Ethics Practice Reggie Townsend articulated a perspective that reframes common concerns about AI bias. When AI produces biased results, the issue is not primarily technical failure, but rather a reflection of biases already embedded within cultural and organisational practices. This view positions AI as a diagnostic tool that surfaces systemic issues requiring organisational attention rather than merely technical remediation.
The focus on trustworthy AI extended beyond bias to encompass governance frameworks, transparency requirements and the persistent challenge that poor data quality leads to ineffective AI regardless of model sophistication. These considerations hold particular significance in probabilistic AI contexts, especially where SAS aims to incorporate deterministic elements into aspects of its AI offering.
Natural Language Interfaces and Accessibility
Content addressing SAS Viya Copilot demonstrated the platform's natural language capabilities, enabling users to interact with analytics through conversational queries rather than requiring technical syntax. This approach aims to democratise data access by allowing users with limited technical knowledge to directly engage with complex datasets. The Copilot functionality, built on Microsoft Azure OpenAI Service, supports code generation, model development assistance and natural language explanations of analytical outputs.
Cloud Migration and Infrastructure Considerations
A presentation on transforming clinical programming using SAS Clinical Acceleration was scheduled but not accessible at the global event. The closing session featured the CIO of Parexel discussing their transition to SAS managed cloud services. Characterised as a modernisation initiative, reported outcomes included reduced outage frequency. This aligns with observations from other multi-tenant systems, where maintaining stability and availability represents a fundamental requirement that often proves more complex than external perspectives might suggest.
Content addressing cloud-native strategies emphasised a fundamental psychological shift in resource management. Rather than the traditional capital expenditure mindset where physical servers run continuously, cloud environments enable strategic use of the capability to create and destroy computing resources on demand. Approaches include spinning up analytics environments at the start of the working day and shutting them down at the end, with more sophisticated implementations that automatically save and shut down environments after periods of inactivity. This dynamic approach ensures organisations pay only for actively used resources.
Presentations on organisational change management accompanying technical migrations emphasised that successful technology projects require attention to human factors alongside technical implementation. Strategies discussed included formal launch events to mark transitions, structured support mechanisms such as office hours for technical questions and community-building activities designed to foster relationships and maintain engagement during periods of change.
Platform Integration and Practical Applications
Content on SAS Viya Workbench covered availability through Azure and AWS, Python integration, R compatibility and interfacing with SAS Enterprise Guide, with demonstrations of several features. As SAS expands support for open-source languages, the presentation illustrated how these capabilities can provide a unified platform for different technical communities.
A presentation on retrieval augmented generation with unstructured data (such as system manuals), combined with agentic AI for diagnosing manufacturing system problems, offered a concrete use case. Given the tendency for these subjects to become abstract, the connected example provided practical insight into how components can function together in operational settings.
Digital Twins and Immersive Simulation
A notable announcement at the global event involved the partnership between SAS and Epic Games to create enhanced digital twins using Unreal Engine. This collaboration applies the same photorealistic 3D rendering technology used in Fortnite to industrial applications. Georgia-Pacific piloted this technology at its Savannah River Mill, which manufactures napkins, paper towels and toilet tissue. The facility was captured using RealityScan, Epic's mobile application, to create photorealistic renderings imported into Unreal Engine.
The application focused on optimising automated guided vehicle deployment and routing strategies. Rather than testing scenarios in the physical environment with associated costs and safety risks, the digital twin enables simulation of complex factory floor operations including AGV navigation, proximity alerts, obstacles and rare adverse events. SAS CTO Bryan Harris emphasised that digital twins should not only function like the real world but also look like it, enabling more accessible decision-making for frontline workers, engineers and machine operators beyond traditional data scientist roles.
The collaboration extends beyond visual fidelity. SAS developed a plugin connecting Unreal Engine to SAS Viya, enabling real-time data from simulated environments to fuel AI models that analyse, optimise and test industrial operations. This approach allows organisations to explore "what-if" scenarios virtually before implementing changes in physical facilities, potentially delivering cost savings whilst improving safety and operational efficiency.
Marketing Intelligence and Customer Respect
Content on SAS Customer Intelligence 360 addressed the platform's marketing decisioning capabilities, including next-best-offer functionality and real-time personalisation across channels. A notable emphasis concerned contact policies and rules that enable marketers to limit communication frequency, reflecting a strategic choice to respect customer attention rather than maximise message volume. This approach recognises that in environments characterised by notification saturation, demonstrating restraint can build trust and ensure greater engagement when communications do occur.
Financial Crime and Integrated Analytics
Presentations on financial crime addressed the value of integrated platforms that connect traditionally siloed functions such as fraud detection, anti-money laundering and sanctions screening. Network analytics capabilities enable identification of patterns and relationships across these domains that might otherwise remain hidden. Examples illustrated how seemingly routine alerts, when analysed within a comprehensive view of connected data, can reveal connections to significant criminal networks, transforming tactical operational issues into sources of strategic intelligence.
Data Lineage and Transformation Planning
Content on data lineage reframed this capability from a purely technical concern to a strategic tool for transformation planning. For large-scale modernisation initiatives, comprehensive mapping of data flows, transformations and dependencies provides the foundation for accurate effort estimation, budgetary planning and risk assessment. This visibility enables organisations to proceed with complex changes whilst maintaining confidence that critical downstream processes will not be inadvertently affected.
Development Practices and Migration Approaches
Sessions included content on using Bitbucket with SAS Viya to support continuous integration and continuous deployment pipelines for SAS code. Git formed the foundation of the approach, with supporting tools such as JQ. Given the current state of manual validation processes, this content addressed a genuine need for more robust validation methods for SAS macros used across clinical portfolios, where these activities can require several weeks and efficiency improvements would represent substantial value.
Another session provided detailed coverage of migrating from SAS 9 to SAS Viya, focusing on assessment methods for determining what requires migration and techniques for locating existing assets. The content reflected the reality that the discovery phase often constitutes the primary work effort rather than a preliminary step.
A presentation on implementing SAS Viya on-premises under restrictive security requirements described a solution requiring sustained collaboration with SAS over multiple years to achieve necessary modifications. This illustrated how certain deployments are defined primarily by governance, controls and assurance requirements rather than by product features.
Technical Fundamentals and Persistent Challenges
A hands-on session on data-driven output programming with SAS macros provided practical content with life sciences examples. Control tables and CALL EXECUTE represented familiar approaches, whilst the data step RESOLVE function offered new functionality worth exploring, particularly given its capability to work with macro expressions rather than being limited to macro variables in the manner of SYMGET.
A recurring theme across multiple contexts emphasised that poor data quality leads to ineffective AI and consequently to flawed decision-making. The technological environment evolves, but fundamental challenges persist. This consideration holds particular significance in probabilistic AI contexts, especially where SAS aims to incorporate deterministic elements into aspects of its AI offering.
London Event
Overview and Core Themes
The London edition of SAS Innovate 2025 on Tour demonstrated the pervasive influence of AI across the programme. The event concluded with Michael Wooldridge from the University of Oxford providing an overview of different categories of AI, offering conceptual grounding for a day when terminology and ambition frequently extended beyond current practical adoption.
The opening session presented SAS' recent offerings, maintaining consistency with content from the global event in Orlando whilst incorporating local perspectives. Trustworthiness, responsibility and governance emerged as prominent themes, particularly relevant given the current industry emphasis on innovation. A panel discussion included a brief exchange regarding the term "digital workforce", reflecting an awareness of the human implications that can be absent from wider industry discussion.
Life Sciences Stream Content
The Life Sciences stream focused heavily on AI, with presentations from AWS, AstraZeneca and IQVIA addressing the subject, followed by a panel discussion continuing this direction. The scale of technological change represents a tangible shift affecting all parts of the ecosystem. A presentation from a healthcare professional provided context regarding the operational environment within which pharmaceutical companies function. SAS CTO Bryan Harris expressed appreciation for pharmaceutical research and development work, an acknowledgement that appeared both substantive and appropriate to the setting.
Adding a new domain or subdomain to an SSL certificate using Certbot
On checking the Site Health page of a WordPress blog, I saw errors that pointed to a problem with its SSL set up. The www subdomain was not included in the site's certificate and was causing PHP errors as a result, though they had no major effect on what visitors saw. Still, it was best to get rid of them, so I needed to update the certificate as needed. Execution of a command like the following did the job:
sudo certbot --expand -d existing.com -d www.example.com
Using a Let's Encrypt certificate meant that I could use the certbot command, since that already was installed on the server. The --expand and -d switches ensured that the listed domains were added to the certificate to sort out the observed problem. In the above, a dummy domain name is used, but this was replaced by the real one to produce the desired effect and make things as they should have been.
From mathematical insights to practical applications: Two perspectives on AI
As AI continues to transform our technological landscape, two recent books offer distinct yet complementary perspectives on understanding and working with these powerful tools. Stephen Wolfram's technical deep dive and Ethan Mollick's practical guide approach the subject from different angles, but both provide valuable insights for navigating our AI-integrated future.
- What is ChatGPT Doing?: Wolfram's Technical Lens
Stephen Wolfram's exploration of large language models is characteristically thorough and mathematically oriented. While dense in parts, his analysis reveals fascinating insights about both AI and human cognition.
Perhaps most intriguing is Wolfram's observation that generative AI unexpectedly teaches us about human language production. These systems, in modelling our linguistic patterns with such accuracy, hold up a mirror to our own cognitive processes, perhaps revealing structures and patterns we had not fully appreciated before.
Wolfram does not shy away from highlighting limitations, particularly regarding computational capabilities. As sophisticated as next-word prediction has become through multi-billion parameter neural networks, these systems fundamentally lack true mathematical reasoning. However, his proposal of integrating language models with computational tools like WolframAlpha presents an elegant solution, combining the conversational fluency of AI with precise computational power.
- Co-intelligence: Mollick's Practical Framework
Ethan Mollick takes a decidedly more accessible approach in "Co-intelligence," offering accessible strategies for effective human-AI collaboration across various contexts. His framework includes several practical principles:
- Invite AI to the table as a collaborator rather than merely a tool
- Maintain human oversight and decision-making authority
- Communicate with AI systems as if they were people with specific roles
- Assume current AI represents the lowest capability level you will work with going forward
What makes Mollick's work particularly valuable is its contextual applications. Drawing from his background as a business professor, he methodically examines how these principles apply across different collaborative scenarios: from personal assistant to creative partner, coworker, tutor, coach, and beyond. With a technology, that, even now, retains some of the quality of a solution looking for a problem, these grounded suggestions act as a counterpoint to the torrent of hype that that deluges our working lives, especially if you frequent LinkedIn a lot as I am doing at this time while searching for new freelance work.
- Complementary Perspectives
Though differing significantly in their technical depth and intended audience, both books contribute meaningfully to our understanding of AI. Wolfram's mathematical rigour provides theoretical grounding, while Mollick's practical frameworks offer immediate actionable insights. For general readers looking to productively integrate AI into their work and life, Mollick's accessible approach serves as an excellent entry point. Those seeking deeper technical understanding will find Wolfram's analysis challenging but rewarding.
As we navigate this rapidly evolving landscape, perspectives from both technical innovators and practical implementers will be essential in helping us maximise the benefits of AI while mitigating potential drawbacks. As ever, the hype outpaces the practical experiences, leaving us to suffer the marketing output while awaiting real experiences to be shared. It is the latter is more tangible and will allow us to make use of game-changing technical advances.
Removing query strings from any URL on an Nginx-powered website
My public transport website is produced using Hugo and is hosted on a web server with Nginx. Usually, I use Apache, so this is an exception. When Google highlighted some duplication caused by unneeded query strings, I set to work. However, doing anything with URL's like redirection cannot use a .htaccess file or MOD_REWRITE on Nginx. Thus, such clauses have to go somewhere else and take a different form.
In my case, the configuration file to edit is /etc/nginx/sites-available/default because that was what was enabled. Once I had that open, I needed to find the following block:
location / {
        # First attempt to serve request as file, then
        # as directory, then fall back to displaying a 404.
        try_files $uri $uri/ =404;
}
Because I have one section for port 80 and another for port 443, there were two locations that I needed to update due to duplication, though I may have got away without altering the second of these. After adding the redirection clause, the block became:
location / {
        # First attempt to serve request as file, then
        # as directory, then fall back to displaying a 404.
        try_files $uri $uri/ =404;

        # Remove query strings only when necessary
        if ($args) {
                rewrite ^(.*)$ $1? permanent;
        }
}
The result of the addition is a permanent (301) redirection whenever there are arguments passed in a query string. The $1? portion is the rewritten URL without a query string that was retrieved in the initial ^(.*)$ portion. In other words, the redirect it from the original address to a new one with only the part preceding the question mark.
Handily, Nginx allows you to test your updated configuration using the following command:
sudo nginx -t
That helped me with some debugging. Once all was in order, I needed to reload the service by issuing this command:
sudo systemctl reload nginx
With Apache, there is no need to restart the service after updating the .htaccess file, which adds some convenience. The different locations also mean some care with backups when upgrading the operating system or moving from one server to another. Apart from that, all works well, proving that there can be different ways to complete the same task.
The critical differences between Generative AI, AI Agents, and Agentic Systems
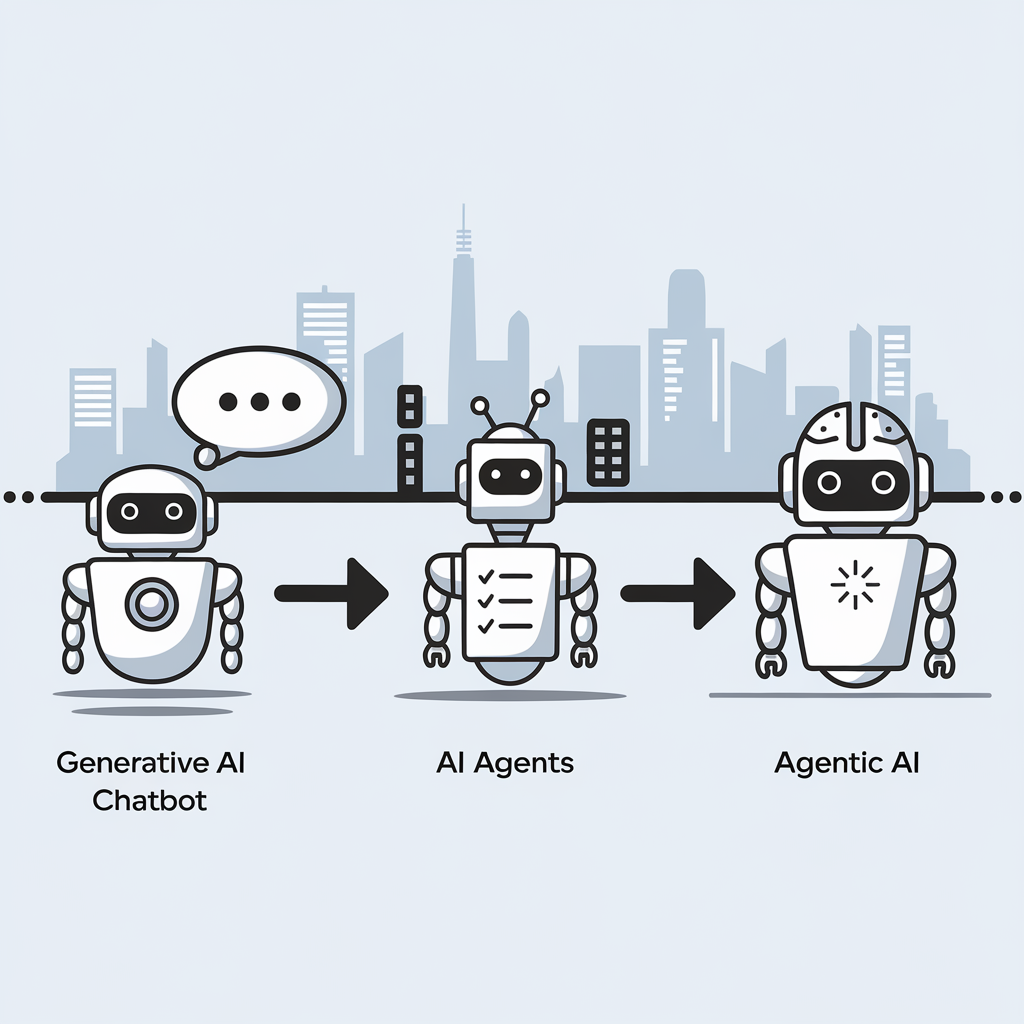
The distinction between three key artificial intelligence concepts can be explained without technical jargon. Here then are the descriptions:
- Generative AI functions as a responsive assistant that creates content when prompted but lacks initiative, memory or goals. Examples include ChatGPT, Claude and GitHub Copilot.
- AI Agents represent a step forward, actively completing tasks by planning, using tools, interacting with APIs and working through processes independently with minimal supervision, similar to a junior colleague.
- Agentic AI represents the most sophisticated approach, possessing goals and memory while adapting to changing circumstances; it operates as a thinking system rather than a simple chatbot, capable of collaboration, self-improvement and autonomous operation.
This evolution marks a significant shift from building applications to designing autonomous workflows, with various frameworks currently being developed in this rapidly advancing field.
Add Canonical Tags to WordPress without plugins
Search engines need to know which is which because they cannot know which is the real content when there is any duplication, unless you tell them. That is where canonical tags come in handy. By default, WordPress appears to add these for posts and pages, which makes sense. However, you can add them for other places too. While a plugin can do this for you, adding some code to your theme's functions.php file also does the job. This is how it could look:
function add_canonical_link() {
    global $post;

    // Check if we're on a single post/page
    if (is_singular()) {
        $canonical_url = get_permalink($post->ID);
    }
    // For the homepage
    elseif (is_home() || is_front_page()) {
        $canonical_url = home_url('/');
    }
    // For category archives
    elseif (is_category()) {
        $canonical_url = get_category_link(get_query_var('cat'));
    }
    // For tag archives
    elseif (is_tag()) {
        $canonical_url = get_tag_link(get_query_var('tag_id'));
    }
    // For other archive pages
    elseif (is_archive()) {
        $canonical_url = get_permalink();
    }
    // Fallback for other pages
    else {
        $canonical_url = get_permalink();
    }

    // Output the canonical link
    echo '' . "\n";
}

// Hook the function to wp_head
add_action('wp_head', 'add_canonical_link');

// Remove default canonical link
remove_action('wp_head', 'rel_canonical');
The first part defines a function to define the canonical URL and create the tag to be added. With that completed, the penultimate piece of code hooks it into the wp_head part of the web page, while the last function gets rid of the default link to get avoid any duplication of output.
WordPress URL management with canonical tags and permalink simplification
Recently, I have been going through the content, rewriting things where necessary. In the early days, there were some posts following diary and announcement styles that I now avoid. Some now have been moved to a more appropriate place for those, while others have been removed.
While this piece might fall into the announcement category, I am going to mix up things too. After some prevarication, I have removed dates from the addresses of entries like this after seeing some duplication. Defining canonical URL's in the page header like this does help:
<link rel="canonical" href="[URL]">
However, it becomes tricky when you have zero-filled and non-zero-filled dates going into URL's. Using the following in a .htaccess file redirects the latter to the former, which is a workaround:
RewriteRule ^([0-9]{4})/([1-9])/([0-9]{1,2})/(.*)$ /$1/0$2/$3/$4 [R=301,L]

RewriteRule ^([0-9]{4})/(0[1-9]|1[0-2])/([1-9])/(.*)$ /$1/$2/0$3/$4 [R=301,L]
The first of these lines zero-fills the month component, while the second zero-fills the day component. Here, [0-9]{4} looks for a four digit year. Then, [1-9] picks up the non-zero-filled components that need zero-prefixing. The replacements are 0$2 or 0$3 as needed.
Naturally, this needs URL rewriting to be turned on for it to work, which it does. Since my set-up is on Apache, the MOD_REWRITE module needs to be activated too. Then, your configuration needs to allow its operation. With dates removed from WordPress permalinks, I had to add the following line to redirect old addresses to new ones for the sake of search engine optimisation:
RedirectMatch 301 ^/([0-9]{4})/([0-9]{2})/([0-9]{2})/(.*)$ /$4
Here, [0-9]{4} picks up the four digit year and [0-9]{2} finds the two-digit month and day. The, (.*) is the rest of the URL that is retained as signalled by /$4 at the end. That redirects things nicely, without my having to have a line for every post on the website. Another refinement was to remove query strings from every page a visitor would see:
RewriteCond %{REQUEST_URI} !(^/wp-admin/|^/wp-login\.php$) [NC]

RewriteCond %{QUERY_STRING} .

RewriteCond %{QUERY_STRING} !(&preview=true) [NC]

RewriteRule ^(.*)$ /$1? [R=301,L]
This still allows the back end and login screens to work as before, along with post previews during the writing stage. One final note is that I am not using the default login address for the sake of added security, yet that needs to be mentioned nowhere in the .htaccess file anyway.
Claude Projects: Reusing your favourite AI prompts
Some things that I do with Anthropic Claude, I end up repeating. Generating titles for pieces of text or rewriting text to make it read better are activities that happen a lot. Others would include the generation of single word previews for a piece or creating a summary.
Python or R scripts come in handy for summarisation, either for a social media post or for introduction into other content. In fact, this is how I go much of the time. Nevertheless, I found another option: using Projects in the Claude web interface.
These allow you to store a prompt that you reuse a lot in the Project Knowledge panel. Otherwise, you need to supply a title and a description too. Once completed, you just add your text in there for the AI to do the rest. Title generation and text rewriting already are set up like this, and keywords could follow. It is a great way to reuse and refine prompts that you use a lot.
An alternate approach to setting up a local Git repository with a remote GitHub connection
For some reason, I ended with two versions of this at the draft stage, forcing me to compare and contrast before merging them together to produce what you find here. The inspiration was something that I encountered a while ago: getting a local repository set up in a perhaps unconventional manner.
The simpler way of working would be to set up a repo on GitHub and clone it to the local machine, yet other needs are the cause of doing things differently. In contrast, this scheme stars with initialising the local directory first using the following command after creating it with some content and navigating there:
git initThis marks the directory as a Git repository, allowing you to track changes by creating a hidden .git directory. Because security measures often require verification of directories when executing Git commands, it is best to configure a safe directory with the following command to avoid any issues:
git config --global --add safe.directory [path to directory]In the above, replace the path with your specific project directory. This ensures that Git recognises your directory as safe and authorised for operations, avoiding any messages whenever you work in there.
With that completed, it is time to add files to the staging area, which serves as an area where you can review and choose changes to be committed to the repository. Here are two commands that show different ways of accomplishing this:
git add README.md

git add .
The first command stages the README.md file, preparing it for the next commit, while the second stages all files in the directory (the . is a wildcard operator that includes everything in there).
Once your files are staged, you are ready to commit them. A commit is essentially a snapshot of your changes, marking a specific point in the project's history. The following command will commit your staged changes:
git commit -m "first commit"The -m flag allows you to add a descriptive message for context; here, it is "first commit." This message helps with understanding the purpose of the commit when reviewing project history.
Before pushing your local files online, you will need to create an empty repository on GitHub using the GitHub website if you do not have one already. While still on the GitHub website, click on the Code button and copy the URL shown under the HTTPS tab that is displayed. This takes the form https://github.com/username/repository.gitand is required for running the next command in your local terminal session:
git remote add origin https://github.com/username/repository.gitThis command establishes a remote connection under the alias origin. By default, Git sets the branch name to 'master'. However, recent conventions prefer using 'main'. To rename your branch, execute:
git branch -M mainThis command will rename your current branch to 'main', aligning it with modern version control standards. Finally, you must push your changes from the local repository to the remote repository on GitHub, using the following command:
git push -u origin mainThe -u flag sets the upstream reference, meaning future push and pull operations will default to this remote branch. This last step completes the process of setting up a local repository, linking it to a remote one on GitHub, staging any changes, committing these and pushing them to the remote repository.