Searching file contents using PowerShell
25th October 2018Having made plenty of use of grep on the Linux/UNIX command and findstr on the legacy Windows command line, I wondered if PowerShell could be used to search the contents of files for a text string. Usefully, this turns out to be the case but I found that the native functionality does not use what I have used before. The form of the command is given below:
Select-String -Path <filename search expression> -Pattern "<search expression>" > <output file>
While you can have the output appear on screen, it always seems easier to send it to a file for subsequent and that is what I am doing above. The input to the -Path switch can be a filename or a wildcard expression while that to the -Pattern can be a text string enclosed in quotes or a regular expression. It works well once you know what to do so here is an example:
Select-String -Path *.sas -Pattern "proc report" > c:\temp\search.txt
The search.txt file then includes both the file information and the text that has been found for sake of checking that you have what you want. What you do next is up to you.
Quickly changing between virtual desktops in Windows 10
12th October 2018One of the benefits of running Linux is the availability of virtual desktops and installing VirtuaWin was the only way to get the same functionality in Windows before the launch of Windows 10. For reasons known to Microsoft, they decided against the same sort of implementation as seen in Linux or UNIX. Instead, they put the virtual desktop functionality a click away and rather hides it from most users unless they know what clicking on the Task View button allows. The approach also made switching between desktops slower with a mouse. However, there are keyboard shortcuts that addresses this once multiple virtual desktops exist.
Using WIN+CTRL+LEFT or WIN+CTRL+RIGHT does this easily once you have mastered the action. Depending on your keyboard setup, WIN is the Windows, Super or Command key while CTRL is the Control key. Then, LEFT is the left arrow key and RIGHT is the right arrow key. For machines with smaller screens where multi-tasking causes clutter, virtual desktops are a godsend for organising how you work and having quick key combinations for switching between them adds to their utility.
Installing Firefox Developer Edition in Linux Mint
22nd April 2018Having moved beyond the slow response and larger memory footprint of Firefox ESR, I am using Firefox Developer Edition in its place even if it means living without a status bar at the bottom of the window. Hopefully, someone will create an equivalent of the old add-on bar extensions that worked before the release of Firefox Quantum.
Firefox Developer Edition may be pre-release software with some extras for web developers like being able to to drill into an HTML element and see its properties but I am finding it stable enough for everyday use. It is speedy too, which helps, and it has its own profile so it can co-exist on the same machine as regular releases of Firefox like its ESR and Quantum variants.
Installation takes a little added effort though and there are various options available. My chosen method involved Ubuntu Make. Installing this involves setting up a new PPA as the first step and the following commands added the software to my system:
sudo add-apt-repository ppa:ubuntu-desktop/ubuntu-make
 sudo apt-get update
 sudo apt-get install ubuntu-make
With the above completed, it was simple to install Firefox Developer edition using the following command:
umake web firefox-dev
Where things got a bit more complicated was getting entries added to the Cinnamon Menu and Docky. The former was sorted using the cinnamon-menu-editor command but the latter needed some tinkering with my firefox-developer.desktop file found in .local/share/applications/ within my user area to get the right icon shown. Discovering this took me into .gconf/apps/docky-2/Docky/Interface/DockPreferences/%gconf.xml where I found the location of the firefox-developer.desktop that needed changing. Once this was completed, there was nothing else to do from the operating system side.
Within Firefox itself, I opted to turn off warnings about password logins on non-https websites by going to about:config using the address bar, then looking for security.insecure_field_warning.contextual.enabled and changing its value from True to False. Some may decry this but there are some local websites on my machine that need attention at times. Otherwise, Firefox is installed with user access so I can update it as if it were a Windows or MacOS application and that is useful given that there are frequent new releases. All is going as I want it so far.
Keyboard shortcut for Euro currency symbol on Windows 10
21st April 2018Because I now have business dealings in Ireland, there is a need to add in the Euro currency symbol to emails even though I based in the U.K. and use U.K. keyboard settings. While there is the possibility to insert the symbol in Microsoft Office and other applications, using a simple keyboard shortcut is more efficient since it avoids multiple mouse clicks. For some reason, CTRL+SHFT+E got into my head as the key combination but that turns on the Track Changes facility in Word. Instead, CTRL+ALT+4 does the needful and that is what I will be keeping in mind for future usage.
Opening up Kindle for PC in a maximised window on Windows 10
18th March 2017It has been a while since I scribbled anything on here but I now have a few things to relating, starting with this one. Amazon now promotes a different app for use when reading its eBooks on PC’s and, with a certain reluctance, I have taken to using this because its page synchronisation is not as good as it should be.
Another irritation is that it does not open in a maximised window and it scarcely remembers your size settings from session to session. Finding solutions to this sizing issue is no easy task so I happened on one of my own that I previously used with Windows (or File) Explorer folder shortcuts.
The first step is to find the actual location of the Start Menu shortcut. Trying C:\Users\[User Name]\AppData\Roaming\Microsoft\Windows\Start Menu\Programs\Amazon\Amazon Kindle should do that.
Next, right click on the Kindle icon and choose Properties from the context menu that appears. In the dialogue box that causes to appear on the screen, look for the “Run:” setting. By default, this appears as “Normal Window” but you can change this to “Maximised”, which is what I did before clicking on Apply before doing the same for the OK button to dismiss the dialogue box.
If you have pinned the shortcut to the taskbar or elsewhere, you may need to unpin it and pin it again to carry over the change. After that, I found that the Kindle app opened up in a maximised window as I wanted.
With that done, I could get along better with the app and it does put a search box in a more obvious place that it was in the old one. You also can set up Collections so your books are organised so there is something new for a user. Other than that, it largely works as before though you may to hit the F5 key every now and again to synchronise reading progress across multiple devices.
Copying a directory tree on a Windows system using XCOPY and ROBOCOPY
17th September 2016My usual method for copying a directory tree without any of the files in there involves the use of the Windows commands line XCOPY and the command takes the following form:
xcopy /t /e <source> <destination>
The /t switch tells XCOPY to copy only the directory structure while the /e one tells it to include empty directories too. Substituting /s for /e would ensure that only non-empty directories are copied. <source> and <destination> are the directory paths that you want to use and need to be enclosed in quotes if you have a space in a directory name.
There is one drawback to this approach that I have discovered. When you have long directory paths, messages about there being insufficient memory are issued and the command fails. The limitation has nothing to do with the machine that you are using but is a limitation of XCOPY itself.
After discovering that, I got to checking if ROBOCOPY can do the same thing without the same file path length limitation because I did not have the liberty of shortening folder names to get the whole path within the length expected by XCOPY. The following is the form of the command that I found did what I needed:
robocopy <source> <destination> /e /xf *.* /r:0 /w:0 /fft
Again, <source> and <destination> are the directory paths that you want to use and need to be enclosed in quotes if you have a space in a directory name. The /e switch copies all subdirectories and not just non-empty ones. Then, the xf *.* portion excludes all files from the copying process. The remaining options are added to help with getting around access issues and to try copy only those directories that do not exist in the destination location. The /ftt switch was added to address the latter by causing ROBOCOPY to assume FAT file times. To get around the folder permission delays, the /r:0 switch was added to stop any operation being retried with /w:0 setting wait times to 0 seconds. All this was enough to achieve what I wanted and I am keeping it on file for my future reference as well as sharing it with you.
Using PowerShell to reinstall Windows Apps
9th September 2016Recently, I managed to use 10AppsManager to remove most of the in-built apps from a Windows 10 virtual machine that I have for testing development versions in case anything ugly were to appear in a production update. Curiosity is my excuse for letting the tool do what it did and some could do with restoration. Out of the lot, Windows Store is the main one that I have sorted so far.
The first step of the process was to start up PowerShell in administrator mode. On my system, this is as simple as clicking on the relevant item in the menu popped up by right clicking on the Start Menu button and clicking on the Yes button in the dialogue box that appears afterwards. In your case, it might be a case of right clicking on the appropriate Start Menu programs entry, selecting the administrator option and going from there.
With this PowerShell session open, the first command to issue is the following:
Get-Appxpackage -Allusers > c:\temp\appxpackage.txt
This creates a listing of Windows app information and pops it into a text file in your choice of directory. Opening the text file in Notepad allows you to search it more easily and there is an entry for Windows Store:
Name : Microsoft.WindowsStore
Publisher : CN=Microsoft Corporation, O=Microsoft Corporation, L=Redmond, S=Washington, C=US
Architecture : X64
ResourceId :
Version : 11607.1001.32.0
PackageFullName : Microsoft.WindowsStore_11607.1001.32.0_x64__8wekyb3d8bbwe
InstallLocation : C:\Program Files\WindowsApps\Microsoft.WindowsStore_11607.1001.32.0_x64__8wekyb3d8bbwe
IsFramework : False
PackageFamilyName : Microsoft.WindowsStore_8wekyb3d8bbwe
PublisherId : 8wekyb3d8bbwe
PackageUserInformation : {S-1-5-21-3224249330-198124288-2558179248-1001
IsResourcePackage : False
IsBundle : False
IsDevelopmentMode : False
Dependencies : {Microsoft.VCLibs.140.00_14.0.24123.0_x64__8wekyb3d8bbwe,
Microsoft.NET.Native.Framework.1.3_1.3.24201.0_x64__8wekyb3d8bbwe,
Microsoft.NET.Native.Runtime.1.3_1.3.23901.0_x64__8wekyb3d8bbwe,
Microsoft.WindowsStore_11607.1001.32.0_neutral_split.scale-100_8wekyb3d8bbwe}
Using the information from the InstallLocation field, the following command can be built and executed (here, it has gone over several lines so you need to get your version onto a single one):
Add-AppxPackage -register “C:\Program Files\WindowsApps\Microsoft.WindowsStore_11607.1001.32.0_x64__8wekyb3d8bbwe\AppxManifest.xml” -DisableDevelopmentMode
Once the above has completed, the app was installed and ready to use again. As the mood took me, I installed other apps from the Windows Store as I saw fit.
Forcing an upgrade to Windows 10 Anniversary Update
6th September 2016There remain people who advise those on Windows 7 or 8.x to hold fire on upgrading to Windows 10. Now that the free upgrade no longer is available, that advice may hold more weight than it did. Even so, there are those among us who jumped ship who do not mind having the latest versions of things at no monetary cost to see what is available and I must admit to being one of those.
After all, I do have a virtual machine with a pre-release version of the next update to Windows 10 installed on there to see what might be coming our way and to get a sense of what changes that may bring so that I am ready for those. Otherwise, I usually am happy to wait but I noticed that the Windows 10 Anniversary Update only came to my HP Pavilion dm4 laptop and not other machines with Windows 10 installed so I started to wonder why there was a lag when it came to automatic upgrades.
So that these things do not arrive when it is least convenient, I took advantage of a manual method in order to choose my timing. This did not involve installation from a disk image but was in-situ. The first part of the process is standard enough in that the Settings app was started and the Update & security item chosen. That dropped me onto the Windows Update and I first clicked on the Check for updates button to see what would happen. When nothing came of that, the Learn more link was clicked to bring me onto part of the Microsoft support website where I found that the Windows 10 Anniversary Update installer could be downloaded so I duly did just that.
Running it produced a screen asking whether or not I wanted to proceed. Since I wanted to go ahead, the appropriate button was clicked and the machine left alone until the process complete. Because the installer purely is a facilitator, the first stage is to download the rest of the files needed and that will take a while on any connection. Once downloading was completed, the actual process of installation commenced with several restarts before a log-in screen was again on offer. On logging in to the machine, the last part of the process started.
The process took quite a while but seemingly worked without a hitch. If there was anything that I needed to do, it was the re-installation of VirtualBox Guest Additions to restore access to shared folders as well as dealing with a self-inflicted irritation. Otherwise, I have found that previously installed software worked as expected and no file has been missed. Waiting a while may have had its advantages too because initial issues with the Anniversary Update will have been addressed but it is best not to leave it too long or you could have the feeling of being forgotten. A happy balance needs striking.
Dealing with an “Your insider preview build settings need attention” message in Windows 10 Settings
5th September 2016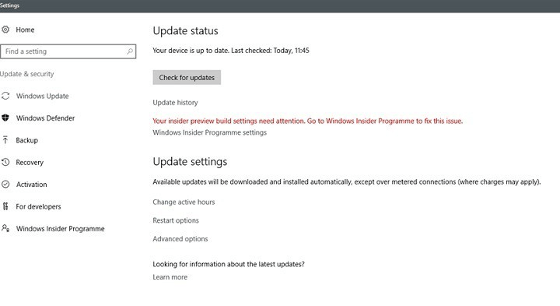
Having now upgraded all my Windows 10 machines to the Anniversary Update edition without much in the way of upheaval, I came across the following message on one of them:
Your insider preview build settings need attention. Go to Windows Insider Programme to fix this.
It appeared on the Update screen of the Settings application and I believe that I may have triggered it by letting foolish curiosity take me to the Windows Insider Programme screen. Returning there offered no way of resolving the issue so I had to try the registry editing tip that I discovered elsewhere on the web. Naturally, the creation of a System Restore Point before proceeding with changes to the Windows Registry is advised.
Typing REGEDIT into Cortana brings up a clickable link to the Registry Editor. Having clicked on this, I then clicked on the Yes button on the ensuing dialogue box that Windows 10 throws up every time you make a system change such as installing new software. With the Registry Editor opened, I made my way to the following location:
HKEY_LOCAL_MACHINE\SOFTWARE\Microsoft\WindowsSelfHost\UI\Strings
Once there, I deleted every entry that mentioned “Insider” or “Windows Insider” to leave only two afterwards: "(Default)", "UnknownErrorDialogValues". That resolved the issue and I now intend to stay away from the Windows Insider Programme screen in Settings so that the message never appears again.
Getting rid of Windows 10 notifications about disabling start-up applications
20th May 2016On several Windows 10 machines, I have been seeing messages appearing in its Action Centre pane with the heading Disable apps to help improve performance. It appeared again recently so I decided to look further into the matter.
What I found was that the solution first involves opening up Control Panel and that takes a little finding in Windows 10. You could use Cortana to get to it or right clicking on the Start Menu and left clicking on the Control Panel menu. Using the Windows key + X will produce the same menu and choosing the same entry will have the same effect.
Once Control Panel is open, it makes life a little easier if you change to the Large icons view using the drop-down menu under the Search Control Panel box on the right hand side. Then, what you need to do is click on the Security and Maintenance icon.
Once in that Security and Maintenance section, you are presented with two subheadings, one for Security and one for Maintenance. So long as you have not dismissed the message in the action centre, you will see a corresponding entry under the Maintenance section. At the bottom of that entry, there will be a link that turns off these messages permanently and clicking on this will have the desired effect.