Controlling display of users on the logon screen in Linux Mint 20.3
15th February 2022Recently, I tried using Commento with a static website that I was developing and this needed PostgreSQL rather than MySQL or MariaDB, which many content management tools use. That meant a learning curve that made me buy a book as well as the creation of a system account for administering PostgreSQL. These are not the kind of things that you want to be too visible so I wanted to hide them.
Since Linux Mint uses AccountsService, you cannot use lightdm to do this (the comments in /etc/lightdm/users.conf suggest as much). Instead, you need to go to /var/lib/AccountsService/users and look for a file called after the user name. If one exists, all that is needed is for you to add the following line under the [User] section:
SystemAccount=true
If there is no file present for the user in question, then you need to create one with the following lines in there:
[User]
SystemAccount=true
Once the configuration files are set up as needed, AccountsService needs to be restarted and the following command does that deed:
sudo systemctl restart accounts-daemon.service
Logging out should reveal that the user in question is not listed on the logon screen as required.
Contents not displaying for Shared Folders on a Fedora 32 guest instance in VirtualBox
26th July 2020While some Linux distros like Fedora install VirtualBox drivers during installation time, I prefer to install the VirtualBox Guest Additions themselves. Before doing this, it is best to remove the virtualbox-guest-additions package from Fedora to avoid conflicts. After that, execute the following command to ensure that all prerequisites for the VirtualBox Guest Additions are in place prior to mounting the VirtualBox Guest Additions ISO image and installing from there:
sudo dnf -y install gcc automake make kernel-headers dkms bzip2 libxcrypt-compat kernel-devel perl
During the installation, you may encounter a message like the following:
ValueError: File context for /opt/VBoxGuestAdditions-<VERSION>/other/mount.vboxsf already defined
This is generated by SELinux so the following commands need executing before the VirtualBox Guest Additions installation is repeated:
sudo semanage fcontext -d /opt/VBoxGuestAdditions-<VERSION>/other/mount.vboxsf
 sudo restorecon /opt/VBoxGuestAdditions-<VERSION>/other/mount.vboxsf
Without doing the above step and fixing the preceding error message, I had an issue with mounting of Shared Folders whereby the mount point was set up but no folder contents were displayed. This happened even when my user account was added to the vboxsf group and it proved to be the SELinux context issue that was the cause.
Restoring the menu bar on GNOME Terminal in a GNOME Shell session
25th July 2020By default, a GNOME Terminal instance does not display a menu bar and that applies not only in GNOME Shell but also on the Cinnamon Desktop environment. In the latter, it is easy enough to display the menu bar using the context menu produced by right clicking in the window before going to Edit > Preferences and ticking the box for Show menubar by default in new terminals in the General section. After closing the Preferences dialogue, every new GNOME Terminal session will show the menu bar.
Unfortunately, it is not so easy in GNOME Shell though the context menu route does allow you to unhide the menu bar on a temporary basis. That is because the requisite tickbox is missing from the Preferences dialogue box displayed after navigating to Edit > Preferences in the menus. To address, you need the execute the following command in a terminal session:
gsettings set org.gnome.Terminal.Legacy.Settings headerbar false
This not only adds the menu bar on a permanent basis but it also adds the missing tickbox, populated as required. GNOME Shell may be minimalist in some ways but making this action harder looks like going a little too far.
Lessons learned on managing Windows Taskbar and Start Menu colouring in VirtualBox virtual machines
9th December 2019In the last few weeks, I have had a few occasions when the colouration of the Windows 10 taskbar and its Star Menu has departed from my expectations. At times, this happened in VirtualBox virtual machine installations and both the legacy 5.2.x versions and the current 6.x ones have thrown up issues.
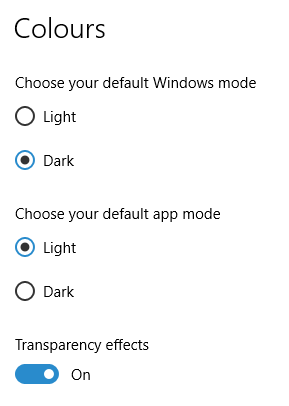

The first one actually happened with a Windows 10 installation in VirtualBox 5.2.x when the taskbar changed colour to light grey and there was no way to get it to pick up the colour of the desktop image to become blue instead. The solution was to change the Windows from Light to Dark in order for the desired colouration to be applied and the settings above are taken from the screen that appears on going to Settings > Personalisation > Colours.
The second issue appeared in Windows 10 Professional installation in VirtualBox 6.0.x when the taskbar and Start Menu turned transparent after an updated. This virtual machine is used to see what is coming in the slow ring of Windows Insider so some rough edges could be expected. The solution here was to turn off 3D acceleration in the Display pane of the VM settings after shutting it down. Starting it again showed that all was back as expected.
Both resolutions took a share of time to find and there was a deal of experimentation needed too. Once identified, they addressed the issues as desired so I am recording here for use by others as much as future reference for myself.
Lightening of desktop background images on Linux Mint Debian Edition running in Virtualbox
22nd October 2018After a recent upgrade to Linux Mint Debian Edition 3 in a VirtualBox virtual machine that I had running its predecessor, I began to notice that background images were being loaded with more washed out of faded colours. This happened at startup so selecting another background image worked as intended until the same thing happened to that after a system restart.
This problem is not new and has affected the Cinnamon desktop in the main Linux Mint variant (the one that is based on Ubuntu) and issuing the following command in a terminal session is a suggested solution:
gsettings set org.cinnamon.muffin background-transition fade-in
In my case, that solved the problem and desktop background image display is as it should be since I executed the above. All it took was a change to a system setting.
Changing monitor brightness using the Linux command line
11th August 2018Recently, I felt the need to reduce the brightness of my monitor but did not persuade the hardware buttons to do the job so I started wondering about other means and found that the xrandr command did the trick. The first step was to find out what my display was being called so I executed the following command to retrieve the information using the -q query switch:
xrandr -q | grep " connected"
The output from this looked like this:
DVI-D-0 connected primary 1920x1080+0+0 (normal left inverted right x axis y axis) 521mm x 293mm
My device name appeared as the first block of characters in the above so I plugged that into the second command below to achieve the desired adjustment.
xrandr --output DVI-D-0 --brightness 0.9
Any value between 0.0 and 1.0 is acceptable but I went with 0.9 for 90% brightness. The required dimming and brightening then is only a command away.
Making pages of new documents look right in LibreOffice Writer on wide screens
21st April 2017My recent move from Linux Mint 17.3 to Linux Mint 18.1 brought with it version 5.3.0.3 of LibreOffice. What that brought was an oddity where the default blank document in a fresh LibreOffice Writer session had its only page displayed to the right within the application window. To me, this looks like a bug even if I have a 24″ computer screen.
After some searching, I found a solution that gets a single page displayed in the centre of the application window and not offset to the right as it was. The first step is to go to the Zoom entry within the View menu. Within the sub-menu that is spawned, you need to click on the Zoom… entry to get a dialogue box. That has two columns and the setting that needs changing is under the one named View Layout. For whatever reason, the Columns setting was highlighted with 2 being selected as the number of columns. Choosing the Single Page option instead sorted the problem on clicking the OK button to dismiss the dialogue and the one named Automatic also appears to work. Quite why such an odd default was selected in the first is beyond me though.
Removing advertisements from uTorrent
12th July 2014BitTorrent may have got some bad press due to its use for downloading copyrighted material such as music and movies but it does have its legitimate uses too. In my case, many a Linux distro has been downloaded in this way and it does take the weight off servers by distributing the load across users instead.
Speaking of Linux, my general choice of client has been Transmission and there are others. In the Windows world, there is a selection that includes BitTorrent, Inc. themselves. However, many favour uTorrent (or μTorrent) so that’s the one that I tried and there free and subscription-based options. To me, the latter feels like overkill when an eternal licence could be made available as an easy way to dispatch the advertisements on display in the free version.
As much as I appreciate the need for ads to provide revenue to a provider of otherwise free software, they do need to be tasteful and those in uTorrent often were for dating websites that had no scruples about exposing folk to images that were unsuitable for a work setting. Those for gaming websites were more tolerable in comparison. With the non-availability of an eternal licence option, I was left pondering alternatives like qBittorrent instead. That is Free Software too so it does have that added advantage.
However, I uncovered an article on LifeHacker that sorted my problem with uTorrent. The trick is to go into Options > Preferences via the menus and then go to the Advanced section in the dialogue box that appears. In there, go looking for each of the following options and set each one to false in turn:
- offers.left_rail_offer_enabled/left_rail_offer
- gui.show_plus_upsell
- offers.sponsored_torrent_offer_enabled/sponsored_torrent_offer_enabled
- bt.enable_pulse
- gui.show_notorrents_node
- offers.content_offer_autoexec
In practice, I found some of the above already set to false and another missing but set those that remained from true to false cleaned up the interface so I hope never to glimpse those unsuitable ads again. The maker of uTorrent need to look at the issue or revenue could get lost and prospective users could see the operation as being cheapened by what is displayed. As for me, I am happy to have gained something in the way of control.
Fixing Background Image Display in GNOME Shell 3.10
2nd May 2014On upgrading from Ubuntu GNOME 13.10 to Ubuntu GNOME 14.04, a few rough edges were to be noticed. One was the display of my chosen background image: it was garbled. Later, I discovered that there is a maximum width of 2560 px for background images in GNOME Shell these days and that things get messy beyond that.
In my case, the image width was around 6000 px and I was used to its getting resized in GNOME Shell 3.8 and its predecessors. It seems that the functionality got removed after that though so the workaround of manual image resizing in the GIMP needed to be employed. Though having big images open in memory creates an additional overhead, not handling them very well at all looks like a bug caused by setting 2560 px as a maximum screen width for the GNOME Shell panel and the complete removal of Nautilus from desktop rendering duties. Let’s hope that sense is seen with ever larger screen sizes and resolutions coming our way.
It’s the sort of thing that did get me looking at adding on Cinnamon 2.2 for a while before setting background image scaling using the indispensable GNOME Tweak Tool was discovered. LinuxG.net has a useful tutorial on this for anyone with such an adventurous streak in them. For now though, I am OK with my set up but the GNOME project’s focus on minimalism could affect us in other ways so I can see why Clem Lefebvre started the Cinnamon one primarily for Linux Mint and the desktop environment is appearing elsewhere too. After all, Gedit lost its menu bar in GNOME 3.12 so it’s just as well that we have alternative choices.
Update 2014-05-06: It seems that the desktop image bug that afflicts GNOME Shell 3.10 got sorted for GNOME Shell 3.12. At least, that is the impression that an Antergos instance in a VirtualBox virtual machine gives me.
Installing FreeBSD in a VirtualBox Virtual Machine
2nd March 2014With UNIX being the basis of Linux, I have a soft spot for trying out any UNIX that can be installed on a PC. For a while, I had OpenSolaris on the go and even vaguely recall having a look at one of the BSD’s. However, any recent attempt to install one of the latter, and there are quite a few around now, got stymied by some sort of kernel panic caused by using AMD CPU’s. With the return to the Intel fold arising from the upgrade of my main home PC last year, it perhaps was time to try again.
The recent release of FreeBSD 10.0 was the cue and I downloaded a DVD image for a test installation in a VirtualBox virtual machine with 4 GB of memory and a 32 GB virtual hard drive attached (expanding storage was chosen so not all the allocated space has been taken so far). The variant of FreeBSD chosen was the 64-bit x86 one and I set to installing it in there. Though not as pretty in appearance as those in various Linux distros, the installer was not that user unfriendly to me. Mind you, I have experience of installing Arch Linux so that might have acclimatised me somewhat.
Those installation screens ask about the keyboard mapping that you want and I successfully chose one of the UK options. There was limited opportunity for adding extras though there was a short list of few from which I made some selections. User account set up also was on offer and I would have been better off knowing what groups to assign for my personal user account so as to have to avoid needing to log in as root so often following system start up later. Otherwise, all the default options were sufficient.
When the installation process was complete, it was time to boot into the new system and all that was on offer was a command line log in session. After logging in as root, it was time to press pkg into service in order to get a desktop environment in place. The first step was to install X:
pkg install xorg
Then, it was time to install a desktop environment. While using XFCE or KDE were alternatives, I chose GNOME 2 due to familiarity and more extensive instructions on the corresponding FreeBSD handbook page. Issuing the following command added GNOME and all its helper applications:
pkg install gnome2
So that GNOME starts up at the next reboot, some extra steps are needed. The first of these is to add the following line into /etc/fstab:
proc /proc procfs rw 0 0
Then, two lines were needed in /etc/rc.conf:
gdm_enable=”YES”
gnome_enable=”YES”
The first enables the GNOME display manager and the second activates other GNOME programs that are needed for a desktop session to start. With each of these in place, I got a graphical login screen at the next boot time.
With FreeDSB being a VirtualBox Guest, it was time to consult the relevant FreeBSD manual page. Here, there are sections for a number of virtual machine tools so a search was needed to find the one for VirtualBox. VirtualBox support for FreeBSD is incomplete in that there is no installation media for BSD systems though Linux and Solaris are supported along with Windows. Therefore, it is over to the FreeBSD repositories for the required software:
pkg install virtualbox-ose-additions
Aside from the virtual machine session not capturing and releasing the mouse pointer automatically, that did everything that was needed even if it was the open source edition of the drivers and their proprietary equivalents. To resolve the mouse pointer issue, I needed to temporarily disable the GNOME desktop session in /etc/rc.conf to drop down to a console only session where xorg. conf could be generated using the following commands:
Xorg -configure
cp xorg.conf.new /etc/xorg.conf
In the new xorg.conf file, the mouse section needs to be as follows:
Section “InputDevice”
Identifier “Mouse0”
Driver “vboxmouse”
EndSection
If it doesn’t look like the above and it wasn’t the case for me then it needs changing. Also, any extra lines from the default set up also need removing or the mouse will not function as it should. The ALT+F1 (for accessing GNOME menus) and ALT+F2 (for running commands) keyboard shortcuts then become crucial when your mouse is not working as it should and could avert a panic too; knowing that adjusting a single configuration file will fix a problem when doing so is less accessible is not a good feeling as I discovered to my own cost. The graphics settings were fine by default but here’s what you should have in case it isn’t for you:
Section “Device”
### Available Driver options are:-
### Values: <i>: integer, <f>: float, <bool>: “True”/”False”,
### <string>: “String”, <freq>: “<f> Hz/kHz/MHz”
### [arg]: arg optional
Identifier “Card0”
Driver “vboxvideo”
VendorName “InnoTek Systemberatung GmbH”
BoardName “VirtualBox Graphics Adapter”
BusID “PCI:0:2:0”
EndSection
The next step is to ensure that your HAL settings are as they should. I needed to create a file in /usr/local/etc/hal/fdi/policy called 90-vboxguest.fdi that contains the following:
<?xml version=”1.0″ encoding=”utf-8″?>
<!--
# Sun VirtualBox
# Hal driver description for the vboxmouse driver
# $Id: chapter.xml,v 1.33 2012-03-17 04:53:52 eadler Exp $
Copyright (C) 2008-2009 Sun Microsystems, Inc.
This file is part of VirtualBox Open Source Edition (OSE, as
available from http://www.virtualbox.org. This file is free software;
you can redistribute it and/or modify it under the terms of the GNU
General Public License (GPL) as published by the Free Software
Foundation, in version 2 as it comes in the “COPYING” file of the
VirtualBox OSE distribution. VirtualBox OSE is distributed in the
hope that it will be useful, but WITHOUT ANY WARRANTY of any kind.
Please contact Sun Microsystems, Inc., 4150 Network Circle, Santa
Clara, CA 95054 USA or visit http://www.sun.com if you need
additional information or have any questions.
-->
<deviceinfo version=”0.2″>
<device>
<match key=”info.subsystem” string=”pci”>
<match key=”info.product” string=”VirtualBox guest Service”>
<append key=”info.capabilities” type=”strlist”>input</append>
<append key=”info.capabilities” type=”strlist”>input.mouse</append>
<merge key=”input.x11_driver” type=”string”>vboxmouse</merge>
<merge key=”input.device” type=”string”>/dev/vboxguest</merge>
</match>
</match>
</device>
</deviceinfo>
With all that set, it is time to ensure that the custom user account is added to the wheel and operator groups using this command:
pw user mod [user name] -G wheel operator
Executing the above as root means that the custom account can run the su command so that logging in as root at the start of a desktop session no longer is needed. That is what being in the wheel group allows and the anyone in the operator group can shut down or restart the system. Both are facilities readily available in Linux so I fancied having them in FreeBSD too.
Being able to switch to root in a terminal session meant that I could go on to add software like Firefox, Libreoffice, GIMP, EMACS, Geany, Netbeans, Banshee and so on. There may be a line of opinion that FreeBSD is a server operating system but all of these make it more than passable for serving as a desktop one too. There may be no package management GUI as such and the ones that come with GNOME do not work either but anyone familiar with command line working will get around that.
FreeBSD may be conservative but that has its place too and being able to build up a system one item at a time teaches far more than getting everything already sorted in one hit. So far, there is enough documentation to get me going and I hope to see where else things go too. So far, the OS hasn’t been that intimidating and that’s good to see.