Quickly changing between virtual desktops in Windows 10
12th October 2018One of the benefits of running Linux is the availability of virtual desktops and installing VirtuaWin was the only way to get the same functionality in Windows before the launch of Windows 10. For reasons known to Microsoft, they decided against the same sort of implementation as seen in Linux or UNIX. Instead, they put the virtual desktop functionality a click away and rather hides it from most users unless they know what clicking on the Task View button allows. The approach also made switching between desktops slower with a mouse. However, there are keyboard shortcuts that addresses this once multiple virtual desktops exist.
Using WIN+CTRL+LEFT or WIN+CTRL+RIGHT does this easily once you have mastered the action. Depending on your keyboard setup, WIN is the Windows, Super or Command key while CTRL is the Control key. Then, LEFT is the left arrow key and RIGHT is the right arrow key. For machines with smaller screens where multi-tasking causes clutter, virtual desktops are a godsend for organising how you work and having quick key combinations for switching between them adds to their utility.
Sorting out sluggish start-up and shutdown times in Linux Mint 19
9th August 2018The Linux Mint team never pushes anyone into upgrading to the latest version of their distribution but curiosity often is strong enough an impulse to make me do just that. When it brings me across some rough edges, then the wisdom of leaving things alone is evident. Nevertheless, doing so also brings its share of learning and that is what I am sharing in this post. It also also me to collect a number of titbits that may be of use to others.
Again, I went with the in-situ upgrade option though the addition of the Timeshift backup tool means that it is less frowned upon than once would have been the case. It worked well too part from slow start-up and shutdown times so I set about track down the causes on the two machines that I have running Linux Mint. As it happens, the cause was different on each machine.
On one PC, it was networking that holding up things. The cause was my specifying a fixed IP address in /etc/network/interfaces instead of using the Network Settings GUI tool. Resetting the configuration file back to its defaults and using the Cinnamon settings interface took away the delays. It was inspecting /var/log/boot.log that highlighted problem so that is worth checking if I ever encounter slow start times again.
As I mentioned earlier, the second PC had a very different problem though it also involved a configuration file. What had happened was that /etc/initramfs-tools/conf.d/resume contained the wrong UUID for my system’s swap drive so I was seeing messages like the following:
 W: initramfs-tools configuration sets RESUME=UUID=<specified UUID for swap partition>
 W: but no matching swap device is available.
 I: The initramfs will attempt to resume from <specified file system location>
 I: (UUID=<specified UUID for swap partition>)
 I: Set the RESUME variable to override this.
Correcting the file and executing the following command fixed the issue by updating the affected initramfs image for all installed kernels and speeded up PC start-up times:
sudo update-initramfs -u -k all
Though it was not a cause of system sluggishness, I also sorted another message that I kept seeing during kernel updates and removals on both machines. This has been there for a while and causes warning messages about my system locale not being recognised. The problem has been described elsewhere as follows: /usr/share/initramfs-tools/hooks/root_locale is expecting to see individual locale directories in /usr/lib/locale but locale-gen is configured to generate an archive file by default. Issuing the following command sorted that:
sudo locale-gen --purge --no-archive
Following these, my new Linux Mint 19 installations have stabilised with more speedy start-up and shutdown times. That allows me to look at what is on Flathub to see what applications and if they get updated to the latest version on an ongoing basis. That may be a topic for another entry on here but the applications that I have tried work well so far.
Trying out a new way to upgrade Linux Mint in situ while going from 17.3 to 18.1
19th March 2017There was a time when the only recommended way to upgrade Linux Mint from one version to another was to do a fresh installation with back-ups of data and a list of the installed applications created from a special tool.
Even so, it never stopped me doing my own style of in situ upgrade though some might see that as a risky option. More often than not, that actually worked without causing major problems in a time when Linux Mint releases were more tightly tied to Ubuntu’s own six-monthly cycle.
In recent years, Linux Mint’s releases have kept in line with Ubuntu’s Long Term Support (LTS) editions instead. That means that any major change comes only every two years with minor releases in between those. The latter are delivered through Linux Mint’s Update Manager so the process is a simple one to implement. Still, upgrades are not forced on you so it is left to your discretion as to when you need to upgrade since all main and interim versions get the same extended level of support. In fact, the recommendation is not to upgrade at all unless something is broken on your own installation.
For a number of reasons, I stuck with that advice by sticking on my main machine with Linux Mint 17.3 instead of upgrading to Linux Mint 18. The fact that I broke things on another machine using an older method of upgrading provided even more encouragement.
However, I subsequently discovered another means of upgrading between major versions of Linux Mint that had some endorsement from the project. There still are warnings about testing a live DVD version of Linux Mint on your PC first and backing up your data beforehand. Another task is ensuring that you are upgraded from a fully up to data Linux Mint 17.3 installation.
When you are ready, you can install mintupgrade using the following command:
sudo apt-get install mintupgrade
When that is installed, there is a sequence of tasks that you need to do. The first of these is to simulate an upgrade to test for the appearance of untoward messages and resolve them. Repeating any checking until all is well gets a recommendation. The command is as follows:
mintupgrade check
Once you are happy that the system is ready, the next step is to download the updated packages so they are on your machine ahead of their installation. Only then should you begin the upgrade process. The two commands that you need to execute are below:
mintupgrade download
mintupgrade upgrade
Once these have completed, you can restart your system. In my case the whole process worked well with only my PHP installation needing attention. A clash between different versions of the scripting interpretor was addressed by removing the older one since PHP 7 is best kept for sake of testing. Beyond that, a reinstallation of VMware Player and the move from version 18 to version 18.1, there hardly was anything more to do and there was next to no real disruption. That is just as well since I depend heavily on my main PC these days. The backup option of a full installation would have left me clearing up things for a few days afterwards since I use a bespoke selection of software.
Forcing an upgrade to Windows 10 Anniversary Update
6th September 2016There remain people who advise those on Windows 7 or 8.x to hold fire on upgrading to Windows 10. Now that the free upgrade no longer is available, that advice may hold more weight than it did. Even so, there are those among us who jumped ship who do not mind having the latest versions of things at no monetary cost to see what is available and I must admit to being one of those.
After all, I do have a virtual machine with a pre-release version of the next update to Windows 10 installed on there to see what might be coming our way and to get a sense of what changes that may bring so that I am ready for those. Otherwise, I usually am happy to wait but I noticed that the Windows 10 Anniversary Update only came to my HP Pavilion dm4 laptop and not other machines with Windows 10 installed so I started to wonder why there was a lag when it came to automatic upgrades.
So that these things do not arrive when it is least convenient, I took advantage of a manual method in order to choose my timing. This did not involve installation from a disk image but was in-situ. The first part of the process is standard enough in that the Settings app was started and the Update & security item chosen. That dropped me onto the Windows Update and I first clicked on the Check for updates button to see what would happen. When nothing came of that, the Learn more link was clicked to bring me onto part of the Microsoft support website where I found that the Windows 10 Anniversary Update installer could be downloaded so I duly did just that.
Running it produced a screen asking whether or not I wanted to proceed. Since I wanted to go ahead, the appropriate button was clicked and the machine left alone until the process complete. Because the installer purely is a facilitator, the first stage is to download the rest of the files needed and that will take a while on any connection. Once downloading was completed, the actual process of installation commenced with several restarts before a log-in screen was again on offer. On logging in to the machine, the last part of the process started.
The process took quite a while but seemingly worked without a hitch. If there was anything that I needed to do, it was the re-installation of VirtualBox Guest Additions to restore access to shared folders as well as dealing with a self-inflicted irritation. Otherwise, I have found that previously installed software worked as expected and no file has been missed. Waiting a while may have had its advantages too because initial issues with the Anniversary Update will have been addressed but it is best not to leave it too long or you could have the feeling of being forgotten. A happy balance needs striking.
Dealing with an “Your insider preview build settings need attention” message in Windows 10 Settings
5th September 2016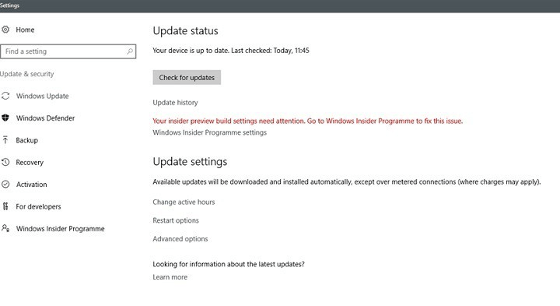
Having now upgraded all my Windows 10 machines to the Anniversary Update edition without much in the way of upheaval, I came across the following message on one of them:
Your insider preview build settings need attention. Go to Windows Insider Programme to fix this.
It appeared on the Update screen of the Settings application and I believe that I may have triggered it by letting foolish curiosity take me to the Windows Insider Programme screen. Returning there offered no way of resolving the issue so I had to try the registry editing tip that I discovered elsewhere on the web. Naturally, the creation of a System Restore Point before proceeding with changes to the Windows Registry is advised.
Typing REGEDIT into Cortana brings up a clickable link to the Registry Editor. Having clicked on this, I then clicked on the Yes button on the ensuing dialogue box that Windows 10 throws up every time you make a system change such as installing new software. With the Registry Editor opened, I made my way to the following location:
HKEY_LOCAL_MACHINE\SOFTWARE\Microsoft\WindowsSelfHost\UI\Strings
Once there, I deleted every entry that mentioned “Insider” or “Windows Insider” to leave only two afterwards: "(Default)", "UnknownErrorDialogValues". That resolved the issue and I now intend to stay away from the Windows Insider Programme screen in Settings so that the message never appears again.
Compressing a VirtualBox VDI file for a Linux guest
6th June 2016In a previous posting, I talked about compressing a virtual hard disk for a Windows guest system running in VirtualBox on a Linux system. Since then, I have needed to do the same for a Linux guest following some housekeeping. The Linux distribution used is Debian so the instructions are relevant to that and maybe its derivatives such as Ubuntu, Linux Mint and their kind.
While there are other alternatives like dd, I am going to stick with a utility named zerofree to overwrite the newly freed up disk space with zeroes to aid compression later on in the process for this and the first step is to install it using the following command:
apt-get install zerofree
Once that has been completed, the next step is to unmount the relevant disk partition. Luckily for me, what I needed to compress was an area that I reserved for synchronisation with Dropbox. If it was the root area where the operating system files are kept, a live distro would be needed instead. In any event, the required command takes the following form with the mount point being whatever it is on your system (/home, for instance):
sudo umount [mount point]
With the disk partition unmounted, zerofree can be run by issuing a command that looks like this:
zerofree -v /dev/sdxN
Above, the -v switch tells zerofree to display its progress and a continually updating percentage count tells you how it is going. The /dev/sdxN piece is generic with the x corresponding to the letter assigned to the disk on which the partition resides (a, b, c or whatever) and the N is the partition number (1, 2, 3 or whatever; before GPT, the maximum was 4). Putting all this together, we get an example like /dev/sdb2.
Once, that had completed, the next step is to shut down the VM and execute a command like the following on the host Linux system ([file location/file name] needs to be replaced with whatever applies on your system):
VBoxManage modifyhd [file location/file name].vdi --compact
With the zero filling in place, there was a lot of space released when I tried this. While it would be nice for dynamic virtual disks to reduce in size automatically, I accept that there may be data integrity risks with those so the manual process will suffice for now. It has not been needed that often anyway.
More thoughts on Windows 10
11th August 2015Now that I have left Windows 8.x behind me and there are a number of my machines running Windows 10, I have decided to revisit my impressions of the operating system. The first Technical Preview was something that I installed in a virtual machine and I have been keeping an eye on things have developed since then and intend to retain a Windows Insider installation to see what might be heading our way as Windows 10 evolves as now expected.
After elaborating on the all important upgrade process earlier, I am now moving onto other topics. The Start Menu is a big item but there are others as you will see below.
Start Menu
Let’s start with an admission: the prototype Start Menu that we got in the initial Windows 10 Technical Preview was more to my liking. Unpinning all the tiles allowed the menu to collapse back to the sort of width that anyone familiar with Windows 7 would have liked. If there was a setting to expunge all tiles at once and produce this state, I would have been well happy.
It was latter that we got to learn that Microsoft was not about consign the Windows 8 Modern interface entirely to history as many would have wanted. Some elements remain with us such as a Start Menu with a mandatory area for tiles and the ability to have it display full screen. Some are live but this can be turned off on a tile by tile basis and unneeded ones can be removed altogether. It is even possible to uninstall most apps by right clicking on a tile or other Start Menu entry and select the required option from the resulting context menu. For others, there is a command line alternative that uses Powershell to do removals. After this pruning, things were left in such a state that I have not been moved to restore Classic Shell so far.
The Start Menu settings used be in the same place as those for the taskbar but they are found in the new Settings tool. Some are in the Personalisation section and it has its own Start subsection for setting full screen mode or highlighting of new apps among other things. The equivalent Colours subsection is where you find other settings like assigning background colours based on those in a desktop background image, which itself is assigned in it own subsection in the Personalisation area.
Virtual Desktops
Initially, I failed to see the point in how Microsoft implemented these and favoured Virtuawin instead. My main complaint was the taskbar showed buttons for all open apps regardless of the screen in which they are opened. However, that was changed so your taskbar shows different buttons for each virtual desktop, just like the way that Linux and UNIX do things. Switching between desktops may not be as smooth of those yet but the default setting is a move in the right direction and you can change it if you want.
Cortana
This was presented to the world as a voice operated personal assistant like Apple’s Siri but I cannot say that I am keen on such things so I decided to work as I usually do instead. Keyboard interaction works fine and I have neutered things to leave off web searches on Bing to use the thing much in the same way as the search box on the Windows 7 Start Menu. It may be able to do more than that but I am more than happy to keep my workflow unchanged for now. Cortana’s settings are available via its pop-up menu. Collapsing the search box to an icon to save space for your pinned and open applications is available from the Search section of the taskbar context menu (right clicking the taskbar produces this).
Settings
In Windows 8.x, the Control Panel was not the only area for settings but remained feature complete but the same is not the case for Windows 10 where the new Settings panel is starting to take over from it. The two co-exist for now but it seems clear that Settings is where everything is headed.
The Personalisation section of the tool has been mentioned in relation to the Start Menu but there are plenty of others. For instance, the Privacy one is one that definitely needs reviewing and I found myself changing a lot of the default settings in there. Naturally, there are some other sections in Settings that need hardly any attention from most of us and these include Ease of access (accessibility), Time & language, Devices and Network & Internet. The System section has a few settings like tablet mode that may need review and the Update & security one has backup and recovery subsections that may be of interest. The latter of these is where you find the tools for refreshing the state of the system following instability or returning to a previous Windows version (7 or 8.x) within thirty days of the upgrade.
Migrating to Windows 10
10th August 2015While I have had preview builds of Windows 10 in various virtual machines for the most of twelve months, actually upgrading physical and virtual devices that you use for more critical work is a very different matter. Also, Windows 10 is set to be a rolling release with enhancements coming on an occasional basis so I would like to see what comes before it hits the actual machines that I need to use. That means that a VirtualBox instance of the preview build is being retained to see what happens to that over time.
Some might call it incautious but I have taken the plunge and completely moved from Windows 8.1 to Windows 10. The first machine that I upgraded was more expendable and success with that encouraged me to move onto others before even including a Windows 7 machine to see how that went. The 30-day restoration period allows an added degree of comfort when doing all this. The list of machines that I upgraded were a VMware VM with 32-bit Windows 8.1 Pro (itself part of a 32-bit upgrade cascade involving Windows 7 Home and Windows 8 Pro), a VirtualBox VM with 64-bit Windows 8.1, a physical PC that dual booted Linux Mint 17.2 and 64-bit Windows 8.1 and an HP Pavilion dm4 laptop (Intel Core i3 with 8 GB RAM and a 1 TB SSHD) with Windows 7.
The main issue that I uncovered with the virtual machines is that the Windows 10 update tool that is downloaded onto Windows 7 and 8.x does not accept the graphics capability on there. This is a bug because the functionality works fine on the Windows Insider builds. The solution was to download the appropriate Windows 10 ISO image for use in the ensuing upgrade. There are 32-bit and 64-bit disk images with Windows 10 and Windows 10 Pro installation files on each. My own actions used both disk images.
During the virtual machine upgrades, most of the applications that considered important were carried over from Windows 8.1 to Windows without a bother. Anyone would expect Microsoft’s own software like Word, Excel and others to make the transition, but others like Adobe’s Photoshop and Lightroom made it too, as did Mozilla’s Firefox, albeit requiring a trip to Settings to set it as the default option for opening web pages. Less well-known desktop applications like Zinio (digital magazines) or Mapyx Quo (maps for cycling, walking and the like) were the same. Classic Shell was an exception but the Windows 10 Start Menu suffices for now anyway. Also, there was a need to reinstate Bitdefender Antivirus Plus using its new Windows 10 compatible installation file. Still, the experience was a big change from the way things used to be in the days when you used to have to reinstall nearly all your software following a Windows upgrade.
The Windows 10 update tool worked well for the Windows 8.1 PC, so no installation disks were needed. Neither was the bootloader overwritten so the Windows option needed selecting from GRUB every time there was a system reboot as part of the installation process, a temporary nuisance that was tolerated since booting into Linux Mint was preserved. Again, no critical software was lost in the process apart from Kaspersky Internet Security, which needed the Windows 10 compatible version installed, much like Bitdefender, or Epson scanning software that I found was easy to reinstall anyway. Usefully, Anquet’s Outdoor Map Navigator (again used for working with walking and cycling maps) continued to function properly after the changeover.
For the Windows 7 laptop, it was much the same story, albeit with the upgrade being delivered using Windows Update. Then, the main Windows account could be connected to my Outlook account to get everything tied up with the other machines for the first time. Before the obligatory change of background picture, the browns in the one that I was using were causing interface items to appear in red, not exactly my favourite colour for application menus and the like. Now they are in blue and all the upheaval surrounding the operating system upgrade had no effect on the Dropbox or Kaspersky installations that I had in place before it all started. If there is any irritation, it is that unpinning of application tiles from the Start Menu or turning off of live tiles is not always as instantaneous as I would have liked and that is all done now anyway.
While writing the above, I could not help thinking that more observations on Windows 10 may follow, but these will do for now. Microsoft had to get this upgrade process right and it does appear that they have, so credit is due to them for that. So far, I have Windows 10 to be stable and will be seeing how things develop from here, especially when those new features arrive occasionally as is the promise that has been made to us users. Hopefully, that will be as painless as it needs to be to ensure trust is retained.
A few more shell commands
8th July 2015Here are some Linux commands that I encountered in a feature article in the current issue of Linux User & Developer that I had not met before:
cd --
This returns you to the previous directory where you were before with having to go back through the folder hierarchy to get there and is handy if you are jumping around a file system and any other means is far from speedy.
lsb_release -a
It can be useful to uncover what version of a distro you have from the command line and the above works for distros as diverse as Linux Mint, Debian, Fedora (it automatically installs in Fedora 22 if it is not installed already, a more advanced approach than showing you the command like in Linux Mint or Ubuntu), openSUSE and Manjaro. These days, the version may not change too often but it still is good to uncover what you have.
yum install fedora-upgrade
This one can be run either with sudo or in a root session started with su and it is specific to Fedora. The command performs an upgrade of the Fedora distro itself and I wonder if the functionality has been ported to the dnf command that has taken over from yum. My experiences with that in Fedora 22 so far suggest that it should be the case though I need to check that further with the VirtualBox VM that I have created.
Controlling clearance of /tmp on Linux systems
19th June 2015While some may view the behaviour in a less favourable, I always have liked the way that Linux can clear its /tmp directory every time the system is restarted. The setting for this is in /etc/default/rcS and the associated line looks something like:
TMPTIME=0
The value of 0 means that the directory is flushed completely every time the system is restarted but there are other options. A setting of -1 makes the directory behave like any other one on the system where any file deletions are manual affairs. Using other positive integer values like 7 will specify the number of days that a file can stay in /tmp before it is removed.
What brought me to this topic was the observation that my main Linux Mint system was accumulating files in /tmp and the cause was the commenting out of the TMPTIME=0 line in /etc/default/rcS. This is not the case in Ubuntu and using that is how I got accustomed to automatic file removal from /tmp in the first place.
All of this discussion so far has pertained to PC’s where systems are turned off or restarted on a regular basis. Things are different for servers of course and I have seen tools like tmpreaper and tmpwatch being given a mention. As if to prove that there is more one way to do anything on Linux, shell scripting and cron remain and ever present fallback.