Shrinking title bar search box in Microsoft Office 365 applications
6th December 2019
It might be a new development but I only recently spotted the presence of a search box in the titles of both Microsoft Word and Microsoft Excel that I have as part of an Office 365 subscription. Though handy for searching file contents and checking on spelling and grammer, I also realised that the boxes take up quite a bit of space and decided to see if hiding them was possible.
![]()
In the event, I found that they could be shrunk from a box to an icon that expanded to pop up a box when you clicked on them. Since I did not need the box to be on view all the time, that outcome was sufficient for my designs though it may not satisfy others who want to hide this functionality completely.
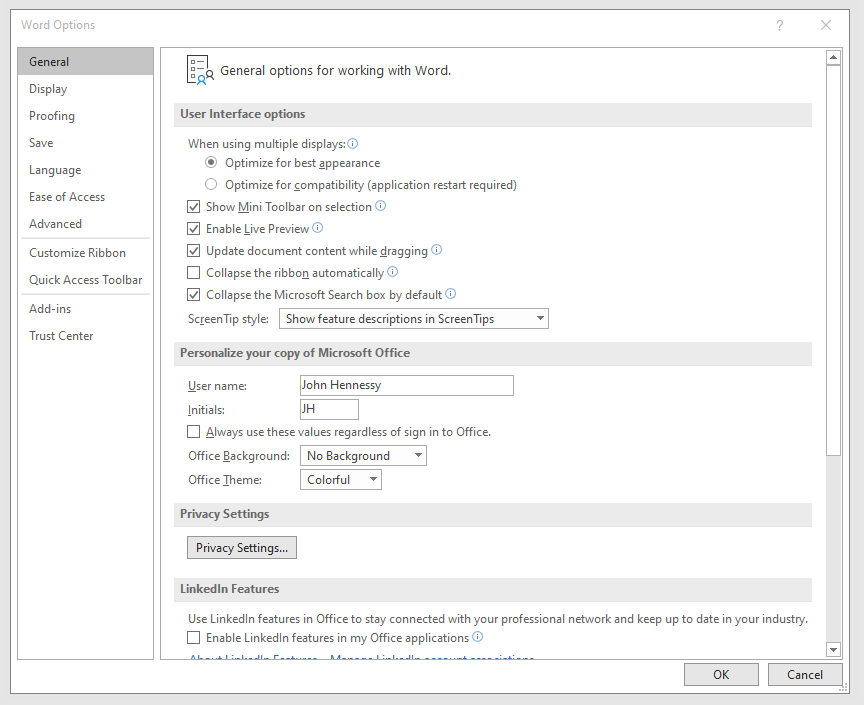
To get it, it was a matter of going to File > Options and putting a tick in the box next to the Collapse the Microsoft Search box by default entry in the General tab before clicking on the OK button. Doing that freed up some title bar space as desired and searching is only a button press away.
Enlarging a VirtualBox VDI virtual disk
20th December 2018It is amazing how the Windows folder manages to grow on your C drive and on in a Windows 7 installation was the cause of my needing to expand the VirtualBox virtual machine VDI disk on which it was installed. After trying various ways to cut down the size, an enlargement could not be avoided. In all of this, it was handy that I had a recent backup for restoration after any damage.
The same thing meant that I could resort to enlarging the VDI file with more peace of mind than otherwise might have been the case. This needed use of the command line once the VM was shut down. The form of the command that I used was the following:
VBoxManage modifyhd <filepath/filename>.vdi --resize 102400
It appears that this also would work on a Windows host but mine was Linux and it did what I needed. The next step was to attach it to an Ubuntu VM and use GParted to expand the main partition to fill the newly available space. That does not mean that it takes up 100 GiB on my system just yet because these things can be left to grow over time and there is a way to shrink them too if you ever need to do just that. As ever, having a backup made before any such operation may have its uses if anything goes awry.
Searching file contents using PowerShell
25th October 2018Having made plenty of use of grep on the Linux/UNIX command and findstr on the legacy Windows command line, I wondered if PowerShell could be used to search the contents of files for a text string. Usefully, this turns out to be the case but I found that the native functionality does not use what I have used before. The form of the command is given below:
Select-String -Path <filename search expression> -Pattern "<search expression>" > <output file>
While you can have the output appear on screen, it always seems easier to send it to a file for subsequent and that is what I am doing above. The input to the -Path switch can be a filename or a wildcard expression while that to the -Pattern can be a text string enclosed in quotes or a regular expression. It works well once you know what to do so here is an example:
Select-String -Path *.sas -Pattern "proc report" > c:\temp\search.txt
The search.txt file then includes both the file information and the text that has been found for sake of checking that you have what you want. What you do next is up to you.
Quickly changing between virtual desktops in Windows 10
12th October 2018One of the benefits of running Linux is the availability of virtual desktops and installing VirtuaWin was the only way to get the same functionality in Windows before the launch of Windows 10. For reasons known to Microsoft, they decided against the same sort of implementation as seen in Linux or UNIX. Instead, they put the virtual desktop functionality a click away and rather hides it from most users unless they know what clicking on the Task View button allows. The approach also made switching between desktops slower with a mouse. However, there are keyboard shortcuts that addresses this once multiple virtual desktops exist.
Using WIN+CTRL+LEFT or WIN+CTRL+RIGHT does this easily once you have mastered the action. Depending on your keyboard setup, WIN is the Windows, Super or Command key while CTRL is the Control key. Then, LEFT is the left arrow key and RIGHT is the right arrow key. For machines with smaller screens where multi-tasking causes clutter, virtual desktops are a godsend for organising how you work and having quick key combinations for switching between them adds to their utility.
Keyboard shortcut for Euro currency symbol on Windows 10
21st April 2018Because I now have business dealings in Ireland, there is a need to add in the Euro currency symbol to emails even though I based in the U.K. and use U.K. keyboard settings. While there is the possibility to insert the symbol in Microsoft Office and other applications, using a simple keyboard shortcut is more efficient since it avoids multiple mouse clicks. For some reason, CTRL+SHFT+E got into my head as the key combination but that turns on the Track Changes facility in Word. Instead, CTRL+ALT+4 does the needful and that is what I will be keeping in mind for future usage.
Rethinking photo editing
17th April 2018Photo editing has been something that I have been doing since my first-ever photo scan in 1998 (I believe it was in June of that year but cannot be completely sure nearly twenty years later). Since then, I have been using a variety of tools for the job and wondered how other photos can look better than my own. What cannot be excluded is my preference for being active in the middle of the day when light is at its bluest as well as a penchant for using a higher ISO of 400. In other words, what I do when making photos affects how they look afterwards as much as the weather that I had encountered.
My reason for mentioning the above aspects of photographic craft is that they affect what you can do in photo editing afterwards, even with the benefits of technological advancement. My tastes have changed over time, so the appeal of re-editing old photos fades when you realise that you only are going around in circles and there always are new ones to share, so that may be a better way to improve.
When I started, I was a user of Paint Shop Pro but have gone over to Adobe since then. First, it was Photoshop Elements, but an offer in 2011 lured me into having Lightroom and the full version of Photoshop. Nowadays, I am a Creative Cloud photography plan subscriber so I get to see new developments much sooner than once was the case.
Even though I have had Lightroom for all that time, I never really made full use of it and preferred a Photoshop-based workflow. Lightroom was used to select photos for Photoshop editing, mainly using adjustments for such things as tones, exposure, levels, hue and saturation. Removal of dust spots, resizing and sharpening were other parts of a still minimalist approach.
What changed all this was a day spent pottering about the 2018 Photography Show at the Birmingham NEC during a cold snap in March. That was followed by my checking out the Adobe YouTube Channel afterwards where there were videos of the talks featured every day of the four-day event. Here are some shortcuts if you want to do some catching up yourself: Day 1, Day 2, Day 3, and Day 4. Be warned though that these videos are long in that they feature the whole day and there are enough gaps that you may wish to fast-forward through them. Even so, there is quite a bit of variety of things to see.
Of particular interest were the talks given by the landscape photographer David Noton who sensibly has a philosophy of doing as little to his images as possible. It helps that his starting points are so good that adjusting black and white points with a little tonal adjustment does most of what he needs. Vibrancy, clarity and sharpening adjustments are kept to a minimum while some work with graduated filters evens out exposure differences between skies and landscapes. It helps that all this can be done in Lightroom, so that set me thinking about trying it out for size and the trick of using the backslash (\) key to switch between raw and processed views is a bonus granted by non-destructive editing. Others may have demonstrated the creation of composite imagery, but simplicity is more like my way of working.
Confusingly, we now have the cloud-based Lightroom CC while the previous desktop counterpart is known as Lightroom Classic CC. Though the former may allow for easy dust spot removal among other things, it is the latter that I prefer because the idea of wholesale image library upload does not appeal to me for now and I already have other places for off-site image backup like Google Drive and Dropbox. The mobile app does look interesting since it allows capturing images on a such a device in Adobe’s raw image format DNG. Still, my workflow is set to be more Lightroom-based than it once was and I quite fancy what new technology offers, especially since Adobe is progressing its Sensai artificial intelligence engine. The fact that it has access to many images on its systems due to Lightroom CC and its own stock library (Adobe Stock, formerly Fotolia) must mean that it has plenty of data for training this AI engine.
Making pages of new documents look right in LibreOffice Writer on wide screens
21st April 2017My recent move from Linux Mint 17.3 to Linux Mint 18.1 brought with it version 5.3.0.3 of LibreOffice. What that brought was an oddity where the default blank document in a fresh LibreOffice Writer session had its only page displayed to the right within the application window. To me, this looks like a bug even if I have a 24″ computer screen.
After some searching, I found a solution that gets a single page displayed in the centre of the application window and not offset to the right as it was. The first step is to go to the Zoom entry within the View menu. Within the sub-menu that is spawned, you need to click on the Zoom… entry to get a dialogue box. That has two columns and the setting that needs changing is under the one named View Layout. For whatever reason, the Columns setting was highlighted with 2 being selected as the number of columns. Choosing the Single Page option instead sorted the problem on clicking the OK button to dismiss the dialogue and the one named Automatic also appears to work. Quite why such an odd default was selected in the first is beyond me though.
Opening up Kindle for PC in a maximised window on Windows 10
18th March 2017It has been a while since I scribbled anything on here but I now have a few things to relating, starting with this one. Amazon now promotes a different app for use when reading its eBooks on PC’s and, with a certain reluctance, I have taken to using this because its page synchronisation is not as good as it should be.
Another irritation is that it does not open in a maximised window and it scarcely remembers your size settings from session to session. Finding solutions to this sizing issue is no easy task so I happened on one of my own that I previously used with Windows (or File) Explorer folder shortcuts.
The first step is to find the actual location of the Start Menu shortcut. Trying C:\Users\[User Name]\AppData\Roaming\Microsoft\Windows\Start Menu\Programs\Amazon\Amazon Kindle should do that.
Next, right click on the Kindle icon and choose Properties from the context menu that appears. In the dialogue box that causes to appear on the screen, look for the “Run:” setting. By default, this appears as “Normal Window” but you can change this to “Maximised”, which is what I did before clicking on Apply before doing the same for the OK button to dismiss the dialogue box.
If you have pinned the shortcut to the taskbar or elsewhere, you may need to unpin it and pin it again to carry over the change. After that, I found that the Kindle app opened up in a maximised window as I wanted.
With that done, I could get along better with the app and it does put a search box in a more obvious place that it was in the old one. You also can set up Collections so your books are organised so there is something new for a user. Other than that, it largely works as before though you may to hit the F5 key every now and again to synchronise reading progress across multiple devices.
Copying a directory tree on a Windows system using XCOPY and ROBOCOPY
17th September 2016My usual method for copying a directory tree without any of the files in there involves the use of the Windows commands line XCOPY and the command takes the following form:
xcopy /t /e <source> <destination>
The /t switch tells XCOPY to copy only the directory structure while the /e one tells it to include empty directories too. Substituting /s for /e would ensure that only non-empty directories are copied. <source> and <destination> are the directory paths that you want to use and need to be enclosed in quotes if you have a space in a directory name.
There is one drawback to this approach that I have discovered. When you have long directory paths, messages about there being insufficient memory are issued and the command fails. The limitation has nothing to do with the machine that you are using but is a limitation of XCOPY itself.
After discovering that, I got to checking if ROBOCOPY can do the same thing without the same file path length limitation because I did not have the liberty of shortening folder names to get the whole path within the length expected by XCOPY. The following is the form of the command that I found did what I needed:
robocopy <source> <destination> /e /xf *.* /r:0 /w:0 /fft
Again, <source> and <destination> are the directory paths that you want to use and need to be enclosed in quotes if you have a space in a directory name. The /e switch copies all subdirectories and not just non-empty ones. Then, the xf *.* portion excludes all files from the copying process. The remaining options are added to help with getting around access issues and to try copy only those directories that do not exist in the destination location. The /ftt switch was added to address the latter by causing ROBOCOPY to assume FAT file times. To get around the folder permission delays, the /r:0 switch was added to stop any operation being retried with /w:0 setting wait times to 0 seconds. All this was enough to achieve what I wanted and I am keeping it on file for my future reference as well as sharing it with you.
Using PowerShell to reinstall Windows Apps
9th September 2016Recently, I managed to use 10AppsManager to remove most of the in-built apps from a Windows 10 virtual machine that I have for testing development versions in case anything ugly were to appear in a production update. Curiosity is my excuse for letting the tool do what it did and some could do with restoration. Out of the lot, Windows Store is the main one that I have sorted so far.
The first step of the process was to start up PowerShell in administrator mode. On my system, this is as simple as clicking on the relevant item in the menu popped up by right clicking on the Start Menu button and clicking on the Yes button in the dialogue box that appears afterwards. In your case, it might be a case of right clicking on the appropriate Start Menu programs entry, selecting the administrator option and going from there.
With this PowerShell session open, the first command to issue is the following:
Get-Appxpackage -Allusers > c:\temp\appxpackage.txt
This creates a listing of Windows app information and pops it into a text file in your choice of directory. Opening the text file in Notepad allows you to search it more easily and there is an entry for Windows Store:
Name : Microsoft.WindowsStore
Publisher : CN=Microsoft Corporation, O=Microsoft Corporation, L=Redmond, S=Washington, C=US
Architecture : X64
ResourceId :
Version : 11607.1001.32.0
PackageFullName : Microsoft.WindowsStore_11607.1001.32.0_x64__8wekyb3d8bbwe
InstallLocation : C:\Program Files\WindowsApps\Microsoft.WindowsStore_11607.1001.32.0_x64__8wekyb3d8bbwe
IsFramework : False
PackageFamilyName : Microsoft.WindowsStore_8wekyb3d8bbwe
PublisherId : 8wekyb3d8bbwe
PackageUserInformation : {S-1-5-21-3224249330-198124288-2558179248-1001
IsResourcePackage : False
IsBundle : False
IsDevelopmentMode : False
Dependencies : {Microsoft.VCLibs.140.00_14.0.24123.0_x64__8wekyb3d8bbwe,
Microsoft.NET.Native.Framework.1.3_1.3.24201.0_x64__8wekyb3d8bbwe,
Microsoft.NET.Native.Runtime.1.3_1.3.23901.0_x64__8wekyb3d8bbwe,
Microsoft.WindowsStore_11607.1001.32.0_neutral_split.scale-100_8wekyb3d8bbwe}
Using the information from the InstallLocation field, the following command can be built and executed (here, it has gone over several lines so you need to get your version onto a single one):
Add-AppxPackage -register “C:\Program Files\WindowsApps\Microsoft.WindowsStore_11607.1001.32.0_x64__8wekyb3d8bbwe\AppxManifest.xml” -DisableDevelopmentMode
Once the above has completed, the app was installed and ready to use again. As the mood took me, I installed other apps from the Windows Store as I saw fit.