Dealing with Error 1064 in MySQL queries
27th April 2023Recently, I was querying a MySQL database table and got a response like the following:
ERROR 1064 (42000): You have an error in your SQL syntax; check the manual that corresponds to your MySQL server version for the right syntax to use
The cause was that one of the data column columns was named using the MySQL reserved word key. While best practice is not to use reserved words like this at all, this was not something that I could alter. Therefore, I enclosed the offending keyword in backticks (`) to make the query work.
There is more information in the MySQL documentation on Schema Object Names and on Keywords and Reserved Words for dealing with or avoiding this kind of situation. While I realise that things change over time and that every implementation of SQL is a little different, it does look as if not using established keywords should be a minimum expectation when any database tables get created.
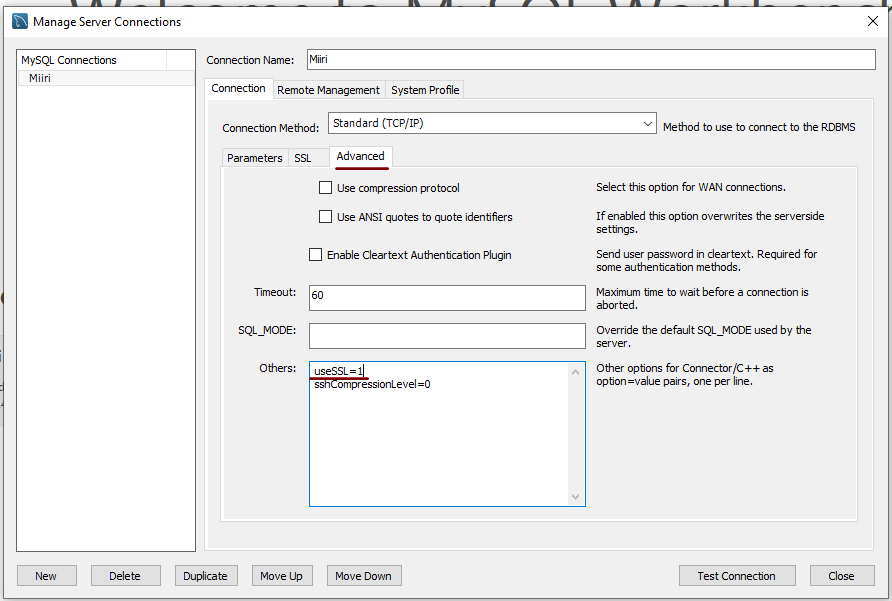
Disabling the SSL connection requirement in MySQL Workbench
7th November 2022A while ago, I found that MySQL Workbench would only use SSL connections and that was stopping it from connecting to local databases so I looked for a way to override this. The cure was to go to Database > Manage Connections… in the menus for the application’s home tab. in the dialogue box that appeared, I chose the connection of interest and went to the Advanced panel under Connection and removed the line useSSL=1 from the Others field. The screenshot below shows you what things look like before the change is made. Naturally, the best practice would be to secure a remote database connection using SSL so this approach is best reserved for remote non-production databases. However, it may be that this does not happen now but I thought I would share this in case the problem persists for anyone.
Useful Python packages for working with data
14th October 2021My response to changes in the technology stack used in clinical research is to develop some familiarity with programming and scripting platforms that complement and compete with SAS, a system with which I have been programming since 2000. One of these has been R but Python is another that has taken up my attention and I now also have Julia in my sights as well. There may be others to assess in the fullness of time.
While I first started to explore the Data Science world in the autumn of 2017, it was in the autumn of 2019 that I began to complete LinkedIn training courses on the subject. Good though they were, I find that I need to actually use a tool in order to better understand it. At that time, I did get to hear about Python packages like Pandas, NumPy, SciPy, Scikit-learn, Matplotlib, Seaborn and Beautiful Soup though it took until of spring of this year for me to start gaining some hands-on experience with using any of these.
During the summer of 2020, I attended a BCS webinar on the CodeGrades initiative, a programming mentoring scheme inspired by the way classical musicianship is assessed. In fact, one of the main progenitors is a trained classical musician and teacher of classical music who turned to Python programming when starting a family so as to have a more stable income. The approach is that a student selects a project and works their way through it with mentoring and periodic assessments carried out in a gentle and discursive manner. Of course, the project has to be engaging for the learning experience to stay the course and that point came through in the webinar.
That is one lesson that resonates with me with subjects as diverse as web server performance and the ongoing pandemic pandemic supplying data and there are other sources of public data to examine as well before looking through my own personal archive gathered over the decades. Some subjects are uplifting while others are more foreboding but the key thing is that they sustain interest and offer opportunities for new learning. Without being able to dream up new things to try, my knowledge of R and Python would not be as extensive as it is and I hope that it will help with learning Julia too.
In the main, my own learning has been a solo effort with consultation of documentation along with web searches that have brought me to the likes of Real Python, Stack Abuse, Data Viz with Python and R and others for longer tutorials as well as threads on Stack Overflow. Usually, the web searching begins when I need a steer on a particular or a way to resolve a particular error or warning message but books always are worth reading even if that is the slower route. Those from the Dummies series or from O’Reilly have proved must useful so far but I do need to read them more completely than I already have; it is all too tempting to go with the try the “programming and search for solutions as you go” approach instead.
To get going, many choose the Anaconda distribution to get Jupyter notebook functionality but I prefer a more traditional editor so Spyder has been my tool of choice for Python programming and there are others like PyCharm as well. Spyder itself is written in Python so it can be installed using pip from PyPi like other Python packages. It has other dependencies like Pylint for code management activities but these get installed behind the scenes.
The packages that I first met in 2019 may be the mainstays for doing data science but I have discovered others since then. It also seems that there is porosity between the worlds of R an Python so you get some Python packages aping R packages and R has the Reticulate package for executing Python code. There are Python counterparts to such Tidyverse stables as dply and ggplot2 in the form of Siuba and Plotnine, respectively. The syntax of these packages are not direct copies of what is executed in R but they are close enough for there to be enough familiarity for added user friendliness compared to Pandas or Matplotlib. The interoperability does not stop there for there is SQLAlchemy for connecting to MySQL and other databases (PyMySQL is needed as well) and there also is SASPy for interacting with SAS Viya.
Pyhton may not have the speed of Julia but there are plenty of packages for working with larger workloads. Of these, Dask, Modin and RAPIDS all have there uses for dealing with data volumes that make Pandas code crawl. As if to prove that there are plenty of libraries for various forms of data analytics, data science, artificial intelligence and machine learning, there also are the likes of Keras, TensorFlow and NetworkX. These are just a selection of what is available and there is no need not to check out more. It may be tempting to stick with the most popular packages all the time, especially when they do so much, but it never hurst to keep an open mind either.
Moving a website from shared hosting to a virtual private server
24th November 2018This year has seen some optimisation being applied to my web presences guided by the results of GTMetrix scans. It was then that I realised how slow things were, so server loads were reduced. Anything that slowed response times, such as WordPress plugins, got removed. Usage of Matomo also was curtailed in favour of Google Analytics while HTML, CSS and JS minification followed. What had yet to happen was a search for a faster server. Now, another website has been moved onto a virtual private server (VPS) to see how that would go.
Speed was not the only consideration since security was a factor too. After all, a VPS is more locked away from other users than a folder on a shared server. There also is the added sense of control, so Let’s Encrypt SSL certificates can be added using the Electronic Frontier Foundation’s Certbot. That avoids the expense of using an SSL certificate provided through my shared hosting provider and a successful transition for my travel website may mean that this one undergoes the same move.
For the VPS, I chose Ubuntu 18.04 as its operating system and it came with the LAMP stack already in place. Have offload development websites, the mix of Apache, MySQL and PHP is more familiar to me than anything using Nginx or Python. It also means that .htaccess files become more useful than they were on my previous Nginx-based platform. Having full access to the operating system by means of SSH helps too and should mean that I have fewer calls on technical support since I can do more for myself. Any extra tinkering should not affect others either, since this type of setup is well known to me and having an offline counterpart means that anything riskier is tried there beforehand.
Naturally, there were niggles to overcome with the move. The first to fix was to make the MySQL instance accept calls from outside the server so that I could migrate data there from elsewhere and I even got my shared hosting setup to start using the new database to see what performance boost it might give. To make all this happen, I first found the location of the relevant my.cnf configuration file using the following command:
find / -name my.cnf
Once I had the right file, I commented out the following line that it contained and restarted the database service afterwards using another command to stop the appearance of any error 111 messages:
bind-address 127.0.0.1
service mysql restart
After that, things worked as required and I moved onto another matter: uploading the requisite files. That meant installing an FTP server so I chose proftpd since I knew that well from previous tinkering. Once that was in place, file transfer commenced.
When that was done, I could do some testing to see if I had an active web server that loaded the website. Along the way, I also instated some Apache modules like mod-rewrite using the a2enmod command, restarting Apache each time I enabled another module.
Then, I discovered that Textpattern needed php-7.2-xml installed, so the following command was executed to do this:
apt install php7.2-xml
Then, the following line was uncommented in the correct php.ini configuration file that I found using the same method as that described already for the my.cnf configuration and that was followed by yet another Apache restart:
extension=php_xmlrpc.dll
Addressing the above issues yielded enough success for me to change the IP address in my Cloudflare dashboard so it pointed at the VPS and not the shared server. The changeover happened seamlessly without having to await DNS updates as once would have been the case. It had the added advantage of making both WordPress and Textpattern work fully.
With everything working to my satisfaction, I then followed the instructions on Certbot to set up my new Let’s Encrypt SSL certificate. Aside from a tweak to a configuration file and another Apache restart, the process was more automated than I had expected so I was ready to embark on some fine-tuning to embed the new security arrangements. That meant updating .htaccess files and Textpattern has its own, so the following addition was needed there:
RewriteCond %{HTTPS} !=on
 RewriteRule ^ https://%{HTTP_HOST}%{REQUEST_URI} [R=301,L]
This complemented what was already in the main .htaccess file and WordPress allows you to include http(s) in the address it uses, so that was another task completed. The general .htaccess only needed the following lines to be added:
RewriteCond %{SERVER_PORT} 80
 RewriteRule ^(.*)$ https://www.assortedexplorations.com/$1 [R,L]
What all these achieve is to redirect insecure connections to secure ones for every visitor to the website. After that, internal hyperlinks without https needed updating along with any forms so that a padlock sign could be shown for all pages.
With the main work completed, it was time to sort out a lingering niggle regarding the appearance of an FTP login page every time a WordPress installation or update was requested. The main solution was to make the web server account the owner of the files and directories, but the following line was added to wp-config.php as part of the fix even if it probably is not necessary:
define('FS_METHOD', 'direct');
There also was the non-operation of WP Cron and that was addressed using WP-CLI and a script from Bjorn Johansen. To make double sure of its effectiveness, the following was added to wp-config.php to turn off the usual WP-Cron behaviour:
define('DISABLE_WP_CRON', true);
Intriguingly, WP-CLI offers a long list of possible commands that are worth investigating. A few have been examined but more await attention.
Before those, I still need to get my new VPS to send emails. So far, sendmail has been installed, the hostname changed from localhost and the server restarted. More investigations are needed but what I have not is faster than what was there before, so the effort has been rewarded already.
Presenting more than one plot on a page using SAS ODS PDF
12th November 2012If you had asked me about getting two or more graphs on a page using SAS/GRAPH procedures, I might have suggested PROC GREPLAY as the means to achieve it. However, I recently came across another way to do the same thing by using ODS. It helped that the graphs were being produced using the PDF destination because I don’t think that what follows will work with the RTF one.
For this three plots on a page example, I first set the orientation to landscape so that the plots can be arranged side by side in a single row:
options orientation=landscape;
Next, the PDF destination was opened with page breaks turned off for the required output file using the STARTPAGE option:
ods pdf file="c:\test.pdf" startpage=off;
The listing destination was turned off as well since it is not needed:
ods listing close;
With that complete, a page or region break gets inserted. This could have been repeated before every procedure to get it popped into the next region on the page but that is the default behaviour for any extra procedural step so it wasn’t needed.
ods pdf startpage=now;
Then, the ODS LAYOUT feature is started so that the layout can be defined on the page:
ods layout start;
For the first plot and the one at the left of the triptych, a region was defined absolutely (grid layouts are available but I didn’t make use of them here) using ODS REGION. Since all plots were to be of the same size, the width was defined as being a third of the page and the bottom left hand corner of the region defined to be the same as that of the plot area on the page. Titles and footnotes usefully lie outside this region in the way that SAS arranges things so there is no further messing. With the region define, it’s a matter of running the required SAS/GRAPH procedure. In my case, this was GPLOT but I am certain that others would work as well. The height was defined as the full possible plot height. This could have a use if I wanted more than one row of graphs on a page with a trellis plot being an example of that sort of arrangement.
ods region x=0pct y=0pct width=33pct height=100pct;
<< SAS/GRAPH Procedure >>
For the middle plot, the starting position is moved a third of the way along the page while the section area has the same dimensions as before. Using percentages in these definitions does make their usage easier.
ods region x=33pct y=0pct width=33pct height=100pct;
<< SAS/GRAPH Procedure >>
Lastly, the right-hand plot has a starting position two-thirds of the width of the page and the other dimensions are as per the other panels:
ods region x=66pct y=0pct width=33pct height=100pct;
<< SAS/GRAPH Procedure >>
With the last graph created, it is time to close ODS LAYOUT and the PDF destination. Then, the listing destination is reopened again.
ods layout end;
 ods pdf close;
 ods listing;
Update 2012-12-08: Since writing the above, I have learned that ODS LAYOUT and ODS REGION have yet to become production features of SAS with 9.3 as the latest version. However, I have encountered an alternative that uses the STARTPAGE=NEVER ODS PDF option to turn off page breaks and GOPTIONS statements to control the regions occupied by plots. It’s Sample 48569 on the SAS website. Having a production equivalent is better since pre-production features are best avoided in production code. If I had realised the status, I would have used PROC GREPLAY to achieve what I needed to do.
Setting up MySQL on Sabayon Linux
27th September 2012For quite a while now, I have offline web servers for doing a spot of tweaking and tinkering away from the gaze of web users that visit what I have on there. Therefore, one of the tests that I apply to any prospective main Linux distro is the ability to set up a web server on there. This is more straightforward for some than for others. For Ubuntu and Linux Mint, it is a matter of installing the required software and doing a small bit of configuration. My experience with Sabayon is that it needs a little more effort than this and I am sharing it here for the installation of MySQL.
The first step is too install the software using the commands that you find below. The first pops the software onto the system while second completes the set up. The --basedir option is need with the latter because it won’t find things without it. It specifies the base location on the system and it’s /usr in my case.
sudo equo install dev-db/mysql
sudo /usr/bin/mysql_install_db --basedir=/usr
With the above complete, it’s time to start the database server and set the password for the root user. That’s what the two following commands achieve. Once your root password is set, you can go about creating databases and adding other users using the MySQL command line
sudo /etc/init.d/mysql start
mysqladmin -u root password ‘password’
The last step is to set the database server to start every time you start your Sabayon system. The first command adds an entry for MySQL to the default run level so that this happens. The purpose of the second command is check that this happened before restarting your computer to discover if it really happens. This procedure also is needed for having an Apache web server behave in the same way so the commands are worth having and even may have a use for other services on your system. ProFTP is another that comes to mind, for instance.
sudo rc-update add mysql default
sudo rc-update show | grep mysql
Sorting out MySQL on Arch Linux
5th November 2011Seeing Arch Linux running so solidly in a VirtualBox virtual box has me contemplating whether I should have it installed on a real PC. Saying that, recent announcements regarding the implementation of GNOME 3 in Linux Mint have caught my interest even if the idea of using a rolling distribution as my main home operating system still has a lot of appeal for me. Having an upheaval come my way every six months when a new version of Linux Mint is released is the main cause of that.
While remaining undecided, I continue to evaluate the idea of Arch Linux acting as my main OS for day-to-day home computing. Towards that end, I have set up a working web server instance on there using the usual combination of Apache, Perl, PHP and MySQL. Of these, it was MySQL that went the least smoothly of all because the daemon wouldn’t start for me.
It was then that I started to turn to Google for inspiration and a range of actions resulted that combined to give the result that I wanted. One problem was a lack of disk space caused by months of software upgrades. Since tools like it in other Linux distros allow you to clear some disk space of obsolete installation files, I decided to see if it was possible to do the same with pacman, the Arch Linux command line package manager. The following command, executed as root, cleared about 2 GB of cruft for me:
pacman -Sc
The S in the switch tells pacman to perform package database synchronization while the c instructs it to clear its cache of obsolete packages. In fact, using the following command as root every time an update is performed both updates software and removes redundant or outmoded packages:
pacman -Syuc
So I don’t forget the needful housekeeping, this will be what I use in future with the y being the switch for a refresh and the u triggering a system upgrade. It’s nice to have everything happen together without too much effort.
To do the required debugging that led me to the above along with other things, I issued the following command:
mysqld_safe --datadir=/var/lib/mysql/ &
This starts up the MySQL daemon in safe mode if all is working properly and it wasn’t in my case. Nevertheless, it creates a useful log file called myhost.err in /var/lib/mysql/. This gave me the messages that allowed the debugging of what was happening. It led me to installing net-tools and inettools using pacman; it was the latter of these that put hostname on my system and got the MySQL server startup a little further along. Other actions included unlocking the ibdata1 data file and removing the ib_logfile0 and ib_logfile1 files so as to gain something of a clean sheet. The kill command was used to shut down any lingering mysqld sessions too. To ensure that the ibdata1 file was unlocked, I executed the following commands:
mv ibdata1 ibdata1.bad
 cp -a ibdata1.bad ibdata1
These renamed the original and then crated a new duplicate of it with the -a switch on the cp command forcing copying with greater integrity than normal. Along with the various file operations, I also created a link to my.cnf, the MySQL configuration file on Linux systems, in /etc using the following command executed by root:
ln -s /etc/mysql/ my.cnf /etc/my.cnf
While I am unsure if this made a real difference, uncommenting the lines in the same file that pertained to InnoDB tables. What directed me to these were complaints from mysqld_safe in the myhost.err log file. All I did was to uncomment the lines beginning with “innodb” and these were 116-118, 121-122 and 124-127 in my configuration file but it may be different in yours.
After all the above, the MySQL daemon ran happily and, more importantly, started when I rebooted the virtual machine. Thinking about it now, I believe that was a lack of disk space, the locking of a data file and the lack of InnoDB support that was stopping the MySQL service from running.Running commands like mysqld start weren’t yielding useful messages so a lot of digging was needed to get the result that I needed. In fact, that’s one of the reasons why I am sharing my experiences here.
In the end, creating databases and loading them with data was all that was needed for me to start see functioning websites on my (virtual) Arch Linux system. It turned out to be another step on the way to making it workable as a potential replacement for the Linux distributions that I use most often (Linux Mint, Fedora and Ubuntu).
Moving from Ubuntu 10.10 to Linux Mint 10
23rd April 2011With a long Easter weekend available to me and with thoughts of forthcoming changes in the world of Ubuntu, I got to wondering about the merits of moving my main home PC to Linux Mint instead. Though there is a rolling variant based on Debian, I went for the more usual one based on Ubuntu that uses GNOME. For the record, Linux Mint isn’t just about the GNOME desktop but you also can have it with Xfce, LXDE and KDE desktops as well. While I have been known to use Lubuntu and like its LXDE implementation, I stuck with the option of which I have most experience.
Once I selected the right disk for the boot loader, the main installation of Mint went smoothly. By default, Ubuntu seems to take care of this but Mint leaves it to you. When you have your operating system files on sdc, installation on the default of sda isn’t going to produce a booting system. Instead, I ended up with GRUB errors and, while I suppose that I could have resolved these, the lazier option of repeating the install with the right boot loader location was the one that I chose. It produced the result that I wanted: a working and loading operating system.
However, there was not something not right about the way that the windows were displayed on the desktop with title bars and window management not working as they should. Creating a new account showed that it was the settings that were carried over from Ubuntu in my home area that were the cause. Again, I opted for a less strenuous option and moved things from the old account to the new one. One outcome of that decisions was that there was a lot of use of the chown command in order to get file and folder permissions set for the new account. In order to make this all happen, the new account needed to be made into an Administrator just like its predecessor; by default, more restrictive desktop accounts are created using the Users and Groups application from the Administration submenu. Once I was happy that the migration was complete, I backed up any remaining files from the old user folder and removed it from the system. Some of the old configuration files were to find a new life with Linux Mint.
In the middle of the above, I also got to customising my desktop to get the feel that is amenable. For example, I do like a panel at the top and another at the bottom. By default, Linux Mint only comes with the latter. The main menu was moved to the top because I have become used to having there and switchers for windows and desktops were added at the bottom. They were only a few from what has turned out not to be a short list of things that I fancied having: clock, bin, clearance of desktop, application launchers, clock, broken application killer, user switcher, off button for PC, run command and notification area. It all was gentle tinkering but still is the sort of thing that you wouldn’t want to have to do over and over again. Let’s hope that is the case for Linux Mint upgrades in the future. That the configuration files for all of these are stored in home area hopefully should make life easier, especially when an in-situ upgrade like that for Ubuntu isn’t recommended by the Mint team.
With the desktop arranged to my liking, the longer job of adding to the collection of software on there while pruning a few unwanted items too was next. Having had Apache, PHP and MySQL on the system before I popped in that Linux Format magazine cover disk for the installation, I wanted to restore them. To get the off-line websites back, I had made copies of the old Apache settings that simply were copied over the defaults in /etc/apache (in fact, I simply overwrote the apache directory in /etc but the effect was the same). MySQL Administrator had been used to take a backup of the old database too. In the interests of spring cleaning, I only migrated a few of the old databases from the old system to the new one. In fact, there was an element of such tidying in my mind when I decided to change Linux distribution in the first place; Ubuntu hadn’t been installed from afresh onto the system for a while anyway and some undesirable messages were appearing at update time though they were far from being critical errors.
The web server reinstatement was only part of the software configuration that I was doing and there was a lot of use of apt-get while this was in progress. A rather diverse selection was added: Emacs, NEdit, ClamAV, Shotwell (just make sure that your permissions are sorted first before getting this to use older settings because anything inaccessible just gets cleared out; F-Spot was never there is the first place in my case but it may differ for you), UFRaw, Chrome, Evolution (never have been a user of Mozilla Thunderbird, the default email client on Mint), Dropbox, FileZilla, MySQL Administrator, MySQL Query Browser, NetBeans, POEdit, Banshee (Rhythmbox is what comes with Mint but I replaced it with this), VirtualBox and GParted. This is quite a list and while I maybe should have engaged the services of dpkg to help automate things, I didn’t on this occasion though Mint seems to have a front end for it that does the same sort of thing. Given that the community favour clean installations, it’s little that something like this is on offer in the suite of tools in the standard installation. This is the type of rigmarole that one would not draw on themselves too often.
With desktop tinkering and software installations complete, it was time to do a little more configuration. In order to get my HP laser printer going, I ran hp-setup to download the (proprietary, RMS will not be happy…) driver for it because it otherwise wouldn’t work for me. Fortune was removed from the terminal sessions because I like them to be without such things. To accomplish this, I edited /etc/bash.bashrc and commented out the /usr/games/fortune line before using apt-get to clear the software from my system. Being able to migrate my old Firefox and Evolution profiles, albeit manually, has become another boon. Without doubt, there are more adjustments that I could be making but I am happy to do these as and when I get to them. So far, I have a more than usable system, even if I engaged in more customisation than many users would go doing.
It probably is useful to finish this by sharing my impressions of Linux Mint. What goes without saying is that some things are done differently and that is to be expected. Distribution upgrades are just one example but there are tools available to make clean installations that little bit easier. To my eyes, the desktop looks very clean and fond display is carried over from Ubuntu, not at all a bad thing. That may sound a small matter but it does appear to me that Fedora and openSUSE could learn a thing or too about how to display fonts on screen on their systems. It is the sort of thing that adds the spot of polish that leaves a much better impression. So far, it hasn’t been any hardship to find my way around and I can make the system fit my wants and needs. That it looks set to stay that way is another bonus. We have a lot of change coming in the Linux world with GNOME 3 on the way and Ubuntu’s decision to use Unity as their main desktop environment. While watching both of these developments mature, it looks as if I’ll be happily using Mint. Change can refresh but a bit of stability is good too.
Turning off the admin bar in WordPress 3.1
25th October 2010Work on WordPress 3.1 is in full swing at the moment though I initially though that they were taking a little break after 3.0. From what I can see, many refinements are being made to the multi-blog functionality and behind-the-scenes work is ongoing on the administration screens too.
Another under-the-bonnet change has been to make WordPress less tied to MySQL since the possibility of dropping in support for an alternative such as PostgreSQL is now a reality even if it isn’t part of the default package. For now, it looks as if this is going to be plugin territory rather than default multi-database support though that may become a sensible development in the light of Oracle’s acquisition of MySQL and its sabre rattling with regard to Java patents. So far, the change to WordPress has affected my use of its database engine to power an offline version of my online photo gallery but a quick spot of code editing sorted that issue.
One more obvious alteration is going to be the addition of a WordPress.com style administration bar to the top of all content and administration screens for a user who is logged into the system. It is going to be turned on by default but there will be the option of turning it off for those among who prefer things that way. All that will be needed for this is to add the following line near the top of wp-config.php:
define( “WP_SHOW_ADMIN_BAR”, false);
The chance to see new additions like those above and be ready for is my main reason for following WordPress development. It’s best to be ready than surprised though it has to be said that the blogging or CMS platform is a very polished one these days.
Basic string searching in MySQL table columns
29th April 2010Last weekend, I ended up doing a spot of file structure reorganisation on the web server for my Assorted Explorations website and needed to correct some file pointers in entries on my outdoors blog. Rather than grabbing a plugin from somewhere, I decided to edit the posts table directly. First, I needed to select the affected observations and this is where I had to pick out the affected rows and edit them in MySQL Query Browser. To accomplish that, I needed basic string searching so I opened up my MySQL e-book from Apress and constructed something like the following:
select * from posts_table where post_text like '%some_text%';
The % wildcard characters are required to pick out a search string in any part of a piece of text. There may be a more sophisticated method, but this did what I needed in a quick and dirty manner without further ado. Well, it was what I needed.